2023 DODGE CHALLENGER warning
[x] Cancel search: warningPage 41 of 300
GETTING TO KNOW YOUR VEHICLE39
NOTE:
If the indicator light stays on constantly, program -
ming is complete and the garage door/device
should activate when the HomeLink® button is
pushed.
To program the two remaining HomeLink®
buttons, repeat each step for each remaining
button. DO NOT erase the channels.
If you unplugged the garage door opener/device for
programming, plug it back in at this time.
Reprogramming A Single HomeLink® Button
(Canadian/Gate Operator)
To reprogram a channel that has been previously trained,
follow these steps:
1. Place the ignition in the ON/RUN position.
2. Press and hold the desired HomeLink® button until the indicator light begins to flash after 20 seconds.
Do not release the button.
3. Without releasing the button, proceed with “Canadian/Gate Operator Programming” Step 2 and
follow all remaining steps.
SECURITY
It is advised to erase all channels before you sell or turn in
your vehicle.
To do this, push and hold the two outside buttons for
20 seconds until the indicator flashes. Note that all
channels will be erased. Individual channels cannot be
erased.
The HomeLink® universal transmitter is disabled when
the Vehicle Security system is active.
TROUBLESHOOTING TIPS
If you are having trouble programming HomeLink®, here
are some of the most common solutions:
Replace the battery in the garage door opener
hand-held transmitter.
Push the LEARN button on the garage door opener to
complete the training for a rolling code.
Did you unplug the device for programming and
remember to plug it back in?
If you have any problems, or require assistance, please
call toll-free 1-800-355-3515 or on the Internet at
HomeLink.com for information or assistance.
EXTERIOR LIGHTS
HEADLIGHT SWITCH
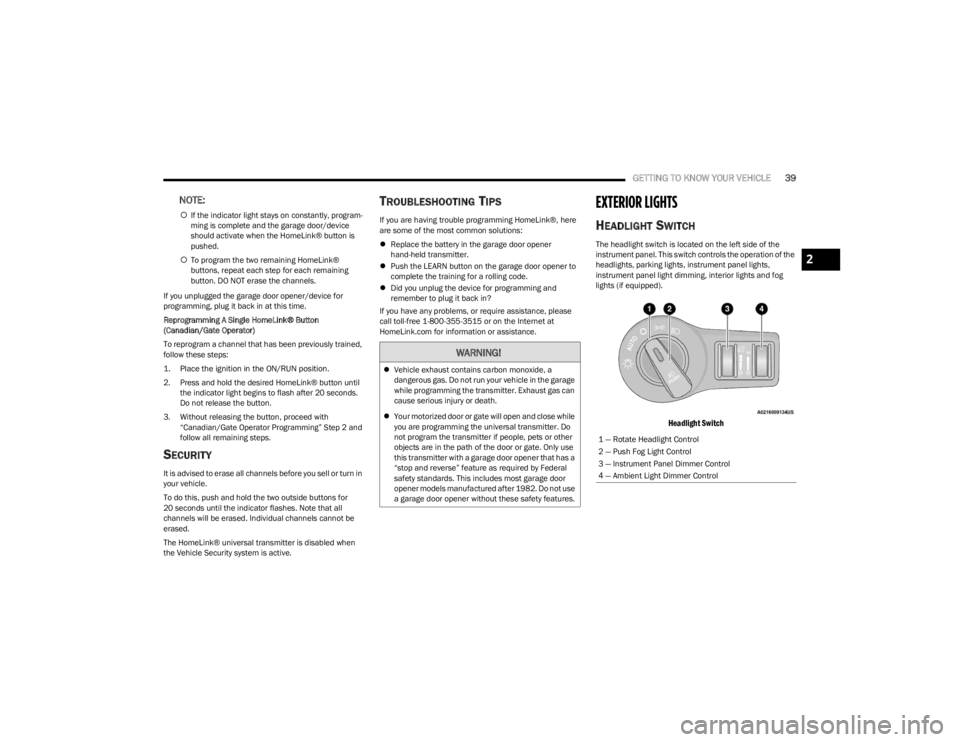
The headlight switch is located on the left side of the
instrument panel. This switch controls the operation of the
headlights, parking lights, instrument panel lights,
instrument panel light dimming, interior lights and fog
lights (if equipped).
Headlight Switch
WARNING!
Vehicle exhaust contains carbon monoxide, a
dangerous gas. Do not run your vehicle in the garage
while programming the transmitter. Exhaust gas can
cause serious injury or death.
Your motorized door or gate will open and close while
you are programming the universal transmitter. Do
not program the transmitter if people, pets or other
objects are in the path of the door or gate. Only use
this transmitter with a garage door opener that has a
“stop and reverse” feature as required by Federal
safety standards. This includes most garage door
opener models manufactured after 1982. Do not use
a garage door opener without these safety features.
1 — Rotate Headlight Control
2 — Push Fog Light Control
3 — Instrument Panel Dimmer Control
4 — Ambient Light Dimmer Control
2
23_LA_OM_EN_USC_t.book Page 39
Page 42 of 300
40GETTING TO KNOW YOUR VEHICLE
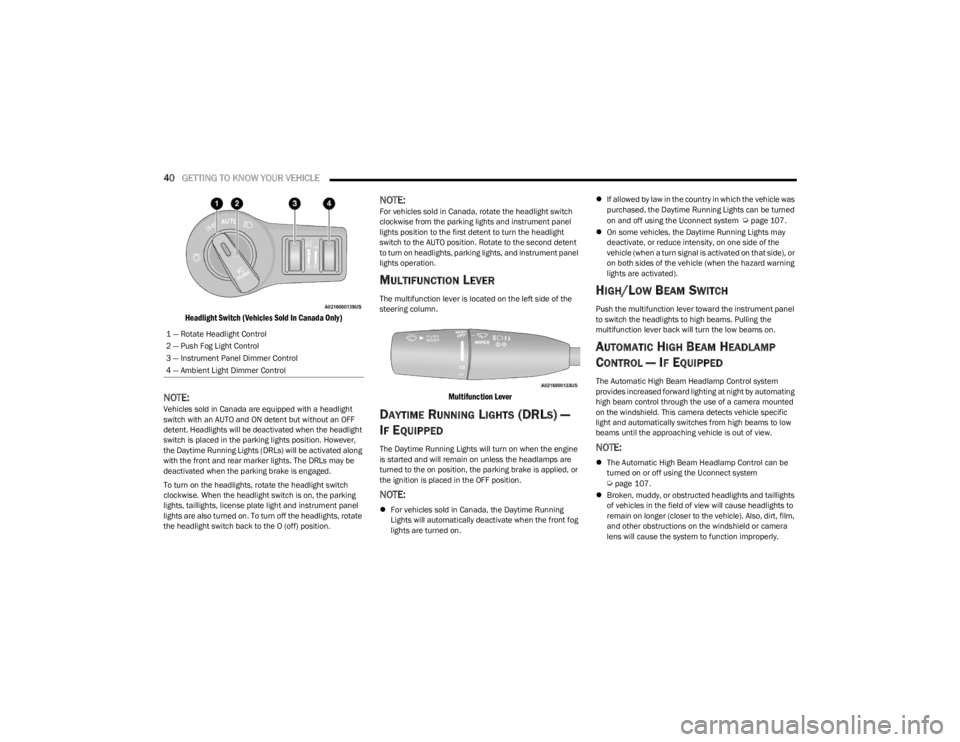
Headlight Switch (Vehicles Sold In Canada Only)
NOTE:Vehicles sold in Canada are equipped with a headlight
switch with an AUTO and ON detent but without an OFF
detent. Headlights will be deactivated when the headlight
switch is placed in the parking lights position. However,
the Daytime Running Lights (DRLs) will be activated along
with the front and rear marker lights. The DRLs may be
deactivated when the parking brake is engaged.
To turn on the headlights, rotate the headlight switch
clockwise. When the headlight switch is on, the parking
lights, taillights, license plate light and instrument panel
lights are also turned on. To turn off the headlights, rotate
the headlight switch back to the O (off) position.
NOTE:For vehicles sold in Canada, rotate the headlight switch
clockwise from the parking lights and instrument panel
lights position to the first detent to turn the headlight
switch to the AUTO position. Rotate to the second detent
to turn on headlights, parking lights, and instrument panel
lights operation.
MULTIFUNCTION LEVER
The multifunction lever is located on the left side of the
steering column.
Multifunction Lever
DAYTIME RUNNING LIGHTS (DRLS) —
I
F EQUIPPED
The Daytime Running Lights will turn on when the engine
is started and will remain on unless the headlamps are
turned to the on position, the parking brake is applied, or
the ignition is placed in the OFF position.
NOTE:
For vehicles sold in Canada, the Daytime Running
Lights will automatically deactivate when the front fog
lights are turned on.
If allowed by law in the country in which the vehicle was
purchased, the Daytime Running Lights can be turned
on and off using the Uconnect system
Úpage 107.
On some vehicles, the Daytime Running Lights may
deactivate, or reduce intensity, on one side of the
vehicle (when a turn signal is activated on that side), or
on both sides of the vehicle (when the hazard warning
lights are activated).
HIGH/LOW BEAM SWITCH
Push the multifunction lever toward the instrument panel
to switch the headlights to high beams. Pulling the
multifunction lever back will turn the low beams on.
AUTOMATIC HIGH BEAM HEADLAMP
C
ONTROL — IF EQUIPPED
The Automatic High Beam Headlamp Control system
provides increased forward lighting at night by automating
high beam control through the use of a camera mounted
on the windshield. This camera detects vehicle specific
light and automatically switches from high beams to low
beams until the approaching vehicle is out of view.
NOTE:
The Automatic High Beam Headlamp Control can be
turned on or off using the Uconnect system
Úpage 107.
Broken, muddy, or obstructed headlights and taillights
of vehicles in the field of view will cause headlights to
remain on longer (closer to the vehicle). Also, dirt, film,
and other obstructions on the windshield or camera
lens will cause the system to function improperly.
1 — Rotate Headlight Control
2 — Push Fog Light Control
3 — Instrument Panel Dimmer Control
4 — Ambient Light Dimmer Control
23_LA_OM_EN_USC_t.book Page 40
Page 46 of 300
44GETTING TO KNOW YOUR VEHICLE
WINDSHIELD WIPERS AND WASHERS
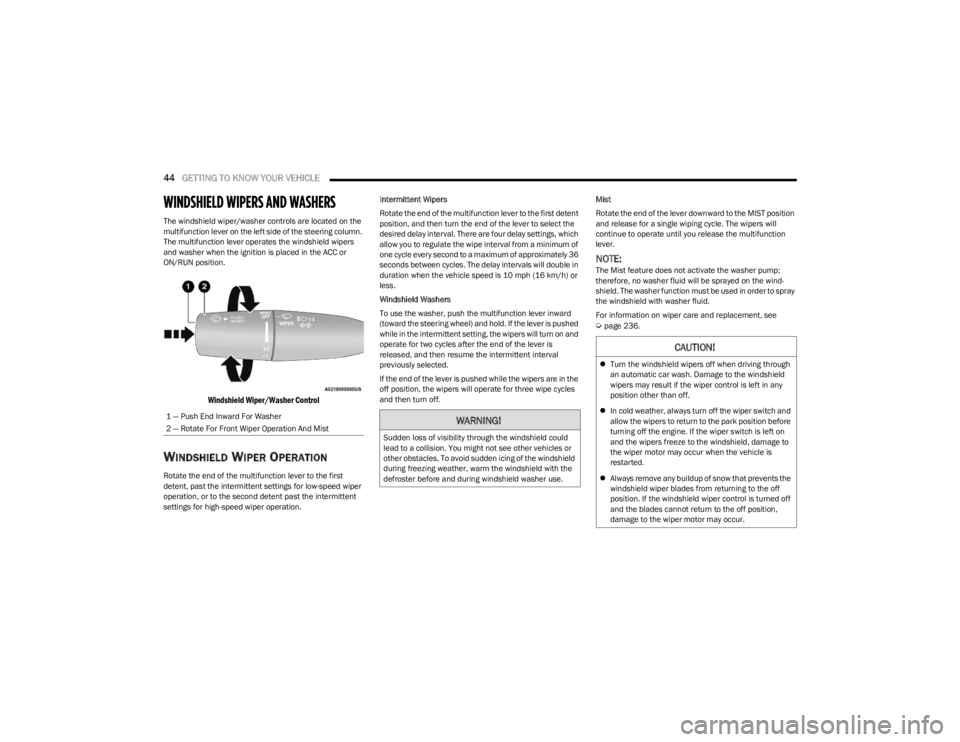
The windshield wiper/washer controls are located on the
multifunction lever on the left side of the steering column.
The multifunction lever operates the windshield wipers
and washer when the ignition is placed in the ACC or
ON/RUN position.
Windshield Wiper/Washer Control
WINDSHIELD WIPER OPERATION
Rotate the end of the multifunction lever to the first
detent, past the intermittent settings for low-speed wiper
operation, or to the second detent past the intermittent
settings for high-speed wiper operation. Intermittent Wipers
Rotate the end of the multifunction lever to the first detent
position, and then turn the end of the lever to select the
desired delay interval. There are four delay settings, which
allow you to regulate the wipe interval from a minimum of
one cycle every second to a maximum of approximately 36
seconds between cycles. The delay intervals will double in
duration when the vehicle speed is 10 mph (16 km/h) or
less.
Windshield Washers
To use the washer, push the multifunction lever inward
(toward the steering wheel) and hold. If the lever is pushed
while in the intermittent setting, the wipers will turn on and
operate for two cycles after the end of the lever is
released, and then resume the intermittent interval
previously selected.
If the end of the lever is pushed while the wipers are in the
off position, the wipers will operate for three wipe cycles
and then turn off.
Mist
Rotate the end of the lever downward to the MIST position
and release for a single wiping cycle. The wipers will
continue to operate until you release the multifunction
lever.
NOTE:The Mist feature does not activate the washer pump;
therefore, no washer fluid will be sprayed on the wind
-
shield. The washer function must be used in order to spray
the windshield with washer fluid.
For information on wiper care and replacement, see
Úpage 236.
1 — Push End Inward For Washer
2 — Rotate For Front Wiper Operation And Mist
WARNING!
Sudden loss of visibility through the windshield could
lead to a collision. You might not see other vehicles or
other obstacles. To avoid sudden icing of the windshield
during freezing weather, warm the windshield with the
defroster before and during windshield washer use.
CAUTION!
Turn the windshield wipers off when driving through
an automatic car wash. Damage to the windshield
wipers may result if the wiper control is left in any
position other than off.
In cold weather, always turn off the wiper switch and
allow the wipers to return to the park position before
turning off the engine. If the wiper switch is left on
and the wipers freeze to the windshield, damage to
the wiper motor may occur when the vehicle is
restarted.
Always remove any buildup of snow that prevents the
windshield wiper blades from returning to the off
position. If the windshield wiper control is turned off
and the blades cannot return to the off position,
damage to the wiper motor may occur.
23_LA_OM_EN_USC_t.book Page 44
Page 51 of 300
GETTING TO KNOW YOUR VEHICLE49
Cabin Air Filter
The Climate Control system filters out dust and pollen
from the air. Contact an authorized dealer to service your
cabin air filter, and to have it replaced when needed.
Operating Tips Chart
INTERIOR STORAGE AND EQUIPMENT
STORAGE
Glove Compartment
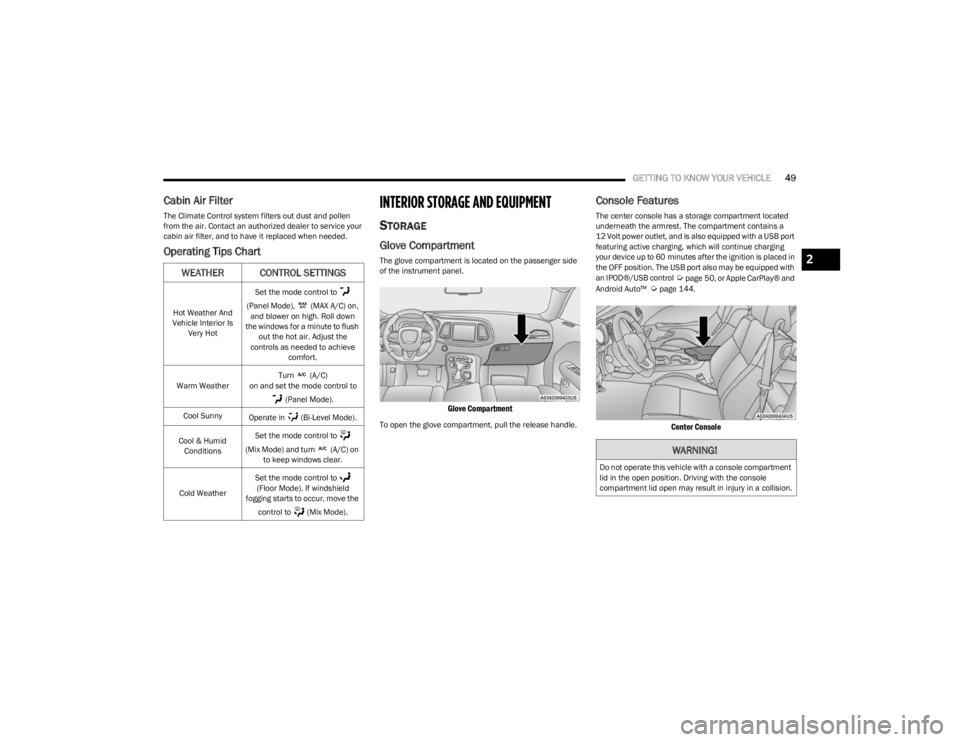
The glove compartment is located on the passenger side
of the instrument panel.
Glove Compartment
To open the glove compartment, pull the release handle.
Console Features
The center console has a storage compartment located
underneath the armrest. The compartment contains a
12 Volt power outlet, and is also equipped with a USB port
featuring active charging, which will continue charging
your device up to 60 minutes after the ignition is placed in
the OFF position. The USB port also may be equipped with
an IPOD®/USB control
Úpage 50, or Apple CarPlay® and
Android Auto™ Úpage 144.
Center Console
WEATHER CONTROL SETTINGS
Hot Weather And
Vehicle Interior Is Very Hot Set the mode control to
(Panel Mode), (MAX A/C) on, and blower on high. Roll down
the windows for a minute to flush out the hot air. Adjust the
controls as needed to achieve comfort.
Warm Weather Turn (A/C)
on and set the mode control to
(Panel Mode).
Cool Sunny Operate in (Bi-Level Mode).
Cool & Humid Conditions Set the mode control to
(Mix Mode) and turn (A/C) on to keep windows clear.
Cold Weather Set the mode control to
(Floor Mode). If windshield
fogging starts to occur, move the
control to (Mix Mode).
WARNING!
Do not operate this vehicle with a console compartment
lid in the open position. Driving with the console
compartment lid open may result in injury in a collision.
2
23_LA_OM_EN_USC_t.book Page 49
Page 53 of 300
GETTING TO KNOW YOUR VEHICLE51
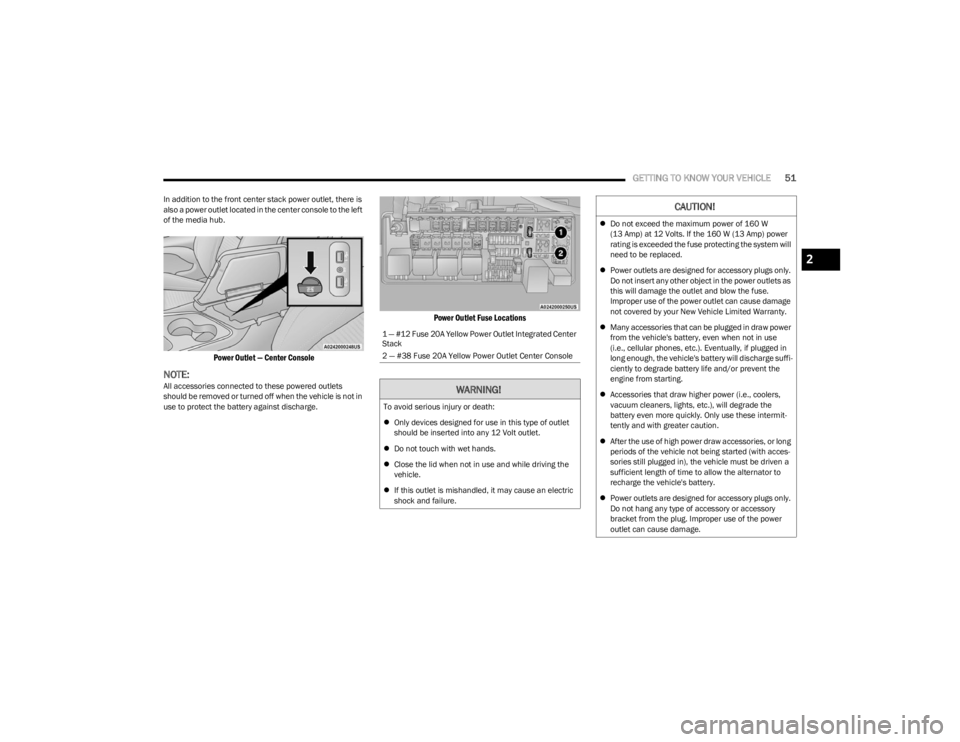
In addition to the front center stack power outlet, there is
also a power outlet located in the center console to the left
of the media hub.
Power Outlet — Center Console
NOTE:All accessories connected to these powered outlets
should be removed or turned off when the vehicle is not in
use to protect the battery against discharge.
Power Outlet Fuse Locations
1 — #12 Fuse 20A Yellow Power Outlet Integrated Center
Stack
2 — #38 Fuse 20A Yellow Power Outlet Center Console
WARNING!
To avoid serious injury or death:
Only devices designed for use in this type of outlet
should be inserted into any 12 Volt outlet.
Do not touch with wet hands.
Close the lid when not in use and while driving the
vehicle.
If this outlet is mishandled, it may cause an electric
shock and failure.
CAUTION!
Do not exceed the maximum power of 160 W
(13 Amp) at 12 Volts. If the 160 W (13 Amp) power
rating is exceeded the fuse protecting the system will
need to be replaced.
Power outlets are designed for accessory plugs only.
Do not insert any other object in the power outlets as
this will damage the outlet and blow the fuse.
Improper use of the power outlet can cause damage
not covered by your New Vehicle Limited Warranty.
Many accessories that can be plugged in draw power
from the vehicle's battery, even when not in use
(i.e., cellular phones, etc.). Eventually, if plugged in
long enough, the vehicle's battery will discharge suffi -
ciently to degrade battery life and/or prevent the
engine from starting.
Accessories that draw higher power (i.e., coolers,
vacuum cleaners, lights, etc.), will degrade the
battery even more quickly. Only use these intermit -
tently and with greater caution.
After the use of high power draw accessories, or long
periods of the vehicle not being started (with acces -
sories still plugged in), the vehicle must be driven a
sufficient length of time to allow the alternator to
recharge the vehicle's battery.
Power outlets are designed for accessory plugs only.
Do not hang any type of accessory or accessory
bracket from the plug. Improper use of the power
outlet can cause damage.
2
23_LA_OM_EN_USC_t.book Page 51
Page 54 of 300
52GETTING TO KNOW YOUR VEHICLE
WINDOWS
POWER WINDOW CONTROLS
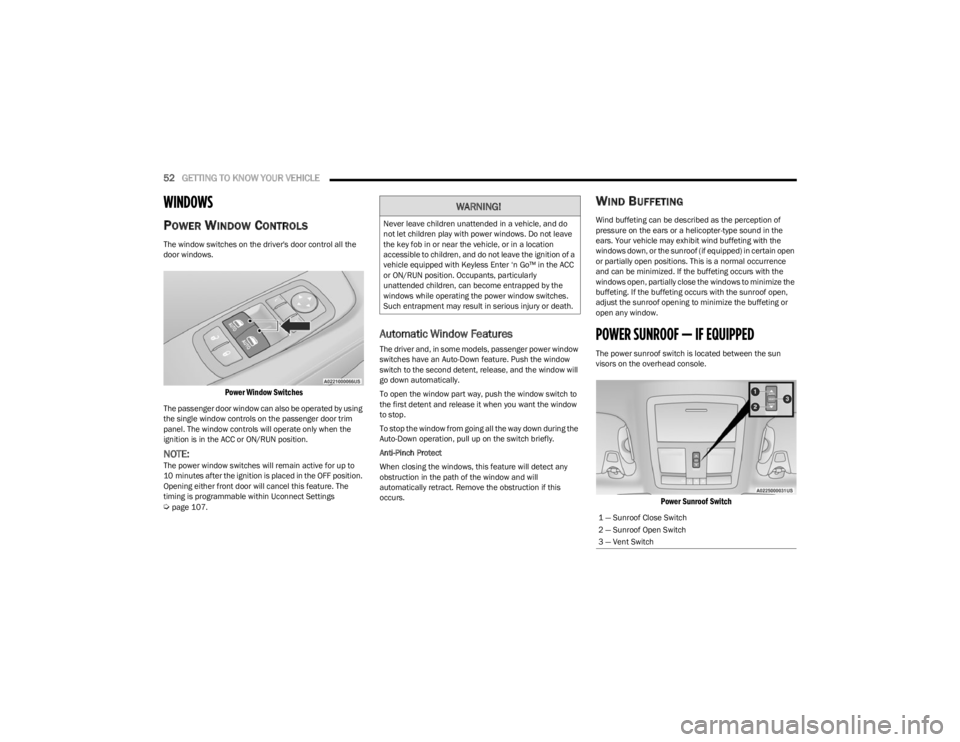
The window switches on the driver's door control all the
door windows.
Power Window Switches
The passenger door window can also be operated by using
the single window controls on the passenger door trim
panel. The window controls will operate only when the
ignition is in the ACC or ON/RUN position.
NOTE:The power window switches will remain active for up to
10 minutes after the ignition is placed in the OFF position.
Opening either front door will cancel this feature. The
timing is programmable within Uconnect Settings
Úpage 107.
Automatic Window Features
The driver and, in some models, passenger power window
switches have an Auto-Down feature. Push the window
switch to the second detent, release, and the window will
go down automatically.
To open the window part way, push the window switch to
the first detent and release it when you want the window
to stop.
To stop the window from going all the way down during the
Auto-Down operation, pull up on the switch briefly.
Anti-Pinch Protect
When closing the windows, this feature will detect any
obstruction in the path of the window and will
automatically retract. Remove the obstruction if this
occurs.
WIND BUFFETING
Wind buffeting can be described as the perception of
pressure on the ears or a helicopter-type sound in the
ears. Your vehicle may exhibit wind buffeting with the
windows down, or the sunroof (if equipped) in certain open
or partially open positions. This is a normal occurrence
and can be minimized. If the buffeting occurs with the
windows open, partially close the windows to minimize the
buffeting. If the buffeting occurs with the sunroof open,
adjust the sunroof opening to minimize the buffeting or
open any window.
POWER SUNROOF — IF EQUIPPED
The power sunroof switch is located between the sun
visors on the overhead console.
Power Sunroof Switch
WARNING!
Never leave children unattended in a vehicle, and do
not let children play with power windows. Do not leave
the key fob in or near the vehicle, or in a location
accessible to children, and do not leave the ignition of a
vehicle equipped with Keyless Enter ‘n Go™ in the ACC
or ON/RUN position. Occupants, particularly
unattended children, can become entrapped by the
windows while operating the power window switches.
Such entrapment may result in serious injury or death.
1 — Sunroof Close Switch
2 — Sunroof Open Switch
3 — Vent Switch
23_LA_OM_EN_USC_t.book Page 52
Page 55 of 300
GETTING TO KNOW YOUR VEHICLE53
OPENING AND CLOSING THE SUNROOF
Express Open/Close
Push the switch rearward and release it within one
second, the sunroof and sunshade will open automatically
and stop at full open position. Push the switch forward and release it within one second
and the sunroof will close automatically from any position.
During Express Open or Express Close operation, any
other movement of the sunroof switch will stop the
sunroof.
Manual Open/Close
Push and hold the switch rearward, the sunroof and
sunshade will open and automatically stop at full open
position.
Push and hold the switch forward and the sunroof will
close from any position and stop at a full closed position.
Any release of the switch during open or close operation
will stop the sunroof movement. The sunroof will remain in
a partially opened position until the switch is operated and
held again.
Venting The Sunroof
Push and release the Vent switch within one second and
the sunroof will open to the vent position. During Express
Vent operation, any other actuation of the sunroof
switches will stop the sunroof operation.
PINCH PROTECT FEATURE —
I
F EQUIPPED
This feature will detect an obstruction in the closing of the
sunroof during the Express Close operation. If an
obstruction in the path of the sunroof is detected, the
sunroof will automatically retract. Remove the obstruction
if this occurs.
NOTE:If three consecutive sunroof close attempts result in Pinch
Protect reversals, Pinch Protect will disable and the
sunroof must be closed in Manual Mode.
SUNSHADE OPERATION
The sunshade can be opened manually. However, the
sunshade will open automatically as the sunroof opens.
NOTE:The sunshade cannot be closed if the sunroof is open.
SUNROOF MAINTENANCE
Use only a non-abrasive cleaner and a soft cloth to clean
the glass panel. Periodically check for and clear out any
debris that may have collected in the tracks.
IGNITION OFF OPERATION
The power sunroof switch can remain active in Accessory
Delay for up to approximately 10 minutes after the
vehicle’s ignition is placed in the OFF position. Opening
either front door will cancel this feature.
NOTE:This feature is programmable using the Uconnect system Úpage 107.
WARNING!
Never leave children unattended in a vehicle, or with
access to an unlocked vehicle. Never leave the key
fob in or near the vehicle, or in a location accessible
to children. Do not leave the ignition of a vehicle
equipped with Keyless Enter ‘n Go™ in the ACC or
ON/RUN position. Occupants, particularly unat -
tended children, can become entrapped by the
power sunroof while operating the power sunroof
switch. Such entrapment may result in serious injury
or death.
In a collision, there is a greater risk of being thrown
from a vehicle with an open sunroof. You could also
be seriously injured or killed. Always fasten your seat
belt properly and make sure all passengers are also
properly secured.
Do not allow small children to operate the sunroof.
Never allow your fingers, other body parts, or any
object, to project through the sunroof opening. Injury
may result.
2
23_LA_OM_EN_USC_t.book Page 53
Page 56 of 300
54GETTING TO KNOW YOUR VEHICLE
HOOD
OPENING THE HOOD
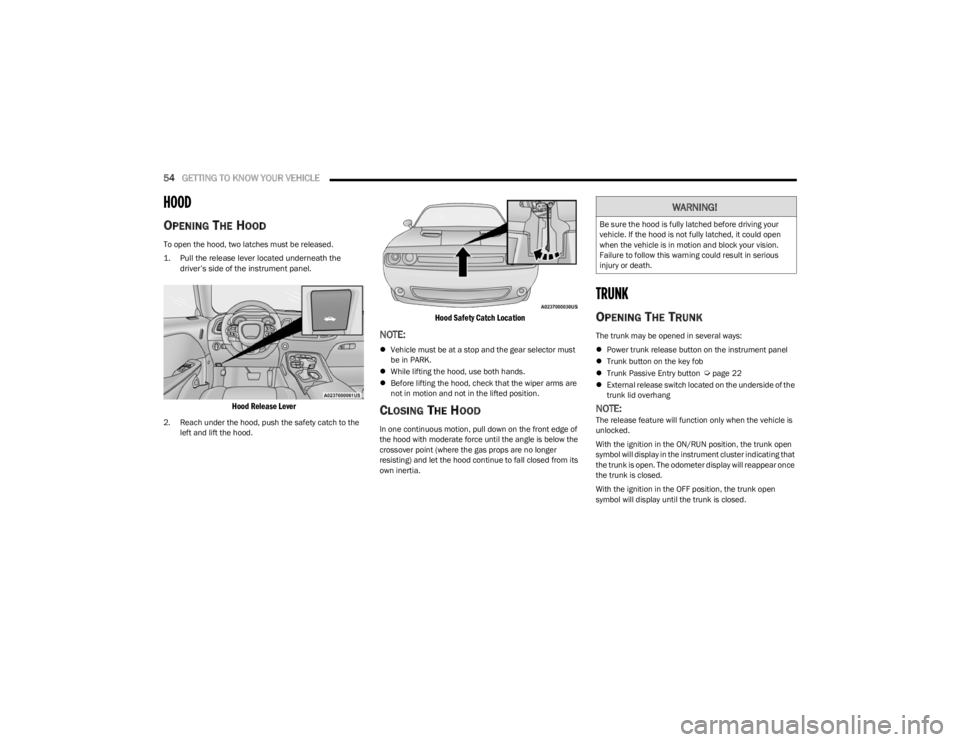
To open the hood, two latches must be released.
1. Pull the release lever located underneath the
driver’s side of the instrument panel.
Hood Release Lever
2. Reach under the hood, push the safety catch to the left and lift the hood.
Hood Safety Catch Location
NOTE:
Vehicle must be at a stop and the gear selector must
be in PARK.
While lifting the hood, use both hands.
Before lifting the hood, check that the wiper arms are
not in motion and not in the lifted position.
CLOSING THE HOOD
In one continuous motion, pull down on the front edge of
the hood with moderate force until the angle is below the
crossover point (where the gas props are no longer
resisting) and let the hood continue to fall closed from its
own inertia.
TRUNK
OPENING THE TRUNK
The trunk may be opened in several ways:
Power trunk release button on the instrument panel
Trunk button on the key fob
Trunk Passive Entry button
Úpage 22
External release switch located on the underside of the
trunk lid overhang
NOTE:The release feature will function only when the vehicle is
unlocked.
With the ignition in the ON/RUN position, the trunk open
symbol will display in the instrument cluster indicating that
the trunk is open. The odometer display will reappear once
the trunk is closed.
With the ignition in the OFF position, the trunk open
symbol will display until the trunk is closed.
WARNING!
Be sure the hood is fully latched before driving your
vehicle. If the hood is not fully latched, it could open
when the vehicle is in motion and block your vision.
Failure to follow this warning could result in serious
injury or death.
23_LA_OM_EN_USC_t.book Page 54