2023 DODGE CHALLENGER recommended oil
[x] Cancel search: recommended oilPage 235 of 300

SERVICING AND MAINTENANCE233
3. Using water and mild detergent, clean the following
locations:
The water drain slot located at the front forward
edge of the Shaker assembly.
The seals attached to the scoop and air box.
Lower water drains located in the lower Shaker
assembly and air box as well as the hood interface
areas for the seals. Apply Mopar® Leather,
Rubber & Vinyl Protectant after cleaning the seals.
4. Reinstall Shaker assembly.
Materials Added To Engine Oil
The manufacturer strongly recommends against the
addition of any additives (other than leak detection dyes)
to the engine oil. Engine oil is an engineered product and
its performance may be impaired by supplemental
additives.
Disposing Of Used Engine Oil And Oil
Filters
Care should be taken in disposing of used engine oil and
oil filters from your vehicle. Used oil and oil filters,
indiscriminately discarded, can present a problem to the
environment. Contact an authorized dealer, service
station or governmental agency for advice on how and
where used oil and oil filters can be safely discarded in
your area.
ENGINE OIL FILTER
The engine oil filter should be replaced with a new filter at
every engine oil change.
Engine Oil Filter Selection
A full-flow type disposable oil filter should be used for
replacement. The quality of replacement filters varies
considerably. Only high quality Mopar® certified filters
should be used. If a Mopar® Engine Oil Filter is
unavailable, only use filters that meet or exceed
SAE/USCAR-36 Filter Performance Requirements.
ENGINE AIR CLEANER FILTER
For the proper maintenance intervals Úpage 224.
NOTE:Be sure to follow the “Severe Duty Conditions” mainte -
nance interval if applicable. Engine Air Cleaner Filter Selection
The quality of replacement filters varies considerably. Only
high quality Mopar® certified filters should be used.
T/A Air Filter Maintenance — If Equipped
Clean Engine Air Filter
T/A air filters are made of a unique, washable material.
Follow the recommended service interval as for non-T/A
air filters, substituting a cleaning for replacement.
Cleaning your engine air filter with the recommended
Mopar® Performance Air Filter Service Kit is not required
if you can still see any part of the wire screen on the entire
air filter regardless of how dirty it may appear. When any
part of the wire screen is no longer visible on the air filter,
that is an indication it is time to clean the air filter.
For cleaning instructions see steps 1-7 from the Shaker
Hood Air Filter Cleaning section
Úpage 232.
Unique for T/A, using the Mopar® Performance Air Filter
Service Kit, spray oil evenly along the crown of each filter
pleat holding the nozzle about 3 inches (76 mm) away
from the air filter. One spray per 2 square inches
(1,290 square mm) of air filter. With one complete coat of
oil, let it wick (saturate) for about 20 minutes, and if
required touch up any light areas on either side of the
filter.
WARNING!
The air induction system (air cleaner, hoses, etc.) can
provide a measure of protection in the case of engine
backfire. Do not remove the air induction system (air
cleaner, hoses, etc.) unless such removal is necessary
for repair or maintenance. Make sure that no one is
near the engine compartment before starting the
vehicle with the air induction system (air cleaner, hoses,
etc.) removed. Failure to do so can result in serious
personal injury.
8
23_LA_OM_EN_USC_t.book Page 233
Page 242 of 300

240SERVICING AND MAINTENANCE
BRAKE SYSTEM
In order to ensure brake system performance, all brake
system components should be inspected periodically
Úpage 224.
Fluid Level Check — Brake Master Cylinder
Check the fluid level in the master cylinder immediately if
the Brake System Warning Light indicates system failure.
Check the fluid level in the master cylinder when
performing underhood services.
Clean the top of the master cylinder area before removing
the cap. Add fluid to bring the level up to the top of the
“FULL” mark on the side of the master cylinder reservoir.
Overfilling of fluid is not recommended because it may
cause leaking in the system.
Add enough fluid to bring the level up to the requirements
described on the brake fluid reservoir. With disc brakes,
fluid level can be expected to fall as the brake pads wear.
However, low fluid level may be caused by a leak and a
checkup may be needed. Use only brake fluid that has been recommended by the
manufacturer, and has been kept in a tightly closed
container to avoid contamination from foreign matter or
moisture
Úpage 278.
CLUTCH HYDRAULIC SYSTEM — MANUAL
T
RANSMISSION (IF EQUIPPED)
The clutch hydraulic system is fed by a segregated volume
of fluid within the brake system master cylinder reservoir.
In the event of leakage or wear, use only the
manufacturer's recommended brake fluid
Úpage 278.
MANUAL TRANSMISSION — IF EQUIPPED
Fluid Level Check
Check the fluid level by removing the fill plug on the left
side of the transmission. The fluid level should be
1/4 inch (6.4mm) below the bottom of the fill hole.
Add fluid, if necessary, to maintain the proper level
Úpage 278.
Change Transmission Fluid
If contaminated with water, change the fluid immediately.
See an authorized dealer for service.
For the proper maintenance intervals
Úpage 224.
WARNING!
Riding the brakes can lead to brake failure and possibly
a collision. Driving with your foot resting or riding on the
brake pedal can result in abnormally high brake
temperatures, excessive lining wear, and possible brake
damage. You would not have your full braking capacity
in an emergency.
WARNING!
Use only manufacturer's recommended brake fluid Úpage 278. Using the wrong type of brake fluid can
severely damage your brake system and/or impair its
performance. The proper type of brake fluid for your
vehicle is also identified on the original factory
installed hydraulic master cylinder reservoir.
To avoid contamination from foreign matter or mois -
ture, use only new brake fluid or fluid that has been
in a tightly closed container. Keep the master
cylinder reservoir cap secured at all times. Brake
fluid in a open container absorbs moisture from the
air resulting in a lower boiling point. This may cause
it to boil unexpectedly during hard or prolonged
braking, resulting in sudden brake failure. This could
result in a collision.
Overfilling the brake fluid reservoir can result in
spilling brake fluid on hot engine parts, causing the
brake fluid to catch fire. Brake fluid can also damage
painted and vinyl surfaces, care should be taken to
avoid its contact with these surfaces.
Do not allow petroleum based fluid to contaminate
the brake fluid. Brake seal components could be
damaged, causing partial or complete brake failure.
This could result in a collision.
CAUTION!
Using a transmission fluid other than the
manufacturer's recommended fluid may cause
deterioration in transmission shift quality and/or
damage to the transmission
Úpage 278.
23_LA_OM_EN_USC_t.book Page 240
Page 265 of 300

SERVICING AND MAINTENANCE263
Tread Wear Indicators
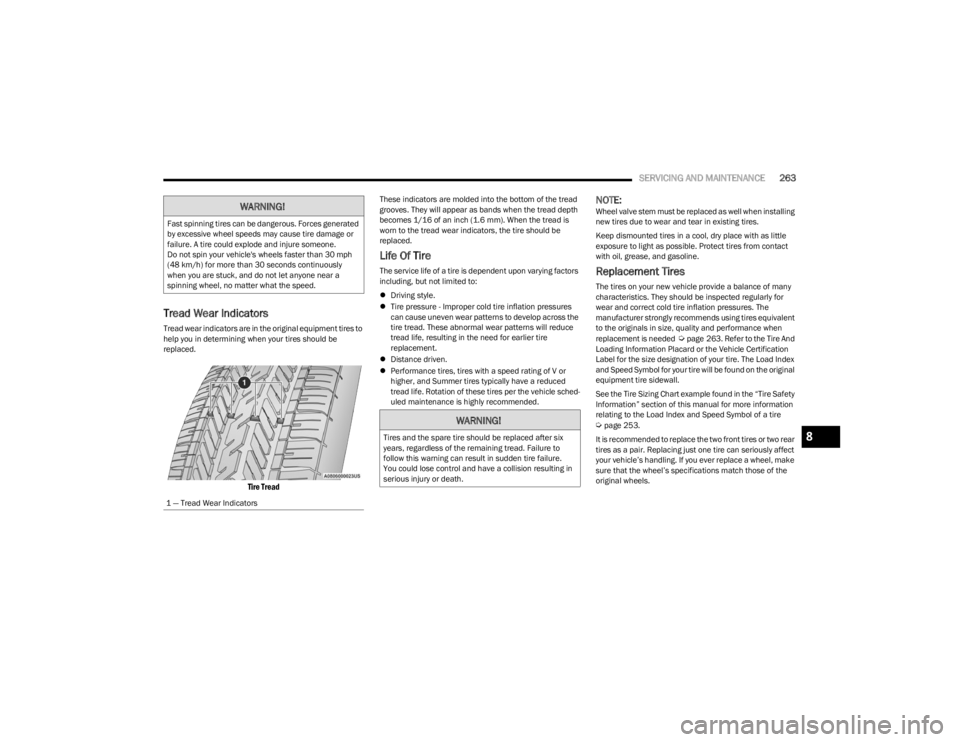
Tread wear indicators are in the original equipment tires to
help you in determining when your tires should be
replaced.
Tire Tread
These indicators are molded into the bottom of the tread
grooves. They will appear as bands when the tread depth
becomes 1/16 of an inch (1.6 mm). When the tread is
worn to the tread wear indicators, the tire should be
replaced.
Life Of Tire
The service life of a tire is dependent upon varying factors
including, but not limited to:
Driving style.
Tire pressure - Improper cold tire inflation pressures
can cause uneven wear patterns to develop across the
tire tread. These abnormal wear patterns will reduce
tread life, resulting in the need for earlier tire
replacement.
Distance driven.
Performance tires, tires with a speed rating of V or
higher, and Summer tires typically have a reduced
tread life. Rotation of these tires per the vehicle sched-
uled maintenance is highly recommended.
NOTE:Wheel valve stem must be replaced as well when installing
new tires due to wear and tear in existing tires.
Keep dismounted tires in a cool, dry place with as little
exposure to light as possible. Protect tires from contact
with oil, grease, and gasoline.
Replacement Tires
The tires on your new vehicle provide a balance of many
characteristics. They should be inspected regularly for
wear and correct cold tire inflation pressures. The
manufacturer strongly recommends using tires equivalent
to the originals in size, quality and performance when
replacement is needed
Úpage 263. Refer to the Tire And
Loading Information Placard or the Vehicle Certification
Label for the size designation of your tire. The Load Index
and Speed Symbol for your tire will be found on the original
equipment tire sidewall.
See the Tire Sizing Chart example found in the “Tire Safety
Information” section of this manual for more information
relating to the Load Index and Speed Symbol of a tire
Úpage 253.
It is recommended to replace the two front tires or two rear
tires as a pair. Replacing just one tire can seriously affect
your vehicle’s handling. If you ever replace a wheel, make
sure that the wheel’s specifications match those of the
original wheels.
WARNING!
Fast spinning tires can be dangerous. Forces generated
by excessive wheel speeds may cause tire damage or
failure. A tire could explode and injure someone.
Do not spin your vehicle's wheels faster than 30 mph
(48 km/h) for more than 30 seconds continuously
when you are stuck, and do not let anyone near a
spinning wheel, no matter what the speed.
1 — Tread Wear Indicators
WARNING!
Tires and the spare tire should be replaced after six
years, regardless of the remaining tread. Failure to
follow this warning can result in sudden tire failure.
You could lose control and have a collision resulting in
serious injury or death.8
23_LA_OM_EN_USC_t.book Page 263
Page 274 of 300

272SERVICING AND MAINTENANCE
Cleaning Plastic Instrument Cluster
Lenses
The lenses in front of the instruments in this vehicle are
molded in clear plastic. When cleaning the lenses, care
must be taken to avoid scratching the plastic.
Clean with a wet soft cloth. A mild soap solution may be
used, but do not use high alcohol content or abrasive
cleaners. If soap is used, wipe clean with a clean damp
cloth. Dry with a soft cloth.
LEATHER SURFACES
Mopar® Total Clean is specifically recommended for
leather upholstery. Your leather upholstery can be best preserved by regular
cleaning with a damp soft cloth. Small particles of dirt can
act as an abrasive and damage the leather upholstery and
should be removed promptly with a damp cloth. Stubborn
soils can be removed easily with a soft cloth and Mopar®
Total Clean. Care should be taken to avoid soaking your
leather upholstery with any liquid. Please do not use
polishes, oils, cleaning fluids, solvents, detergents, or
ammonia-based cleaners to clean your leather upholstery.
NOTE:If equipped with light colored leather, it tends to show any
foreign material, dirt, and fabric dye transfer more so than
darker colors. The leather is designed for easy cleaning,
and the manufacturer recommends Mopar® total care
leather cleaner applied on a cloth to clean the leather
seats as needed.
GLASS SURFACES
All glass surfaces should be cleaned on a regular basis
with Mopar® Glass Cleaner, or any commercial
household-type glass cleaner. Never use an abrasive type
cleaner. Use caution when cleaning the inside rear
window equipped with electric defrosters or windows
equipped with radio antennas. Do not use scrapers or
other sharp instruments that may scratch the elements.
When cleaning the rearview mirror, spray cleaner on the
towel or cloth that you are using. Do not spray cleaner
directly on the mirror.
CAUTION!
Do not use alcohol and alcohol-based and/or
ketone-based cleaning products to clean leather
upholstery, as damage to the upholstery may result.
23_LA_OM_EN_USC_t.book Page 272
Page 275 of 300

273
TECHNICAL SPECIFICATIONS
VEHICLE IDENTIFICATION NUMBER (VIN)
The VIN is on the left front corner of the instrument panel.
The VIN is visible from outside of the vehicle through the
windshield.
Windshield VIN Location
NOTE:It is illegal to remove or alter the VIN.
BRAKE SYSTEM
Your vehicle is equipped with dual hydraulic brake
systems. If either of the two hydraulic systems lose normal
capability, the remaining system will still function. There
will be some loss of overall braking effectiveness.This may be evident by increased pedal travel during
application, greater pedal force required to slow or stop,
and potential activation of the Brake Warning Light.
In the event power assist is lost for any reason (for
example, repeated brake applications with the engine off),
the brakes will still function. The effort required to brake
the vehicle will be much greater than that required with
the power system operating.
WHEEL AND TIRE TORQUE SPECIFICATIONS
Proper lug nut/bolt torque is very important to ensure that
the wheel is properly mounted to the vehicle. Any time a
wheel has been removed and reinstalled on the vehicle,
the lug nuts/bolts should be torqued using a properly
calibrated torque wrench using a six-sided (hex) deep wall
socket.
TORQUE SPECIFICATIONS
**Use only authorized dealer recommended lug nuts/
bolts and clean or remove any dirt or oil before tightening.
Inspect the wheel mounting surface prior to mounting the
tire and remove any corrosion or loose particles.
Wheel Mounting Surface
Tighten the lug nuts/bolts in a star pattern until each
nut/bolt has been tightened twice. Ensure that the socket
is fully engaged on the lug nut/bolt (do not insert it
halfway).
NOTE:If in doubt about the correct tightness, have them checked
with a torque wrench by an authorized dealer or service
station.
Lug Nut/Bolt
Torque **Lug Nut/Bolt
Size Lug Nut/Bolt
Socket Size
130 ft-lb
(176 N·m) M14 x 1.50 22 mm
9
23_LA_OM_EN_USC_t.book Page 273
Page 280 of 300

278TECHNICAL SPECIFICATIONS
ENGINE FLUIDS AND LUBRICANTS
Component Fluid, Lubricant, or Genuine Part
Engine Coolant
We recommend using Mopar® Antifreeze/Coolant 10 Year/150,000 Mile (240,000 km)
Formula OAT (Organic Additive Technology).
Engine Oil – 3.6L Engine
We recommend using Mopar® SAE 5W-20 Full Synthetic Engine Oil which meets the
requirements of the manufacturer Material Standard MS-6395. Equivalent full synthetic
SAE 5W-20 engine oil can be used but must have the API Starburst trademark
Úpage 232.
Mopar® SAE 5W-30 engine oil approved to the manufacturer Material Standard
MS-6395 may be used when SAE 5W-20 engine oil meeting MS-6395 is not available.
Engine Oil – 5.7L Engine We recommend using Mopar® SAE 0W-20 Full Synthetic Engine Oil which meets the
requirements of the manufacturer Material Standard MS-6395. Equivalent full synthetic
SAE 0W-20 engine oil can be used but must have the API Starburst trademark
Úpage 232.
Fuel Selection – 3.6L Engine 87 Octane (R+M)/2 Method, 0-15% ethanol.
Fuel Selection – 5.7L Engine With Automatic Transmission 89 Octane recommended – 87 Octane acceptable (R+M)/2 Method, 0-15% ethanol.
Fuel Selection – 5.7L Engine With Manual Transmission 91 Octane or higher (R+M)/2 Method, 0-15% ethanol.
23_LA_OM_EN_USC_t.book Page 278