2023 DODGE CHALLENGER belt
[x] Cancel search: beltPage 35 of 300
GETTING TO KNOW YOUR VEHICLE33
PASSENGER SEAT EASY ENTRY
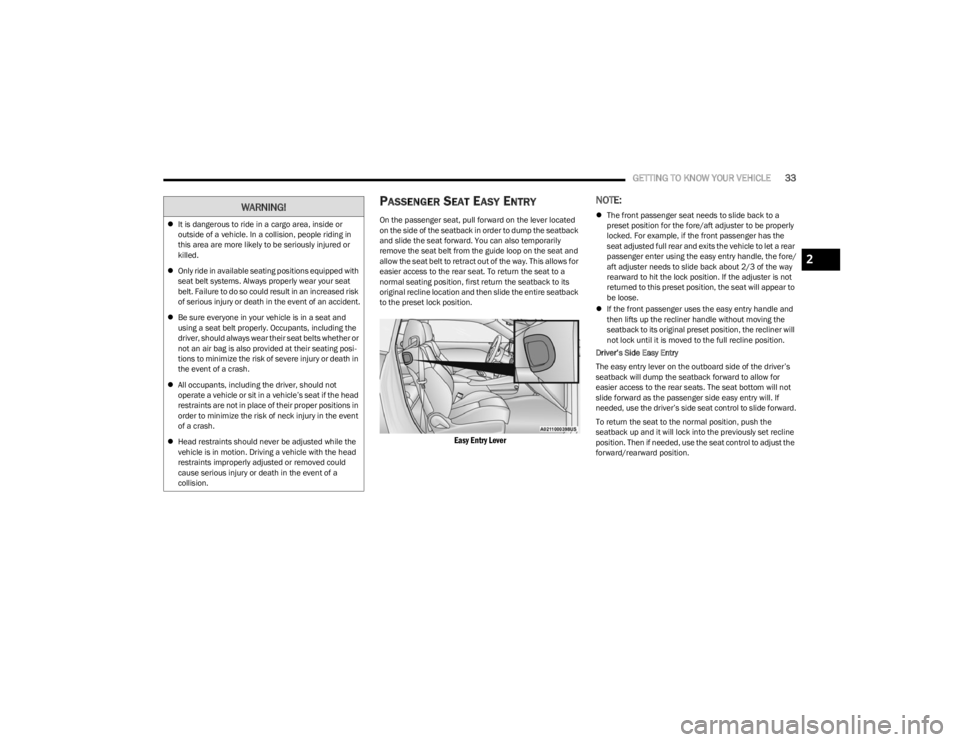
On the passenger seat, pull forward on the lever located
on the side of the seatback in order to dump the seatback
and slide the seat forward. You can also temporarily
remove the seat belt from the guide loop on the seat and
allow the seat belt to retract out of the way. This allows for
easier access to the rear seat. To return the seat to a
normal seating position, first return the seatback to its
original recline location and then slide the entire seatback
to the preset lock position.
Easy Entry Lever
NOTE:
The front passenger seat needs to slide back to a
preset position for the fore/aft adjuster to be properly
locked. For example, if the front passenger has the
seat adjusted full rear and exits the vehicle to let a rear
passenger enter using the easy entry handle, the fore/
aft adjuster needs to slide back about 2/3 of the way
rearward to hit the lock position. If the adjuster is not
returned to this preset position, the seat will appear to
be loose.
If the front passenger uses the easy entry handle and
then lifts up the recliner handle without moving the
seatback to its original preset position, the recliner will
not lock until it is moved to the full recline position.
Driver’s Side Easy Entry
The easy entry lever on the outboard side of the driver’s
seatback will dump the seatback forward to allow for
easier access to the rear seats. The seat bottom will not
slide forward as the passenger side easy entry will. If
needed, use the driver’s side seat control to slide forward.
To return the seat to the normal position, push the
seatback up and it will lock into the previously set recline
position. Then if needed, use the seat control to adjust the
forward/rearward position.
It is dangerous to ride in a cargo area, inside or
outside of a vehicle. In a collision, people riding in
this area are more likely to be seriously injured or
killed.
Only ride in available seating positions equipped with
seat belt systems. Always properly wear your seat
belt. Failure to do so could result in an increased risk
of serious injury or death in the event of an accident.
Be sure everyone in your vehicle is in a seat and
using a seat belt properly. Occupants, including the
driver, should always wear their seat belts whether or
not an air bag is also provided at their seating posi -
tions to minimize the risk of severe injury or death in
the event of a crash.
All occupants, including the driver, should not
operate a vehicle or sit in a vehicle’s seat if the head
restraints are not in place of their proper positions in
order to minimize the risk of neck injury in the event
of a crash.
Head restraints should never be adjusted while the
vehicle is in motion. Driving a vehicle with the head
restraints improperly adjusted or removed could
cause serious injury or death in the event of a
collision.WARNING!
2
23_LA_OM_EN_USC_t.book Page 33
Page 36 of 300
34GETTING TO KNOW YOUR VEHICLE
HEAD RESTRAINTS
Head restraints are designed to reduce the risk of injury by
restricting head movement in the event of a rear impact.
Head restraints should be adjusted so that the top of the
head restraint is located above the top of your ear.
NOTE:Do not reverse the head restraints (making the rear of the
head restraint face forward) in an attempt to gain addi -
tional clearance to the back of your head.
Reactive Head Restraints — Front Seats
The front driver and passenger seats are equipped with
Reactive Head Restraints (RHR). In the event of a rear
impact, the RHR will automatically extend forward
minimizing the gap between the back of the occupants
head and the RHR. The RHR will automatically return to their normal position
following a rear impact. If the RHR do not return to their
normal position, see an authorized dealer immediately.
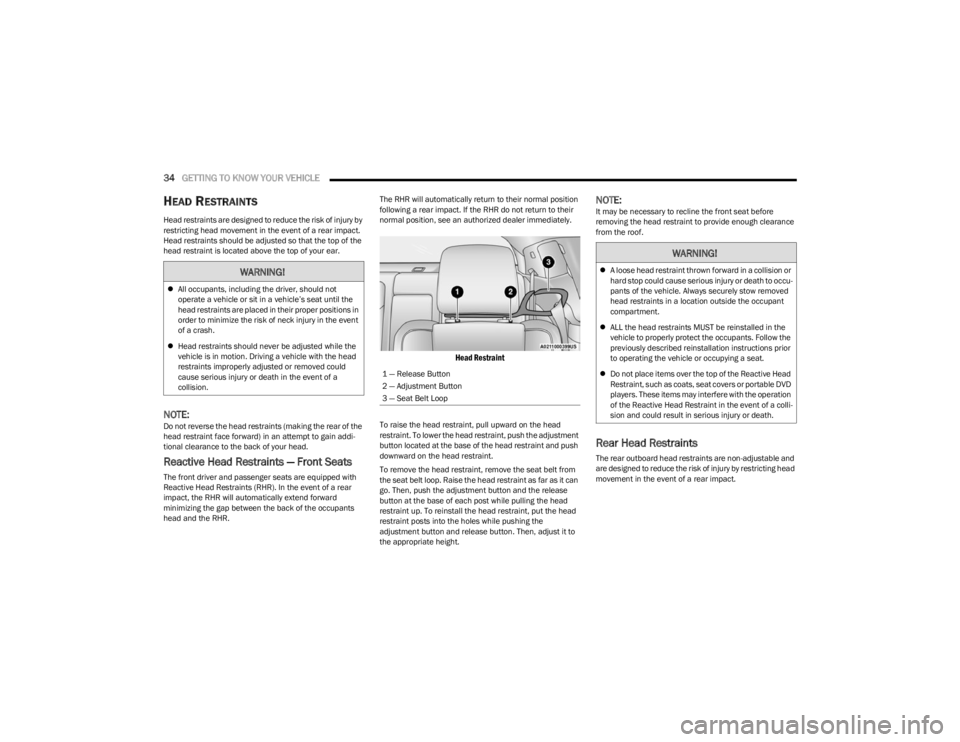
Head Restraint
To raise the head restraint, pull upward on the head
restraint. To lower the head restraint, push the adjustment
button located at the base of the head restraint and push
downward on the head restraint.
To remove the head restraint, remove the seat belt from
the seat belt loop. Raise the head restraint as far as it can
go. Then, push the adjustment button and the release
button at the base of each post while pulling the head
restraint up. To reinstall the head restraint, put the head
restraint posts into the holes while pushing the
adjustment button and release button. Then, adjust it to
the appropriate height.
NOTE:It may be necessary to recline the front seat before
removing the head restraint to provide enough clearance
from the roof.
Rear Head Restraints
The rear outboard head restraints are non-adjustable and
are designed to reduce the risk of injury by restricting head
movement in the event of a rear impact.
WARNING!
All occupants, including the driver, should not
operate a vehicle or sit in a vehicle’s seat until the
head restraints are placed in their proper positions in
order to minimize the risk of neck injury in the event
of a crash.
Head restraints should never be adjusted while the
vehicle is in motion. Driving a vehicle with the head
restraints improperly adjusted or removed could
cause serious injury or death in the event of a
collision.
1 — Release Button
2 — Adjustment Button
3 — Seat Belt Loop
WARNING!
A loose head restraint thrown forward in a collision or
hard stop could cause serious injury or death to occu -
pants of the vehicle. Always securely stow removed
head restraints in a location outside the occupant
compartment.
ALL the head restraints MUST be reinstalled in the
vehicle to properly protect the occupants. Follow the
previously described reinstallation instructions prior
to operating the vehicle or occupying a seat.
Do not place items over the top of the Reactive Head
Restraint, such as coats, seat covers or portable DVD
players. These items may interfere with the operation
of the Reactive Head Restraint in the event of a colli -
sion and could result in serious injury or death.
23_LA_OM_EN_USC_t.book Page 34
Page 55 of 300
GETTING TO KNOW YOUR VEHICLE53
OPENING AND CLOSING THE SUNROOF
Express Open/Close
Push the switch rearward and release it within one
second, the sunroof and sunshade will open automatically
and stop at full open position. Push the switch forward and release it within one second
and the sunroof will close automatically from any position.
During Express Open or Express Close operation, any
other movement of the sunroof switch will stop the
sunroof.
Manual Open/Close
Push and hold the switch rearward, the sunroof and
sunshade will open and automatically stop at full open
position.
Push and hold the switch forward and the sunroof will
close from any position and stop at a full closed position.
Any release of the switch during open or close operation
will stop the sunroof movement. The sunroof will remain in
a partially opened position until the switch is operated and
held again.
Venting The Sunroof
Push and release the Vent switch within one second and
the sunroof will open to the vent position. During Express
Vent operation, any other actuation of the sunroof
switches will stop the sunroof operation.
PINCH PROTECT FEATURE —
I
F EQUIPPED
This feature will detect an obstruction in the closing of the
sunroof during the Express Close operation. If an
obstruction in the path of the sunroof is detected, the
sunroof will automatically retract. Remove the obstruction
if this occurs.
NOTE:If three consecutive sunroof close attempts result in Pinch
Protect reversals, Pinch Protect will disable and the
sunroof must be closed in Manual Mode.
SUNSHADE OPERATION
The sunshade can be opened manually. However, the
sunshade will open automatically as the sunroof opens.
NOTE:The sunshade cannot be closed if the sunroof is open.
SUNROOF MAINTENANCE
Use only a non-abrasive cleaner and a soft cloth to clean
the glass panel. Periodically check for and clear out any
debris that may have collected in the tracks.
IGNITION OFF OPERATION
The power sunroof switch can remain active in Accessory
Delay for up to approximately 10 minutes after the
vehicle’s ignition is placed in the OFF position. Opening
either front door will cancel this feature.
NOTE:This feature is programmable using the Uconnect system Úpage 107.
WARNING!
Never leave children unattended in a vehicle, or with
access to an unlocked vehicle. Never leave the key
fob in or near the vehicle, or in a location accessible
to children. Do not leave the ignition of a vehicle
equipped with Keyless Enter ‘n Go™ in the ACC or
ON/RUN position. Occupants, particularly unat -
tended children, can become entrapped by the
power sunroof while operating the power sunroof
switch. Such entrapment may result in serious injury
or death.
In a collision, there is a greater risk of being thrown
from a vehicle with an open sunroof. You could also
be seriously injured or killed. Always fasten your seat
belt properly and make sure all passengers are also
properly secured.
Do not allow small children to operate the sunroof.
Never allow your fingers, other body parts, or any
object, to project through the sunroof opening. Injury
may result.
2
23_LA_OM_EN_USC_t.book Page 53
Page 66 of 300

64GETTING TO KNOW YOUR INSTRUMENT PANEL
Brake Warning Light
This warning light monitors various brake
functions, including brake fluid level and
parking brake application. If the brake light
turns on it may indicate that the parking brake
is applied, that the brake fluid level is low, or that there is
a problem with the Anti-Lock Brake System reservoir.
If the light remains on when the parking brake has been
disengaged, and the fluid level is at the full mark on the
master cylinder reservoir, it indicates a possible brake
hydraulic system malfunction or that a problem with the
Brake Booster has been detected by the Anti-Lock Brake
System (ABS) / Electronic Stability Control (ESC) system.
In this case, the light will remain on until the condition has
been corrected. If the problem is related to the brake
booster, the ABS pump will run when applying the brake,
and a brake pedal pulsation may be felt during each stop.
The dual brake system provides a reserve braking capacity
in the event of a failure to a portion of the hydraulic
system. A leak in either half of the dual brake system is
indicated by the Brake Warning Light, which will turn on
when the brake fluid level in the master cylinder has
dropped below a specified level.
The light will remain on until the cause is corrected.
NOTE:The light may flash momentarily during sharp cornering
maneuvers, which change fluid level conditions. The
vehicle should have service performed, and the brake
fluid level checked.
If brake failure is indicated, immediate repair is necessary. Vehicles equipped with the Anti-Lock Brake System (ABS)
are also equipped with Electronic Brake Force Distribution
(EBD). In the event of an EBD failure, the Brake Warning
Light will turn on along with the ABS Light. Immediate
repair to the ABS system is required.
Operation of the Brake Warning Light can be checked by
turning the ignition switch from the OFF position to the
ON/RUN position. The light should illuminate for
approximately two seconds. The light should then turn off
unless the parking brake is applied or a brake fault is
detected. If the light does not illuminate, have the light
inspected by an authorized dealer.
The light also will turn on when the parking brake is
applied with the ignition switch in the ON/RUN position.
NOTE:This light shows only that the parking brake is applied. It
does not show the degree of brake application.
Seat Belt Reminder Warning Light
This warning light indicates when the driver or
passenger seat belt is unbuckled. When the
ignition is first placed in the ON/RUN or ACC/
ON/RUN position and if the driver’s seat belt is
unbuckled, a chime will sound and the light will turn on.
When driving, if the driver or front passenger seat belt
remains unbuckled, the Seat Belt Reminder Light will flash
or remain on continuously and a chime will sound
Úpage 172.
Battery Charge Warning Light
This warning light will illuminate when the
battery is not charging properly. If it stays on
while the engine is running, there may be a
malfunction with the charging system. Contact
an authorized dealer as soon as possible.
This indicates a possible problem with the electrical
system or a related component.
Door Open Warning Light
This indicator will illuminate when a door is
ajar/open and not fully closed.
NOTE:If the vehicle is moving, there will also be a single chime.
WARNING!
Driving a vehicle with the red brake light on is
dangerous. Part of the brake system may have failed. It
will take longer to stop the vehicle. You could have a
collision. Have the vehicle checked immediately.
23_LA_OM_EN_USC_t.book Page 64
Page 73 of 300

71
STARTING AND OPERATING
STARTING THE ENGINE
Before starting your vehicle, adjust your seat, adjust the
inside and outside mirrors, fasten your seat belt, and if
present, instruct all other occupants to buckle their seat
belts.
MANUAL TRANSMISSION — IF EQUIPPED
Apply the parking brake, place the gear selector in
NEUTRAL and press the clutch pedal before starting
vehicle. This vehicle is equipped with a clutch interlocking
ignition system. It will not start unless the clutch pedal is
pressed to the floor.
AUTOMATIC TRANSMISSION —
I
F EQUIPPED
The gear selector must be in the PARK position before you
can start the engine. Apply the brakes before shifting into
any driving gear.
Tip Start Feature — Automatic
Transmission
Place the ignition in the START position and release it as
the starter engages. The starter motor will automatically
disengage itself once engine is running. If the engine fails
to start, the starter will disengage automatically in 10
seconds. If this occurs:
1. Place the ignition in the OFF position.
2. Wait 10 to 15 seconds.
3. Repeat the “Normal Starting” procedure.
NORMAL STARTING
To Turn On The Engine Using The ENGINE
START/STOP Button — Manual
Transmission Only
1. Press and hold the clutch pedal while pushing and
holding the ENGINE START/STOP button.
2. Release the ENGINE START/STOP button when the engine starts. If the vehicle fails to start within 10
seconds, release the ENGINE START/STOP button,
wait 10 to 15 seconds, then repeat the “Normal
Starting” procedure.
WARNING!
When exiting the vehicle, always make sure the igni -
tion is in OFF position, remove the key fob from the
vehicle and lock the vehicle.
Never leave children alone in a vehicle, or with
access to an unlocked vehicle. Leaving children in a
vehicle unattended is dangerous for a number of
reasons. A child or others could be seriously or fatally
injured. Children should be warned not to touch the
parking brake, brake pedal or the transmission gear
selector.
Do not leave the key fob in or near the vehicle (or in
a location accessible to children), and do not leave
the ignition (of a vehicle equipped with Keyless Enter
‘n Go™) in the ACC or ON/RUN position. A child could
operate power windows, other controls, or move the
vehicle.
Do not leave children or animals inside parked vehi -
cles in hot weather. Interior heat buildup may cause
serious injury or death.
CAUTION!
Shift into or out of PARK or REVERSE only after the
vehicle has come to a complete stop.
Do not shift between PARK, REVERSE, NEUTRAL, or
DRIVE when the engine is above idle speed.
Before shifting into any gear, make sure your foot is
firmly pressing the brake pedal.
4
23_LA_OM_EN_USC_t.book Page 71
Page 75 of 300

STARTING AND OPERATING73
If the vehicle is not in PARK and the driver turns off the
engine, the vehicle may AutoPark.
AutoPark will engage when all of these conditions are met:
Vehicle is equipped with an 8-speed transmission
Vehicle is not in PARK
Vehicle speed is 1.2 mph (1.9 km/h) or less
Ignition switched from RUN to ACC
NOTE:For Keyless Enter ‘n Go™ equipped vehicles, the engine
will turn off and the ignition switch will change to ACC
position. After 30 minutes, the ignition switches to OFF
automatically, unless the driver turns the ignition switch
OFF.
If the vehicle is not in PARK and the driver exits the vehicle
with the engine running, the vehicle may AutoPark.
AutoPark will engage when all of these conditions are met:
Vehicle is equipped with an 8-speed transmission
Vehicle is not in PARK
Vehicle speed is 1.2 mph (1.9 km/h) or less
Driver’s seat belt is unbuckled
Driver’s door is ajar
Brake pedal is not pressed The message “
AutoPark Engaged Shift to P then Shift to
Gear ” will display in the instrument cluster.
NOTE:In some cases the ParkSense graphic will be displayed in
the instrument cluster. In these cases, the gear selector
must be returned to “P” to select desired gear.
If the driver shifts into PARK while moving, the vehicle may
AutoPark.
AutoPark will engage ONLY when vehicle speed is 1.2 mph
(1.9 km/h) or less.
The message “ Vehicle Speed is Too High to Shift to P ” will
be displayed in the instrument cluster if vehicle speed is
above 1.2 mph (1.9 km/h).
ALWAYS DO A VISUAL CHECK
that your vehicle is in PARK
by looking for the "P" in the instrument cluster display and
on the gear selector. As an added precaution, always apply
the parking brake when exiting the vehicle.
EXTENDED PARK STARTING
NOTE:Extended Park condition occurs when the vehicle has not
been started or driven for at least 30 days.
1. Install a battery charger or jumper cables to the battery to ensure a full battery charge during the
crank cycle.
2. Place the ignition in the START position and release it when the engine starts. For Keyless Enter ‘n Go™
ignition systems, press and hold the brake pedal
while pushing the ENGINE START/STOP button once.
3. If the engine fails to start within 10 seconds, place the ignition in the OFF position, wait 10 to 15 seconds
to allow the starter to cool, then repeat the “Extended
Park Starting” procedure.
4. If the engine fails to start after eight attempts, allow the starter to cool for at least 10 minutes, then repeat
the procedure.
AutoPark is a supplemental feature. It is not
designed to replace the need to shift your vehicle
into PARK. It is a back up system and should not be
relied upon as the primary method by which the
driver shifts the vehicle into PARK.
WARNING!
WARNING!
If vehicle speed is above 1.2 mph (1.9 km/h), the
transmission will default to NEUTRAL until the vehicle
speed drops below 1.2 mph (1.9 km/h). A vehicle left in
the NEUTRAL position can roll. As an added precaution,
always apply the parking brake when exiting the vehicle.
CAUTION!
To prevent damage to the starter, do not crank
continuously for more than 10 seconds at a time. Wait
10 to 15 seconds before trying again.
4
23_LA_OM_EN_USC_t.book Page 73
Page 174 of 300
172SAFETY
OCCUPANT RESTRAINT SYSTEMS
Some of the most important safety features in your vehicle
are the restraint systems:
OCCUPANT RESTRAINT SYSTEMS
F
EATURES
Seat Belt Systems
Supplemental Restraint Systems (SRS) Air Bags
Child Restraints
Some of the safety features described in this section may
be standard equipment on some models, or may be
optional equipment on others. If you are not sure, ask an
authorized dealer.
IMPORTANT SAFETY PRECAUTIONS
Please pay close attention to the information in this
section. It tells you how to use your restraint system
properly, to keep you and your passengers as safe as
possible.
Here are some simple steps you can take to minimize the
risk of harm from a deploying air bag:
1. Children 12 years old and under should always ride buckled up in the rear seat of a vehicle with a rear
seat.
If your vehicle is not equipped with a rear seat,
FCA US LLC recommends that you do not allow
children 12 years old and under to ride in your
vehicle. 2. A child who is not big enough to wear the vehicle seat
belt properly must be secured in the appropriate child
restraint or belt-positioning booster seat in a rear
seating position
Úpage 185.
3. If a child from 2 to 12 years old (not in a rear-facing child restraint) must ride in the front passenger seat,
move the seat as far back as possible and use the
proper child restraint
Úpage 185.
4. Never allow children to slide the shoulder belt behind them or under their arm.
5. You should read the instructions provided with your child restraint to make sure that you are using it
properly.
6. All occupants should always wear their lap and shoulder belts properly.
7. The driver and front passenger seats should be moved back as far as practical to allow the front air
bags room to inflate.
8. Do not lean against the door or window. If your vehicle has side air bags, and deployment occurs, the side air
bags will inflate forcefully into the space between
occupants and the door and occupants could be
injured.
9. If the air bag system in this vehicle needs to be modified to accommodate a disabled person, see
Úpage 280 for customer service contact
information.
SEAT BELT SYSTEMS
Buckle up even though you are an excellent driver, even
on short trips. Someone on the road may be a poor driver
and could cause a collision that includes you. This can
happen far away from home or on your own street.
Research has shown that seat belts save lives, and they
can reduce the seriousness of injuries in a collision. Some
of the worst injuries happen when people are thrown from
the vehicle. Seat belts reduce the possibility of ejection
and the risk of injury caused by striking the inside of the
vehicle. Everyone in a motor vehicle should be belted at all
times.
WARNING!
Never place a rear-facing child restraint in front of an
air bag. A deploying passenger front air bag can
cause death or serious injury to a child 12 years or
younger, including a child in a rear-facing child
restraint.
Never install a rear-facing child restraint in the front
seat of a vehicle. Only use a rear-facing child
restraint in the rear seat. If the vehicle does not have
a rear seat, do not transport a rear-facing child
restraint in that vehicle.
23_LA_OM_EN_USC_t.book Page 172
Page 175 of 300
SAFETY173
(Continued)
Vehicles Without Passenger Seating
Installed
If your vehicle does not have a factory installed front
passenger seat and/or rear passenger seats, the features
described in this section may not be available in your
vehicle.
This vehicle has been designed to maximize total
performance. The passenger seats may be deleted, which
may affect the NVH (Noise, Vibration, and Harshness)
characteristics. As a result, the vehicle may be louder
overall. Furthermore, the passenger seats and seat belts
systems are deleted.
Enhanced Seat Belt Use Reminder System
(BeltAlert)
Driver And Passenger BeltAlert — If Equipped
BeltAlert is a feature intended to remind the
driver and outboard front seat passenger (if
equipped with outboard front passenger seat
BeltAlert) to buckle their seat belts. The
BeltAlert feature is active whenever the ignition switch is
in the START or ON/RUN position.
Initial Indication
If the driver is unbuckled when the ignition switch is first in
the START or ON/RUN position, a chime will signal for a
few seconds. If the driver or outboard front seat passenger
(if equipped with outboard front passenger seat BeltAlert)
is unbuckled when the ignition switch is first in the START
or ON/RUN position the Seat Belt Reminder Light will turn
on and remain on until both outboard front seat belts are
buckled. The outboard front passenger seat BeltAlert is
not active when an outboard front passenger seat is
unoccupied.
BeltAlert Warning Sequence
The BeltAlert warning sequence is activated when the
vehicle is moving above a specified vehicle speed range
and the driver or outboard front seat passenger is
unbuckled (if equipped with outboard front passenger
seat BeltAlert) (the outboard front passenger seat
BeltAlert is not active when the outboard front passenger
seat is unoccupied). The BeltAlert warning sequence
starts by blinking the Seat Belt Reminder Light and
sounding an intermittent chime.
WARNING!
If the passenger and/or rear seats have been
removed, do not ride in those areas. In a collision,
people riding in these areas are more likely to be seri -
ously injured or killed.
If this vehicle was not factory equipped with a
passenger seat, NEVER attempt to install a
passenger seat because the safety systems,
including the air bags and seat belt, may not properly
protect you.
It is dangerous to ride in a cargo area, inside or
outside of a vehicle. In a collision, people riding in
this area are more likely to be seriously injured or
killed.
Only ride in available seating positions equipped with
seat belt systems. Always properly wear your seat
belt. Failure to do so could result in an increased risk
of serious injury or death in the event of an accident.
Be sure everyone in your vehicle is in a seat and
using a seat belt properly. Occupants, including the
driver, should always wear their seat belts whether or
not an air bag is also provided at their seating posi -
tions to minimize the risk of severe injury or death in
the event of a crash.
All occupants, including the driver, should not
operate a vehicle or sit in a vehicle’s seat if the head
restraints are not in place of their proper positions in
order to minimize the risk of neck injury in the event
of a crash.
Head restraints should never be adjusted while the
vehicle is in motion. Driving a vehicle with the head
restraints improperly adjusted or removed could
cause serious injury or death in the event of a
collision.
WARNING!
6
23_LA_OM_EN_USC_t.book Page 173