2023 CITROEN DS4 wheel
[x] Cancel search: wheelPage 4 of 296

2
01
02
0304
05
10 Instrument panels
12
R
ev counter
13
W
arning and indicator lamps
27
E
lectric parking brake
30
I
ndicators
37
M
onochrome screen C
40
T
ouch screen
41
T
rip computer
45
D
ate and time adjustment
47
R
emote control key
50
K
eyless Entry and Starting
57
Alarm
59
Doors
60
Boot
61
E
lectric windows 64
F
ront seats
69
R
ear seats
70
S
teering wheel adjustment
70
M
irrors
72
M
anual air conditioning
74 D ual-zone automatic air conditioning
78 R ecommendations for ventilation and air
conditioning
79
F
ront demist – defrost
79
R
ear screen demist – defrost
80
P
anoramic windscreen
81 Front
fittings
83
C
ourtesy lamps
84
I
nterior mood lighting
84
C
entre consoles
85
Fr
ont armrest
87
St
orage drawers
88 Rear
fi
ttings
88 Boot
fittings92
L
ighting controls
94
D
irection indicators
95
A
utomatic illumination of headlamps
96
H
eadlamp adjustment
97
D
irectional lighting
97 C ornering lighting
99
W
iper control stalk
103
G
eneral safety recommendations
104
H
azard warning lamps
104
Horn
104
E
mergency or assistance call
108
E
lectronic stability control (ESC)
110
Se
at belts
113
Airbags
116
Ch
ild seats
118
D
eactivating the passenger's front airbag
124
I
SOFIX mountings and child seats
129
M
anual child lock
130
E
lectric child lock
Over view
Instruments
Access Ease of use and comfort
Safety Lighting and visibility
Eco-driving
7 4
4 Instruments and controls
Contents
Page 5 of 296

3
07
08
0609
132 Driving recommendations
13 4
A
nti-theft protection
13 4
S
tarting/Switching off the engine with the
key
136
S
tarting/Switching off the engine with
Keyless Entry and Starting
138
M
anual parking brake
139
E
lectric parking brake
142
M
anual gearbox
14 3
Aut
omatic gearbox
14 6 Gear
ef ficiency indicator
14
7
St
op & Start
14 9
H
ill start assist
15 0
M
emorising speeds
151
Spe
ed limiter
15 3
C
ruise control
15 6
L
ane departure warning system
157
B
lind spot monitoring
15 9
P
arking sensors
161
R
eversing camera
162 Tyre
under-inflation detection 166
Fuel
167
M
isfuel prevention (Diesel)
168
C
ompatibility of fuels
169
S
now chains
170
V
ery cold climate screen
170
T
o w b a r
171
T
owbar with quickly detachable towball
175
L
oad reduction mode
175
E
nergy saving mode
176
C
hanging a wiper blade
176
F
itting roof bars
17 7
B
onnet
178
E
ngines
179
Ch
ecking levels
181
Checks
183
AdBlue
® (BlueHDi engines)
186
A
dvice on care and maintenance
189
T
emporary puncture repair kit
192
S
pare wheel
198
C
hanging a bulb
205
C
hanging a fuse
209
1
2 V battery
212
T
owing the vehicle
214
R
unning out of fuel (Diesel) 216
C
haracteristics of the engines and towed
loads
217
Pe
trol engines
219
D
iesel engines
221
Dimensions
222 Identification
ma
rkings
Driving
Practical information
In the event of a breakdownTechnical data
Alphabetical index DS Connect Nav
Bluetooth
® audio system
Audio and telematics
Contents
Page 7 of 296

5
Multifunction steering wheel1
Lighting controls
Direction indicators
2
Headlamp beam height adjustment
3
Speed limiter
Cruise control
Memorising speeds
4
Instrument panels
Indicator and warning lamps
Indicators
Distance recorders
5
Horn
6
Wiper control stalk
Trip computer
7
Starting – Switching off the engine
8
Steering wheel adjustment
Central switch panel
1
Hazard warning lamps
2
Central locking
3
Black panel (comfortable night driving
display)
Over view
Page 10 of 296

8
Limit the causes of excess
consumption
Spread loads throughout the vehicle; place
the heaviest items in the bottom of the boot,
as close as possible to the rear seats.
Limit the loads carried in the vehicle and
reduce wind resistance (roof bars, roof rack,
bicycle carrier, trailer...). Preferably, use a roof
box.
Remove roof bars and roof racks after use.
At the end of winter, remove snow tyres and
refit your summer tyres.
Observe the recommendations on
maintenance
Check the tyre pressures regularly, when cold,
referring to the label in the door aperture,
driver's side.
Carry out this check in particular:
-
b
efore a long journey,
-
a
t each change of season,
-
a
fter a long period out of use. Have your vehicle ser viced regularly (engine
oil, oil filter, air filter, cabin filter...) and
obser ve the schedule of operations in the
manufacturer's service schedule.
With a BlueHDi Diesel engine, if the SCR
system is faulty, your vehicle becomes
polluting. As soon as possible, visit a member
of the dealer network or a qualified workshop
to make your vehicle’s level of nitrogen oxides
emissions compliant to the standard.
When filling the tank, do not continue after the
3rd cut-off of the nozzle to avoid over flow.
At the wheel of your new vehicle, it is only
after around the first 1,900 miles (3,000
kilometres) that you will see the fuel
consumption settle down to a consistent
average. Do not forget the spare wheel and the tyres on
any trailer or caravan.
Eco-driving
Page 21 of 296

19
Warning/indicator lampStateCause Action/Observations
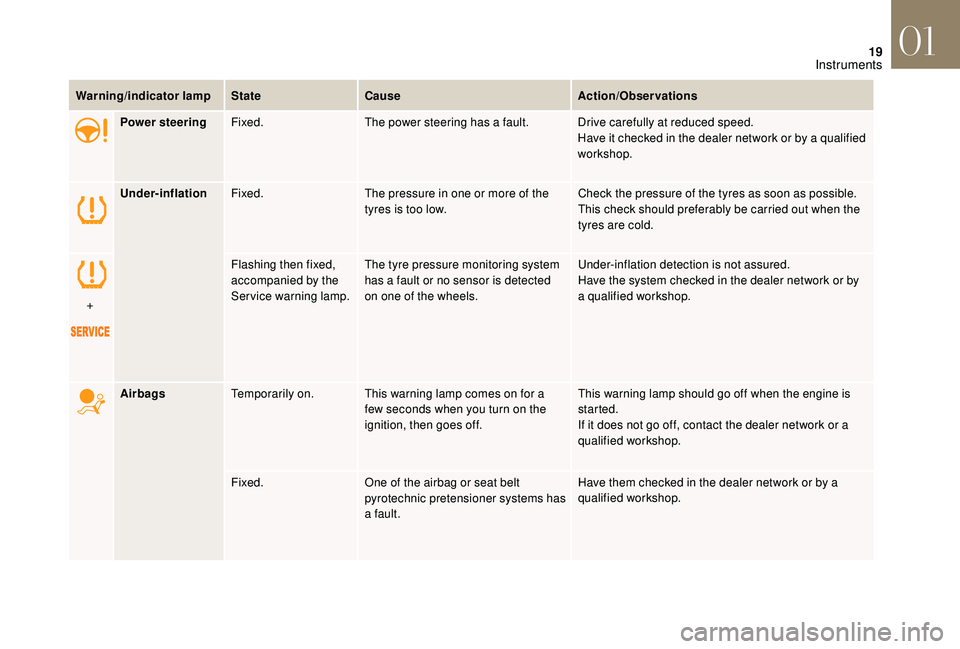
Power steering Fixed. The power steering has a fault. Drive carefully at reduced speed.
Have it checked in the dealer network or by a qualified
workshop.
Under-inflation Fixed. The pressure in one or more of the
tyres is too low. Check the pressure of the tyres as soon as possible.
This check should preferably be carried out when the
tyres are cold.
+ Flashing then fixed,
accompanied by the
Service warning lamp.
The tyre pressure monitoring system
has a fault or no sensor is detected
on one of the wheels. Under-inflation detection is not assured.
Have the system checked in the dealer network or by
a
qualified workshop.
Airbags Temporarily on. This warning lamp comes on for a
few seconds when you turn on the
ignition, then goes off. This warning lamp should go off when the engine is
started.
If it does not go off, contact the dealer network or a
qualified workshop.
Fixed. One of the airbag or seat belt
pyrotechnic pretensioner systems has
a fault. Have them checked in the dealer network or by a
qualified workshop.
01
Instruments
Page 30 of 296

28
Warning/indicator lamp StateCause Action/Observations
+
+
+
+ They light up,
accompanied by the
display of the message
"Parking brake fault".
The automatic functions are
deactivated.
Hill start assist is not available.
Upon stopping, to apply the electric parking brake:
F
S
witch off the ignition.
F
P
ull the control for at least 5 seconds or until application is
complete.
F
S
witch on the ignition and check that the electric parking brake
warning lamps come on.
Application is slower than normal.
Upon stopping, to release the electric parking brake:
F
S
witch on the ignition.
F
P
ull the control lever and hold it for at least 3 seconds, then release
it.
If the braking warning lamp is flashing or if the warning lamps do not
come on with the ignition on, these procedures will not work; you must
make your vehicle safe on a level sur face:
F
W
ith a manual gearbox, engage a gear.
F
W
ith an automatic gearbox, put the gear selector in position P,
then
put a chock against one of the wheels.
Contact the dealer network or a qualified workshop.
01
Instruments
Page 31 of 296

29
For more information on the use of the Electric parking brake, refer to the corresponding section.
Warning/indicator lamp StateCause Action/Observations
+ They light up,
accompanied by the
display of the message
"Parking brake fault". The manual application/release of
the electric parking brake and the
emergency braking are not available.
Only the automatic application on switching off the engine and
automatic release on acceleration functions are available.
Contact the dealer network or a qualified workshop.
It lights up,
accompanied by the
display of the message
"Faulty battery". A discharged battery no longer allows
the use of the electric parking brake.
Stop the vehicle as soon as it is safe to do so.
Apply the electric parking brake before switching off the engine, then
immobilise the vehicle:
F
W
ith a manual gearbox, engage a gear.
F
W
ith an automatic gearbox, put a chock against one of the wheels.
Contact the dealer network or a qualified workshop.
01
Instruments
Page 60 of 296

58
The monitoring system is active: the indicator
lamp in the button flashes once per second
and the direction indicators come on for about
2 seconds.
Following a vehicle locking request, the
perimeter monitoring is activated after 5
seconds and the interior volumetric and anti-tilt
monitoring after 45 seconds.
If an opening (door, boot...) is not fully closed,
the vehicle will not be locked but the exterior
perimeter monitoring will be activated after
45 seconds, at the same time as the interior
volumetric and anti-tilt monitoring.
Deactivation
F Press the unlocking button on the remote control.
or
F
U
nlock the vehicle with the "Keyless Entry
and Starting" system.
The monitoring system is deactivated: the
indicator lamp in the button goes off and the
direction indicators flash for about 2 seconds. If the vehicle locks itself again
automatically (which occurs 30 seconds
after unlocking, if a door or the boot is
not opened), the monitoring system is not
reactivated automatically. To reactivate it,
the vehicle must be unlocked and locked
again, using the remote control or the
"Keyless Entry and Starting" system.
Locking the vehicle with
exterior perimeter monitoring
only
Deactivate the interior volumetric and anti-tilt
monitoring to avoid unwanted triggering of the
alarm in certain cases such as:
-
l
eaving a pet in the vehicle,
-
l
eaving a window partially open,
-
w
ashing your vehicle,
-
c
hanging a wheel,
-
h
aving your vehicle towed,
-
t
ransportation by sea.
Deactivating the interior volumetric
and anti-tilt monitoring
F Switch off the ignition and within ten seconds, press the button until the indicator
lamp is on continuously.
F
G
et out of the vehicle.
F
I
mmediately lock the vehicle using the
remote control or the Keyless Entry and
Starting system.
The exterior perimeter monitoring alone is
activated: the indicator lamp in the button
flashes once per second.
To be effective, this deactivation must
be carried out each time the ignition is
switched off.
02
Access