2023 CITROEN DS4 steering
[x] Cancel search: steeringPage 7 of 296

5
Multifunction steering wheel1
Lighting controls
Direction indicators
2
Headlamp beam height adjustment
3
Speed limiter
Cruise control
Memorising speeds
4
Instrument panels
Indicator and warning lamps
Indicators
Distance recorders
5
Horn
6
Wiper control stalk
Trip computer
7
Starting – Switching off the engine
8
Steering wheel adjustment
Central switch panel
1
Hazard warning lamps
2
Central locking
3
Black panel (comfortable night driving
display)
Over view
Page 16 of 296

14
Warning/indicator lampStateCause Action/Observations
STOP Fixed, alone or
associated with
another warning
lamp, accompanied
by an audible signal
and a message in the
screen. Illumination of this warning lamp is
associated with a serious fault with
the braking system, power steering,
engine lubrication system or cooling
system.
Stop as soon as it is safe to do so as there is a risk
that the engine will cut out while driving.
Park, switch off the ignition and call the dealer network
or a qualified workshop.
Maximum
coolant
temperature Fixed.
The temperature of the cooling
system is too high. You must stop as soon as it is safe to do so.
Wait until the engine has cooled down before
topping up the level, if necessary.
If the problem persists, contact the dealer network or
a
qualified workshop.
Engine oil
pressure Fixed.
There is a fault with the engine oil
lubrication circuit. You must stop as soon as it is safe to do so.
Park, switch off the ignition and contact the dealer
network or a qualified workshop.
Seat belt not
fastened/
unfastened *Fixed, then flashing,
accompanied by an
increasing audible
signal. The driver or front passenger has
not fastened or has unfastened their
seat belt.
At least one rear passenger has
unfastened their seat belt. Pull on the belt in question and insert the tongue in the
buckle.
This warning repeats the seat belt information given by
the roof console warning lamps.
*
D
epending on the country of sale.
01
Instruments
Page 21 of 296

19
Warning/indicator lampStateCause Action/Observations
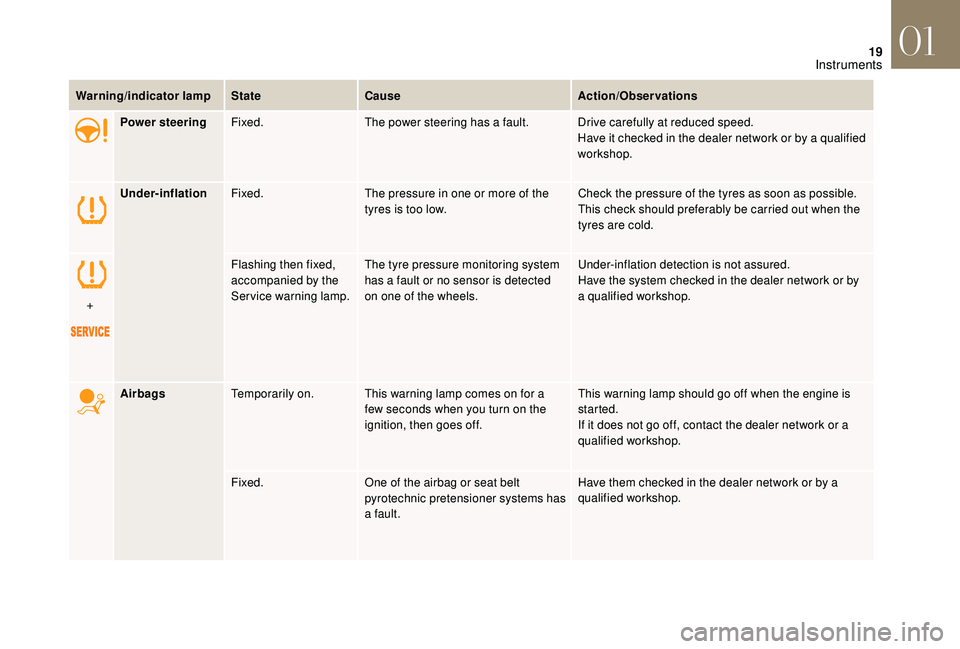
Power steering Fixed. The power steering has a fault. Drive carefully at reduced speed.
Have it checked in the dealer network or by a qualified
workshop.
Under-inflation Fixed. The pressure in one or more of the
tyres is too low. Check the pressure of the tyres as soon as possible.
This check should preferably be carried out when the
tyres are cold.
+ Flashing then fixed,
accompanied by the
Service warning lamp.
The tyre pressure monitoring system
has a fault or no sensor is detected
on one of the wheels. Under-inflation detection is not assured.
Have the system checked in the dealer network or by
a
qualified workshop.
Airbags Temporarily on. This warning lamp comes on for a
few seconds when you turn on the
ignition, then goes off. This warning lamp should go off when the engine is
started.
If it does not go off, contact the dealer network or a
qualified workshop.
Fixed. One of the airbag or seat belt
pyrotechnic pretensioner systems has
a fault. Have them checked in the dealer network or by a
qualified workshop.
01
Instruments
Page 57 of 296

55
F Open the front armrest.
F R aise the mat by its tongue and remove it.
F
P
lace the electronic key in the back-up
reader.
F
S
witch on the ignition by
pressing the " START/STOP "
button.
Remember to refit the mat at the bottom of
the armrest after removing the reinitialised
electronic key.
If the problem persists, contact the dealer
network or a qualified workshop as soon as
possible. Lost keys, remote control, electronic
key
Go to a member of the dealer network,
taking with you the vehicle's registration
certificate, your personal identification
documents and if possible, the label
bearing the key code.
The dealer will be able to retrieve the key
code and the transponder code required to
order a new key.
The electronic key is now fully operational
again. F
P
lace the back-up key (integral with the
remote control) in the lock to unlock your
vehicle. As a safety precaution (with children on
board), remove the key from the ignition or
take the electronic key when you leave the
vehicle, even for a short time.
Remote control
The high frequency remote control is a
sensitive system; do not operate it while
it is in your pocket as there is a possibility
that it may unlock the vehicle, without you
being aware of it.
Do not repeatedly press the buttons of
your remote control out of range and out of
sight of your vehicle. You may stop it from
working and the remote control would have
to be reinitialised.
The remote control does not operate when
the key is in the ignition, even when the
ignition is switched off.
Locking the vehicle
Driving with the doors locked may make
access to the passenger compartment by
the emergency ser vices more difficult in an
emergency. Electrical interference
The Keyless Entry and Starting electronic
key may not operate if close to certain
electronic devices: telephone, laptop
computer, strong magnetic fields, etc.
Anti-theft protection
Do not make any modifications to the
electronic engine immobiliser system;
this
could cause malfunctions.
For vehicles with an ignition switch, do
not forget to remove the key and turn the
steering to engage the steering lock.
When purchasing a second-hand vehicle
Have the key codes memorised by the dealer
network, to ensure that the keys in your
possession are the only ones which can start
the vehicle.
02
Access
Page 66 of 296

64
Front seats
Correct driving position
Before taking to the road and to make the most of the
ergonomic layout of the instruments and controls, carry out
these adjustments in the following order:
-
t
he height of the head restraint,
-
t
he seat backrest angle,
-
t
he seat cushion height,
-
t
he longitudinal (forwards-backwards) position of the seat,
-
t
he height of the steering wheel,
-
t
he rear view mirror and door mirrors.
Once these adjustments have been made,
check the instrument panel can be viewed
correctly from your driving position.
Manual adjustments
Forwards-backwards
F Raise the control and slide the seat forwards or backwards.
F
R
elease the control to lock the position. Before moving the seat backwards,
ensure that there is no object or person in
the way, preventing full travel of the seat.
There is a risk of trapping or pinching
passengers if present in the rear seats
or jamming the seat if large objects are
placed on the floor behind the seat.
Seat height
F Pull the control upwards to raise or push
it downwards to lower, as many times as
necessary, to obtain the position required.
As a safety measure, adjustments to the
driver's seat must only be done when
stationary.
03
Ease of use and comfort
Page 72 of 296

70
Steering wheel adjustment
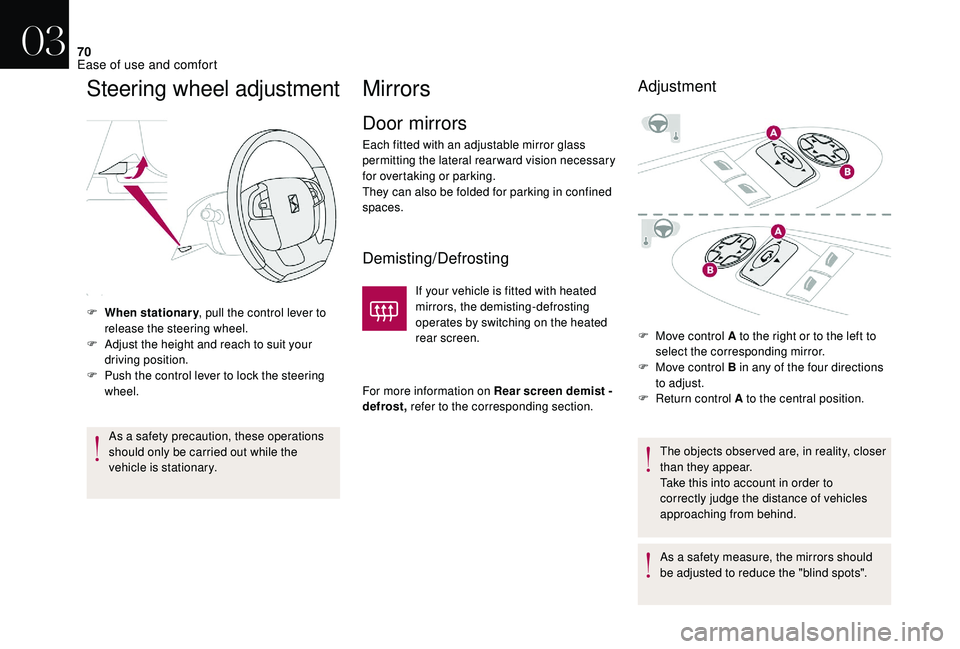
F When stationary, pull the control lever to
release the steering wheel.
F
A
djust the height and reach to suit your
driving position.
F
P
ush the control lever to lock the steering
wheel.
As a safety precaution, these operations
should only be carried out while the
vehicle is stationary.
MirrorsAdjustment
Door mirrors
Each fitted with an adjustable mirror glass
permitting the lateral rearward vision necessary
for overtaking or parking.
They can also be folded for parking in confined
spaces.
Demisting/Defrosting
If your vehicle is fitted with heated
mirrors, the demisting-defrosting
operates by switching on the heated
rear screen.
For more information on Rear screen demist -
defrost, refer to the corresponding section. F
M
ove control A to the right or to the left to
select the corresponding mirror.
F
M
ove control B in any of the four directions
to adjust.
F
R
eturn control A to the central position.
The objects obser ved are, in reality, closer
than they appear.
Take this into account in order to
correctly judge the distance of vehicles
approaching from behind.
As a safety measure, the mirrors should
be adjusted to reduce the "blind spots".
03
Ease of use and comfort
Page 84 of 296

82
To avoid any risk of jamming of the pedals:
- o nly use mats which are suited to the
fixings already present in the vehicle;
these fixings must be used,
-
n
ever place one mat on top of another.
The use of unapproved mats may inter fere
with access to the pedals and hinder the
operation of the cruise control/speed
limiter.
The approved mats have two fixings
located below the seat.
Cigar lighter/12 V accessory
s o c ket (s)
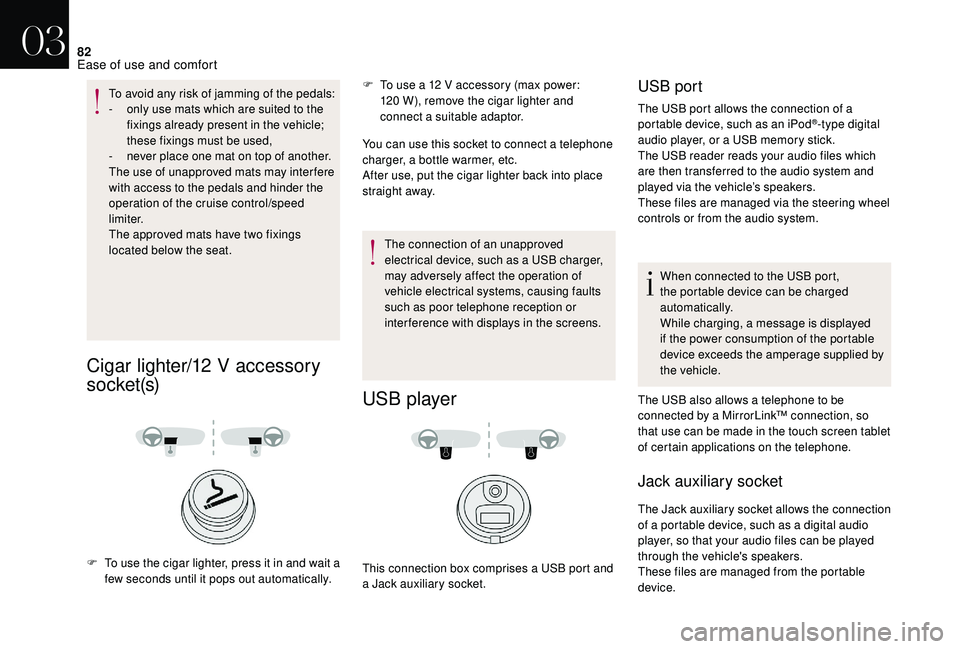
F To use a 12 V accessory (max power: 120 W), remove the cigar lighter and
connect a suitable adaptor.
You can use this socket to connect a telephone
charger, a bottle warmer, etc.
After use, put the cigar lighter
back into place
straight away.
F
T
o use the cigar lighter, press it in and wait a
few seconds until it pops out automatically. The connection of an unapproved
electrical device, such as a USB charger,
may adversely affect the operation of
vehicle electrical systems, causing faults
such as poor telephone reception or
interference with displays in the screens.
USB player
This connection box comprises a USB port and
a Jack auxiliary socket.
USB port
The USB port allows the connection of a
portable device, such as an iPod®-type digital
audio player, or a USB memory stick.
The USB reader reads your audio files which
are then transferred to the audio system and
played via the vehicle’s speakers.
These files are managed via the steering wheel
controls or from the audio system.
When connected to the USB port,
the portable device can be charged
automatically.
While charging, a message is displayed
if the power consumption of the portable
device exceeds the amperage supplied by
the vehicle.
The USB also allows a telephone to be
connected by a MirrorLink™ connection, so
that use can be made in the touch screen tablet
of certain applications on the telephone.
Jack auxiliary socket
The Jack auxiliary socket allows the connection
of a portable device, such as a digital audio
player, so that your audio files can be played
through the vehicle's speakers.
These files are managed from the portable
device.
03
Ease of use and comfort
Page 100 of 296

98
Without cornering lighting
Switching on
This system starts:
- w hen the corresponding direction indicator
is switched on,
or
-
f
rom a certain angle of rotation of the
steering wheel.
Switching off
The system does not operate:
- b elow a certain angle of rotation of the
steering wheel,
-
a
bove 25 mph (40 km/h),
-
w
hen reverse gear is engaged.
Programming
The function is activated or
deactivated via the vehicle
configuration menu.
This function is activated by default.
Wiper control stalk
System for selection and control of the various
front and rear wiping modes for the elimination
of rain and cleaning the screens.
The vehicle's front and rear wipers are
designed to improve the driver's visibility
according to the climatic conditions.
The wipers are controlled by means of the
wiping speed control lever for the front and the
ring for the rear.
Programming
Various automatic wiper control modes are also
available according to the following options:
-
a
utomatic rain sensitive windscreen wipers,
-
r
ear wiping on engaging reverse gear.
With cornering lighting
04
Lighting and visibility