2023 CHRYSLER PACIFICA Anchors
[x] Cancel search: AnchorsPage 37 of 328

GETTING TO KNOW YOUR VEHICLE35
2. Tilt seat rearward to lock the seat back into its original
position.
NOTE:Push downward to ensure the rear latches are in the
locked position.
3. Lift the recline handle and return the seat back to the seating position.
Manually Folding Third Row Seats —
If Equipped
NOTE:
You may experience deformation in the seat cushion
from the seat belt buckles, or wrinkling of the seat
fabric if the seats are left folded for an extended period
of time. This is normal and by simply unfolding the
seats to the open position, over time the seat cushion
may return to its normal shape. Having an occupant sit
in the seat, or massaging the fabric by hand may
smooth away any excess wrinkling.
Permanent wrinkles may still result.
1. Lower the center head restraint down to the seatback by pushing the button on the guide and
pushing the head restraint down.
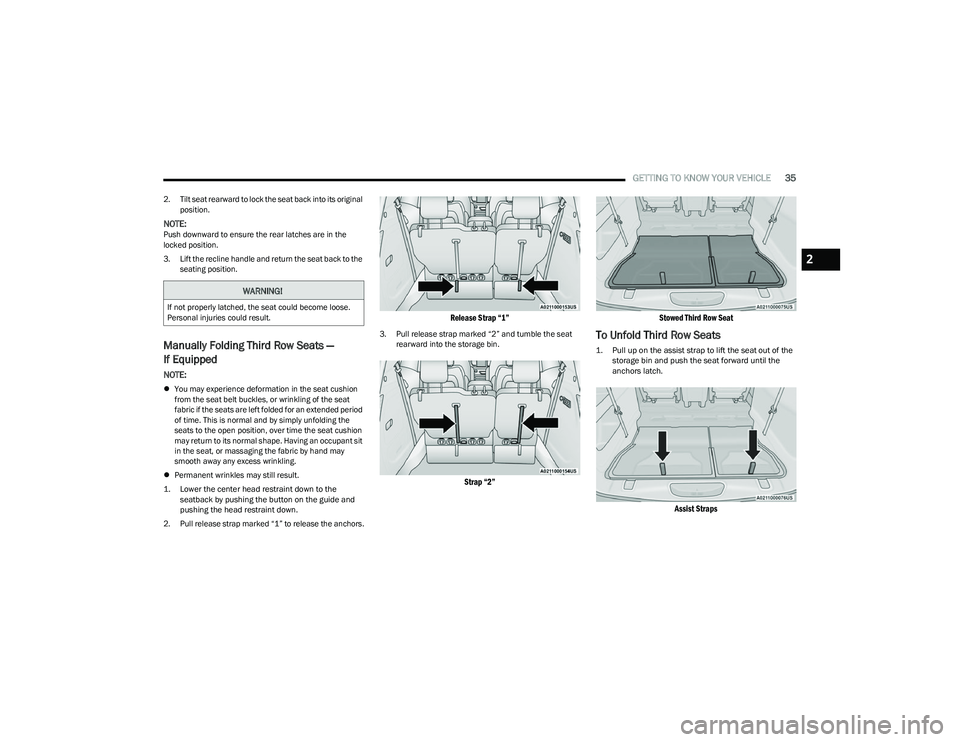
2. Pull release strap marked “1” to release the anchors.
Release Strap “1”
3. Pull release strap marked “2” and tumble the seat rearward into the storage bin.
Strap “2” Stowed Third Row Seat
To Unfold Third Row Seats
1. Pull up on the assist strap to lift the seat out of the
storage bin and push the seat forward until the
anchors latch.
Assist Straps
WARNING!
If not properly latched, the seat could become loose.
Personal injuries could result.
2
23_RUP_OM_EN_USC_t.book Page 35
Page 224 of 328

222SAFETY
Recommendations For Attaching Child Restraints
Lower Anchors And Tethers For CHildren
(LATCH) Restraint System
LATCH Label
Your vehicle is equipped with the child restraint anchorage
system called LATCH, which stands for Lower Anchors and
Tethers for CHildren. The LATCH system has three vehicle
anchor points for installing LATCH-equipped child seats.
There are two lower anchorages located at the back of the
seat cushion where it meets the seatback and one top
tether anchorage located behind the seating position.
These anchorages are used to install LATCH-equipped
child seats without using the vehicle’s seat belts. Some
seating positions may have a top tether anchorage but no
lower anchorages. In these seating positions, the seat belt
must be used with the top tether anchorage to install the
child restraint. Please see the following table for more
information.
Restraint Type Combined Weight of the
Child + Child Restraint Use Any Attachment Method Shown With An “X” Below
LATCH – Lower Anchors Only Seat Belt OnlyLATCH – Lower Anchors +
Top Tether Anchor Seat Belt + Top Tether
Anchor
Rear-Facing Child Restraint Up to 65 lb (29.5 kg) XX
Rear-Facing Child Restraint More than 65 lb (29.5 kg) X
Forward-Facing Child Restraint Up to 65 lb (29.5 kg)
XX
Forward-Facing Child Restraint More than 65 lb (29.5 kg)
X
23_RUP_OM_EN_USC_t.book Page 222
Page 229 of 328

SAFETY227
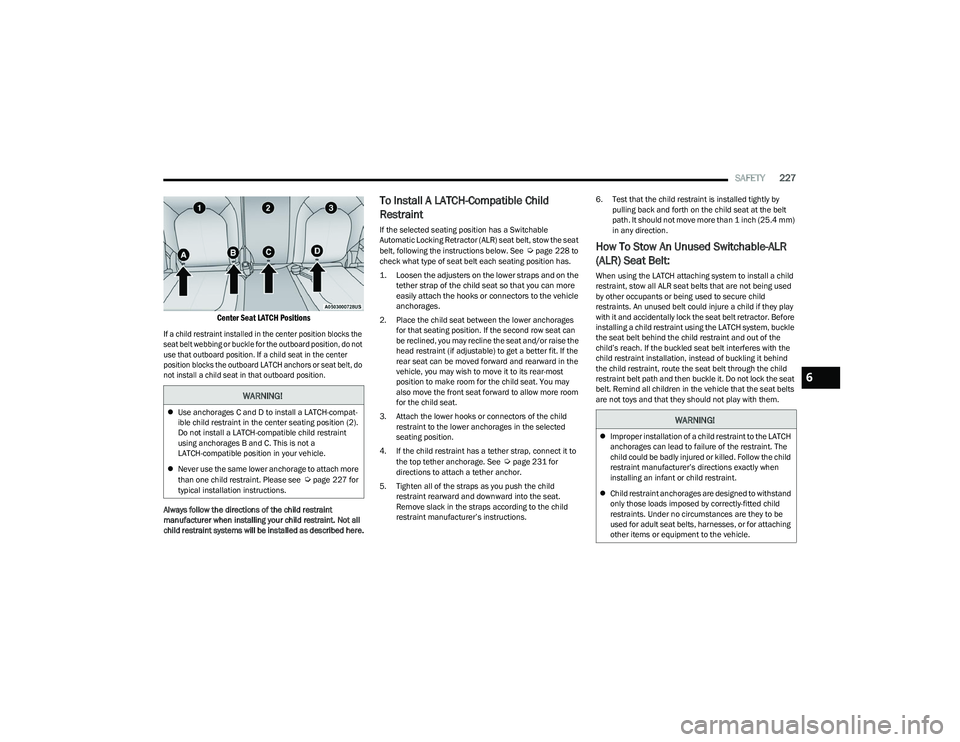
Center Seat LATCH Positions
If a child restraint installed in the center position blocks the
seat belt webbing or buckle for the outboard position, do not
use that outboard position. If a child seat in the center
position blocks the outboard LATCH anchors or seat belt, do
not install a child seat in that outboard position.
Always follow the directions of the child restraint
manufacturer when installing your child restraint. Not all
child restraint systems will be installed as described here.
To Install A LATCH-Compatible Child
Restraint
If the selected seating position has a Switchable
Automatic Locking Retractor (ALR) seat belt, stow the seat
belt, following the instructions below. See
Úpage 228 to
check what type of seat belt each seating position has.
1. Loosen the adjusters on the lower straps and on the tether strap of the child seat so that you can more
easily attach the hooks or connectors to the vehicle
anchorages.
2. Place the child seat between the lower anchorages for that seating position. If the second row seat can
be reclined, you may recline the seat and/or raise the
head restraint (if adjustable) to get a better fit. If the
rear seat can be moved forward and rearward in the
vehicle, you may wish to move it to its rear-most
position to make room for the child seat. You may
also move the front seat forward to allow more room
for the child seat.
3. Attach the lower hooks or connectors of the child restraint to the lower anchorages in the selected
seating position.
4. If the child restraint has a tether strap, connect it to the top tether anchorage. See
Úpage 231 for
directions to attach a tether anchor.
5. Tighten all of the straps as you push the child restraint rearward and downward into the seat.
Remove slack in the straps according to the child
restraint manufacturer’s instructions. 6. Test that the child restraint is installed tightly by
pulling back and forth on the child seat at the belt
path. It should not move more than 1 inch (25.4 mm) in any direction.
How To Stow An Unused Switchable-ALR
(ALR) Seat Belt:
When using the LATCH attaching system to install a child
restraint, stow all ALR seat belts that are not being used
by other occupants or being used to secure child
restraints. An unused belt could injure a child if they play
with it and accidentally lock the seat belt retractor. Before
installing a child restraint using the LATCH system, buckle
the seat belt behind the child restraint and out of the
child’s reach. If the buckled seat belt interferes with the
child restraint installation, instead of buckling it behind
the child restraint, route the seat belt through the child
restraint belt path and then buckle it. Do not lock the seat
belt. Remind all children in the vehicle that the seat belts
are not toys and that they should not play with them.
WARNING!
Use anchorages C and D to install a LATCH-compat -
ible child restraint in the center seating position (2).
Do not install a LATCH-compatible child restraint
using anchorages B and C. This is not a
LATCH-compatible position in your vehicle.
Never use the same lower anchorage to attach more
than one child restraint. Please see
Úpage 227 for
typical installation instructions.
WARNING!
Improper installation of a child restraint to the LATCH
anchorages can lead to failure of the restraint. The
child could be badly injured or killed. Follow the child
restraint manufacturer’s directions exactly when
installing an infant or child restraint.
Child restraint anchorages are designed to withstand
only those loads imposed by correctly-fitted child
restraints. Under no circumstances are they to be
used for adult seat belts, harnesses, or for attaching
other items or equipment to the vehicle.
6
23_RUP_OM_EN_USC_t.book Page 227
Page 316 of 328

314
Brake System ...................................................... 273, 303
Anti-Lock (ABS)........................................................ 303 Fluid Check..................................................... 274
, 307
Master Cylinder ....................................................... 274
Parking .................................................................... 115
Warning Light .......................................................... 103
Brake/Transmission Interlock..................................... 118
Brightness, Interior Lights .............................................. 58
Bulb Replacement ....................................................... 282
Bulbs, Light.......................................................... 235
, 282
CCamera ......................................................................... 142
Camera, Rear ...................................................... 142, 143
Capacities, Fluid ........................................................... 306
Caps, Filler Fuel .......................................................................... 146
Oil (Engine) .............................................................. 262
Radiator (Coolant Pressure)................................... 272
Car Washes .................................................................. 300
Carbon Monoxide Warning .......................................... 235
Cargo Vehicle Loading..........................................................86
Cargo Compartment Luggage Carrier..........................................................90
Cargo Load Floor ............................................................. 86
Cellular Phone .............................................................. 186
Certification Label ........................................................ 146
Chains, Tire................................................................... 297
Change Oil Indicator ....................................................... 98
Changing A Flat Tire ..................................................... 239 Chart, Tire Sizing ...........................................................284
Check Engine Light (Malfunction Indicator Light) ...... 110
Checking Your Vehicle For Safety ................................ 233
Checks, Safety .............................................................. 233
Child Restraint .............................................................. 219
Child Restraints Booster Seats .......................................................... 221
Center Seat LATCH ..................................................226
Child Seat Installation ................................... 228
, 230
How To Stow An unused ALR Seat Belt .................227 Infant And Child Restraints ..................................... 220
Lower Anchors And Tethers For Children............... 222
Older Children And Child Restraints....................... 221
Seating Positions ..................................................... 222Using The Top Tether Anchorage ...........................231
Clean Air Gasoline ........................................................ 304
Cleaning Wheels .....................................................................296
Climate Control ............................................................... 60 Automatic ................................................................... 61
Manual ....................................................................... 66
Rear ..................................................................... 64
, 69
Cold Weather Operation ............................................... 113
Compact Spare Tire ...................................................... 295
Contract, Service .......................................................... 310
Cooling Pressure Cap (Radiator Cap) ..........................272 Cooling System ............................................................. 271
Adding Coolant (Antifreeze) .................................... 272
Coolant Level........................................................... 273
Cooling Capacity...................................................... 306
Disposal Of Used Coolant ....................................... 273
Drain, Flush, And Refill ........................................... 272
Inspection .......................................................271
, 273
Points To Remember .............................................. 273
Pressure Cap ........................................................... 272
Radiator Cap............................................................ 272
Selection Of Coolant (Antifreeze) ..................272
, 306
Corrosion Protection .................................................... 300
Cruise Control ............................................................... 123
Cruise Control (Speed Control) .................................... 124
Cruise Light ..........................................................107
, 108
Customer Assistance ................................................... 308
Cybersecurity ................................................................ 157
DDaytime Running Lights ................................................. 54 Dealer Service .............................................................. 264
Defroster, Windshield .................................................. 234
Delay (Intermittent) Wipers............................................ 59
Diagnostic System, Onboard ....................................... 109
Dimmer Switch Headlight ................................................................... 54
Dipsticks Oil (Engine) .............................................................. 263
23_RUP_OM_EN_USC_t.book Page 314