2023 CHRYSLER PACIFICA ECU
[x] Cancel search: ECUPage 247 of 328

IN CASE OF EMERGENCY245
Portable Air Compressor Usage With Inflatable Spare Tire
1. Remove the Portable Air Compressor from the
storage location.
2. Raise the vehicle as described in the
Jacking Instructions within this section.
3. Install the Inflatable Spare tire as
described in the Jack Instructions section
in this manual. Make sure that the valve
stem is located near the ground, and
then screw the air hose of the Portable Air
Compressor to the valve stem.
4. Uncoil the power plug and connect it
the vehicles 12 Volt power Outlet.
5. Always start the engine before turning
ON the Portable Air Compressor.
6. Switch the power button ON.
7. Inflate the tire to 60 psi (4.2 Bar)
recommended as per the label on the
wheel or if the vehicle equipped with the
inflatable spare tire pressure indicated
on the Tire and Loading information label
located on the driver-side door opening.
NOTE:If the tire is overinflated, use the deflation button to
reduce the tire air pressure. 8. After the tire reaches the
recommended pressure, lower the
vehicle with the jack as described in the
Jack Instructions section in this manual.
9. Remove the speed limit label sticker
from the Portable Air Compressor and
place it on the center of the steering
wheel.
10. Return the Portable Air Compressor to the foam tray and secure it with the strap. Store the foam tray in the
cargo area.
RETURN INFLATABLE SPARE TIRE
To return Inflatable Spare Tire to its storage location.
1. Return the Jack.
2. Deflate the spare tire. Use the Tire Service Kit or Portable Air Compressor and push the deflation
button to do this step. See the Portable Air
Compressor in this section for additional information. The inflatable spare tire will return to its original
shape.
3. Install the inflatable spare tire back into its original stowage location and position facing outward.
4. Install the foam tray with wrench and funnel installed.
5. Install and tighten the wing nut by hand.
6. Install the Tire Service Kit or Portable Air Compressor (if equipped) and tighten the strap.
7. Install access panel door.
TIRE SERVICE KIT — IF EQUIPPED
Use this QR code to access your digital
experience.
Your vehicle may be equipped with a
Tire Service Kit. Small punctures up to
1/4 inch (6 mm) in the tire tread can
be sealed with Tire Service Kit. Foreign
objects (e.g., screws or nails) should
not be removed from the tire. Tire
Service Kit can be used in outside temperatures down to
approximately -4°F (-20°C). This kit will provide a
temporary tire seal, allowing you to drive your vehicle up to
100 miles (160 km) with a maximum speed of 50 mph
(80 km/h).WARNING!
Do not lift or carry the Portable Air Compressor by the
hose.
Always stow the Portable Air Compressor only in the
provided place.
The metal end fitting from Power Plug may get hot
after use, so it should be handled carefully.
Keep the Portable Air Compressor away from open
flames or heat source.
7
23_RUP_OM_EN_USC_t.book Page 245
Page 248 of 328

246IN CASE OF EMERGENCY
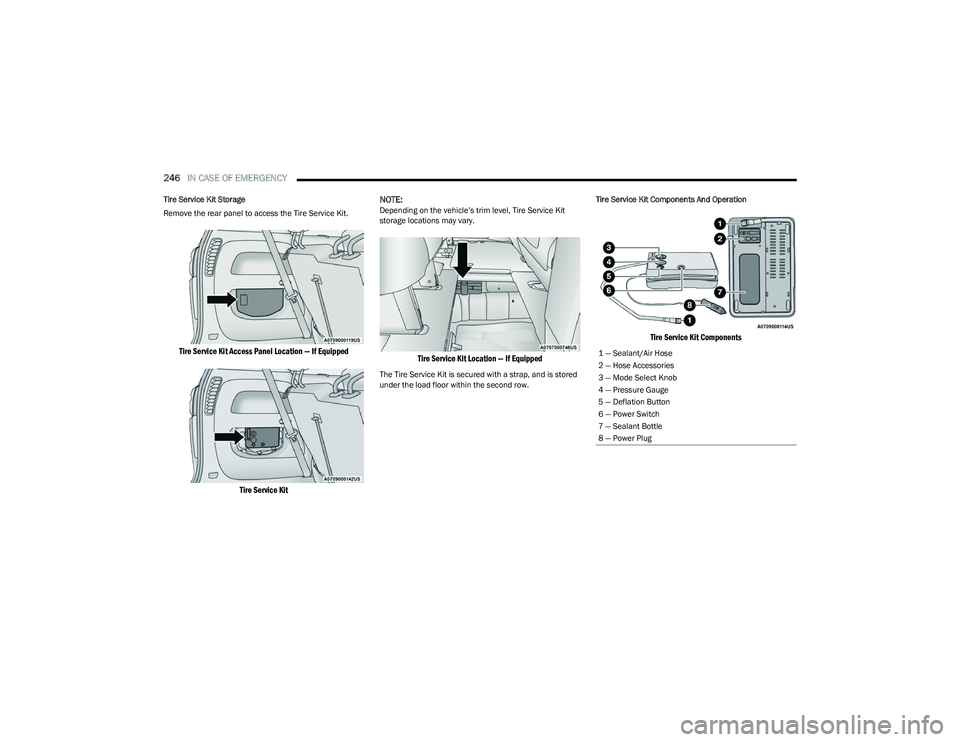
Tire Service Kit Storage
Remove the rear panel to access the Tire Service Kit.
Tire Service Kit Access Panel Location — If Equipped
Tire Service Kit
NOTE:
Depending on the vehicle’s trim level, Tire Service Kit
storage locations may vary.
Tire Service Kit Location — If Equipped
The Tire Service Kit is secured with a strap, and is stored
under the load floor within the second row.
Tire Service Kit Components And Operation
Tire Service Kit Components
1 — Sealant/Air Hose
2 — Hose Accessories
3 — Mode Select Knob
4 — Pressure Gauge
5 — Deflation Button
6 — Power Switch
7 — Sealant Bottle
8 — Power Plug
23_RUP_OM_EN_USC_t.book Page 246
Page 256 of 328

254IN CASE OF EMERGENCY
If the temperature gauge is moving towards or close to the
HOT (H) position, you can reduce the potential for
overheating by taking the appropriate action.
On highways — slow down.
In city traffic — while stopped, place the transmission in
NEUTRAL (N), but do not increase the engine idle speed
while preventing vehicle motion with the brakes.
If your Air Conditioner (A/C) is on, turn it off. The A/C
system adds heat to the engine cooling system and
turning the A/C off can help remove this heat.
You can also turn the temperature control to maximum
heat, the mode control to floor and the blower control
to high. This allows the heater core to act as a supple -
ment to the radiator and aids in removing heat from the
engine cooling system.MANUAL PARK RELEASE
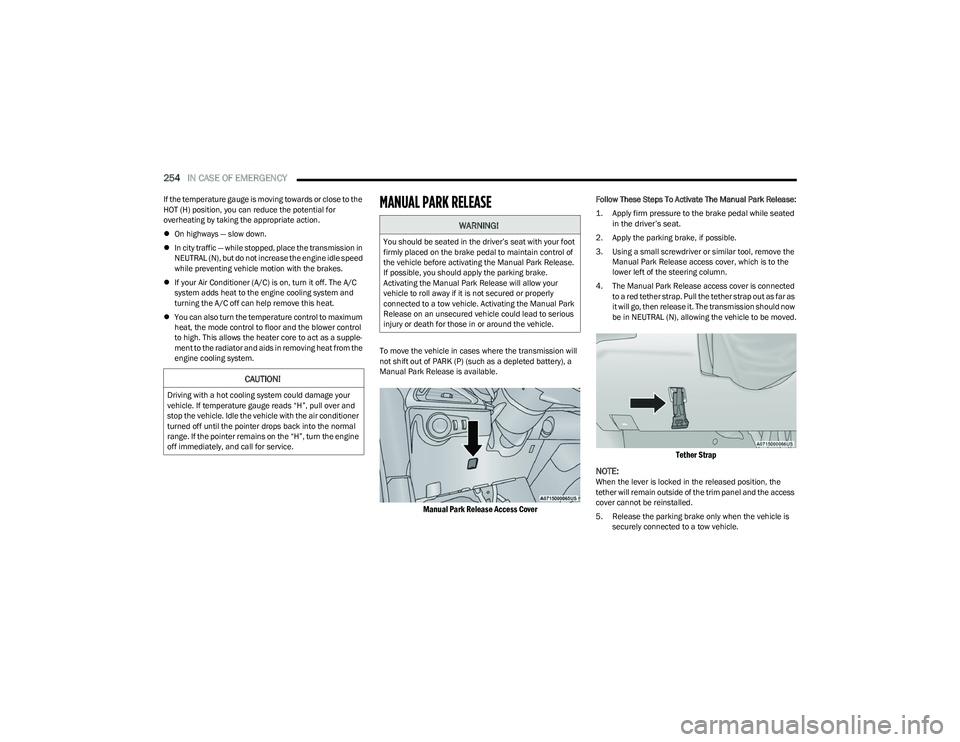
To move the vehicle in cases where the transmission will
not shift out of PARK (P) (such as a depleted battery), a
Manual Park Release is available.
Manual Park Release Access Cover
Follow These Steps To Activate The Manual Park Release:
1. Apply firm pressure to the brake pedal while seated in the driver’s seat.
2. Apply the parking brake, if possible.
3. Using a small screwdriver or similar tool, remove the Manual Park Release access cover, which is to the
lower left of the steering column.
4. The Manual Park Release access cover is connected to a red tether strap. Pull the tether strap out as far as
it will go, then release it. The transmission should now
be in NEUTRAL (N), allowing the vehicle to be moved.
Tether Strap
NOTE:
When the lever is locked in the released position, the
tether will remain outside of the trim panel and the access
cover cannot be reinstalled.
5. Release the parking brake only when the vehicle is securely connected to a tow vehicle.
CAUTION!
Driving with a hot cooling system could damage your
vehicle. If temperature gauge reads “H”, pull over and
stop the vehicle. Idle the vehicle with the air conditioner
turned off until the pointer drops back into the normal
range. If the pointer remains on the “H”, turn the engine
off immediately, and call for service.
WARNING!
You should be seated in the driver’s seat with your foot
firmly placed on the brake pedal to maintain control of
the vehicle before activating the Manual Park Release.
If possible, you should apply the parking brake.
Activating the Manual Park Release will allow your
vehicle to roll away if it is not secured or properly
connected to a tow vehicle. Activating the Manual Park
Release on an unsecured vehicle could lead to serious
injury or death for those in or around the vehicle.
23_RUP_OM_EN_USC_t.book Page 254
Page 259 of 328

IN CASE OF EMERGENCY257
(Continued)
FCA US LLC recommends towing your vehicle with all four
wheels
OFF the ground using a flatbed.
If flatbed equipment is not available, this vehicle must be
towed with the front wheels OFF the ground (using a
towing dolly, or wheel lift equipment with the front wheels
raised).
NOTE:Ensure that the Electric Park Brake is released, and
remains released, while being towed.
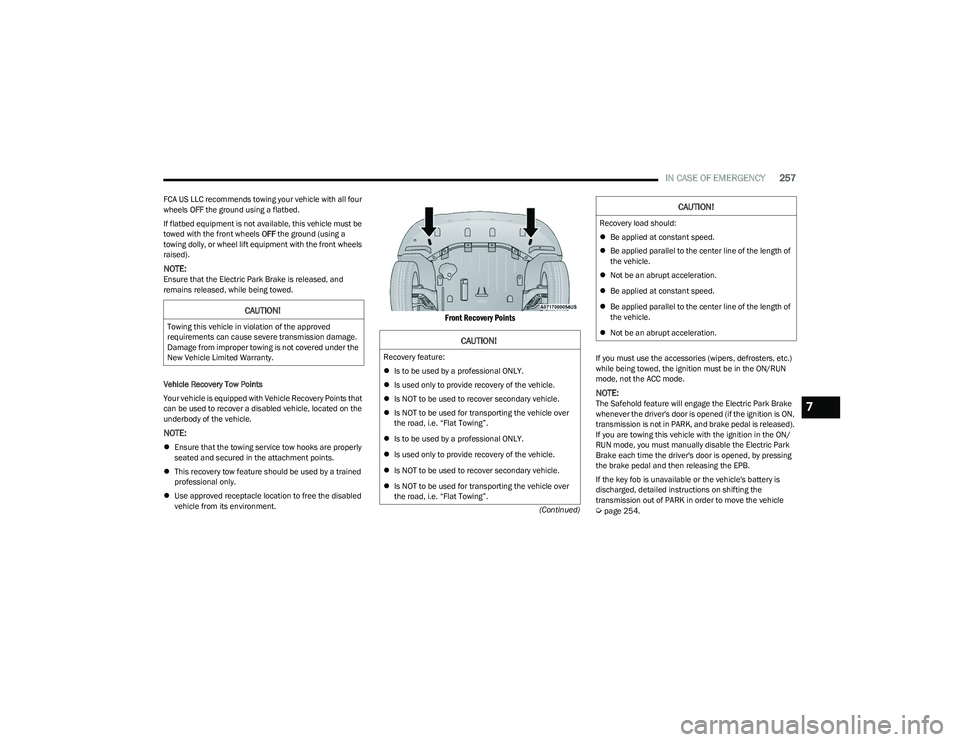
Vehicle Recovery Tow Points
Your vehicle is equipped with Vehicle Recovery Points that
can be used to recover a disabled vehicle, located on the
underbody of the vehicle.
NOTE:
Ensure that the towing service tow hooks are properly
seated and secured in the attachment points.
This recovery tow feature should be used by a trained
professional only.
Use approved receptacle location to free the disabled
vehicle from its environment.
Front Recovery Points
If you must use the accessories (wipers, defrosters, etc.)
while being towed, the ignition must be in the ON/RUN
mode, not the ACC mode.
NOTE:The Safehold feature will engage the Electric Park Brake
whenever the driver's door is opened (if the ignition is ON,
transmission is not in PARK, and brake pedal is released).
If you are towing this vehicle with the ignition in the ON/
RUN mode, you must manually disable the Electric Park
Brake each time the driver's door is opened, by pressing
the brake pedal and then releasing the EPB.
If the key fob is unavailable or the vehicle's battery is
discharged, detailed instructions on shifting the
transmission out of PARK in order to move the vehicle
Úpage 254.
CAUTION!
Towing this vehicle in violation of the approved
requirements can cause severe transmission damage.
Damage from improper towing is not covered under the
New Vehicle Limited Warranty.
CAUTION!
Recovery feature:
Is to be used by a professional ONLY.
Is used only to provide recovery of the vehicle.
Is NOT to be used to recover secondary vehicle.
Is NOT to be used for transporting the vehicle over
the road, i.e. “Flat Towing”.
Is to be used by a professional ONLY.
Is used only to provide recovery of the vehicle.
Is NOT to be used to recover secondary vehicle.
Is NOT to be used for transporting the vehicle over
the road, i.e. “Flat Towing”.
Recovery load should:
Be applied at constant speed.
Be applied parallel to the center line of the length of
the vehicle.
Not be an abrupt acceleration.
Be applied at constant speed.
Be applied parallel to the center line of the length of
the vehicle.
Not be an abrupt acceleration.
CAUTION!
7
23_RUP_OM_EN_USC_t.book Page 257
Page 260 of 328

258IN CASE OF EMERGENCY
ALL WHEEL DRIVE (AWD) MODELS
FCA US LLC recommends towing your vehicle with all four
wheels OFF the ground using a flatbed.
ENHANCED ACCIDENT RESPONSE SYSTEM
(EARS)
This vehicle is equipped with an Enhanced Accident
Response System.
This feature is a communication network that takes effect
in the event of an impact. Detailed information can be
found on
Úpage 218.
EVENT DATA RECORDER (EDR)
This vehicle is equipped with an event data recorder
(EDR). The main purpose of an EDR is to record data that
will assist in understanding how a vehicle’s systems
performed under certain crash or near crash-like
situations, such as an air bag deployment or hitting a road
obstacle. Detailed information can be found on
Úpage 219.
CAUTION!
Do not use sling-type equipment when towing.
Vehicle damage may occur.
When securing the vehicle to a flatbed truck, do not
attach to front or rear suspension components.
Damage to your vehicle may result from improper
towing.
Ensure that the Electric Park Brake is released, and
remains released, while being towed.
CAUTION!
Towing this vehicle using any other method can
cause severe transmission and/or transfer case
damage.
Damage from improper towing is not covered under
the New Vehicle Limited Warranty.
23_RUP_OM_EN_USC_t.book Page 258
Page 270 of 328

268SERVICING AND MAINTENANCE
9. Once the filter is replaced, reinstall the filter cover,
making sure the retaining tabs are fully secured into
their housings.
10. Close the cabin air filter compartment cover, and reinsert the snaps into their slots. Push the snap lids
until fully attached.
11. Push the glove compartment door to the near closed position to reengage the glove compartment travel
stops. Finally, pull the glove compartment tension
tether clip down and slide it back into the slot on the
side of the glove compartment door.
BODY LUBRICATION
Locks and all body pivot points, including such items as
seat tracks, door hinge pivot points and rollers, liftgate,
tailgate, decklid, sliding doors and hood hinges, should be
lubricated periodically. Use a lithium-based grease, such
as Mopar® Spray White Lube to ensure quiet, easy
operation and to protect against rust and wear. Prior to the
application of any lubricant, the parts concerned should
be wiped clean to remove dust and grit; after lubricating,
excess oil and grease should be removed. Particular
attention should also be given to hood latching
components to ensure proper function. When performing
other underhood services, the hood latch release
mechanism, and safety catch should be cleaned and
lubricated.
The external lock cylinders should be lubricated twice a
year, preferably in the Autumn and Spring. Apply a small
amount of a high quality lubricant, such as Mopar® Lock
Cylinder Lubricant directly into the lock cylinder.
WINDSHIELD WIPER BLADES
Clean the rubber edges of the wiper blades and the
windshield periodically with a sponge or soft cloth and a
mild nonabrasive cleaner. This will remove accumulations
of salt or road film.
Operation of the wipers on dry glass for long periods may
cause deterioration of the wiper blades. Always use
washer fluid when using the wipers to remove salt or dirt
from a dry windshield.
Avoid using the wiper blades to remove frost or ice from
the windshield. Keep the blade rubber out of contact with
petroleum products such as engine oil, gasoline, etc.
NOTE:Life expectancy of wiper blades varies depending on
geographical area and frequency of use. If chattering,
marks, water lines or wet spots are present, clean the
wiper blades or replace as necessary.
The wiper blades and wiper arms should be inspected
periodically, not just when wiper performance problems
are experienced. This inspection should include the
following points:
Wear or uneven edges
Foreign material
Hardening or cracking
Deformation or fatigue
If a wiper blade or wiper arm is damaged, replace the
affected wiper arm or blade with a new unit. Do not
attempt to repair a wiper arm or blade that is damaged.
Front Wiper Blade Removal/Installation
1. Lift the wiper arm to raise the wiper blade off of the glass, until the wiper arm is in the full up position.
Wiper Blade With Release Tab In Locked Position
CAUTION!
Do not allow the wiper arm to spring back against the
glass without the wiper blade in place or the glass may
be damaged.
1 — Wiper Blade
2 — Release Tab
3 — Wiper Arm
23_RUP_OM_EN_USC_t.book Page 268
Page 276 of 328

274SERVICING AND MAINTENANCE
(Continued)
Brake Master Cylinder
The fluid in the master cylinder should be checked when
performing under hood services or immediately if the
Brake Warning Light is illuminated.
Be sure to clean the top of the master cylinder area before
removing the cap. If necessary, add fluid to bring the fluid
level up to the requirements described on the brake fluid
reservoir. With disc brakes, fluid level can be expected to
fall as the brake pads wear. Brake fluid level should be
checked when pads are replaced. However, low fluid level
may be caused by a leak and a checkup may be needed.
Use only manufacturer recommended brake fluid
Úpage 307.AUTOMATIC TRANSMISSION
Special Additives
The manufacturer strongly recommends against using any
special additives in the transmission. Automatic
Transmission Fluid (ATF) is an engineered product and its
performance may be impaired by supplemental additives.
Therefore, do not add any fluid additives to the
transmission. Avoid using transmission sealers as they
may adversely affect seals.
Fluid Level Check
The fluid level is preset at the factory and does not require
adjustment under normal operating conditions. Routine
fluid level checks are not required; therefore the
transmission has no dipstick. An authorized dealer can
check your transmission fluid level using special service
tools. If you notice fluid leakage or transmission
malfunction, visit an authorized dealer immediately to
have the transmission fluid level checked. Operating the
vehicle with an improper fluid level can cause severe
transmission damage.
Fluid And Filter Changes
Under normal operating conditions, the fluid installed at
the factory will provide satisfactory lubrication for the life
of the vehicle.
Routine fluid and filter changes are not required. However,
change the fluid and filter if the fluid becomes
contaminated (with water, etc.), or if the transmission is
disassembled for any reason.
Selection Of Lubricant
It is important to use the proper transmission fluid to
ensure optimum transmission performance and life. Use
only the manufacturer specified transmission fluid
Úpage 307. It is important to maintain the transmission
fluid at the correct level using the recommended fluid.
WARNING!
Use only manufacturer recommended brake fluid Úpage 307. Using the wrong type of brake fluid can
severely damage your brake system and/or impair its
performance. The proper type of brake fluid for your
vehicle is also identified on the original factory
installed hydraulic master cylinder reservoir.
To avoid contamination from foreign matter or mois -
ture, use only new brake fluid or fluid that has been
in a tightly closed container. Keep the master
cylinder reservoir cap secured at all times. Brake
fluid in an open container absorbs moisture from the
air resulting in a lower boiling point. This may cause
it to boil unexpectedly during hard or prolonged
braking, resulting in sudden brake failure. This could
result in a collision.
Overfilling the brake fluid reservoir can result in
spilling brake fluid on hot engine parts, causing the
brake fluid to catch fire. Brake fluid can also damage
painted and vinyl surfaces, care should be taken to
avoid its contact with these surfaces.
Do not allow petroleum-based fluid to contaminate
the brake fluid. Brake seal components could be
damaged, causing partial or complete brake failure.
This could result in a collision.
CAUTION!
Do not use chemical flushes in your transmission as the
chemicals can damage your transmission components.
Such damage is not covered by the New Vehicle Limited
Warranty.
WARNING!
CAUTION!
If a transmission fluid leak occurs, visit an authorized
dealer immediately. Severe transmission damage may
occur. An authorized dealer has the proper tools to
adjust the fluid level accurately.
23_RUP_OM_EN_USC_t.book Page 274
Page 277 of 328

SERVICING AND MAINTENANCE275
(Continued)
NOTE:No chemical flushes should be used in any transmission;
only the approved lubricant should be used.
FUSES
General Information
The fuses protect electrical systems against excessive
current.
When a device does not work, you must check the fuse
element inside the blade fuse for a break/melt.
Also, please be aware that using power outlets for
extended periods of time with the engine off may result in
vehicle battery discharge.
Blade Fuses
Underhood Fuses
The Power Distribution Center (PDC) is located in the
engine compartment near the battery. This center
contains cartridge fuses, mini-fuses, micro-fuses, circuit
breakers and relays. A label that identifies each
component is printed on the inside of the cover.
Before any procedure is done on the PDC, make sure
engine is turned off.
Remove the cover by unlatching the two locks located at
each side of the PDC cover, avoid using screwdrivers or
any other tool to remove the cover, since they may apply
excessive force and result in a broken/damaged part.
After service is done, secure the cover with its two locks.
NOTE:The function and amperage of the following fuses are
different, depending on vehicle trim level and content.
CAUTION!
Using a transmission fluid other than the manufacturer
recommended fluid may cause deterioration in
transmission shift quality and/or torque converter
shudder
Úpage 307.
WARNING!
When replacing a blown fuse, always use an appro -
priate replacement fuse with the same amp rating as
the original fuse. Never replace a fuse with another
fuse of higher amp rating. Never replace a blown
fuse with metal wires or any other material. Do not
place a fuse inside a circuit breaker cavity or vice
versa. Failure to use proper fuses may result in
serious personal injury, fire and/or property damage.
Before replacing a fuse, make sure that the ignition
is off and that all the other services are switched off
and/or disengaged.
If the replaced fuse blows again, contact an autho -
rized dealer.
If a general protection fuse for safety systems (air
bag system, braking system), power unit systems
(engine system, transmission system) or steering
system blows, contact an authorized dealer.
1 — Fuse Element
2 — Blade Fuse with a good/functional fuse element
3 — Blade Fuse with a bad/not functional fuse element
(blown fuse)
WARNING!
CAUTION!
When installing the power distribution center cover, it is
important to ensure the cover is properly positioned
and fully latched. Failure to do so may allow water to get
into the power distribution center and possibly result in
an electrical system failure.
8
23_RUP_OM_EN_USC_t.book Page 275