2023 CHRYSLER PACIFICA parking brake
[x] Cancel search: parking brakePage 250 of 328

248IN CASE OF EMERGENCY
Sealing A Tire With Tire Service Kit
Whenever You Stop To Use Tire Service Kit:
1. Pull over to a safe location and turn on the vehicle’s
Hazard Warning Flashers.
2. Verify that the valve stem (on the wheel with the deflated tire) is in a position that is near to the
ground. This will allow the Tire Service Kit Hose to
reach the valve stem and keep the Tire Service Kit flat
on the ground. This will provide the best positioning of
the kit when injecting the sealant into the deflated
tire and running the air pump. Move the vehicle as
necessary to place the valve stem in this position
before proceeding. 3. Place the gear selector in PARK, then push and
release the ENGINE START/STOP button to set the
ignition switch to the OFF position.
4. Apply the parking brake.
Setting Up To Use Tire Service Kit:
1. Uncoil the Sealant Hose and then remove the cap from the fitting at the end of the hose.
2. Place the Tire Service Kit flat on the
ground next to the deflated tire.
3. Remove the cap from the valve stem and then screw the fitting at the end of the Sealant Hose onto the
valve stem.
4. Uncoil the Power Plug and insert the
plug into the vehicle’s 12 Volt power
outlet.
NOTE:Do not remove foreign objects (e.g., screws or nails) from
the tire.
Injecting Tire Service Kit Sealant Into The Deflated Tire:
1. Always start the vehicle before turning
the Tire Service Kit on.
2. Ensure the Mode Select Knob is to the
Sealant Mode position. 3. After pushing the Power Button, the
sealant (white fluid) will flow from the
Sealant Bottle through the Sealant Hose
and into the tire.
NOTE:Sealant may leak out through the puncture in the tire.
If the sealant (white fluid) does not flow within 0 – 10
seconds through the Sealant Hose:
1. Push the Power Button to turn the Tire Service Kit
off. Disconnect the Sealant Hose from the valve
stem. Make sure the valve stem is free of debris.
Reconnect the Sealant Hose to the valve stem.
Check that the Mode Select Knob is in the Sealant
Mode position and not Air Mode. Push the Power
Button to turn the Tire Service Kit on.
2. Connect the Power Plug to a different 12 Volt power outlet in your vehicle or another vehicle, if available.
Make sure the vehicle is running before turning the
Tire Service Kit on.
3. The Sealant Bottle may be empty due to previous use. Call for assistance.
If the sealant (white fluid) does flow through the Sealant
Hose:
1. Continue to operate the pump until
sealant is no longer flowing through
hose (typically takes 30 - 70 seconds).
As the sealant flows through the Sealant
Hose, the Pressure Gauge can read as
high as 70 psi (4.8 bar). The Pressure Gauge will
decrease quickly from approximately 70 psi
(4.8 bar) to the actual tire pressure when the
Sealant Bottle is empty.
Take care not to allow the contents of Tire Service Kit
to come in contact with hair, eyes, or clothing. Tire
Service Kit sealant is harmful if inhaled, swallowed,
or absorbed through the skin. It causes skin, eye, and
respiratory irritation. Flush immediately with plenty of
water if there is any contact with eyes or skin. Change
clothing as soon as possible, if there is any contact
with clothing.
Tire Service Kit Sealant solution contains latex. In
case of an allergic reaction or rash, consult a physi -
cian immediately. Keep Tire Service Kit out of reach
of children. If swallowed, rinse mouth immediately
with plenty of water and drink plenty of water. Do not
induce vomiting! Consult a physician immediately.
WARNING!
23_RUP_OM_EN_USC_t.book Page 248
Page 251 of 328

IN CASE OF EMERGENCY249
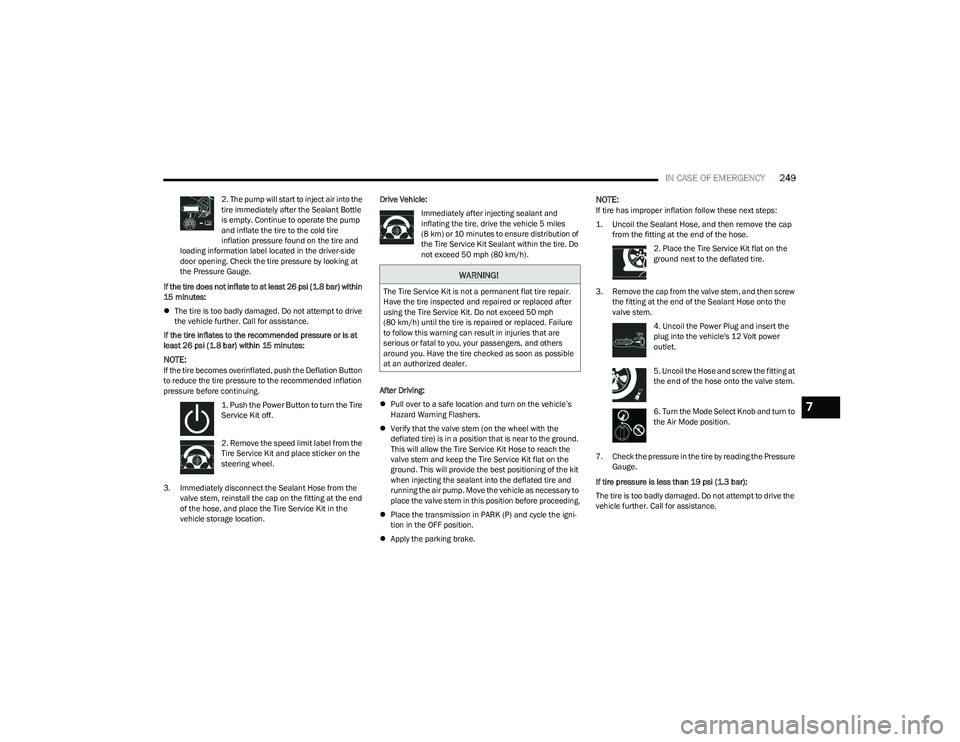
2. The pump will start to inject air into the
tire immediately after the Sealant Bottle
is empty. Continue to operate the pump
and inflate the tire to the cold tire
inflation pressure found on the tire and
loading information label located in the driver-side
door opening. Check the tire pressure by looking at
the Pressure Gauge.
If the tire does not inflate to at least 26 psi (1.8 bar) within
15 minutes:
The tire is too badly damaged. Do not attempt to drive
the vehicle further. Call for assistance.
If the tire inflates to the recommended pressure or is at
least 26 psi (1.8 bar) within 15 minutes:
NOTE:If the tire becomes overinflated, push the Deflation Button
to reduce the tire pressure to the recommended inflation
pressure before continuing.
1. Push the Power Button to turn the Tire
Service Kit off.
2. Remove the speed limit label from the
Tire Service Kit and place sticker on the
steering wheel.
3. Immediately disconnect the Sealant Hose from the valve stem, reinstall the cap on the fitting at the end
of the hose, and place the Tire Service Kit in the
vehicle storage location. Drive Vehicle:
Immediately after injecting sealant and
inflating the tire, drive the vehicle 5 miles
(8 km) or 10 minutes to ensure distribution of
the Tire Service Kit Sealant within the tire. Do
not exceed 50 mph (80 km/h).
After Driving:
Pull over to a safe location and turn on the vehicle’s
Hazard Warning Flashers.
Verify that the valve stem (on the wheel with the
deflated tire) is in a position that is near to the ground.
This will allow the Tire Service Kit Hose to reach the
valve stem and keep the Tire Service Kit flat on the
ground. This will provide the best positioning of the kit
when injecting the sealant into the deflated tire and
running the air pump. Move the vehicle as necessary to
place the valve stem in this position before proceeding.
Place the transmission in PARK (P) and cycle the igni -
tion in the OFF position.
Apply the parking brake.
NOTE:If tire has improper inflation follow these next steps:
1. Uncoil the Sealant Hose, and then remove the cap
from the fitting at the end of the hose.
2. Place the Tire Service Kit flat on the
ground next to the deflated tire.
3. Remove the cap from the valve stem, and then screw the fitting at the end of the Sealant Hose onto the
valve stem.
4. Uncoil the Power Plug and insert the
plug into the vehicle's 12 Volt power
outlet.
5. Uncoil the Hose and screw the fitting at
the end of the hose onto the valve stem.
6. Turn the Mode Select Knob and turn to
the Air Mode position.
7. Check the pressure in the tire by reading the Pressure Gauge.
If tire pressure is less than 19 psi (1.3 bar):
The tire is too badly damaged. Do not attempt to drive the
vehicle further. Call for assistance.
WARNING!
The Tire Service Kit is not a permanent flat tire repair.
Have the tire inspected and repaired or replaced after
using the Tire Service Kit. Do not exceed 50 mph
(80 km/h) until the tire is repaired or replaced. Failure
to follow this warning can result in injuries that are
serious or fatal to you, your passengers, and others
around you. Have the tire checked as soon as possible
at an authorized dealer.
7
23_RUP_OM_EN_USC_t.book Page 249
Page 253 of 328

IN CASE OF EMERGENCY251
JUMP STARTING
If your vehicle has a discharged battery it can be jump
started using a set of jumper cables and a battery in
another vehicle or by using a portable battery booster
pack. Jump starting can be dangerous if done improperly
so please follow the procedures in this section carefully.
NOTE:When using a portable battery booster pack follow the
manufacturer’s operating instructions and precautions.
PREPARATIONS FOR JUMP START
The battery in your vehicle is located on the driver’s side of
the engine compartment.
Battery Location
NOTE:
The positive battery post may be covered with a protective
cap. Lift up on the cap to gain access to the positive
battery post. Do not jump off fuses. Only jump directly off
positive post which has a positive
(+) symbol on or around
the post.
See the following steps to prepare for jump starting:
1. Apply the parking brake, shift the automatic transmission into PARK (P) and place the ignition to
OFF.
2. Turn off the heater, radio, and all electrical accessories.
3. Pull upward and remove the protective cap over the positive (+) battery post.
4. If using another vehicle to jump start the battery, park the vehicle within the jumper cable’s reach, set the
parking brake and make sure the ignition is OFF.
WARNING!
Do not attempt jump starting if the battery is frozen. It
could rupture or explode and cause personal injury.
CAUTION!
Do not use a portable battery booster pack or any other
booster source with a system voltage greater than
12 Volts or damage to the battery, starter motor,
alternator or electrical system may occur.
WARNING!
Take care to avoid the radiator cooling fan whenever
the hood is raised. It can start anytime the ignition
switch is ON. You can be injured by moving fan
blades.
Remove any metal jewelry such as rings, watch
bands and bracelets that could make an inadvertent
electrical contact. You could be seriously injured.
Batteries contain sulfuric acid that can burn your
skin or eyes and generate hydrogen gas which is
flammable and explosive. Keep open flames or
sparks away from the battery.
WARNING!
Do not allow vehicles to touch each other as this could
establish a ground connection and personal injury
could result.
7
23_RUP_OM_EN_USC_t.book Page 251
Page 256 of 328

254IN CASE OF EMERGENCY
If the temperature gauge is moving towards or close to the
HOT (H) position, you can reduce the potential for
overheating by taking the appropriate action.
On highways — slow down.
In city traffic — while stopped, place the transmission in
NEUTRAL (N), but do not increase the engine idle speed
while preventing vehicle motion with the brakes.
If your Air Conditioner (A/C) is on, turn it off. The A/C
system adds heat to the engine cooling system and
turning the A/C off can help remove this heat.
You can also turn the temperature control to maximum
heat, the mode control to floor and the blower control
to high. This allows the heater core to act as a supple -
ment to the radiator and aids in removing heat from the
engine cooling system.MANUAL PARK RELEASE
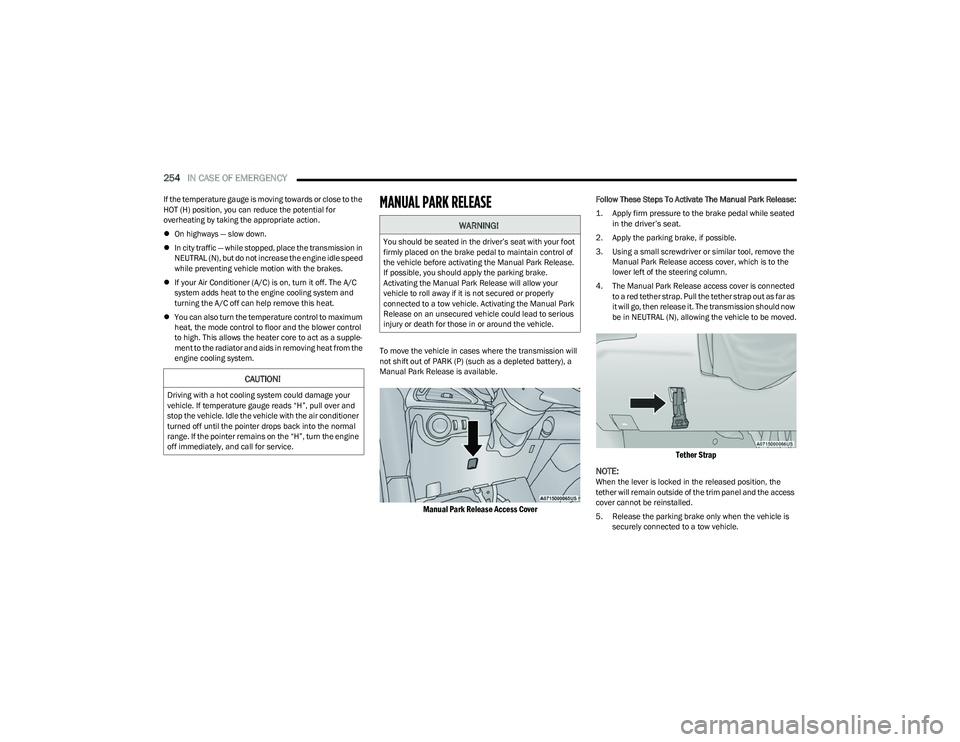
To move the vehicle in cases where the transmission will
not shift out of PARK (P) (such as a depleted battery), a
Manual Park Release is available.
Manual Park Release Access Cover
Follow These Steps To Activate The Manual Park Release:
1. Apply firm pressure to the brake pedal while seated in the driver’s seat.
2. Apply the parking brake, if possible.
3. Using a small screwdriver or similar tool, remove the Manual Park Release access cover, which is to the
lower left of the steering column.
4. The Manual Park Release access cover is connected to a red tether strap. Pull the tether strap out as far as
it will go, then release it. The transmission should now
be in NEUTRAL (N), allowing the vehicle to be moved.
Tether Strap
NOTE:
When the lever is locked in the released position, the
tether will remain outside of the trim panel and the access
cover cannot be reinstalled.
5. Release the parking brake only when the vehicle is securely connected to a tow vehicle.
CAUTION!
Driving with a hot cooling system could damage your
vehicle. If temperature gauge reads “H”, pull over and
stop the vehicle. Idle the vehicle with the air conditioner
turned off until the pointer drops back into the normal
range. If the pointer remains on the “H”, turn the engine
off immediately, and call for service.
WARNING!
You should be seated in the driver’s seat with your foot
firmly placed on the brake pedal to maintain control of
the vehicle before activating the Manual Park Release.
If possible, you should apply the parking brake.
Activating the Manual Park Release will allow your
vehicle to roll away if it is not secured or properly
connected to a tow vehicle. Activating the Manual Park
Release on an unsecured vehicle could lead to serious
injury or death for those in or around the vehicle.
23_RUP_OM_EN_USC_t.book Page 254
Page 262 of 328

260SERVICING AND MAINTENANCE
MAINTENANCE PLAN
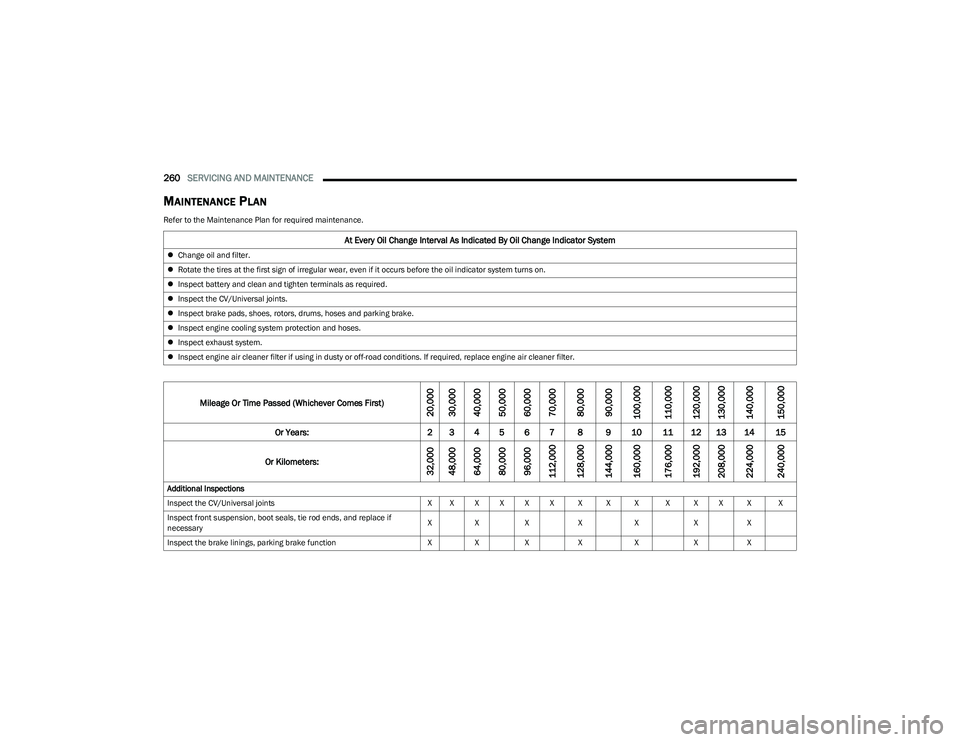
Refer to the Maintenance Plan for required maintenance.
At Every Oil Change Interval As Indicated By Oil Change Indicator System
Change oil and filter.
Rotate the tires at the first sign of irregular wear, even if it occurs before the oil indicator system turns on.
Inspect battery and clean and tighten terminals as required.
Inspect the CV/Universal joints.
Inspect brake pads, shoes, rotors, drums, hoses and parking brake.
Inspect engine cooling system protection and hoses.
Inspect exhaust system.
Inspect engine air cleaner filter if using in dusty or off-road conditions. If required, replace engine air cleaner filter.
Mileage Or Time Passed (Whichever Comes First)20,000
30,000
40,000
50,000
60,000
70,000
80,000
90,000
100,000
110,000
120,000
130,000
140,000
150,000
Or Years: 2 3 4 5 6 7 8 9 10 11 12 13 14 15
Or Kilometers:
32,000
48,000
64,000
80,000
96,000
112,000
128,000
144,000
160,000
176,000
192,000
208,000
224,000
240,000
Additional Inspections
Inspect the CV/Universal joints X X X X X X X X X X X X X X
Inspect front suspension, boot seals, tie rod ends, and replace if
necessary X
X X X X XX
Inspect the brake linings, parking brake function XX X X X XX
23_RUP_OM_EN_USC_t.book Page 260
Page 298 of 328

296SERVICING AND MAINTENANCE
Full Size Spare — If Equipped
The full size spare is for temporary emergency use only.
This tire may look like the originally equipped tire on the
front or rear axle of your vehicle, but it is not. This spare
tire may have limited tread life. When the tread is worn to
the tread wear indicators, the temporary use full size
spare tire needs to be replaced. Since it is not the same as
your original equipment tire, replace (or repair) the original
equipment tire and reinstall on the vehicle at the first
opportunity.
Limited Use Spare — If Equipped
The limited use spare tire is for temporary emergency use
only. This tire is identified by a label located on the limited
use spare wheel. This label contains the driving limitations
for this spare. This tire may look like the original equipped
tire on the front or rear axle of your vehicle, but it is not.
Installation of this limited use spare tire affects vehicle
handling. Since it is not the same as your original
equipment tire, replace (or repair) the original equipment
tire and reinstall on the vehicle at the first opportunity.
WHEEL AND WHEEL TRIM CARE
All wheels and wheel trim, especially aluminum and
chrome plated wheels, should be cleaned regularly using
mild (neutral Ph) soap and water to maintain their luster
and to prevent corrosion. Wash wheels with the same
soap solution recommended for the body of the vehicle
and remember to always wash when the surfaces are not
hot to the touch.
Your wheels are susceptible to deterioration caused by
salt, sodium chloride, magnesium chloride, calcium
chloride, etc., and other road chemicals used to melt ice
or control dust on dirt roads. Use a soft cloth or sponge
and mild soap to wipe away promptly. Do not use harsh
chemicals or a stiff brush. They can damage the wheel’s
protective coating that helps keep them from corroding
and tarnishing.
When cleaning extremely dirty wheels including excessive
brake dust, care must be taken in the selection of tire and
wheel cleaning chemicals and equipment to prevent
damage to the wheels. Mopar® Wheel Treatment or
Mopar® Chrome Cleaner or their equivalent is recommended or select a non-abrasive, non-acidic
cleaner for aluminum or chrome wheels.
NOTE:If you intend parking or storing your vehicle for an
extended period after cleaning the wheels with wheel
cleaner, drive your vehicle and apply the brakes to remove
the water droplets from the brake components. This
activity will remove the red rust on the brake rotors and
prevent vehicle vibration when braking.
Dark Vapor Chrome, Black Satin Chrome, or Low Gloss
Clear Coat Wheels
WARNING!
Limited use spares are for emergency use only.
Installation of this limited use spare tire affects vehicle
handling. With this tire, do not drive more than the
speed listed on the limited use spare wheel. Keep
inflated to the cold tire inflation pressures listed on your
Tire And Loading Information Placard located on the
driver’s side B-pillar or the rear edge of the driver’s side
door. Replace (or repair) the original equipment tire at
the first opportunity and reinstall it on your vehicle.
Failure to do so could result in loss of vehicle control.
CAUTION!
Avoid products or automatic car washes that use acidic
solutions or strong alkaline additives or harsh brushes.
Many aftermarket wheel cleaners and automatic car
washes may damage the wheel's protective finish. Such
damage is not covered by the New Vehicle Limited
Warranty. Only car wash soap, Mopar® Wheel Cleaner
or equivalent is recommended.
CAUTION!
Do not use scouring pads, steel wool, a bristle brush,
metal polishes or oven cleaner. These products may
damage the wheel's protective finish. Such damage is
not covered by the New Vehicle Limited Warranty. Only
car wash soap, Mopar® Wheel Cleaner or equivalent is
recommended.
CAUTION!
If your vehicle is equipped with these specialty wheels,
DO NOT USE wheel cleaners, abrasives, or polishing
compounds. They will permanently damage this finish
and such damage is not covered by the New Vehicle
Limited Warranty. HAND WASH ONLY USING MILD SOAP
AND WATER WITH A SOFT CLOTH. Used on a regular
basis; this is all that is required to maintain this finish.
23_RUP_OM_EN_USC_t.book Page 296
Page 316 of 328

314
Brake System ...................................................... 273, 303
Anti-Lock (ABS)........................................................ 303 Fluid Check..................................................... 274
, 307
Master Cylinder ....................................................... 274
Parking .................................................................... 115
Warning Light .......................................................... 103
Brake/Transmission Interlock..................................... 118
Brightness, Interior Lights .............................................. 58
Bulb Replacement ....................................................... 282
Bulbs, Light.......................................................... 235
, 282
CCamera ......................................................................... 142
Camera, Rear ...................................................... 142, 143
Capacities, Fluid ........................................................... 306
Caps, Filler Fuel .......................................................................... 146
Oil (Engine) .............................................................. 262
Radiator (Coolant Pressure)................................... 272
Car Washes .................................................................. 300
Carbon Monoxide Warning .......................................... 235
Cargo Vehicle Loading..........................................................86
Cargo Compartment Luggage Carrier..........................................................90
Cargo Load Floor ............................................................. 86
Cellular Phone .............................................................. 186
Certification Label ........................................................ 146
Chains, Tire................................................................... 297
Change Oil Indicator ....................................................... 98
Changing A Flat Tire ..................................................... 239 Chart, Tire Sizing ...........................................................284
Check Engine Light (Malfunction Indicator Light) ...... 110
Checking Your Vehicle For Safety ................................ 233
Checks, Safety .............................................................. 233
Child Restraint .............................................................. 219
Child Restraints Booster Seats .......................................................... 221
Center Seat LATCH ..................................................226
Child Seat Installation ................................... 228
, 230
How To Stow An unused ALR Seat Belt .................227 Infant And Child Restraints ..................................... 220
Lower Anchors And Tethers For Children............... 222
Older Children And Child Restraints....................... 221
Seating Positions ..................................................... 222Using The Top Tether Anchorage ...........................231
Clean Air Gasoline ........................................................ 304
Cleaning Wheels .....................................................................296
Climate Control ............................................................... 60 Automatic ................................................................... 61
Manual ....................................................................... 66
Rear ..................................................................... 64
, 69
Cold Weather Operation ............................................... 113
Compact Spare Tire ...................................................... 295
Contract, Service .......................................................... 310
Cooling Pressure Cap (Radiator Cap) ..........................272 Cooling System ............................................................. 271
Adding Coolant (Antifreeze) .................................... 272
Coolant Level........................................................... 273
Cooling Capacity...................................................... 306
Disposal Of Used Coolant ....................................... 273
Drain, Flush, And Refill ........................................... 272
Inspection .......................................................271
, 273
Points To Remember .............................................. 273
Pressure Cap ........................................................... 272
Radiator Cap............................................................ 272
Selection Of Coolant (Antifreeze) ..................272
, 306
Corrosion Protection .................................................... 300
Cruise Control ............................................................... 123
Cruise Control (Speed Control) .................................... 124
Cruise Light ..........................................................107
, 108
Customer Assistance ................................................... 308
Cybersecurity ................................................................ 157
DDaytime Running Lights ................................................. 54 Dealer Service .............................................................. 264
Defroster, Windshield .................................................. 234
Delay (Intermittent) Wipers............................................ 59
Diagnostic System, Onboard ....................................... 109
Dimmer Switch Headlight ................................................................... 54
Dipsticks Oil (Engine) .............................................................. 263
23_RUP_OM_EN_USC_t.book Page 314
Page 317 of 328

315
Disable Vehicle Towing ................................................ 256
DisposalAntifreeze (Engine Coolant) ................................... 273
Door Ajar .............................................................. 103
, 104
Door Ajar Light..................................................... 103, 104
Driver’s Seat Back Tilt ....................................................28
Driving Through Flowing, Rising, Or Shallow Standing Water .................................................. 156
EElectric Brake Control System..................................... 188Anti-Lock Brake System ......................................... 187
Traction Control System ......................................... 191
Electric Parking Brake ................................................. 115
Electronic Stability Control (ESC) ................................ 189
Electronic Throttle Control Warning Light................... 104
Emergency Braking ...................................................... 197
Emergency, In Case Of Hazard Warning Flasher ......................................... 236
Jacking............................................................ 239
, 240
Jump Starting .......................................................... 251
Overheating ............................................................. 253
Towing ..................................................................... 256
Emission Control System Maintenance...................... 110 Engine............................................................................262
Air Cleaner ............................................................... 265
Block Heater ............................................................114Break-In Recommendations ...................................114
Checking Oil Level ...................................................263
Compartment...........................................................262
Compartment Identification....................................262
Coolant (Antifreeze)................................................. 306
Cooling .....................................................................271
Exhaust Gas Caution ............................................... 235
Fails To Start ............................................................114Flooded, Starting ..................................................... 114Fuel Requirements ..................................................304
Oil ................................................................... 264
, 306
Oil Filler Cap ............................................................. 262
Oil Filter ....................................................................265 Oil Selection ................................................... 264
, 306
Oil Synthetic ............................................................. 264
Overheating ............................................................. 253
Starting.....................................................................111
Engine Oil Life ¹............................................................... 98
Enhanced Accident Response Feature ............. 218
, 258
Ethanol .......................................................................... 304
Exhaust Gas Cautions ..................................................235
Exhaust System .................................................. 235
, 270
Exterior Lighting .....................................................54, 282
Exterior Lights .............................................. 54, 235, 282
FFamCam System .......................................................... 145
Filters Air Cleaner ............................................................... 265Air Conditioning ................................................ 71
, 266
Engine Oil................................................................. 265
Engine Oil Disposal ................................................. 265
FireTV ............................................................................ 181
Flashers Hazard Warning....................................................... 236Turn Signals................................... 54
, 108, 235, 282
Flash-To-Pass........................................................... 54, 56
Flat Tire Changing ..................................... 239, 283, 295
Flat Tire Stowage ....................................... 245, 283, 295
Flooded Engine Starting............................................... 114
Fluid Capacities ............................................................ 306
Fluid Leaks.................................................................... 235
Fluid Level Checks Brake........................................................................ 274
Engine Oil................................................................. 263
Fluid, Brake................................................................... 307
Fog Lights................................................................. 54
, 57
Fold In Floor (Stow ‘n Go) Seating ................................. 36 Fold-Flat Seats ................................................................ 28
Forward Collision Warning ........................................... 195
Freeing A Stuck Vehicle ............................................... 255
Front Position Light ...................................................... 282
11
23_RUP_OM_EN_USC_t.book Page 315