2023 CHRYSLER PACIFICA HYBRID manual radio set
[x] Cancel search: manual radio setPage 7 of 328

5
MULTIMEDIA
UCONNECT SYSTEMS ..................................................... 157
CYBERSECURITY ............................................................. 157
UCONNECT SETTINGS...................................................... 157Customer Programmable Features ........................ 158
REAR SEAT ENTERTAINMENT (RSE) WITH AMAZON
FIRE TV BUILT-IN — IF EQUIPPED .................................. 177 Overview .................................................................... 177Getting Started .......................................................... 177
Accessing Rear Seat Entertainment with Fire TV
built-in from the Front Radio Screen ....................... 178
Accessing Rear Seat Entertainment with Fire TV
built-in from the Rear Screens ................................. 178First Time Starting Up (Using the Rear Screens) .... 178Alexa Voice Control ................................................... 179
Listen Via Vehicle Speakers ..................................... 179
Quick Menu ............................................................... 179
Parental Controls (Using the Rear Screens)............ 179Voice Remote with Alexa Pairing (Using the Rear
Screens)..................................................................... 179Media Sources Input (Using the Front Radio and
Rear Screens)............................................................ 180
Voice Remote with Alexa .......................................... 180
Rear Seat Entertainment with Fire TV built-in streaming
(Using the Front Radio and Rear Screens) .................181
Play A Blu-ray™ or DVD —If Equipped ...................... 182
Fire TV Apps/Games (Using the Rear Screens) ...... 183 Using The Video USB Port ........................................ 183
Play Video Games ..................................................... 183
Headphones Operation ............................................ 183
Rear Climate Controls .............................................. 184
Legal & Compliance.................................................. 186
RADIO OPERATION AND MOBILE PHONES.................. 186 Regulatory And Safety Information.......................... 186
SAFETY
SAFETY FEATURES .......................................................... 187Anti-Lock Brake System (ABS) ................................ 187
Electronic Brake Control (EBC) System .................. 188
AUXILIARY DRIVING SYSTEMS ...................................... 192 Blind Spot Monitoring (BSM) — If Equipped............ 192
Forward Collision Warning (FCW) With Mitigation —
If Equipped ................................................................ 195Tire Pressure Monitoring System (TPMS) ............... 197
OCCUPANT RESTRAINT SYSTEMS ............................... 200 Occupant Restraint Systems Features ................... 200
Important Safety Precautions .................................. 200
Seat Belt Systems .................................................... 201
Supplemental Restraint Systems (SRS).................. 209
Child Restraints ........................................................ 219
SAFETY TIPS .................................................................... 233 Transporting Passengers ......................................... 233
Transporting Pets .................................................... 233
Connected Vehicles .................................................. 233Safety Checks You Should Make Inside
The Vehicle ............................................................... 233 Periodic Safety Checks You Should Make Outside
The Vehicle ................................................................ 234
Exhaust Gas ............................................................... 235
Carbon Monoxide Warnings ..................................... 235
IN CASE OF EMERGENCY
HAZARD WARNING FLASHERS ......................................236
SOS AND ASSIST MIRROR — IF EQUIPPED ..................236
JACKING AND TIRE CHANGING —IF EQUIPPED ...........239
Preparations For Jacking ......................................... 239
Jack And Spare Tire Location ................................... 240
Equipment Removal ................................................. 240
Jacking Instructions .................................................. 240
Road Tire Installation ................................................ 244
Portable Air Compressor —If Equipped .................... 244
Return Inflatable Spare Tire ..................................... 245
TIRE SERVICE KIT — IF EQUIPPED.................................. 245
JUMP STARTING ...............................................................251 Preparations For Jump Start..................................... 251
Jump Starting Procedure .......................................... 252
REFUELING IN EMERGENCY – IF EQUIPPED ................252
IF YOUR ENGINE OVERHEATS......................................... 253
MANUAL PARK RELEASE ...............................................254
FREEING A STUCK VEHICLE ........................................... 255
TOWING A DISABLED VEHICLE.......................................256 All Wheel Drive (AWD) Models .................................. 258
ENHANCED ACCIDENT RESPONSE SYSTEM (EARS) ..258
EVENT DATA RECORDER (EDR)......................................258
23_RUP_OM_EN_USC_t.book Page 5
Page 49 of 328

GETTING TO KNOW YOUR VEHICLE47
POWER FOLDING THIRD ROW HEAD
RESTRAINTS — IF EQUIPPED
For improved visibility, the third row outboard head
restraints can be folded using the Uconnect system.
Press Vehicle, then Controls located on the bottom of the
Uconnect display.
Press the Head Restraint Fold button to power
fold the third row head restraints.
NOTE:
The head restraints can be folded downward using the
Head Restraint button or using the manual release
strap. The head restraints must be raised manually
when occupying the third row.
Do not fold if there are passengers seated in the third
row seats.
UCONNECT VOICE RECOGNITION —
IF EQUIPPED
INTRODUCING VOICE RECOGNITION
Start using Uconnect Voice Recognition (VR) with these
helpful quick tips. It provides the key Voice Commands
and tips you need to know to control your system.
BASIC VOICE COMMANDS
The following basic Voice Commands can be given at any
point while using your Uconnect system.
Push the VR button on the steering wheel. After the beep,
say:
“Cancel ” to stop a current voice session.
“Help ” to hear a list of suggested Voice Commands.
“Repeat ” to listen to the system prompts again.
Notice the visual cues that inform you of your Voice
Recognition system’s status.
GET STARTED
The VR button is used to activate/deactivate your
Voice Recognition system.
Helpful hints for using Voice Recognition:
Reduce background noise. Wind noise and passenger
conversations are examples of noise that may impact
recognition.
Speak clearly at a normal pace and volume while facing
straight ahead.
Each time you give a Voice Command, first push the VR
button, wait until after the beep, then say your Voice
Command. You can also say the vehicle “Wake Up”
word and state your command.
NOTE:The factory default Wake Up word is set to “Hey Uconnect”
and can be reprogrammed through the Uconnect Settings.
After the beep, say:
A passenger can press the VR button shortcut on the
radio status bar to also issue a command.
You can interrupt the help message or system prompts
by pushing the VR button and saying a Voice Command
or saying the vehicle’s “Wake Up” word and saying a
command from the current category.
Uconnect Voice Command Buttons
1 — Push To Answer An Incoming Phone Call
2 — For Vehicles Equipped With Navigation: Push
The Voice Recognition Button To Begin Radio, Media,
Navigation, Climate, Start Or Answer A Phone Call, And
Send Or Receive A Text
2 — For Vehicles Not Equipped With Navigation: Push The
Phone Button To Answer An Incoming Phone Call
2
23_RUP_OM_EN_USC_t.book Page 47
Page 50 of 328
48GETTING TO KNOW YOUR VEHICLE
ADDITIONAL INFORMATION
© 2022 FCA US LLC. All rights reserved. Mopar and
Uconnect are registered trademarks and Mopar Owner
Connect is a trademark of FCA US LLC. SiriusXM® and all
related marks and logos are trademarks of SiriusXM®
Radio Inc.
Úpage 312.
For Uconnect system support, call 1-877-855-8400
(24 hours a day 7 days a week) or visit DriveUconnect.com
(US) or DriveUconnect.ca (Canada).
MIRRORS
INSIDE REARVIEW MIRROR
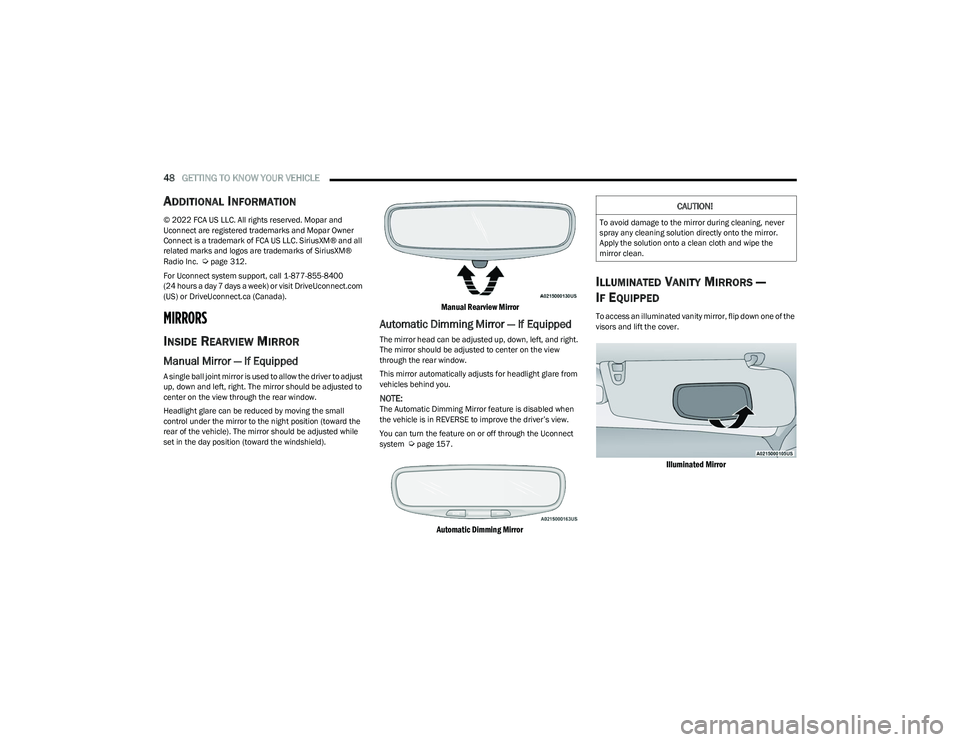
Manual Mirror — If Equipped
A single ball joint mirror is used to allow the driver to adjust
up, down and left, right. The mirror should be adjusted to
center on the view through the rear window.
Headlight glare can be reduced by moving the small
control under the mirror to the night position (toward the
rear of the vehicle). The mirror should be adjusted while
set in the day position (toward the windshield).
Manual Rearview Mirror
Automatic Dimming Mirror — If Equipped
The mirror head can be adjusted up, down, left, and right.
The mirror should be adjusted to center on the view
through the rear window.
This mirror automatically adjusts for headlight glare from
vehicles behind you.
NOTE:The Automatic Dimming Mirror feature is disabled when
the vehicle is in REVERSE to improve the driver’s view.
You can turn the feature on or off through the Uconnect
system
Úpage 157.
Automatic Dimming Mirror
ILLUMINATED VANITY MIRRORS —
I
F EQUIPPED
To access an illuminated vanity mirror, flip down one of the
visors and lift the cover.
Illuminated Mirror
CAUTION!
To avoid damage to the mirror during cleaning, never
spray any cleaning solution directly onto the mirror.
Apply the solution onto a clean cloth and wipe the
mirror clean.
23_RUP_OM_EN_USC_t.book Page 48
Page 104 of 328

102GETTING TO KNOW YOUR INSTRUMENT PANEL
NOTE:
The charging system is independent from load reduc -
tion. The charging system performs a diagnostic on the
charging system continuously.
If the Battery Charge Warning Light is on it may indicate
a problem with the charging system
Úpage 103.
The electrical loads that may be switched off (if equipped),
and vehicle functions which can be effected by load
reduction:
Heated Seat/Vented Seats/Heated Wheel
Heated/Cooled Cup Holders — If Equipped
Rear Defroster And Heated Mirrors
HVAC System
115 Volts AC Power Inverter System
Audio and Telematics System
Loss of the battery charge may indicate one or more of the
following conditions:
The charging system cannot deliver enough electrical
power to the vehicle system because the electrical
loads are larger than the capability of charging system.
The charging system is still functioning properly.
Turning on all possible vehicle electrical loads (e.g.
HVAC to max settings, exterior and interior lights, over -
loaded power outlets +12 Volts, 150W, USB ports)
during certain driving conditions (city driving, towing,
frequent stopping).
Installing options like additional lights, upfitter elec -
trical accessories, audio systems, alarms and similar
devices.
Unusual driving cycles (short trips separated by long
parking periods).
The vehicle was parked for an extended period of time
(weeks, months).
The battery was recently replaced and was not charged
completely.
The battery was discharged by an electrical load left on
when the vehicle was parked.
The battery was used for an extended period with the
engine not running to supply radio, lights, chargers,
+12 Volt portable appliances like vacuum cleaners,
game consoles and similar devices.
What to do when an electrical load reduction action
message is present (“Battery Saver On” or “Battery Saver
Mode”)
During a trip:
Reduce power to unnecessary loads if possible:
Turn off redundant lights (interior or exterior)
Check what may be plugged in to power outlets
+12 Volts, 150W, USB ports
Check HVAC settings (blower, temperature)
Check the audio settings (volume)
After a trip:
Check if any aftermarket equipment was installed
(additional lights, upfitter electrical accessories, audio
systems, alarms) and review specifications if any (load
and Ignition Off Draw currents).
Evaluate the latest driving cycles (distance, driving
time and parking time).
The vehicle should have service performed if the
message is still present during consecutive trips and
the evaluation of the vehicle and driving pattern did not
help to identify the cause.
WARNING LIGHTS AND MESSAGES
The warning/indicator lights will illuminate in the
instrument panel together with a dedicated message and/
or acoustic signal when applicable. These indications are
indicative and precautionary and as such must not be
considered as exhaustive and/or alternative to the
information contained in the Owner’s Manual, which you
are advised to read carefully in all cases. Always refer to
the information in this chapter in the event of a failure
indication. All active telltales will display first if applicable.
The system check menu may appear different based upon
equipment options and current vehicle status. Some
telltales are optional and may not appear.
RED WARNING LIGHTS
Air Bag Warning Light
This warning light will illuminate to indicate a
fault with the air bag, and will turn on for four to
eight seconds as a bulb check when the ignition
is placed in the ON/RUN or ACC/ON/RUN
position. This light will illuminate with a single chime when a
fault with the air bag has been detected, it will stay on until
the fault is cleared. If the light is either not on during startup,
stays on, or turns on while driving, have the system
inspected at an authorized dealer as soon as possible.
23_RUP_OM_EN_USC_t.book Page 102
Page 159 of 328
157
MULTIMEDIA
UCONNECT SYSTEMS
For detailed information about your Uconnect 5 With
7-inch Display or Uconnect 5/5NAV With 10.1-inch Display
system, refer to your Uconnect Radio Instruction Manual.
NOTE:Uconnect screen images are for illustration purposes only
and may not reflect exact software for your vehicle.
CYBERSECURITY
Depending on applicability, your vehicle may be able to
send or receive information from a wired or wireless
network. This information allows systems and features in
your vehicle to function properly.
Your vehicle may be equipped with certain security
features to reduce the risk of unauthorized and unlawful
access to vehicle systems and wireless communications.
Vehicle software technology continues to evolve over time
and FCA US LLC, working with its suppliers, evaluates and
takes appropriate steps as needed. As always, if you
experience unusual behavior, contact an authorized
dealer immediately,
Úpage 308, or refer to your
Uconnect Radio Instruction Manual for additional contact
information. The risk of unauthorized and unlawful access to your
vehicle systems may still exist, even if the most recent
version of vehicle software (such as Uconnect software) is
installed.
NOTE:To help further improve user experience, features,
stability, etc., and minimize the potential risk of a security
breach, vehicle owners should routinely check
www.driveuconnect.com (US Residents) or www.driveuco
-
nnect.ca (Canadian Residents) to learn about available
Uconnect software updates.
UCONNECT SETTINGS
The Uconnect system uses a combination of buttons on
the touchscreen and buttons on the faceplate located on
the center of the instrument panel. These buttons allow
you to access and change the Customer Programmable
Features. Many features can vary by vehicle.
Buttons on the faceplate are located below and/or beside
the Uconnect system in the center of the instrument
panel. In addition, there is a SCROLL/ENTER control knob
located on the right side. Turn the control knob to scroll
through menus and change settings. Push the center of
the control knob one or more times to select or change a
setting.
WARNING!
ONLY insert trusted devices/components into your
vehicle. Media of unknown origin could possibly
contain malicious software, and if installed in your
vehicle, it may increase the possibility for vehicle
systems to be breached.
As always, if you experience unusual vehicle
behavior, take your vehicle to an authorized dealer
immediately.
5
23_RUP_OM_EN_USC_t.book Page 157
Page 162 of 328
160MULTIMEDIA
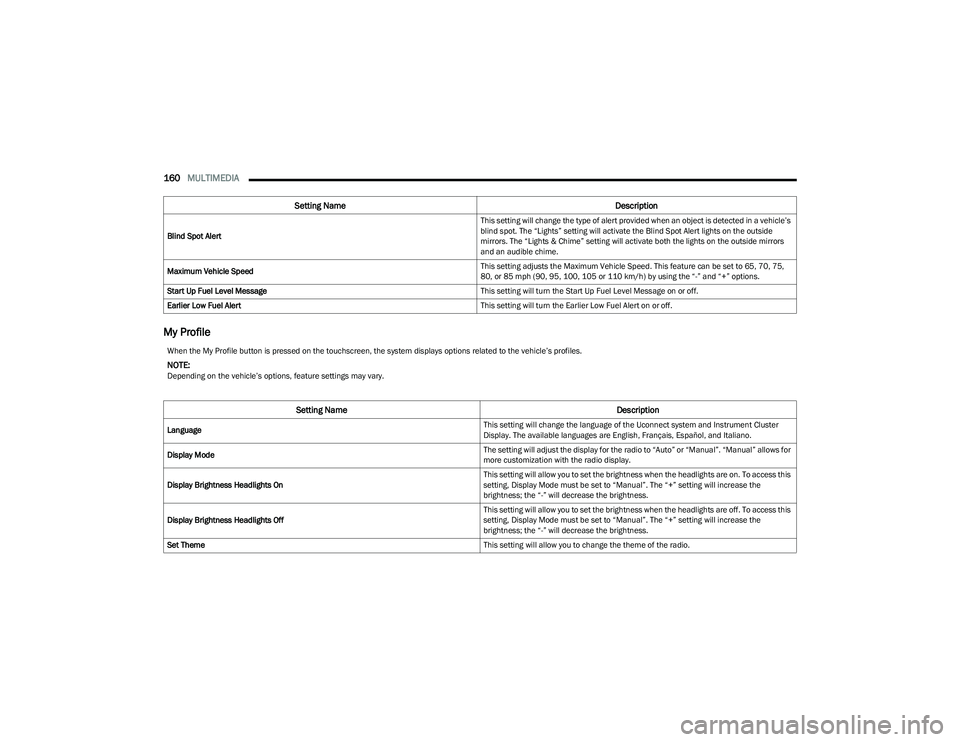
My Profile
Blind Spot Alert This setting will change the type of alert provided when an object is detected in a vehicle’s
blind spot. The “Lights” setting will activate the Blind Spot Alert lights on the outside
mirrors. The “Lights & Chime” setting will activate both the lights on the outside mirrors
and an audible chime.
Maximum Vehicle Speed This setting adjusts the Maximum Vehicle Speed. This feature can be set to 65, 70, 75,
80, or 85 mph (90, 95, 100, 105 or 110 km/h) by using the “-” and “+” options.
Start Up Fuel Level Message This setting will turn the Start Up Fuel Level Message on or off.
Earlier Low Fuel Alert This setting will turn the Earlier Low Fuel Alert on or off.
Setting NameDescription
When the My Profile button is pressed on the touchscreen, the system displays options related to the vehicle’s profiles.
NOTE:Depending on the vehicle’s options, feature settings may vary.
Setting NameDescription
Language This setting will change the language of the Uconnect system and Instrument Cluster
Display. The available languages are English, Français, Español, and Italiano.
Display Mode The setting will adjust the display for the radio to “Auto” or “Manual”. “Manual” allows for
more customization with the radio display.
Display Brightness Headlights On This setting will allow you to set the brightness when the headlights are on. To access this
setting, Display Mode must be set to “Manual”. The “+” setting will increase the
brightness; the “-” will decrease the brightness.
Display Brightness Headlights Off This setting will allow you to set the brightness when the headlights are off. To access this
setting, Display Mode must be set to “Manual”. The “+” setting will increase the
brightness; the “-” will decrease the brightness.
Set Theme This setting will allow you to change the theme of the radio.
23_RUP_OM_EN_USC_t.book Page 160
Page 165 of 328
MULTIMEDIA163
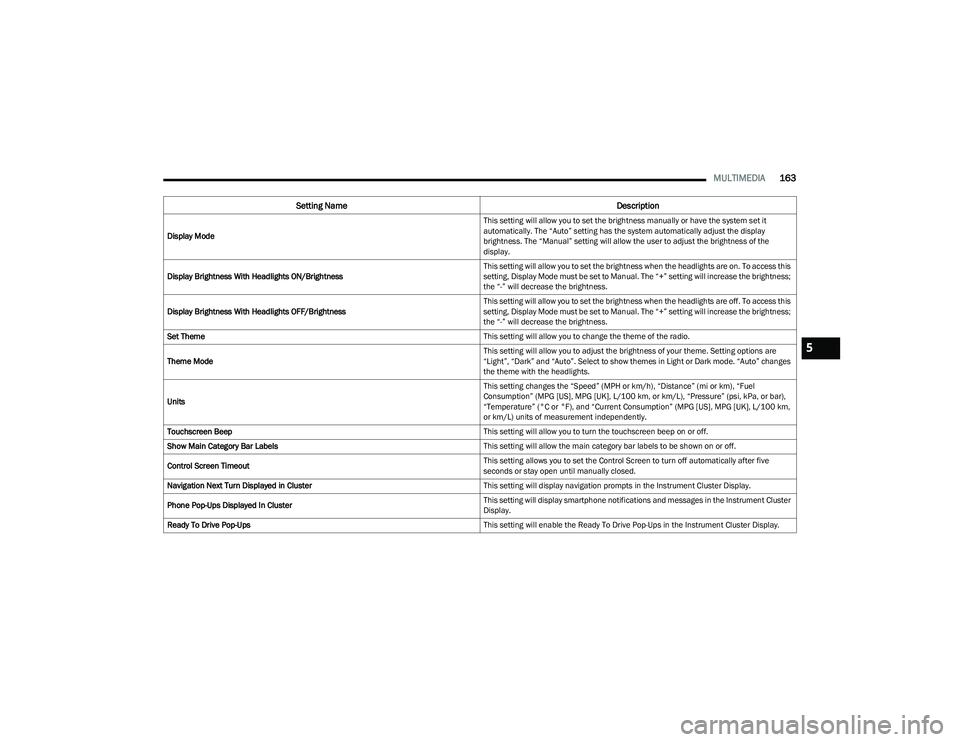
Display Mode This setting will allow you to set the brightness manually or have the system set it
automatically. The “Auto” setting has the system automatically adjust the display
brightness. The “Manual” setting will allow the user to adjust the brightness of the
display.
Display Brightness With Headlights ON/Brightness This setting will allow you to set the brightness when the headlights are on. To access this
setting, Display Mode must be set to Manual. The “+” setting will increase the brightness;
the “-” will decrease the brightness.
Display Brightness With Headlights OFF/Brightness This setting will allow you to set the brightness when the headlights are off. To access this
setting, Display Mode must be set to Manual. The “+” setting will increase the brightness;
the “-” will decrease the brightness.
Set Theme This setting will allow you to change the theme of the radio.
Theme Mode This setting will allow you to adjust the brightness of your theme. Setting options are
“Light”, “Dark” and “Auto”. Select to show themes in Light or Dark mode. “Auto” changes
the theme with the headlights.
Units This setting changes the “Speed” (MPH or km/h), “Distance” (mi or km), “Fuel
Consumption” (MPG [US], MPG [UK], L/100 km, or km/L), “Pressure” (psi, kPa, or bar),
“Temperature” (°C or °F), and “Current Consumption” (MPG [US], MPG [UK], L/100 km,
or km/L) units of measurement independently.
Touchscreen Beep This setting will allow you to turn the touchscreen beep on or off.
Show Main Category Bar Labels This setting will allow the main category bar labels to be shown on or off.
Control Screen Timeout This setting allows you to set the Control Screen to turn off automatically after five
seconds or stay open until manually closed.
Navigation Next Turn Displayed in Cluster This setting will display navigation prompts in the Instrument Cluster Display.
Phone Pop-Ups Displayed In Cluster This setting will display smartphone notifications and messages in the Instrument Cluster
Display.
Ready To Drive Pop-Ups This setting will enable the Ready To Drive Pop-Ups in the Instrument Cluster Display.
Setting NameDescription
5
23_RUP_OM_EN_USC_t.book Page 163
Page 169 of 328
MULTIMEDIA167
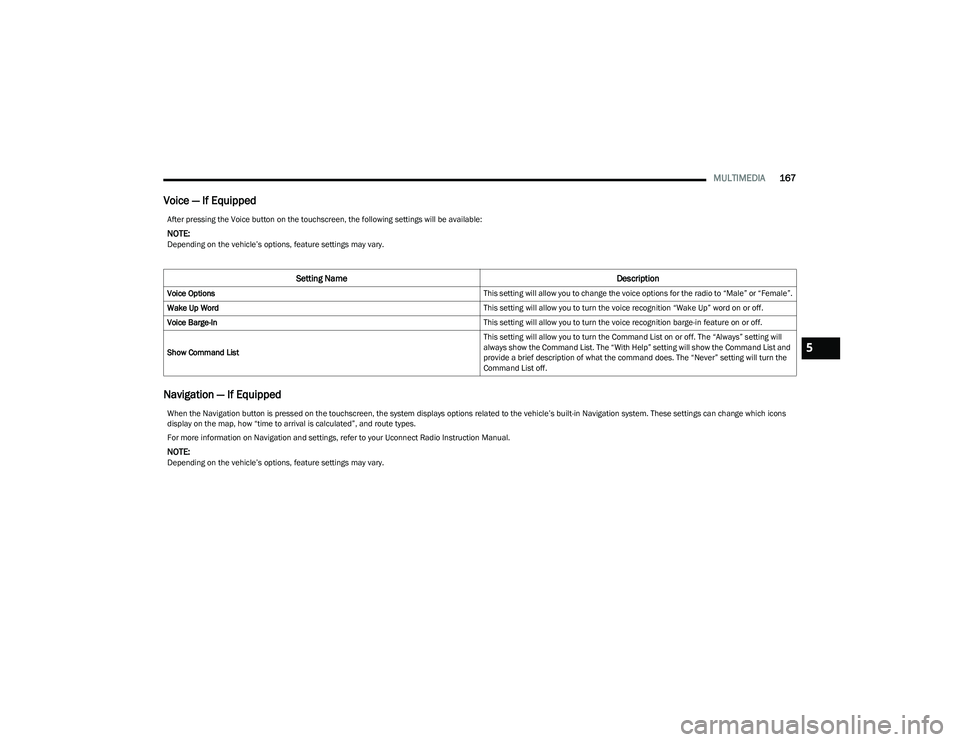
Voice — If Equipped
Navigation — If Equipped
After pressing the Voice button on the touchscreen, the following settings will be available:
NOTE:Depending on the vehicle’s options, feature settings may vary.
Setting Name Description
Voice Options This setting will allow you to change the voice options for the radio to “Male” or “Female”.
Wake Up Word This setting will allow you to turn the voice recognition “Wake Up” word on or off.
Voice Barge-In This setting will allow you to turn the voice recognition barge-in feature on or off.
Show Command List This setting will allow you to turn the Command List on or off. The “Always” setting will
always show the Command List. The “With Help” setting will show the Command List and
provide a brief description of what the command does. The “Never” setting will turn the
Command List off.
When the Navigation button is pressed on the touchscreen, the system displays options related to the vehicle’s built-in Navigation system. These settings can change which icons
display on the map, how “time to arrival is calculated”, and route types.
For more information on Navigation and settings, refer to your Uconnect Radio Instruction Manual.
NOTE:Depending on the vehicle’s options, feature settings may vary.
5
23_RUP_OM_EN_USC_t.book Page 167