2023 CHRYSLER PACIFICA HYBRID key fob
[x] Cancel search: key fobPage 22 of 328
20GETTING TO KNOW YOUR VEHICLE
DOORS
MANUAL DOOR LOCKS
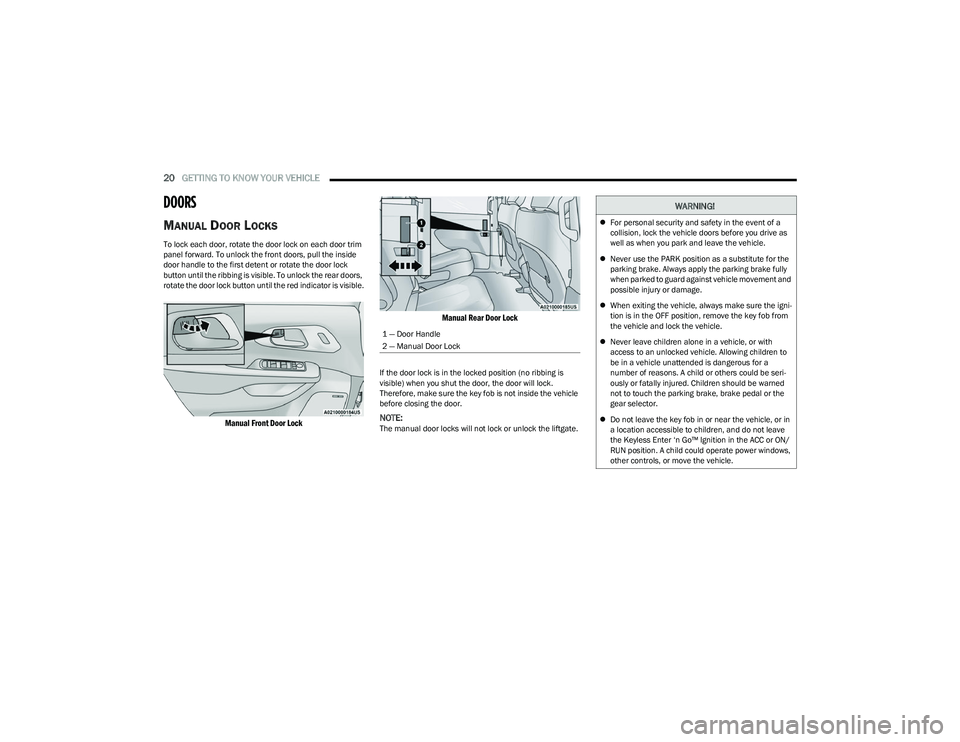
To lock each door, rotate the door lock on each door trim
panel forward. To unlock the front doors, pull the inside
door handle to the first detent or rotate the door lock
button until the ribbing is visible. To unlock the rear doors,
rotate the door lock button until the red indicator is visible.
Manual Front Door Lock Manual Rear Door Lock
If the door lock is in the locked position (no ribbing is
visible) when you shut the door, the door will lock.
Therefore, make sure the key fob is not inside the vehicle
before closing the door.
NOTE:The manual door locks will not lock or unlock the liftgate.
1 — Door Handle
2 — Manual Door Lock
WARNING!
For personal security and safety in the event of a
collision, lock the vehicle doors before you drive as
well as when you park and leave the vehicle.
Never use the PARK position as a substitute for the
parking brake. Always apply the parking brake fully
when parked to guard against vehicle movement and
possible injury or damage.
When exiting the vehicle, always make sure the igni -
tion is in the OFF position, remove the key fob from
the vehicle and lock the vehicle.
Never leave children alone in a vehicle, or with
access to an unlocked vehicle. Allowing children to
be in a vehicle unattended is dangerous for a
number of reasons. A child or others could be seri -
ously or fatally injured. Children should be warned
not to touch the parking brake, brake pedal or the
gear selector.
Do not leave the key fob in or near the vehicle, or in
a location accessible to children, and do not leave
the Keyless Enter ‘n Go™ Ignition in the ACC or ON/
RUN position. A child could operate power windows,
other controls, or move the vehicle.
23_RUP_OM_EN_USC_t.book Page 20
Page 23 of 328

GETTING TO KNOW YOUR VEHICLE21
POWER DOOR LOCKS — IF EQUIPPED
A power door lock switch is on each front door trim panel.
Use this switch to lock or unlock the doors.
Driver Power Door Lock Switches
If you push the power door lock switch while the ignition is
in the ACC or ON/RUN position, and any front door is open,
the power locks will not operate. This prevents you from
accidentally locking your key fob in the vehicle. Placing the
ignition in the OFF position or closing the door will allow
the locks to operate. A chime will sound if the ignition is in
the ACC or ON/RUN position and a door is open, as a
reminder to place the ignition in the OFF position and
remove the key fob.
KEYLESS ENTER ‘N GO™ — PASSIVE
E
NTRY
The Passive Entry system is an enhancement to the
vehicle’s Remote Keyless Entry system. This feature
allows you to lock and unlock the vehicle’s door(s) without
having to push the key fob lock or unlock buttons.
NOTE:
Passive Entry may be programmed on/off through the
Uconnect system Úpage 157.
The key fob may not be detected by the Passive Entry
system if it is located next to a mobile phone, laptop, or
other electronic device; these devices may block the
key fob’s wireless signal and prevent the Passive Entry
handle from locking/unlocking the vehicle.
If set by the customer in the Uconnect Settings,
unlocking with Passive Entry will initiate illuminated
approach (low beams, license plate light, parking
lights) for the time 0, 30, 60 or 90 seconds. Passive
Entry also initiates two flashes of the turn signals.
If wearing gloves, if it has been raining/snowing, or
there is salt/dirt covering the Passive Entry door
handle, the unlock sensitivity can be affected, resulting
in a slower response time.
The doors may unlock when water is sprayed on the
Passive Entry door handles, if the key fob is located
outside of the vehicle within 5 ft (1.5 m) of the handle.
If the vehicle is unlocked by Passive Entry and no door
is opened within 60 seconds, the vehicle will relock and
will arm the Vehicle Security system (if equipped).
The sliding side doors can be unlocked from the
outside using the hands-free or Passive Entry system.
To Unlock From The Driver Or Passenger Side:
With a valid key fob within 5 ft (1.5 m) of the door handle,
grab the handle to unlock the vehicle. Grabbing the
driver’s door handle will unlock the driver’s side doors
(driver/sliding door) automatically. Grabbing the front
passenger door handle will unlock all four doors and the
liftgate automatically. The interior door panel lock knob
will rotate when the door is unlocked.
Grab The Door Handle To Unlock
2
23_RUP_OM_EN_USC_t.book Page 21
Page 24 of 328
22GETTING TO KNOW YOUR VEHICLE
NOTE:
Either the driver door only or all doors will unlock when
you grab hold of the front driver’s door handle,
depending on the selected setting in the Uconnect
system
Úpage 157.
All doors will unlock when the front passenger door
handle is grabbed regardless of the driver’s door
unlock preference setting.
Frequency Operated Button Integrated Key (FOBIK-Safe)
To minimize the possibility of unintentionally locking a key
fob inside your vehicle, the Passive Entry system is
equipped with an automatic door unlock feature.
There are three situations that trigger a FOBIK-Safe search
in any Passive Entry vehicle:
A lock request is made by a valid key fob while a door
is open.
A lock request is made by the Passive Entry door
handle while a door is open.
A lock request is made by the door panel switch while
the door is open.
When any of these situations occur, after all open doors
are shut, the FOBIK-Safe search will be executed. If it
detects a key fob inside the car, and it does not detect any
key fob outside the car, then the car will unlock and alert
the customer.
NOTE:The vehicle will only unlock the doors when a valid Passive
Entry key fob is detected inside the vehicle, and no valid
key fob is detected outside the vehicle. The vehicle will not
unlock the doors when any of the following conditions are
met:
The doors are manually locked using the door lock
knobs.
Three attempts are made to lock the doors using the
door panel switch and then the doors are closed.
There is a valid Passive Entry key fob outside the
vehicle and within 5 ft (1.5 m) of either Passive Entry
door handle.
NOTE:On the third attempt ALL doors will lock and the key fob
can be locked in the vehicle.
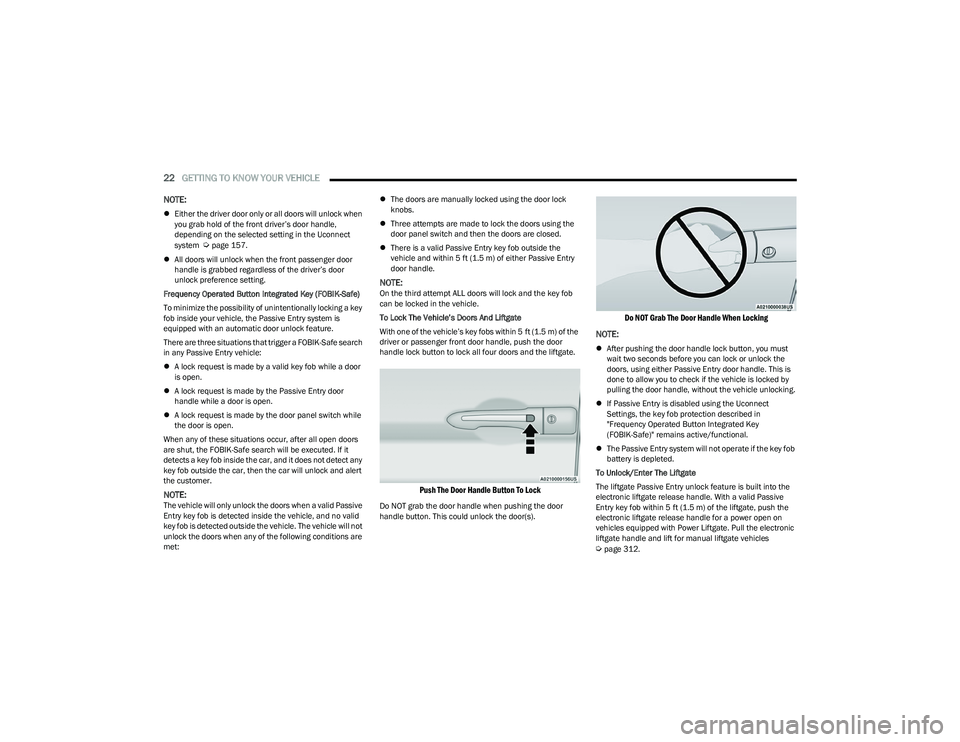
To Lock The Vehicle’s Doors And Liftgate
With one of the vehicle’s key fobs within 5 ft (1.5 m) of the
driver or passenger front door handle, push the door
handle lock button to lock all four doors and the liftgate.
Push The Door Handle Button To Lock
Do NOT grab the door handle when pushing the door
handle button. This could unlock the door(s).
Do NOT Grab The Door Handle When Locking
NOTE:
After pushing the door handle lock button, you must
wait two seconds before you can lock or unlock the
doors, using either Passive Entry door handle. This is
done to allow you to check if the vehicle is locked by
pulling the door handle, without the vehicle unlocking.
If Passive Entry is disabled using the Uconnect
Settings, the key fob protection described in
"Frequency Operated Button Integrated Key
(FOBIK-Safe)" remains active/functional.
The Passive Entry system will not operate if the key fob
battery is depleted.
To Unlock/Enter The Liftgate
The liftgate Passive Entry unlock feature is built into the
electronic liftgate release handle. With a valid Passive
Entry key fob within 5 ft (1.5 m) of the liftgate, push the
electronic liftgate release handle for a power open on
vehicles equipped with Power Liftgate. Pull the electronic
liftgate handle and lift for manual liftgate vehicles
Úpage 312.
23_RUP_OM_EN_USC_t.book Page 22
Page 26 of 328
24GETTING TO KNOW YOUR VEHICLE
POWER SLIDING SIDE DOOR —
I
F EQUIPPED
The power sliding door may be power opened or closed in
several ways:
Key fob
Inside or outside handles
Buttons located:
In the overhead console
Just inside the sliding door
On the outside handle
Push the button on the key fob twice within five
seconds to open, close, or reverse a power
sliding door.
The key fob and the overhead console button will operate
the door when the door is locked. All other ways require
the sliding door to be unlocked. If the vehicle is equipped
with Passive Entry, pushing the button on the outside
handle or Hands-Free feature (if equipped) will unlock and
open the sliding door, with a valid Passive Entry key fob
within 5 ft (1.5 m) of the door handle.
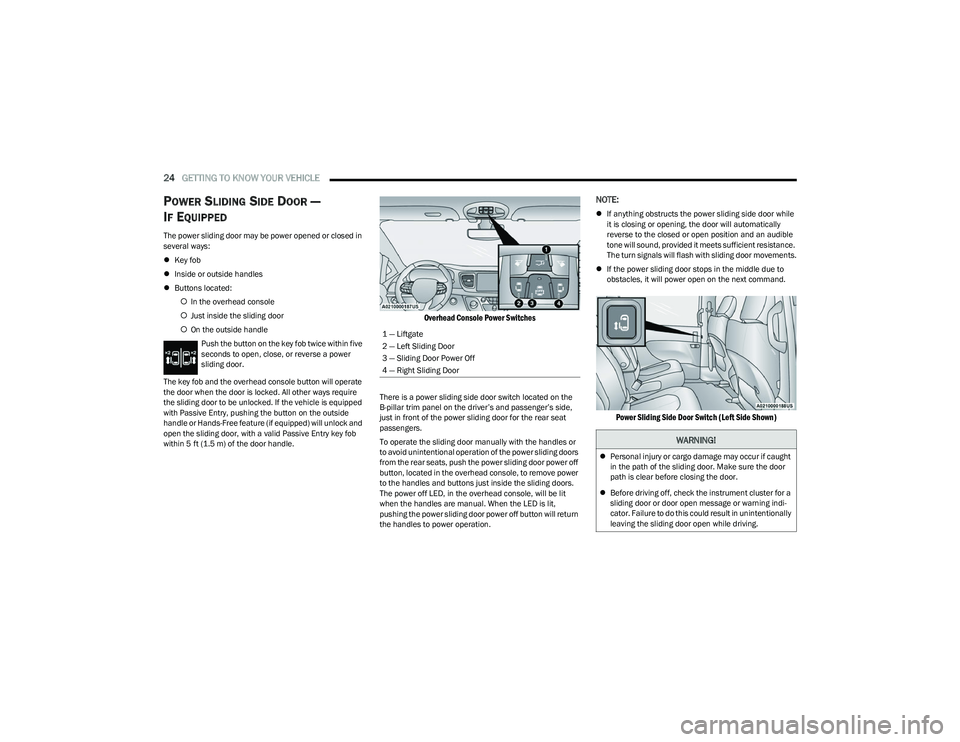
Overhead Console Power Switches
There is a power sliding side door switch located on the
B-pillar trim panel on the driver’s and passenger’s side,
just in front of the power sliding door for the rear seat
passengers.
To operate the sliding door manually with the handles or
to avoid unintentional operation of the power sliding doors
from the rear seats, push the power sliding door power off
button, located in the overhead console, to remove power
to the handles and buttons just inside the sliding doors.
The power off LED, in the overhead console, will be lit
when the handles are manual. When the LED is lit,
pushing the power sliding door power off button will return
the handles to power operation.
NOTE:
If anything obstructs the power sliding side door while
it is closing or opening, the door will automatically
reverse to the closed or open position and an audible
tone will sound, provided it meets sufficient resistance.
The turn signals will flash with sliding door movements.
If the power sliding door stops in the middle due to
obstacles, it will power open on the next command.
Power Sliding Side Door Switch (Left Side Shown)
1 — Liftgate
2 — Left Sliding Door
3 — Sliding Door Power Off
4 — Right Sliding Door
WARNING!
Personal injury or cargo damage may occur if caught
in the path of the sliding door. Make sure the door
path is clear before closing the door.
Before driving off, check the instrument cluster for a
sliding door or door open message or warning indi -
cator. Failure to do this could result in unintentionally
leaving the sliding door open while driving.
23_RUP_OM_EN_USC_t.book Page 24
Page 27 of 328
GETTING TO KNOW YOUR VEHICLE25
HANDS-FREE SLIDING DOORS —
I
F EQUIPPED
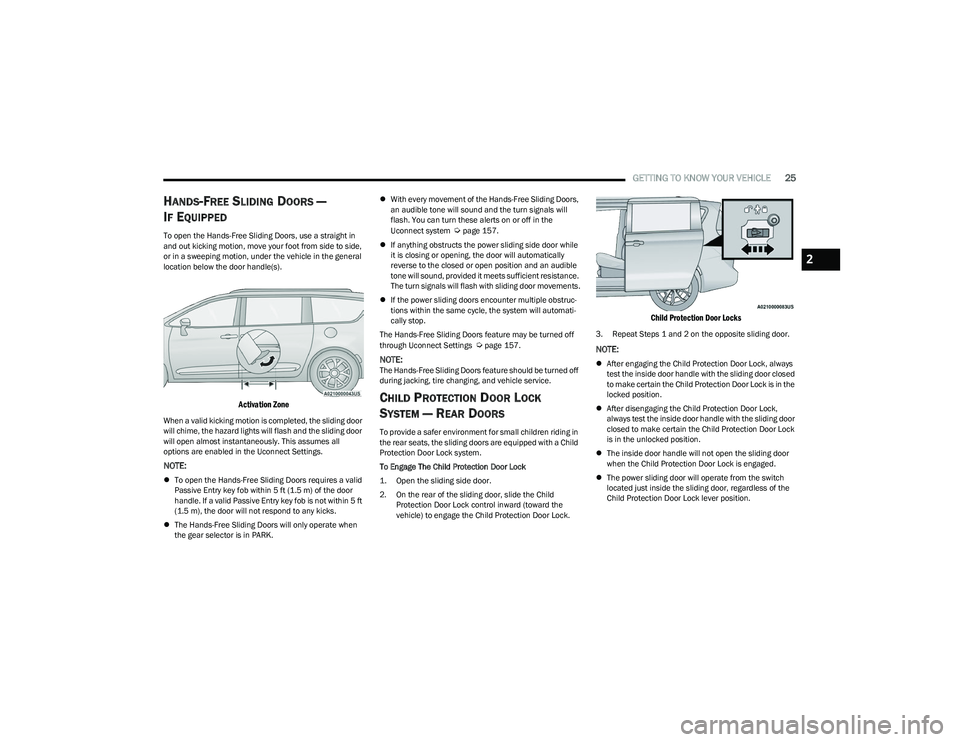
To open the Hands-Free Sliding Doors, use a straight in
and out kicking motion, move your foot from side to side,
or in a sweeping motion, under the vehicle in the general
location below the door handle(s).
Activation Zone
When a valid kicking motion is completed, the sliding door
will chime, the hazard lights will flash and the sliding door
will open almost instantaneously. This assumes all
options are enabled in the Uconnect Settings.
NOTE:
To open the Hands-Free Sliding Doors requires a valid
Passive Entry key fob within 5 ft (1.5 m) of the door
handle. If a valid Passive Entry key fob is not within 5 ft
(1.5 m), the door will not respond to any kicks.
The Hands-Free Sliding Doors will only operate when
the gear selector is in PARK.
With every movement of the Hands-Free Sliding Doors,
an audible tone will sound and the turn signals will
flash. You can turn these alerts on or off in the
Uconnect system
Úpage 157.
If anything obstructs the power sliding side door while
it is closing or opening, the door will automatically
reverse to the closed or open position and an audible
tone will sound, provided it meets sufficient resistance.
The turn signals will flash with sliding door movements.
If the power sliding doors encounter multiple obstruc -
tions within the same cycle, the system will automati -
cally stop.
The Hands-Free Sliding Doors feature may be turned off
through Uconnect Settings
Úpage 157.
NOTE:The Hands-Free Sliding Doors feature should be turned off
during jacking, tire changing, and vehicle service.
CHILD PROTECTION DOOR LOCK
S
YSTEM — REAR DOORS
To provide a safer environment for small children riding in
the rear seats, the sliding doors are equipped with a Child
Protection Door Lock system.
To Engage The Child Protection Door Lock
1. Open the sliding side door.
2. On the rear of the sliding door, slide the Child
Protection Door Lock control inward (toward the
vehicle) to engage the Child Protection Door Lock.
Child Protection Door Locks
3. Repeat Steps 1 and 2 on the opposite sliding door.
NOTE:
After engaging the Child Protection Door Lock, always
test the inside door handle with the sliding door closed
to make certain the Child Protection Door Lock is in the
locked position.
After disengaging the Child Protection Door Lock,
always test the inside door handle with the sliding door
closed to make certain the Child Protection Door Lock
is in the unlocked position.
The inside door handle will not open the sliding door
when the Child Protection Door Lock is engaged.
The power sliding door will operate from the switch
located just inside the sliding door, regardless of the
Child Protection Door Lock lever position.
2
23_RUP_OM_EN_USC_t.book Page 25
Page 29 of 328

GETTING TO KNOW YOUR VEHICLE27
NOTE:The engine must be running for the heated steering wheel
to operate.
For information on use with the Remote Start system, see
Úpage 18.
DRIVER MEMORY SETTINGS — IF EQUIPPED
This feature allows the driver to save up to two different
memory profiles for easy recall through a memory switch.
Each memory profile saves desired position settings for
the following features:
Driver’s seat
Easy Entry/Exit seat operation (if equipped)
Power steering wheel position (if equipped)
Side mirrors (if equipped)
A set of desired radio station presets
NOTE:
Your vehicle is equipped with two key fobs, each can be
linked to either memory position 1 or 2.
Memory settings will be linked to the driver profiles in
the Uconnect system, in addition to several other
features (radio presets, home screens, settings, navi -
gation, phone, etc.)
Úpage 157.
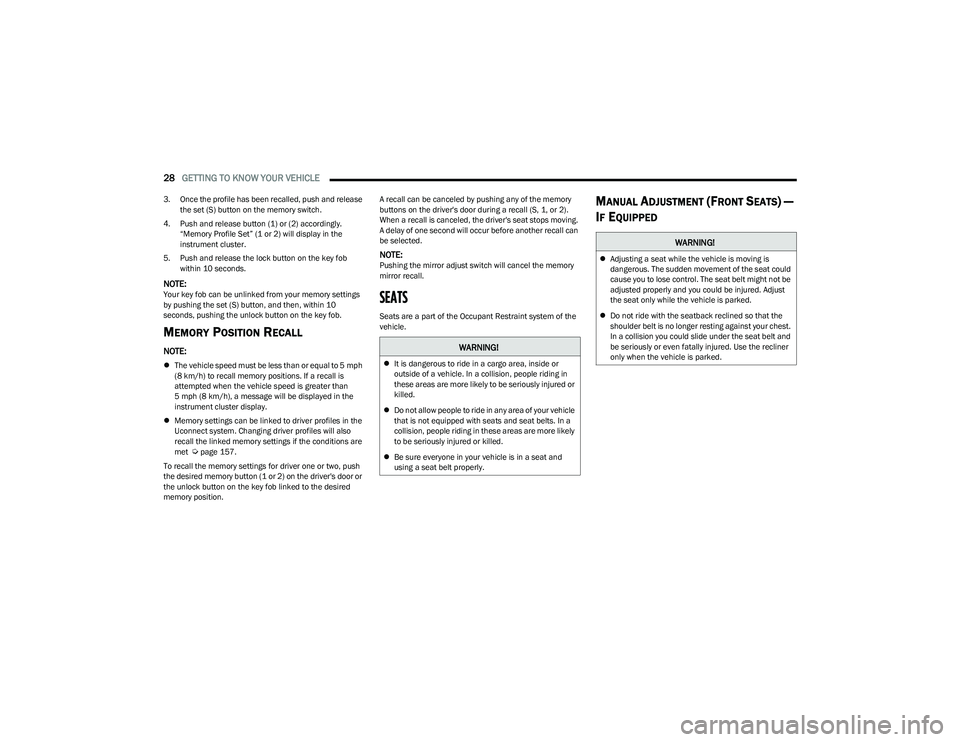
The Driver Memory Settings switch is located on the driver
door, next to the door handle, and consists of three
buttons:
The set (S) button, which is used to activate the
memory save function.
The (1) and (2) buttons which are used to recall either
of two saved memory profiles.
Driver Memory Switch
PROGRAMMING THE MEMORY FEATURE
To create a new memory profile, perform the following:
NOTE:Saving a new memory profile will erase the selected profile
from memory.
1. Place the vehicle’s ignition in the ON/RUN position
(do not start the engine).
2. Adjust all memory profile settings to desired preferences (i.e., driver’s seat, outside mirrors and
radio station presets).
3. Push the set (S) button on the memory switch, and then push the desired memory button (1 or 2) within
five seconds. The instrument cluster display will show
which memory position has been set.
NOTE:Memory profiles can be set without the vehicle in PARK.
LINKING AND UNLINKING THE KEY FOB
T
O MEMORY
Your key fob can be programmed to recall one of two
saved memory profiles.
NOTE:Before programming your key fob you must select the
“Personal Settings Linked to Key Fob” feature through the
Uconnect Settings
Úpage 157.
To program your key fob, perform the following:
1. Place the vehicle’s ignition in the OFF position.
2. Select a desired memory profile 1 or 2.
WARNING!
Persons who are unable to feel pain to the skin
because of advanced age, chronic illness, diabetes,
spinal cord injury, medication, alcohol use, exhaus -
tion, or other physical conditions must exercise care
when using the steering wheel heater. It may cause
burns even at low temperatures, especially if used
for long periods.
Do not place anything on the steering wheel that
insulates against heat, such as a blanket or steering
wheel covers of any type and material. This may
cause the steering wheel heater to overheat.
1 — Memory Profile Button 1
2 — Memory Profile Button 2
3 — Set Button
2
23_RUP_OM_EN_USC_t.book Page 27
Page 30 of 328
28GETTING TO KNOW YOUR VEHICLE
3. Once the profile has been recalled, push and release
the set (S) button on the memory switch.
4. Push and release button (1) or (2) accordingly. “Memory Profile Set” (1 or 2) will display in the
instrument cluster.
5. Push and release the lock button on the key fob within 10 seconds.
NOTE:Your key fob can be unlinked from your memory settings
by pushing the set (S) button, and then, within 10
seconds, pushing the unlock button on the key fob.
MEMORY POSITION RECALL
NOTE:
The vehicle speed must be less than or equal to 5 mph
(8 km/h) to recall memory positions. If a recall is
attempted when the vehicle speed is greater than
5 mph (8 km/h), a message will be displayed in the
instrument cluster display.
Memory settings can be linked to driver profiles in the
Uconnect system. Changing driver profiles will also
recall the linked memory settings if the conditions are
met
Úpage 157.
To recall the memory settings for driver one or two, push
the desired memory button (1 or 2) on the driver's door or
the unlock button on the key fob linked to the desired
memory position. A recall can be canceled by pushing any of the memory
buttons on the driver's door during a recall (S, 1, or 2).
When a recall is canceled, the driver's seat stops moving.
A delay of one second will occur before another recall can
be selected.
NOTE:Pushing the mirror adjust switch will cancel the memory
mirror recall.
SEATS
Seats are a part of the Occupant Restraint system of the
vehicle.
MANUAL ADJUSTMENT (FRONT SEATS) —
I
F EQUIPPED
WARNING!
It is dangerous to ride in a cargo area, inside or
outside of a vehicle. In a collision, people riding in
these areas are more likely to be seriously injured or
killed.
Do not allow people to ride in any area of your vehicle
that is not equipped with seats and seat belts. In a
collision, people riding in these areas are more likely
to be seriously injured or killed.
Be sure everyone in your vehicle is in a seat and
using a seat belt properly.
WARNING!
Adjusting a seat while the vehicle is moving is
dangerous. The sudden movement of the seat could
cause you to lose control. The seat belt might not be
adjusted properly and you could be injured. Adjust
the seat only while the vehicle is parked.
Do not ride with the seatback reclined so that the
shoulder belt is no longer resting against your chest.
In a collision you could slide under the seat belt and
be seriously or even fatally injured. Use the recliner
only when the vehicle is parked.
23_RUP_OM_EN_USC_t.book Page 28
Page 52 of 328
50GETTING TO KNOW YOUR VEHICLE
POWER FOLDING OUTSIDE MIRRORS —
I
F EQUIPPED
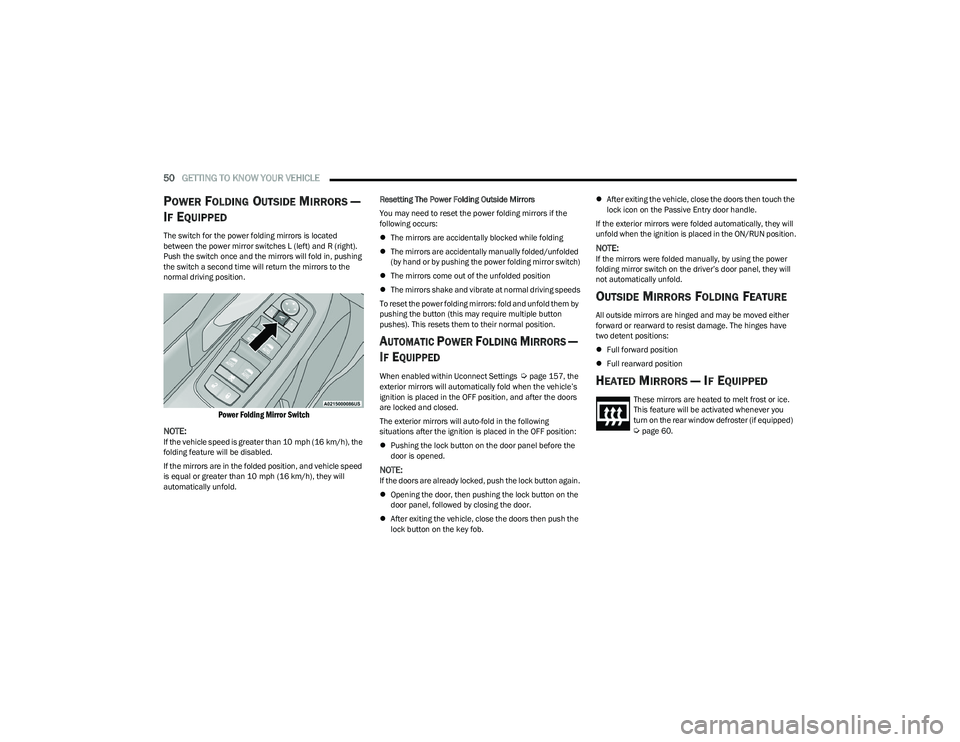
The switch for the power folding mirrors is located
between the power mirror switches L (left) and R (right).
Push the switch once and the mirrors will fold in, pushing
the switch a second time will return the mirrors to the
normal driving position.
Power Folding Mirror Switch
NOTE:
If the vehicle speed is greater than 10 mph (16 km/h), the
folding feature will be disabled.
If the mirrors are in the folded position, and vehicle speed
is equal or greater than 10 mph (16 km/h), they will
automatically unfold. Resetting The Power Folding Outside Mirrors
You may need to reset the power folding mirrors if the
following occurs:
The mirrors are accidentally blocked while folding
The mirrors are accidentally manually folded/unfolded
(by hand or by pushing the power folding mirror switch)
The mirrors come out of the unfolded position
The mirrors shake and vibrate at normal driving speeds
To reset the power folding mirrors: fold and unfold them by
pushing the button (this may require multiple button
pushes). This resets them to their normal position.
AUTOMATIC POWER FOLDING MIRRORS —
I
F EQUIPPED
When enabled within Uconnect Settings Úpage 157, the
exterior mirrors will automatically fold when the vehicle’s
ignition is placed in the OFF position, and after the doors
are locked and closed.
The exterior mirrors will auto-fold in the following
situations after the ignition is placed in the OFF position:
Pushing the lock button on the door panel before the
door is opened.
NOTE:If the doors are already locked, push the lock button again.
Opening the door, then pushing the lock button on the
door panel, followed by closing the door.
After exiting the vehicle, close the doors then push the
lock button on the key fob.
After exiting the vehicle, close the doors then touch the
lock icon on the Passive Entry door handle.
If the exterior mirrors were folded automatically, they will
unfold when the ignition is placed in the ON/RUN position.
NOTE:If the mirrors were folded manually, by using the power
folding mirror switch on the driver’s door panel, they will
not automatically unfold.
OUTSIDE MIRRORS FOLDING FEATURE
All outside mirrors are hinged and may be moved either
forward or rearward to resist damage. The hinges have
two detent positions:
Full forward position
Full rearward position
HEATED MIRRORS — IF EQUIPPED
These mirrors are heated to melt frost or ice.
This feature will be activated whenever you
turn on the rear window defroster (if equipped)
Úpage 60.
23_RUP_OM_EN_USC_t.book Page 50