2023 CHRYSLER PACIFICA HYBRID key battery
[x] Cancel search: key batteryPage 24 of 328

22GETTING TO KNOW YOUR VEHICLE
NOTE:
Either the driver door only or all doors will unlock when
you grab hold of the front driver’s door handle,
depending on the selected setting in the Uconnect
system
Úpage 157.
All doors will unlock when the front passenger door
handle is grabbed regardless of the driver’s door
unlock preference setting.
Frequency Operated Button Integrated Key (FOBIK-Safe)
To minimize the possibility of unintentionally locking a key
fob inside your vehicle, the Passive Entry system is
equipped with an automatic door unlock feature.
There are three situations that trigger a FOBIK-Safe search
in any Passive Entry vehicle:
A lock request is made by a valid key fob while a door
is open.
A lock request is made by the Passive Entry door
handle while a door is open.
A lock request is made by the door panel switch while
the door is open.
When any of these situations occur, after all open doors
are shut, the FOBIK-Safe search will be executed. If it
detects a key fob inside the car, and it does not detect any
key fob outside the car, then the car will unlock and alert
the customer.
NOTE:The vehicle will only unlock the doors when a valid Passive
Entry key fob is detected inside the vehicle, and no valid
key fob is detected outside the vehicle. The vehicle will not
unlock the doors when any of the following conditions are
met:
The doors are manually locked using the door lock
knobs.
Three attempts are made to lock the doors using the
door panel switch and then the doors are closed.
There is a valid Passive Entry key fob outside the
vehicle and within 5 ft (1.5 m) of either Passive Entry
door handle.
NOTE:On the third attempt ALL doors will lock and the key fob
can be locked in the vehicle.
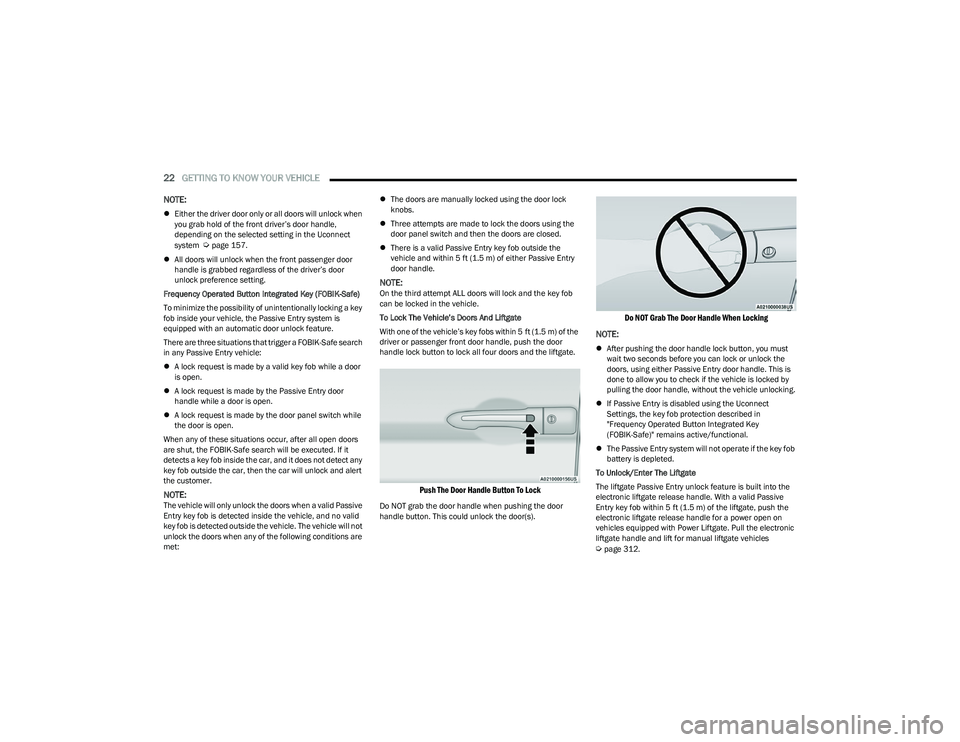
To Lock The Vehicle’s Doors And Liftgate
With one of the vehicle’s key fobs within 5 ft (1.5 m) of the
driver or passenger front door handle, push the door
handle lock button to lock all four doors and the liftgate.
Push The Door Handle Button To Lock
Do NOT grab the door handle when pushing the door
handle button. This could unlock the door(s).
Do NOT Grab The Door Handle When Locking
NOTE:
After pushing the door handle lock button, you must
wait two seconds before you can lock or unlock the
doors, using either Passive Entry door handle. This is
done to allow you to check if the vehicle is locked by
pulling the door handle, without the vehicle unlocking.
If Passive Entry is disabled using the Uconnect
Settings, the key fob protection described in
"Frequency Operated Button Integrated Key
(FOBIK-Safe)" remains active/functional.
The Passive Entry system will not operate if the key fob
battery is depleted.
To Unlock/Enter The Liftgate
The liftgate Passive Entry unlock feature is built into the
electronic liftgate release handle. With a valid Passive
Entry key fob within 5 ft (1.5 m) of the liftgate, push the
electronic liftgate release handle for a power open on
vehicles equipped with Power Liftgate. Pull the electronic
liftgate handle and lift for manual liftgate vehicles
Úpage 312.
23_RUP_OM_EN_USC_t.book Page 22
Page 60 of 328

58GETTING TO KNOW YOUR VEHICLE
INTERIOR LIGHTS
INTERIOR COURTESY LIGHTS
The courtesy light switches are used to turn the courtesy
lights on/off.
Courtesy Light Switches
To operate the courtesy lights, push either the driver or
passenger light switch.
NOTE:
Before exiting the vehicle, make sure that the interior
lights are turned off. This will prevent the battery from
discharging once the doors are closed.
If a light is left on, it will automatically be turned off
approximately 10 minutes after the ignition is placed in
the OFF position.
Rear Courtesy/Reading Lights —
If Equipped
Located above the rear passengers are courtesy/reading
lights. The lights turn on when a front door, a sliding door
or the liftgate is opened. If your vehicle is equipped with
Remote Keyless Entry (RKE) the lights will also turn on
when the unlock button on the key fob is pushed.
The courtesy lights also function as reading lights. Push
the lens to turn these lights on while inside the vehicle.
Push the lens a second time to turn each light off.
Dimmer Controls
The dimmer controls are part of the headlight switch, and
are located on the driver’s side of the instrument panel.
With the parking lights or headlights on, rotating the right
dimmer control upward will increase the brightness of the
instrument cluster lights. Rotating the left dimmer control
will adjust the interior light levels of the ambient lighting
on the instrument panel and doors.
Dimmer Controls
Dimmer Controls (Vehicles Sold In Canada Only)
1 — Ambient Light Dimmer Control
2 — Instrument Panel Dimmer Control
1 — Ambient Light Dimmer Control
2 — Instrument Panel Dimmer Control
23_RUP_OM_EN_USC_t.book Page 58
Page 77 of 328

GETTING TO KNOW YOUR VEHICLE75
Charge Only USB In The Center Console
NOTE:
The USB outlet in the bottom of the instrument panel can
be switched from ignition only to constant battery powered
all the time. See an authorized dealer for details.
Rear Seat USB Charging Port Without Uconnect Theater Rear Seat USB Media Hub With Uconnect Theater
3rd Row USB Charging Port
NOTE:
The USB “Charge Only” ports will recharge battery
operated USB devices when connected.
Different scenarios are listed below when a non-phone
device is plugged into the smaller and larger USB ports,
and when a phone device is plugged into the smaller and
larger USB ports:
“A new device is now connected. Previous connection
was lost.”
“(Phone Name) now connected. Previous connection
was lost.”
“Another device is in use through the same USB port.
Please disconnect the first device to use the second
device.”
Plugging in a phone or another USB device may cause the
connection to a previous device to be lost.
NOTE:Charge unsupported devices with the Charge Only USB
ports. If an unsupported device is plugged into a Media
USB port, a message will display on the touchscreen that
the device is not supported by the system.
POWER OUTLETS
Your vehicle is equipped with 12 Volt (15 Amp) power
outlets that can be used to power cellular phones, small
electronics and other low powered electrical accessories.
The power outlets can be labeled with either a “key” or a
“battery” symbol to indicate how the outlet is powered.
Power outlets labeled with a key symbol are powered
when the ignition is in the ACC or ON/RUN position, while
the outlets labeled with a battery symbol are connected
directly to the battery and powered at all times.
1 — Headphone Jack (Headphone Output Only)
2 — HDMI Port
3 — USB Port (Charge Only)
2
23_RUP_OM_EN_USC_t.book Page 75
Page 89 of 328

GETTING TO KNOW YOUR VEHICLE87
(Continued)
The vacuum will operate in two modes:
Ignition in the ACC position: Engine remains off, and
vacuum usage is limited to 10 minutes.
Ignition in the START position: Engine is running, and
vacuum usage is unlimited until the vehicle’s battery
level falls below 60%.
NOTE:The vacuum will not operate when the ignition is in the OFF
position, or in the ON/RUN position with the engine off. For
more information on ignition positions, see
Úpage 15.
1. Before Using Vacuum:
Accessory (ACC) Mode Operation - For up to
10 minutes of operation
Always apply the parking brake, shift the transmission
into PARK, and push ignition button to place ignition in
Accessory (ACC) mode. The engine will not be running
in this mode. Do not leave the key fob in or near the ve -
hicle, or in a location accessible to children.
NOTE:The vacuum system will run for 10 minutes off battery
power and then the vacuum will shut down. A low battery
indication light (LOW PWR) located below the vacuum
nozzle storage location will come on one minute before
the vacuum shuts down.
Engine Running (START) Operation - For more than
10 minutes of operation
Position vehicle outdoors and fully open all side
windows.
Always apply the parking brake, shift the transmis -
sion into PARK, and leave engine running. 2. Unclip the vacuum nozzle and pull to extend vacuum
hose from the storage location.NOTE:The hose can reach every corner of the vehicle floor.
3. Install desired attachment if needed.
Front Storage Compartments
Do not vacuum toxic material such as chlorine
bleach, ammonia, drain cleaner, etc.
Do not vacuum hard or sharp objects such as glass,
nails, screws, coins, etc.
Keep hair, loose clothing, fingers, and all parts of
body away from openings and moving parts.
Only use with filter in place. Periodically check that
the filter is in place and in good condition.
WARNING!
This equipment incorporates parts such as switches,
motors, or the like that tend to produce arcs or sparks
that can cause an explosion. When using your vacuum
near gasoline-dispensing equipment or service
stations, park vehicle at least 20 ft (6 m) away from the
exterior enclosure of any dispensing pump. The vacuum
is mounted more than 18 inches (45 cm) above ground
level in your vehicle.
WARNING!
WARNING!
Carbon monoxide (CO) in exhaust gases can cause
serious injury or death. Follow these precautions to
prevent carbon monoxide poisoning:
Do not inhale exhaust gases.
Do not start or run an engine in a closed garage or
confined area. Always position vehicle outdoors and
fully open all side windows before using vacuum
system with the engine running.
Guard against carbon monoxide with proper mainte -
nance. Have the exhaust system inspected every
time the vehicle is raised. Have any abnormal condi -
tions repaired promptly.
1 — Vacuum Nozzle Storage Location
2 — Attachment Compartment
WARNING!
2
23_RUP_OM_EN_USC_t.book Page 87
Page 123 of 328

STARTING AND OPERATING121
ACTIVE NOISE CANCELLATION
Your vehicle is equipped with an Active Noise Cancellation
system. This system is designed to address exhaust and
engine noise. The system relies on four microphones
embedded in the headliner, which monitor exhaust and
engine noise, and assists an onboard frequency
generator, which creates counteracting sound waves in
the audio system’s speakers. This helps keep the vehicle
quiet at idle and during drive.
POWER STEERING
The electric power steering system will provide increased
vehicle response and ease of maneuverability. The power
steering system adapts to different driving conditions. If the Steering icon is displayed and the “Power Steering
System Over Temp” message is displayed on the
instrument cluster screen, this indicates an over
temperature condition in the power steering system. Once
driving conditions are safe, pull over and let the vehicle
idle for a few moments until the icon and message turn off
Úpage 102.
If the “Service Power Steering" or "Power
Steering Assist Off - Service System” message
and a steering wheel icon are displayed on the
instrument cluster screen, it indicates that the
vehicle needs to be taken to an authorized dealer for
service. It is likely the vehicle has lost power steering
assistance
Úpage 102.
NOTE:
Even if the power steering assistance is no longer oper -
ational, it is still possible to steer the vehicle. Under
these conditions there will be a substantial increase in
steering effort, especially at low speeds and during
parking maneuvers.
The power steering system is fully electric; it requires
no power steering fluid.
If the condition persists, see an authorized dealer for
service.
STOP/START SYSTEM — IF EQUIPPED
The Stop/Start function is designed to reduce fuel
consumption. The system will stop the engine
automatically during a vehicle stop if the required
conditions are met. Releasing the brake pedal, pressing
the accelerator pedal or shifting out of DRIVE (D) will
automatically re-start the engine.
This vehicle has been upgraded with a heavy-duty starter,
enhanced battery, and other upgraded engine parts to
handle the additional engine starts.
AUTOSTOP MODE
The Stop/Start feature is enabled after every driver key
start. At that time, the system will go into STOP/START
READY and if all other conditions are met, can go into a
STOP/START AUTOSTOP ACTIVE.
To Activate Auto STOP/START, The Following Must Occur:
The system must be in STOP/START READY state. A
STOP/START READY message will be displayed in the
instrument cluster within the Stop/Start section
Úpage 102.
The vehicle must be completely stopped.
The gear selector must be in a forward gear and the
brake pedal pressed.
The engine will shut down, the tachometer will move to the
zero position and the Stop/Start telltale will illuminate
indicating you are in Autostop. Customer settings will be
maintained throughout the Auto Stop/Start process.
CAUTION!
All wheels must have the same size and type tires.
Unequal tire sizes must not be used. Unequal tire size
may cause premature wear of the driveline
components.
WARNING!
Continued operation with reduced assist could pose a
safety risk to yourself and others. Service should be
obtained as soon as possible.
4
23_RUP_OM_EN_USC_t.book Page 121
Page 220 of 328

218SAFETY
(Continued)
Enhanced Accident Response System
In the event of an impact, if the communication network
remains intact, and the power remains intact, depending
on the nature of the event, the Occupant Restraint
Controller (ORC) will determine whether to have the
Enhanced Accident Response System perform the
following functions:
Cut off fuel to the engine (if equipped).
Cut off battery power to the electric motor (if equipped).
Flash hazard lights as long as the battery has power.
Turn on the interior lights, which remain on as long as
the battery has power or for 15 minutes from the inter -
vention of the Enhanced Accident Response System.
Unlock the power door locks.
Your vehicle may also be designed to perform any of these
other functions in response to the Enhanced Accident
Response System:
Turn off the Fuel Filter Heater, Turn off the HVAC Blower
Motor, Close the HVAC Circulation Door
Cut off battery power to the:
Engine
Electric Motor (if equipped)
Electric power steering
Brake booster
Electric park brake
Automatic transmission gear selector
Horn
Front wiper
Headlight washer pump (if equipped)
NOTE:After an accident, remember to cycle the ignition to the
STOP (OFF/LOCK) position and remove the key from the
ignition switch to avoid draining the battery. Carefully
check the vehicle for fuel leaks in the engine compartment
and on the ground near the engine compartment and fuel
tank before resetting the system and starting the engine.
If there are no fuel leaks or damage to the vehicle elec -
trical devices (e.g. headlights) after an accident, reset the
system by following the procedure described below. If you
have any doubt, contact an authorized dealer.
Enhanced Accident Response System
Reset Procedure
If applicable, refer to the “Hybrid Supplement” for
additional information.
In order to reset the Enhanced Accident Response System
functions after an event, the ignition switch must be
changed from ignition START or ON/RUN to ignition OFF.
Carefully check the vehicle for fuel leaks in the engine
compartment and on the ground near the engine
compartment and fuel tank before resetting the system
and starting the engine.
After an accident, if the vehicle will not start after
performing the reset procedure, the vehicle must be
towed to an authorized dealer to be inspected and to have
the Enhanced Accident Response System reset.
Maintaining Your Air Bag System
WARNING!
Modifications to any part of the air bag system could
cause it to fail when you need it. You could be injured
if the air bag system is not there to protect you. Do
not modify the components or wiring, including
adding any kind of badges or stickers to the steering
wheel hub trim cover or the upper passenger side of
the instrument panel. Do not modify the front fascia/
bumper, vehicle body structure, or add aftermarket
side steps or running boards.
23_RUP_OM_EN_USC_t.book Page 218
Page 259 of 328

IN CASE OF EMERGENCY257
(Continued)
FCA US LLC recommends towing your vehicle with all four
wheels
OFF the ground using a flatbed.
If flatbed equipment is not available, this vehicle must be
towed with the front wheels OFF the ground (using a
towing dolly, or wheel lift equipment with the front wheels
raised).
NOTE:Ensure that the Electric Park Brake is released, and
remains released, while being towed.
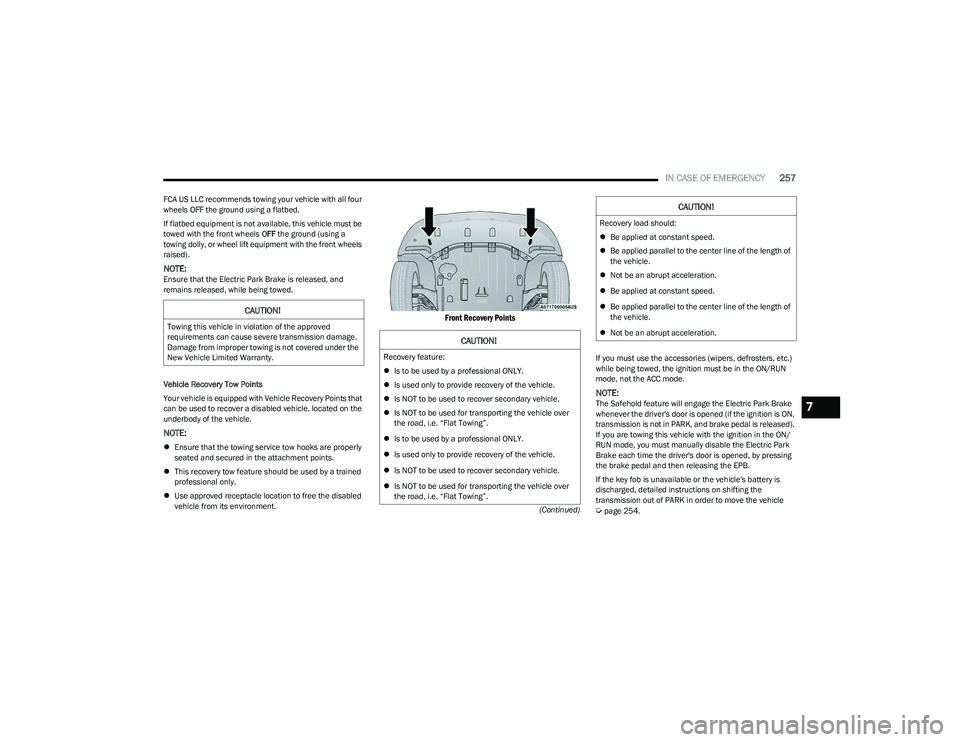
Vehicle Recovery Tow Points
Your vehicle is equipped with Vehicle Recovery Points that
can be used to recover a disabled vehicle, located on the
underbody of the vehicle.
NOTE:
Ensure that the towing service tow hooks are properly
seated and secured in the attachment points.
This recovery tow feature should be used by a trained
professional only.
Use approved receptacle location to free the disabled
vehicle from its environment.
Front Recovery Points
If you must use the accessories (wipers, defrosters, etc.)
while being towed, the ignition must be in the ON/RUN
mode, not the ACC mode.
NOTE:The Safehold feature will engage the Electric Park Brake
whenever the driver's door is opened (if the ignition is ON,
transmission is not in PARK, and brake pedal is released).
If you are towing this vehicle with the ignition in the ON/
RUN mode, you must manually disable the Electric Park
Brake each time the driver's door is opened, by pressing
the brake pedal and then releasing the EPB.
If the key fob is unavailable or the vehicle's battery is
discharged, detailed instructions on shifting the
transmission out of PARK in order to move the vehicle
Úpage 254.
CAUTION!
Towing this vehicle in violation of the approved
requirements can cause severe transmission damage.
Damage from improper towing is not covered under the
New Vehicle Limited Warranty.
CAUTION!
Recovery feature:
Is to be used by a professional ONLY.
Is used only to provide recovery of the vehicle.
Is NOT to be used to recover secondary vehicle.
Is NOT to be used for transporting the vehicle over
the road, i.e. “Flat Towing”.
Is to be used by a professional ONLY.
Is used only to provide recovery of the vehicle.
Is NOT to be used to recover secondary vehicle.
Is NOT to be used for transporting the vehicle over
the road, i.e. “Flat Towing”.
Recovery load should:
Be applied at constant speed.
Be applied parallel to the center line of the length of
the vehicle.
Not be an abrupt acceleration.
Be applied at constant speed.
Be applied parallel to the center line of the length of
the vehicle.
Not be an abrupt acceleration.
CAUTION!
7
23_RUP_OM_EN_USC_t.book Page 257
Page 311 of 328

CUSTOMER ASSISTANCE309
What to Do
If your vehicle requires jump start assistance, out of gas/
fuel delivery, tire service, lockout service or towing as a
result of a mechanical breakdown, dial toll-free: USA:
1-800-521-2779/Canada: 1-800-363-4869. Provide your
name, Vehicle Identification Number (VIN) required for
covered services, license plate number, and your location,
including the telephone number from which you are
calling. Briefly describe the nature of the problem and
answer a few simple questions. You will be given the name
of the service provider and an estimated time of arrival. If
you feel you are in an unsafe situation, please let us know.
With your consent, we will contact local police or safety
authorities.
If Unable to Contact Roadside Assistance
If you are unable to contact Roadside Assistance or
unable to provide a valid Vehicle Identification Number
(VIN), and you obtain towing services on your own, you
may submit your original receipts from the licensed
towing or service facility, for services rendered within 30
days of the occurrence. Be sure to include your VIN,
odometer mileage at the time of service, and current
mailing address. We will process the claim based on
vehicle and service eligibility. If eligible, we will reimburse
you for the reasonable amount actually paid, based on
the usual and customary charges for that service in the
area where they were provided. FCA US LLC’s
determination relating to reimbursement is final.
Correspondence should be mailed to:
FCA US LLC Customer Assistance
P.O. Box 9145
Medford, MA 02155
Attention Claims Department
FCA US LLC reserves the right to modify the terms or
discontinue the Roadside Assistance Program at any time.
The Roadside Assistance program is subject to restrictions
and conditions of use, which are determined solely by FCA
US LLC.
Flat Tire Service
If you are inconvenienced by a flat tire, we will dispatch a
service provider to use your vehicle’s temporary spare tire
(if equipped) as recommended in your Owner’s Manual.
This is not a permanent flat tire repair.
Out of Gas/Fuel Delivery
Drivers cannot always count on a gas station being
nearby, especially when traveling away from home. We will
dispatch a service provider to deliver a small amount of
fuel (maximum two gallons) to get you to a nearby station.
This service is limited to two occurrences in a 12-month
period.
Battery Jump Assistance
No time is a good time for a depleted battery. With
Roadside Assistance, you do not have to worry about
being stranded. We will dispatch a service provider to
provide you with a battery jump anytime, day or night.
Lockout Service
Whether the keys are locked in your vehicle or frozen locks
are keeping you from getting on your way, help is just a
phone call away. This service is limited to providing access
to the vehicle’s seating area. It does not cover the cost of
replacement keys.
Towing Service
Our towing service gives you peace of mind and
confidence. If your vehicle becomes disabled as a result of
a mechanical breakdown, Roadside Assistance will
dispatch a towing service to transport your vehicle to the
closest authorized Chrysler, Dodge, Jeep®, or Ram dealer.
If you choose to go to another dealer, you will be
responsible for the cost if the extra distance exceeds
10 miles.
FCA U S LLC CUSTOMER CENTER
P.O. Box 21–8004
Auburn Hills, MI 48321–8004
Phone: (800) 247-9753
FCA CANADA INC. CUSTOMER CENTER
P.O. Box 1621
Windsor, Ontario N9A 4H6
Phone: (800) 465-2001 English / (800) 387-9983 French
10
23_RUP_OM_EN_USC_t.book Page 309