2023 CHRYSLER PACIFICA HYBRID fold seats
[x] Cancel search: fold seatsPage 44 of 328
42GETTING TO KNOW YOUR VEHICLE
POWER ADJUSTMENT (REAR SEATS) —
I
F EQUIPPED
Third Row Power Recline — If Equipped
The power recline feature, located on the trim panel next
to the seat, adjusts the seatback angle forward/rearward
for occupant comfort.
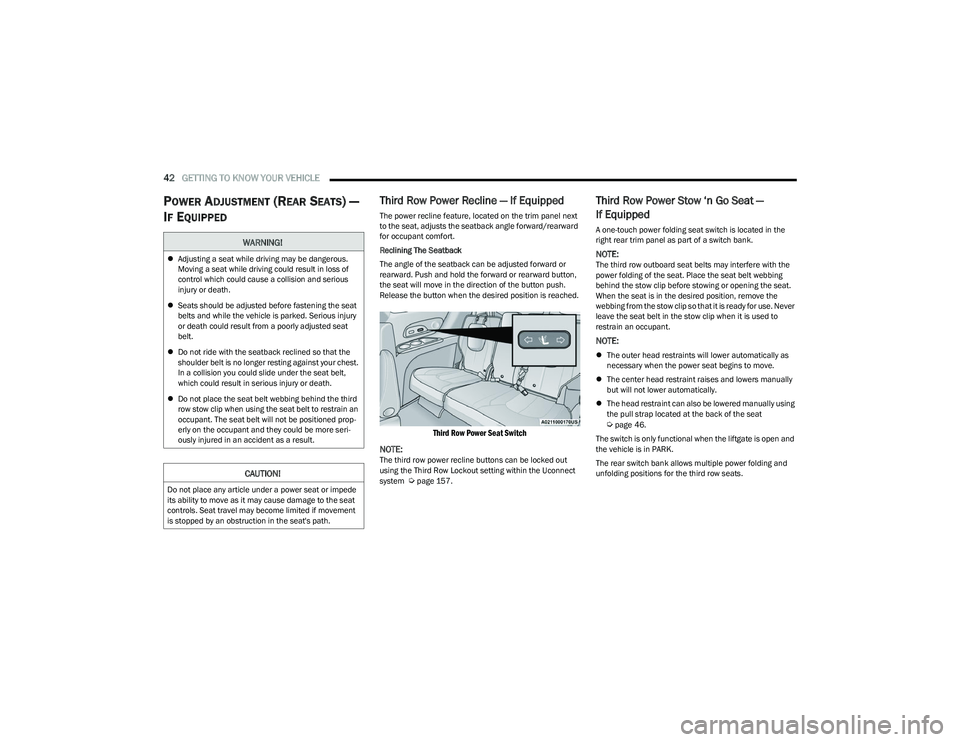
Reclining The Seatback
The angle of the seatback can be adjusted forward or
rearward. Push and hold the forward or rearward button,
the seat will move in the direction of the button push.
Release the button when the desired position is reached.
Third Row Power Seat Switch
NOTE:
The third row power recline buttons can be locked out
using the Third Row Lockout setting within the Uconnect
system
Úpage 157.
Third Row Power Stow ‘n Go Seat —
If Equipped
A one-touch power folding seat switch is located in the
right rear trim panel as part of a switch bank.
NOTE:The third row outboard seat belts may interfere with the
power folding of the seat. Place the seat belt webbing
behind the stow clip before stowing or opening the seat.
When the seat is in the desired position, remove the
webbing from the stow clip so that it is ready for use. Never
leave the seat belt in the stow clip when it is used to
restrain an occupant.
NOTE:
The outer head restraints will lower automatically as
necessary when the power seat begins to move.
The center head restraint raises and lowers manually
but will not lower automatically.
The head restraint can also be lowered manually using
the pull strap located at the back of the seat
Úpage 46.
The switch is only functional when the liftgate is open and
the vehicle is in PARK.
The rear switch bank allows multiple power folding and
unfolding positions for the third row seats.
WARNING!
Adjusting a seat while driving may be dangerous.
Moving a seat while driving could result in loss of
control which could cause a collision and serious
injury or death.
Seats should be adjusted before fastening the seat
belts and while the vehicle is parked. Serious injury
or death could result from a poorly adjusted seat
belt.
Do not ride with the seatback reclined so that the
shoulder belt is no longer resting against your chest.
In a collision you could slide under the seat belt,
which could result in serious injury or death.
Do not place the seat belt webbing behind the third
row stow clip when using the seat belt to restrain an
occupant. The seat belt will not be positioned prop -
erly on the occupant and they could be more seri -
ously injured in an accident as a result.
CAUTION!
Do not place any article under a power seat or impede
its ability to move as it may cause damage to the seat
controls. Seat travel may become limited if movement
is stopped by an obstruction in the seat's path.
23_RUP_OM_EN_USC_t.book Page 42
Page 45 of 328
GETTING TO KNOW YOUR VEHICLE43
Left and right third row seats can be folded individually or
together. The third row power folding seat adjusts to the
following positions using the switch bank located on the
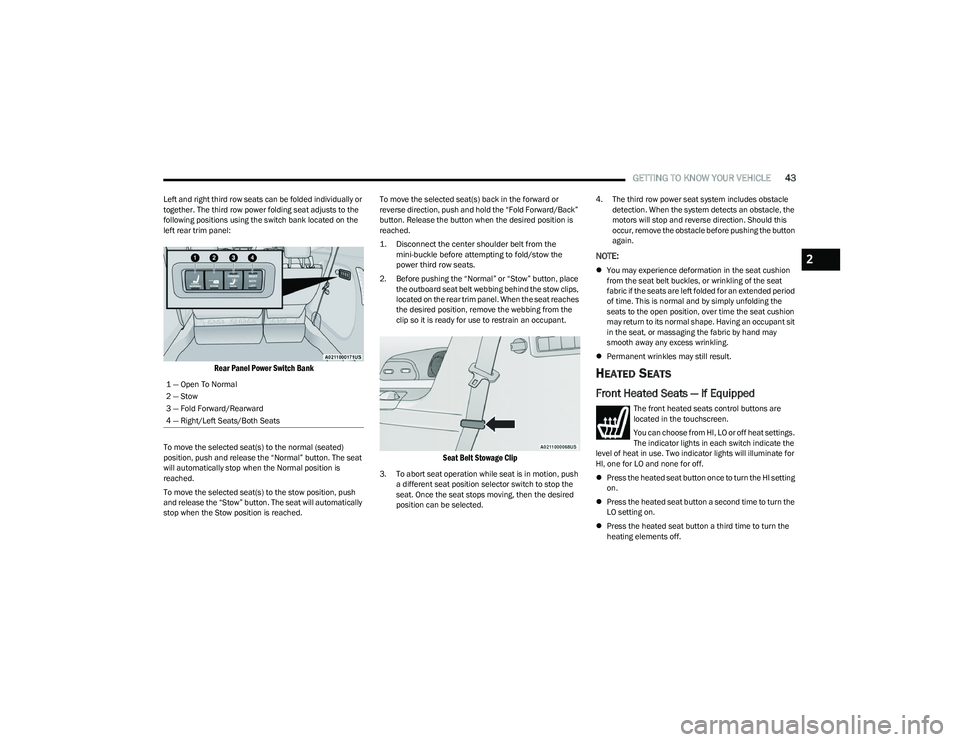
left rear trim panel:
Rear Panel Power Switch Bank
To move the selected seat(s) to the normal (seated)
position, push and release the “Normal” button. The seat
will automatically stop when the Normal position is
reached.
To move the selected seat(s) to the stow position, push
and release the “Stow” button. The seat will automatically
stop when the Stow position is reached. To move the selected seat(s) back in the forward or
reverse direction, push and hold the “Fold Forward/Back”
button. Release the button when the desired position is
reached.
1. Disconnect the center shoulder belt from the
mini-buckle before attempting to fold/stow the
power third row seats.
2. Before pushing the “Normal” or “Stow” button, place the outboard seat belt webbing behind the stow clips,
located on the rear trim panel. When the seat reaches
the desired position, remove the webbing from the
clip so it is ready for use to restrain an occupant.
Seat Belt Stowage Clip
3. To abort seat operation while seat is in motion, push a different seat position selector switch to stop the
seat. Once the seat stops moving, then the desired
position can be selected. 4. The third row power seat system includes obstacle
detection. When the system detects an obstacle, the
motors will stop and reverse direction. Should this
occur, remove the obstacle before pushing the button
again.
NOTE:
You may experience deformation in the seat cushion
from the seat belt buckles, or wrinkling of the seat
fabric if the seats are left folded for an extended period
of time. This is normal and by simply unfolding the
seats to the open position, over time the seat cushion
may return to its normal shape. Having an occupant sit
in the seat, or massaging the fabric by hand may
smooth away any excess wrinkling.
Permanent wrinkles may still result.
HEATED SEATS
Front Heated Seats — If Equipped
The front heated seats control buttons are
located in the touchscreen.
You can choose from HI, LO or off heat settings.
The indicator lights in each switch indicate the
level of heat in use. Two indicator lights will illuminate for
HI, one for LO and none for off.
Press the heated seat button once to turn the HI setting
on.
Press the heated seat button a second time to turn the
LO setting on.
Press the heated seat button a third time to turn the
heating elements off.
1 — Open To Normal
2 — Stow
3 — Fold Forward/Rearward
4 — Right/Left Seats/Both Seats
2
23_RUP_OM_EN_USC_t.book Page 43
Page 48 of 328
46GETTING TO KNOW YOUR VEHICLE
Head Restraints — Second Row Quad
Seats
The second row outboard head restraints, as well as the
removable 8th passenger seat (if equipped), may have
adjustable head restraints.
NOTE:If equipped with Stow ‘n Go seating, the head restraints
are non-adjustable and non-removable. Do not pull on
non-adjustable head restraints when folding the seat.
To raise the head restraint, pull upward on the head
restraint. To lower the head restraint, push the adjustment
button, located at the base of the head restraint, and push
downward.
To remove the head restraint, raise it as far as it can go.
Then, push the release button and the adjustment button
at the base of each post while pulling the head restraint
up. Seatback angle may need to be adjusted to fully
remove the head restraint. To reinstall the head restraint, put the head restraint posts into the holes and push
downward. Then, adjust the head restraint to the
appropriate height.
Head Restraints — Third Row
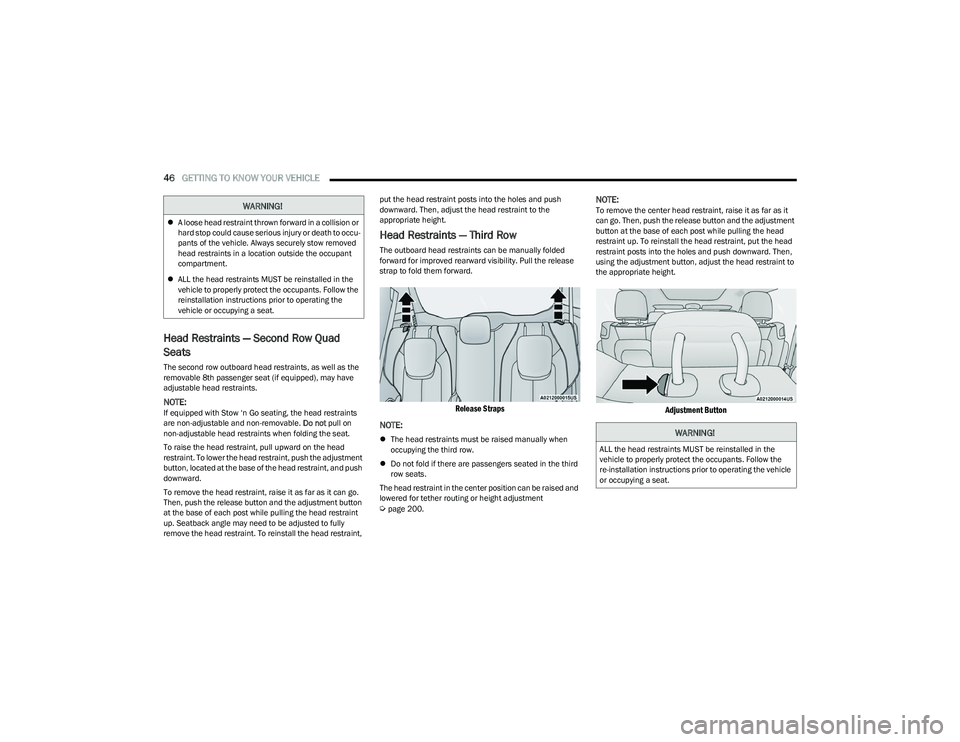
The outboard head restraints can be manually folded
forward for improved rearward visibility. Pull the release
strap to fold them forward.
Release Straps
NOTE:
The head restraints must be raised manually when
occupying the third row.
Do not fold if there are passengers seated in the third
row seats.
The head restraint in the center position can be raised and
lowered for tether routing or height adjustment
Úpage 200.
NOTE:To remove the center head restraint, raise it as far as it
can go. Then, push the release button and the adjustment
button at the base of each post while pulling the head
restraint up. To reinstall the head restraint, put the head
restraint posts into the holes and push downward. Then,
using the adjustment button, adjust the head restraint to
the appropriate height.
Adjustment Button
WARNING!
A loose head restraint thrown forward in a collision or
hard stop could cause serious injury or death to occu -
pants of the vehicle. Always securely stow removed
head restraints in a location outside the occupant
compartment.
ALL the head restraints MUST be reinstalled in the
vehicle to properly protect the occupants. Follow the
reinstallation instructions prior to operating the
vehicle or occupying a seat.
WARNING!
ALL the head restraints MUST be reinstalled in the
vehicle to properly protect the occupants. Follow the
re-installation instructions prior to operating the vehicle
or occupying a seat.
23_RUP_OM_EN_USC_t.book Page 46
Page 49 of 328

GETTING TO KNOW YOUR VEHICLE47
POWER FOLDING THIRD ROW HEAD
RESTRAINTS — IF EQUIPPED
For improved visibility, the third row outboard head
restraints can be folded using the Uconnect system.
Press Vehicle, then Controls located on the bottom of the
Uconnect display.
Press the Head Restraint Fold button to power
fold the third row head restraints.
NOTE:
The head restraints can be folded downward using the
Head Restraint button or using the manual release
strap. The head restraints must be raised manually
when occupying the third row.
Do not fold if there are passengers seated in the third
row seats.
UCONNECT VOICE RECOGNITION —
IF EQUIPPED
INTRODUCING VOICE RECOGNITION
Start using Uconnect Voice Recognition (VR) with these
helpful quick tips. It provides the key Voice Commands
and tips you need to know to control your system.
BASIC VOICE COMMANDS
The following basic Voice Commands can be given at any
point while using your Uconnect system.
Push the VR button on the steering wheel. After the beep,
say:
“Cancel ” to stop a current voice session.
“Help ” to hear a list of suggested Voice Commands.
“Repeat ” to listen to the system prompts again.
Notice the visual cues that inform you of your Voice
Recognition system’s status.
GET STARTED
The VR button is used to activate/deactivate your
Voice Recognition system.
Helpful hints for using Voice Recognition:
Reduce background noise. Wind noise and passenger
conversations are examples of noise that may impact
recognition.
Speak clearly at a normal pace and volume while facing
straight ahead.
Each time you give a Voice Command, first push the VR
button, wait until after the beep, then say your Voice
Command. You can also say the vehicle “Wake Up”
word and state your command.
NOTE:The factory default Wake Up word is set to “Hey Uconnect”
and can be reprogrammed through the Uconnect Settings.
After the beep, say:
A passenger can press the VR button shortcut on the
radio status bar to also issue a command.
You can interrupt the help message or system prompts
by pushing the VR button and saying a Voice Command
or saying the vehicle’s “Wake Up” word and saying a
command from the current category.
Uconnect Voice Command Buttons
1 — Push To Answer An Incoming Phone Call
2 — For Vehicles Equipped With Navigation: Push
The Voice Recognition Button To Begin Radio, Media,
Navigation, Climate, Start Or Answer A Phone Call, And
Send Or Receive A Text
2 — For Vehicles Not Equipped With Navigation: Push The
Phone Button To Answer An Incoming Phone Call
2
23_RUP_OM_EN_USC_t.book Page 47
Page 74 of 328
72GETTING TO KNOW YOUR VEHICLE
Storage Drawers — If Equipped
There may be a storage drawer located in the lower center
of the instrument panel, or as part of the center console.
It can be released by pushing the access button above the
drawer. The drawer is actuator assisted once the access
button is pushed. Pull drawer outward to the fully open
position.
Instrument Panel Storage Drawer
Front Seatback Storage — If Equipped
The front seatbacks have a storage pocket on some
models.
Front Seatback Storage
Second Row Floor Storage Bins
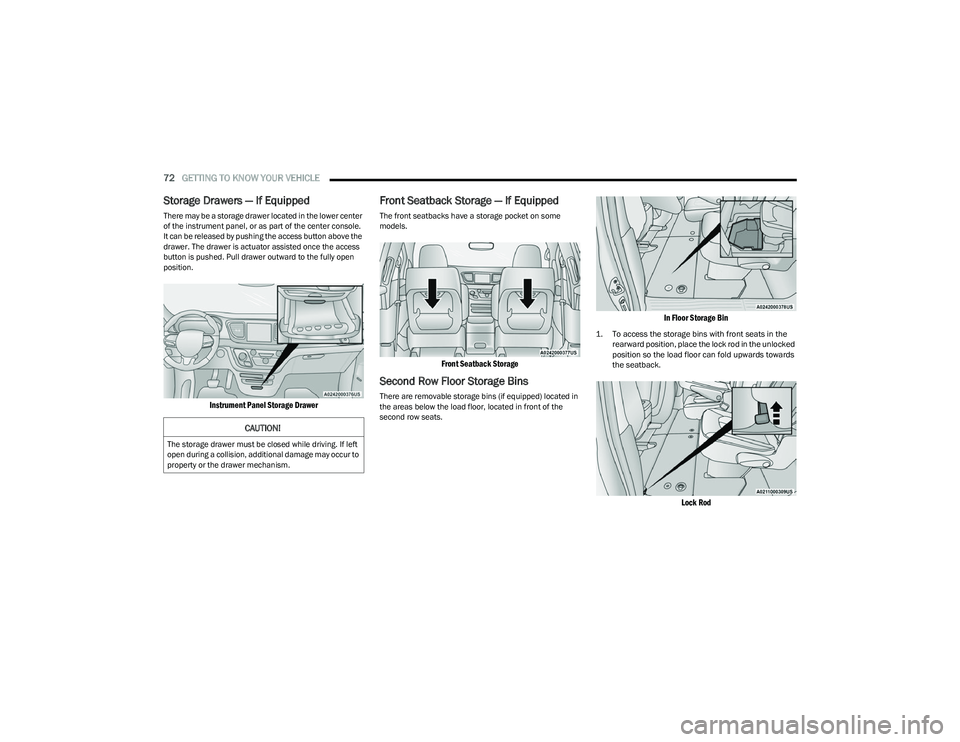
There are removable storage bins (if equipped) located in
the areas below the load floor, located in front of the
second row seats.
In Floor Storage Bin
1. To access the storage bins with front seats in the
rearward position, place the lock rod in the unlocked
position so the load floor can fold upwards towards
the seatback.
Lock Rod
CAUTION!
The storage drawer must be closed while driving. If left
open during a collision, additional damage may occur to
property or the drawer mechanism.
23_RUP_OM_EN_USC_t.book Page 72
Page 206 of 328
204SAFETY
Lap/Shoulder Belt Untwisting Procedure
Use the following procedure to untwist a twisted lap/
shoulder belt.
1. Position the latch plate as close as possible to the
anchor point.
2. At about 6 to 12 inches (15 to 30 cm) above the latch plate, grab and twist the seat belt webbing
180 degrees to create a fold that begins immediately
above the latch plate.
3. Slide the latch plate upward over the folded webbing. The folded webbing must enter the slot at the top of
the latch plate.
4. Continue to slide the latch plate up until it clears the folded webbing and the seat belt is no longer twisted.
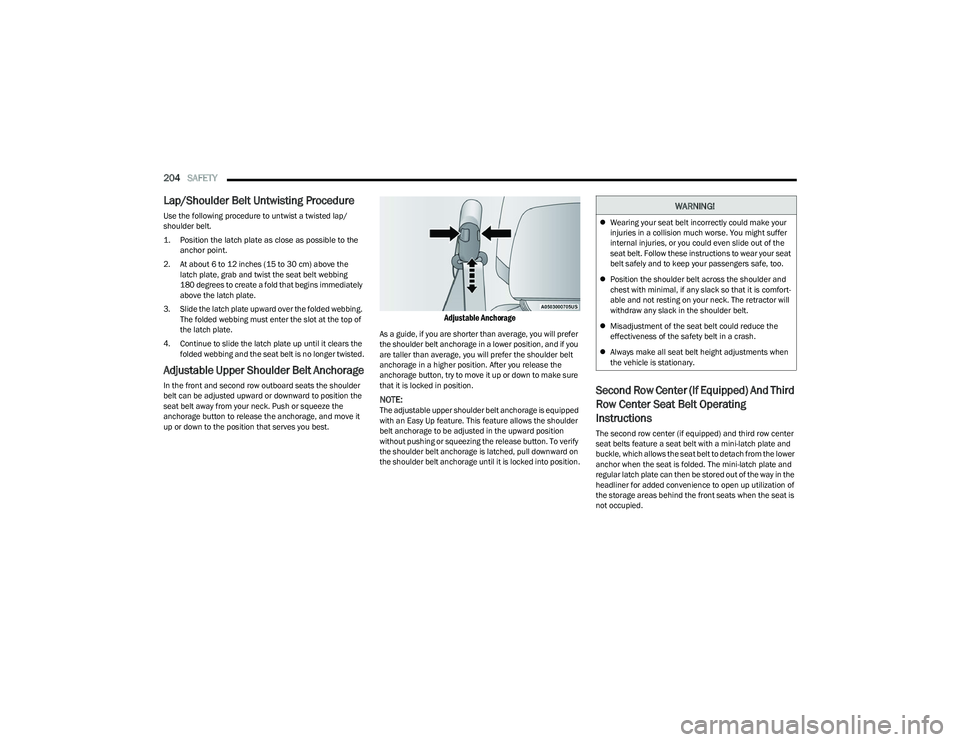
Adjustable Upper Shoulder Belt Anchorage
In the front and second row outboard seats the shoulder
belt can be adjusted upward or downward to position the
seat belt away from your neck. Push or squeeze the
anchorage button to release the anchorage, and move it
up or down to the position that serves you best.
Adjustable Anchorage
As a guide, if you are shorter than average, you will prefer
the shoulder belt anchorage in a lower position, and if you
are taller than average, you will prefer the shoulder belt
anchorage in a higher position. After you release the
anchorage button, try to move it up or down to make sure
that it is locked in position.
NOTE:The adjustable upper shoulder belt anchorage is equipped
with an Easy Up feature. This feature allows the shoulder
belt anchorage to be adjusted in the upward position
without pushing or squeezing the release button. To verify
the shoulder belt anchorage is latched, pull downward on
the shoulder belt anchorage until it is locked into position.
Second Row Center (If Equipped) And Third
Row Center Seat Belt Operating
Instructions
The second row center (if equipped) and third row center
seat belts feature a seat belt with a mini-latch plate and
buckle, which allows the seat belt to detach from the lower
anchor when the seat is folded. The mini-latch plate and
regular latch plate can then be stored out of the way in the
headliner for added convenience to open up utilization of
the storage areas behind the front seats when the seat is
not occupied.
WARNING!
Wearing your seat belt incorrectly could make your
injuries in a collision much worse. You might suffer
internal injuries, or you could even slide out of the
seat belt. Follow these instructions to wear your seat
belt safely and to keep your passengers safe, too.
Position the shoulder belt across the shoulder and
chest with minimal, if any slack so that it is comfort -
able and not resting on your neck. The retractor will
withdraw any slack in the shoulder belt.
Misadjustment of the seat belt could reduce the
effectiveness of the safety belt in a crash.
Always make all seat belt height adjustments when
the vehicle is stationary.
23_RUP_OM_EN_USC_t.book Page 204
Page 210 of 328
208SAFETY
How To Engage The Automatic Locking Mode
1. Buckle the combination lap and shoulder belt.
2. Grab the shoulder portion and pull downward until
the entire seat belt is extracted.
3. Allow the seat belt to retract. As the seat belt retracts, you will hear a clicking sound. This indicates the seat
belt is now in the Automatic Locking Mode.
How To Disengage The Automatic Locking Mode
Unbuckle the combination lap/shoulder belt and allow it
to retract completely to disengage the Automatic Locking
Mode and activate the vehicle sensitive (emergency)
locking mode.
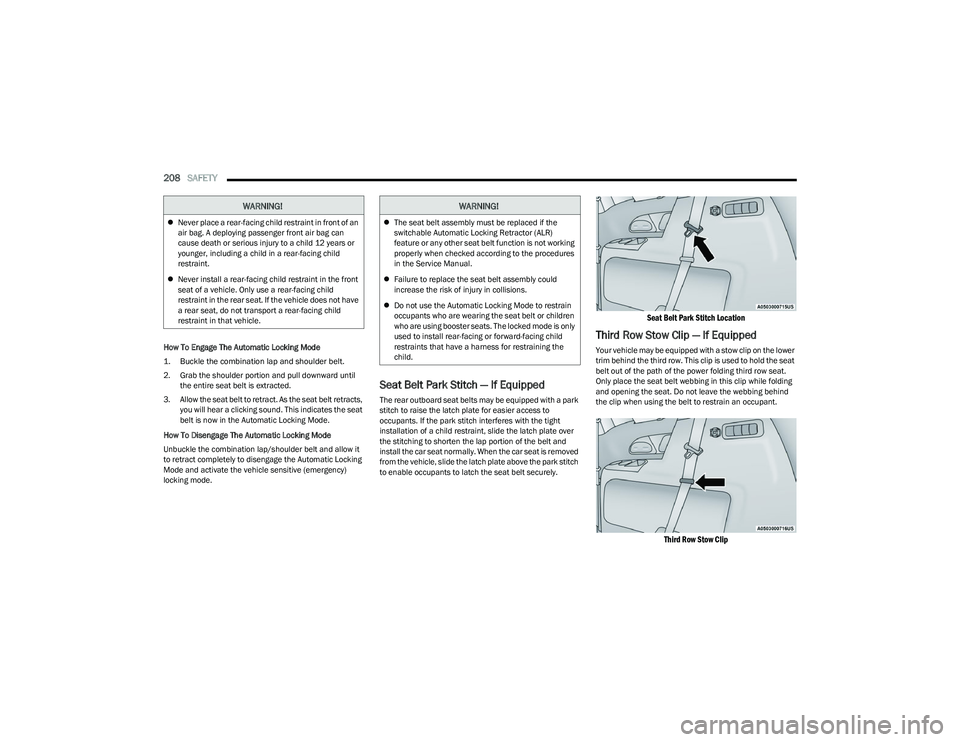
Seat Belt Park Stitch — If Equipped
The rear outboard seat belts may be equipped with a park
stitch to raise the latch plate for easier access to
occupants. If the park stitch interferes with the tight
installation of a child restraint, slide the latch plate over
the stitching to shorten the lap portion of the belt and
install the car seat normally. When the car seat is removed
from the vehicle, slide the latch plate above the park stitch
to enable occupants to latch the seat belt securely.
Seat Belt Park Stitch Location
Third Row Stow Clip — If Equipped
Your vehicle may be equipped with a stow clip on the lower
trim behind the third row. This clip is used to hold the seat
belt out of the path of the power folding third row seat.
Only place the seat belt webbing in this clip while folding
and opening the seat. Do not leave the webbing behind
the clip when using the belt to restrain an occupant.
Third Row Stow Clip
WARNING!
Never place a rear-facing child restraint in front of an
air bag. A deploying passenger front air bag can
cause death or serious injury to a child 12 years or
younger, including a child in a rear-facing child
restraint.
Never install a rear-facing child restraint in the front
seat of a vehicle. Only use a rear-facing child
restraint in the rear seat. If the vehicle does not have
a rear seat, do not transport a rear-facing child
restraint in that vehicle.
WARNING!
The seat belt assembly must be replaced if the
switchable Automatic Locking Retractor (ALR)
feature or any other seat belt function is not working
properly when checked according to the procedures
in the Service Manual.
Failure to replace the seat belt assembly could
increase the risk of injury in collisions.
Do not use the Automatic Locking Mode to restrain
occupants who are wearing the seat belt or children
who are using booster seats. The locked mode is only
used to install rear-facing or forward-facing child
restraints that have a harness for restraining the
child.
23_RUP_OM_EN_USC_t.book Page 208
Page 232 of 328
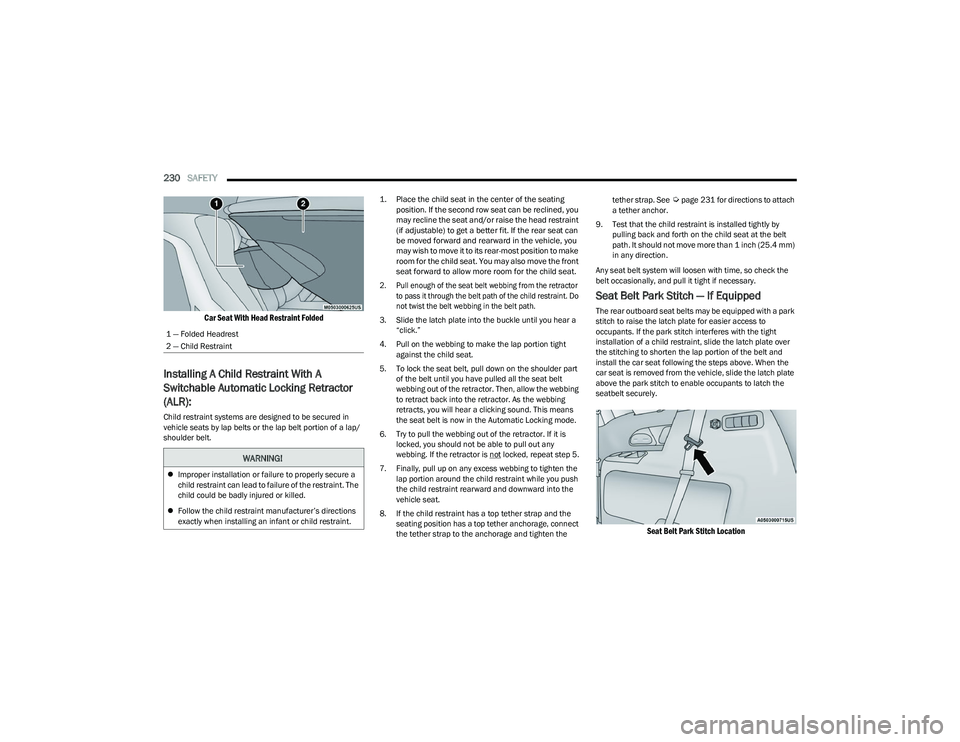
230SAFETY
Car Seat With Head Restraint Folded
Installing A Child Restraint With A
Switchable Automatic Locking Retractor
(ALR):
Child restraint systems are designed to be secured in
vehicle seats by lap belts or the lap belt portion of a lap/
shoulder belt.
1. Place the child seat in the center of the seating
position. If the second row seat can be reclined, you
may recline the seat and/or raise the head restraint
(if adjustable) to get a better fit. If the rear seat can
be moved forward and rearward in the vehicle, you
may wish to move it to its rear-most position to make
room for the child seat. You may also move the front
seat forward to allow more room for the child seat.
2. Pull enough of the seat belt webbing from the retractor to pass it through the belt path of the child restraint. Do
not twist the belt webbing in the belt path.
3. Slide the latch plate into the buckle until you hear a “click.”
4. Pull on the webbing to make the lap portion tight against the child seat.
5. To lock the seat belt, pull down on the shoulder part of the belt until you have pulled all the seat belt
webbing out of the retractor. Then, allow the webbing
to retract back into the retractor. As the webbing
retracts, you will hear a clicking sound. This means
the seat belt is now in the Automatic Locking mode.
6. Try to pull the webbing out of the retractor. If it is locked, you should not be able to pull out any
webbing. If the retractor is not
locked, repeat step 5.
7. Finally, pull up on any excess webbing to tighten the lap portion around the child restraint while you push
the child restraint rearward and downward into the
vehicle seat.
8. If the child restraint has a top tether strap and the seating position has a top tether anchorage, connect
the tether strap to the anchorage and tighten the tether strap. See
Úpage 231 for directions to attach
a tether anchor.
9. Test that the child restraint is installed tightly by pulling back and forth on the child seat at the belt
path. It should not move more than 1 inch (25.4 mm) in any direction.
Any seat belt system will loosen with time, so check the
belt occasionally, and pull it tight if necessary.
Seat Belt Park Stitch — If Equipped
The rear outboard seat belts may be equipped with a park
stitch to raise the latch plate for easier access to
occupants. If the park stitch interferes with the tight
installation of a child restraint, slide the latch plate over
the stitching to shorten the lap portion of the belt and
install the car seat following the steps above. When the
car seat is removed from the vehicle, slide the latch plate
above the park stitch to enable occupants to latch the
seatbelt securely.
Seat Belt Park Stitch Location
1 — Folded Headrest
2 — Child Restraint
WARNING!
Improper installation or failure to properly secure a
child restraint can lead to failure of the restraint. The
child could be badly injured or killed.
Follow the child restraint manufacturer’s directions
exactly when installing an infant or child restraint.
23_RUP_OM_EN_USC_t.book Page 230