2023 CHEVROLET TAHOE door lock
[x] Cancel search: door lockPage 273 of 443
Chevrolet Tahoe/Suburban Owner Manual (GMNA-Localizing-U.S./Canada/
Mexico-16416971) - 2023 - CRC - 5/16/22
272 Driving and Operating
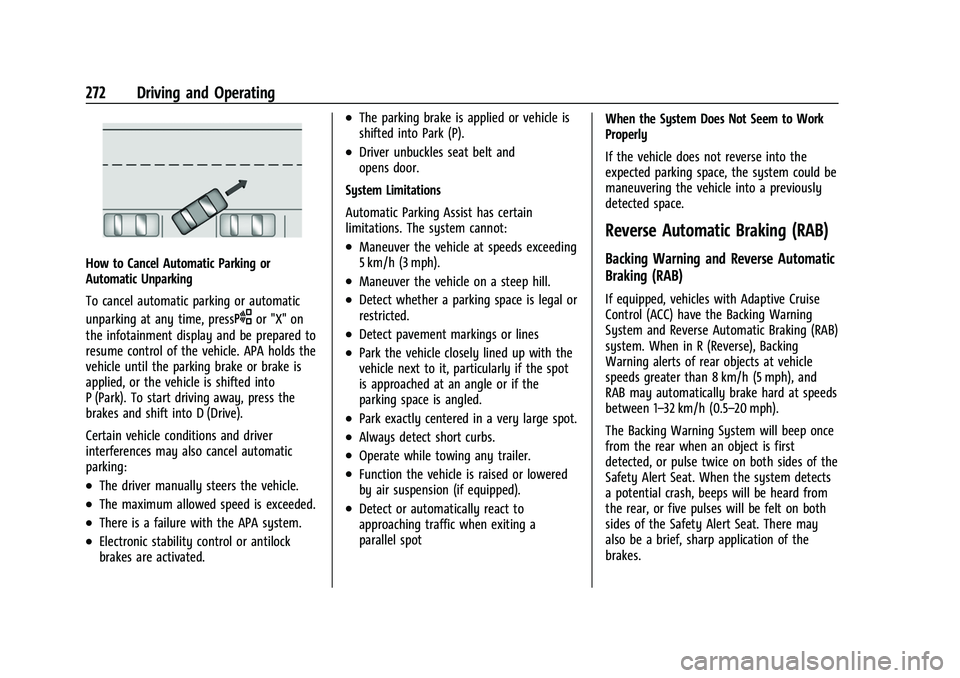
How to Cancel Automatic Parking or
Automatic Unparking
To cancel automatic parking or automatic
unparking at any time, press
Oor "X" on
the infotainment display and be prepared to
resume control of the vehicle. APA holds the
vehicle until the parking brake or brake is
applied, or the vehicle is shifted into
P (Park). To start driving away, press the
brakes and shift into D (Drive).
Certain vehicle conditions and driver
interferences may also cancel automatic
parking:
.The driver manually steers the vehicle.
.The maximum allowed speed is exceeded.
.There is a failure with the APA system.
.Electronic stability control or antilock
brakes are activated.
.The parking brake is applied or vehicle is
shifted into Park (P).
.Driver unbuckles seat belt and
opens door.
System Limitations
Automatic Parking Assist has certain
limitations. The system cannot:
.Maneuver the vehicle at speeds exceeding
5 km/h (3 mph).
.Maneuver the vehicle on a steep hill.
.Detect whether a parking space is legal or
restricted.
.Detect pavement markings or lines
.Park the vehicle closely lined up with the
vehicle next to it, particularly if the spot
is approached at an angle or if the
parking space is angled.
.Park exactly centered in a very large spot.
.Always detect short curbs.
.Operate while towing any trailer.
.Function the vehicle is raised or lowered
by air suspension (if equipped).
.Detect or automatically react to
approaching traffic when exiting a
parallel spot When the System Does Not Seem to Work
Properly
If the vehicle does not reverse into the
expected parking space, the system could be
maneuvering the vehicle into a previously
detected space.
Reverse Automatic Braking (RAB)
Backing Warning and Reverse Automatic
Braking (RAB)
If equipped, vehicles with Adaptive Cruise
Control (ACC) have the Backing Warning
System and Reverse Automatic Braking (RAB)
system. When in R (Reverse), Backing
Warning alerts of rear objects at vehicle
speeds greater than 8 km/h (5 mph), and
RAB may automatically brake hard at speeds
between 1–32 km/h (0.5–20 mph).
The Backing Warning System will beep once
from the rear when an object is first
detected, or pulse twice on both sides of the
Safety Alert Seat. When the system detects
a potential crash, beeps will be heard from
the rear, or five pulses will be felt on both
sides of the Safety Alert Seat. There may
also be a brief, sharp application of the
brakes.
Page 350 of 443

Chevrolet Tahoe/Suburban Owner Manual (GMNA-Localizing-U.S./Canada/
Mexico-16416971) - 2023 - CRC - 4/26/22
Vehicle Care 349
Instrument Panel Fuse Block
The right instrument panel fuse block access
door is on the passenger side edge of the
instrument panel.
Pull off the cover to access the fuse block.
A fuse puller is available on the right
instrument panel end cap.
There are relays on the back of the fuse
block. To access, press the tabs and remove
the fuse block.The vehicle may not be equipped with all of
the fuses, relays, and features shown.
Fuses Usage
F1 Right Door
Page 351 of 443

Chevrolet Tahoe/Suburban Owner Manual (GMNA-Localizing-U.S./Canada/
Mexico-16416971) - 2023 - CRC - 4/26/22
350 Vehicle Care
FusesUsage
F2 Left Door
F3 Universal Garage Door Opener (UGDO)/OnStar
Hands-free Calling (OHC)/
Camera
F4 BCM 2 –Body Control
Module 2
F5 Displays
F6 Front Blower
F8 Left Door Panel
F10 Tilt/Column Lock F11 USB/Data Link Connector (DLC)
F12 Central Gateway Module (CGM)/Onstar
F14 Right Door Panel F17 Steering Wheel Control
F18 AVM 1 –Active Vibration
Module 1
F19 –
F20 –
F21 – Fuses
Usage
F22 Heated Wheel
F23 –
F24 –
F25 Search Engine Optimization (SEO)/UPFITTER
F26 USB/Search Engine Optimization (SEO)
Retained Accessory
Power (RAP)
F27 Auxiliary Power Outlet (APO)/Retained Accessory
Power
F28 Spare
F30 SDM/AOS –Sensing and
Diagnostic Module/
Automatic Occupant
Sensing
F31 BCM 3 –Body Control
Module 3
F32 Center Stack Module (CSM)/USB
F33 BCM 4 –Body Control
Module 4
F34 Out of Park Fuses
Usage
F40 –
F41 –
F42 Electric Park Brake Switch
F43 RSE –Road Side Equipment
F44 AVM 2 –Active Vibration
Module 2
F45 Radio Module
F46 BCM 1A –Body Control
Module 1A
F47 –
F48 TCM –Telematics Control
Module
F49 BCM 1 –Body Control
Module 1
F50 DMS –Driver Monitoring
System
F51 –
F52 –
F53 –
F54 Sunroof F55 APO 3 –Auxiliary Power
Outlet 3
Page 374 of 443
Chevrolet Tahoe/Suburban Owner Manual (GMNA-Localizing-U.S./Canada/
Mexico-16416971) - 2023 - CRC - 4/26/22
Vehicle Care 373
Removing the Spare Tire and Tools
The equipment needed to change a flat tire
is stored in the rear of the vehicle. The
jacking tools are under the load floor,
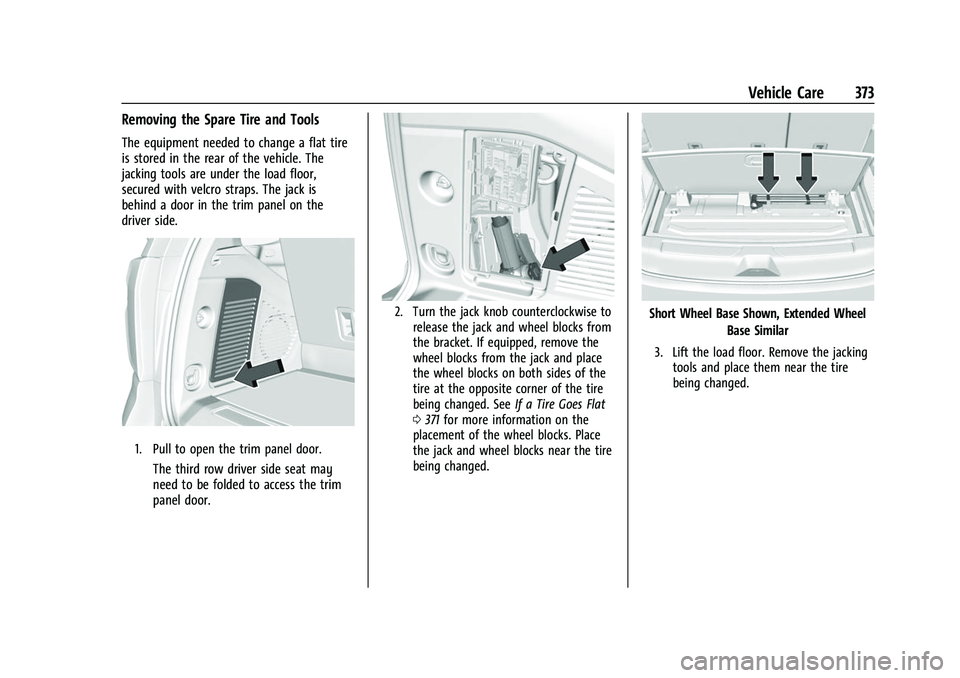
secured with velcro straps. The jack is
behind a door in the trim panel on the
driver side.
1. Pull to open the trim panel door.
The third row driver side seat may
need to be folded to access the trim
panel door.
2. Turn the jack knob counterclockwise torelease the jack and wheel blocks from
the bracket. If equipped, remove the
wheel blocks from the jack and place
the wheel blocks on both sides of the
tire at the opposite corner of the tire
being changed. See If a Tire Goes Flat
0 371 for more information on the
placement of the wheel blocks. Place
the jack and wheel blocks near the tire
being changed.Short Wheel Base Shown, Extended Wheel
Base Similar
3. Lift the load floor. Remove the jackingtools and place them near the tire
being changed.
Page 383 of 443
Chevrolet Tahoe/Suburban Owner Manual (GMNA-Localizing-U.S./Canada/
Mexico-16416971) - 2023 - CRC - 4/26/22
382 Vehicle Care
Storing the Tools
To store the tools:1. Return the tools (wheel wrench, jack handle, and jack handle extensions) to
the tool bag. Use the velcro straps to
secure the tool bag under the load floor
in the cargo area.
2. Position the jack and wheel blocks in the driver side trim panel over the
wheelhouse.
3. Turn the jack knob clockwise until the jack is secured tight in the mounting
bracket. Be sure to position the holes in
the base of the jack onto the pin in the
mounting bracket.
4. Close the trim panel door.
Storing a Flat Tire Inside of the Vehicle
If the vehicle has 275/60R20 or 275/50R22
size tires, the flat tire must be stored inside
of the vehicle in the cargo area using the
flat tire secure strap inside the glove box. 1. Store the tools. See “Storing the Tools”
earlier in this section.
2. If the vehicle has a short wheel base, the third row seat must be folded down to
provide sufficient space to store the flat
tire. If the third row seat cannot be folded down, the flat tire cannot be
stored and must be left in a safe
location, to be picked up at a later time.
3. Once there is sufficient space in the rear of the vehicle, lift the flat tire and place
it on top of the load floor, with the
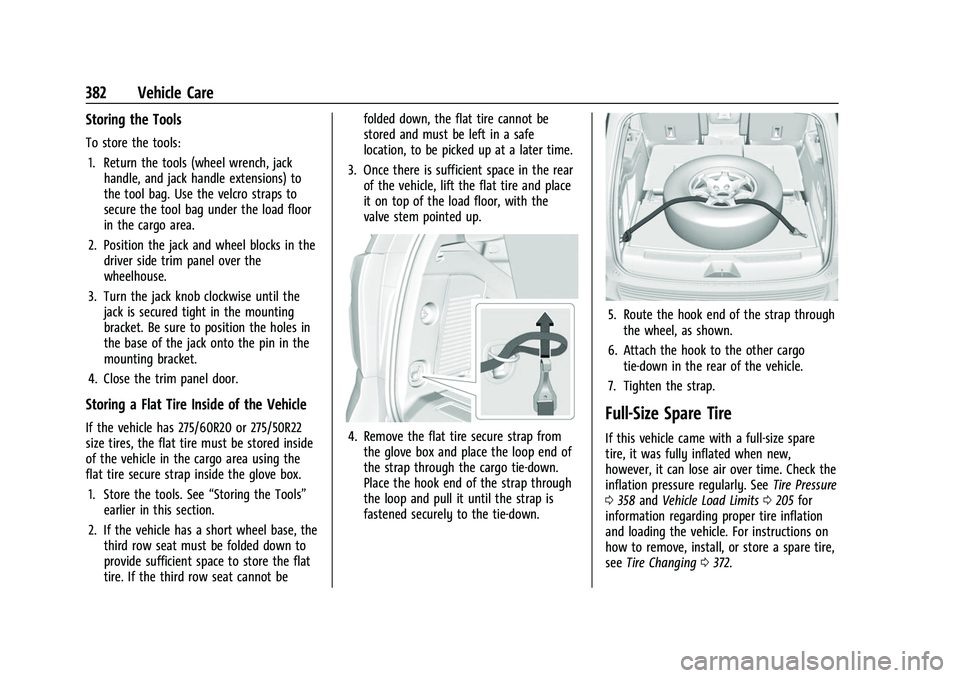
valve stem pointed up.4. Remove the flat tire secure strap from
the glove box and place the loop end of
the strap through the cargo tie-down.
Place the hook end of the strap through
the loop and pull it until the strap is
fastened securely to the tie-down.
5. Route the hook end of the strap throughthe wheel, as shown.
6. Attach the hook to the other cargo tie-down in the rear of the vehicle.
7. Tighten the strap.
Full-Size Spare Tire
If this vehicle came with a full-size spare
tire, it was fully inflated when new,
however, it can lose air over time. Check the
inflation pressure regularly. See Tire Pressure
0 358 and Vehicle Load Limits 0205 for
information regarding proper tire inflation
and loading the vehicle. For instructions on
how to remove, install, or store a spare tire,
see Tire Changing 0372.
Page 390 of 443

Chevrolet Tahoe/Suburban Owner Manual (GMNA-Localizing-U.S./Canada/
Mexico-16416971) - 2023 - CRC - 4/26/22
Vehicle Care 389
Caution
Failure to tow the vehicle with the
transmission in P (Park) can cause
damage to the transmission.
6. Turn off the engine.
7. Place the vehicle in accessory mode by pressing the start button without
stepping on the brake pedal.
8. Release the parking brake only when you are confident it is secured to tow vehicle
and will not roll.
Before going on to the next step, be
sure to take the mechanical key with
you. It will be needed to re-enter the
vehicle after the power is disconnected.
See “Drive Door Key Lock Cylinder
Access” underDoor Locks 015.
9. Disconnect the negative battery cable at the battery and secure the nut and bolt.
Cover the negative battery post with a
non-conductive material to prevent any
contact with the negative battery
terminal.
Caution
Failure to disconnect the negative battery
cable or to have it contact the terminals
can cause damage to the vehicle.
10. Move the steering wheel to make sure the steering column is unlocked.
Caution
If the steering column is locked, vehicle
damage may occur.
11. Rock the vehicle to make sure the parking brake is not set and transfer case
is in N (Neutral).
Caution
Towing the vehicle with the parking
brake set can damage it. Always release
the parking brake prior to towing the
vehicle.
Disconnecting the Towed Vehicle
Before disconnecting the towed vehicle: 1. Park on a level surface.
2. Connect the battery.
3. Apply the brake pedal.
{Warning
The vehicle can roll when the brake pedal
is released. Always apply and hold the
brake pedal when setting the parking
brake. Make sure the parking brake is
fully engaged before releasing the brake
pedal.
4. Start the engine and shift the transfer case out of N (Neutral) to 2
m. See
“Shifting out of N (Neutral)” under
Four-Wheel Drive 0219. See your dealer
if the transfer case cannot be shifted out
of N (Neutral).
5. Check that the vehicle is in 2
mby
shifting the transmission to R (Reverse)
and then to D (Drive). There should be
movement of the vehicle while shifting.
6. Shift the transmission to P (Park) and turn off the vehicle.
7. Set the parking brake.
8. Release the parking brake.
9. Disconnect the vehicle from the tow vehicle.
Page 395 of 443
Chevrolet Tahoe/Suburban Owner Manual (GMNA-Localizing-U.S./Canada/
Mexico-16416971) - 2023 - CRC - 4/26/22
394 Vehicle Care
Steering, Suspension, and Chassis
Components
Visually inspect steering, suspension, and
chassis components for damaged, loose,
or missing parts or signs of wear at least
once a year.
Inspect power steering for proper
attachment, connections, binding, cut/
punctured tie rod boots that could allow
water intrusion, cracks, chafing, etc.
Visually check constant velocity joint boots
and axle seals for leaks.
Control arm ball joints and outer tie rod
ends are maintenance-free.
Body Component Lubrication
Lubricate all key lock cylinders, hood hinges,
liftgate hinges, steel fuel door hinge and
power assist step hinges, unless the
components are plastic. Applying silicone
grease on weatherstrips with a clean cloth
will make them last longer, seal better, and
eliminate sticking or squeaking.
Underbody MaintenanceCaution
Avoid pressure washing the vehicle frame.
Use of high-pressure washers can result
in removal of corrosion protection and
possible vehicle damage.
At least twice a year, spring and fall, use
plain water to flush any corrosive materials
from the underbody. Take care to
thoroughly clean any areas where mud and
other debris can collect. If equipped with
power assist steps, extend them and then
use a high pressure wash to clean all joints
and gaps.
Do not directly pressure wash the transfer
case and/or front/rear axle output seals.
High pressure water can overcome the seals
and contaminate the fluid. Contaminated
fluid will decrease the life of the transfer
case and/or axles and should be replaced.
Sheet Metal Damage
If the vehicle is damaged and requires sheet
metal repair or replacement, make sure the
body repair shop applies anti-corrosion
material to parts repaired or replaced to
restore corrosion protection. Original manufacturer replacement parts will
provide the corrosion protection while
maintaining the vehicle warranty.
Finish Damage
Quickly repair minor chips and scratches
with touch-up materials available from your
dealer to avoid corrosion. Larger areas of
finish damage can be corrected in your
dealer's body and paint shop.
Chemical Paint Spotting
Airborne pollutants can fall upon and attack
painted vehicle surfaces causing blotchy,
ring-shaped discolorations, and small,
irregular dark spots etched into the paint
surface. See
“Finish Care” previously in this
section.
Interior Care
To prevent dirt particle abrasions, regularly
clean the vehicle's interior. Before using
cleaners, read and follow all safety
instructions on the label. While cleaning the
interior, open the doors and windows to get
proper ventilation. Newspapers or dark
garments can transfer color to the vehicle’s
interior.
Page 405 of 443
Chevrolet Tahoe/Suburban Owner Manual (GMNA-Localizing-U.S./Canada/
Mexico-16416971) - 2023 - CRC - 4/25/22
404 Service and Maintenance
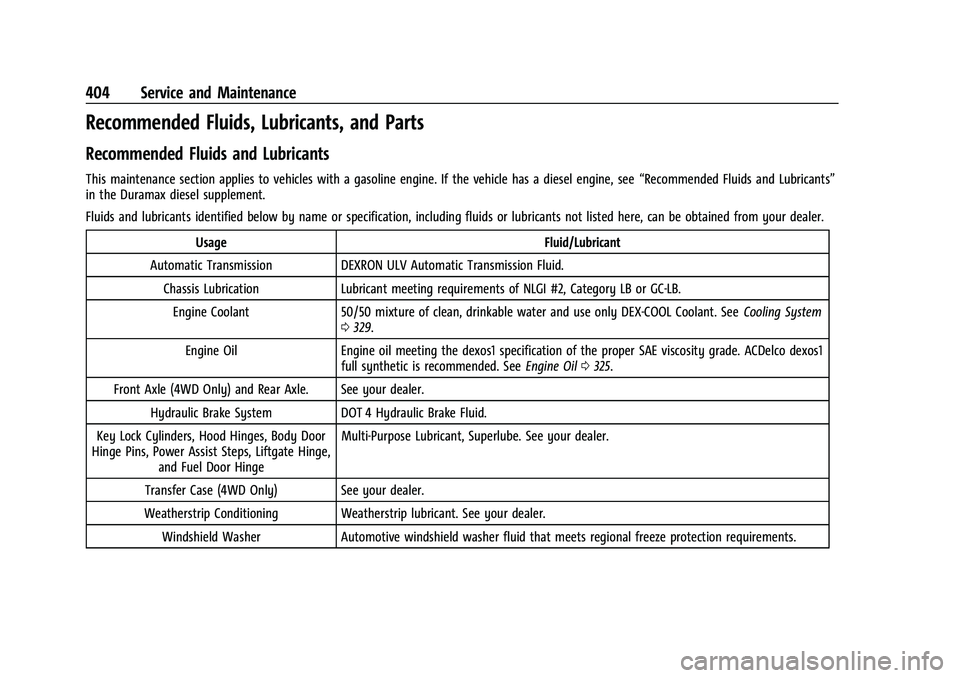
Recommended Fluids, Lubricants, and Parts
Recommended Fluids and Lubricants
This maintenance section applies to vehicles with a gasoline engine. If the vehicle has a diesel engine, see“Recommended Fluids and Lubricants”
in the Duramax diesel supplement.
Fluids and lubricants identified below by name or specification, including fluids or lubricants not listed here, can be obtained from your dealer.
Usage Fluid/Lubricant
Automatic Transmission DEXRON ULV Automatic Transmission Fluid.
Chassis Lubrication Lubricant meeting requirements of NLGI #2, Category LB or GC-LB.Engine Coolant 50/50 mixture of clean, drinkable water and use only DEX-COOL Coolant. See Cooling System
0 329.
Engine Oil Engine oil meeting the dexos1 specification of the proper SAE viscosity grade. ACDelco dexos1 full synthetic is recommended. See Engine Oil0325.
Front Axle (4WD Only) and Rear Axle. See your dealer. Hydraulic Brake System DOT 4 Hydraulic Brake Fluid.
Key Lock Cylinders, Hood Hinges, Body Door
Hinge Pins, Power Assist Steps, Liftgate Hinge, and Fuel Door Hinge Multi-Purpose Lubricant, Superlube. See your dealer.
Transfer Case (4WD Only) See your dealer.
Weatherstrip Conditioning Weatherstrip lubricant. See your dealer. Windshield Washer Automotive windshield washer fluid that meets regional freeze protection requirements.