2023 CHEVROLET TAHOE tires
[x] Cancel search: tiresPage 206 of 443

Chevrolet Tahoe/Suburban Owner Manual (GMNA-Localizing-U.S./Canada/
Mexico-16416971) - 2023 - CRC - 5/16/22
Driving and Operating 205
If the vehicle has recovery hooks at the
front of the vehicle, use them if the vehicle
is stuck off-road and needs to be pulled
some place to continue driving.
Vehicle Load Limits
It is very important to know how much
weight the vehicle can carry. This
weight is called the vehicle capacity
weight and includes the weight of all
occupants, cargo, and all
nonfactory-installed options. Two labels
on the vehicle may show how much
weight it was designed to carry, the
Tire and Loading Information label and
the Certification/Tire label.
{Warning
Do not load the vehicle any heavier
than the Gross Vehicle Weight Rating
(GVWR), or either the maximum
front or rear Gross Axle Weight
Rating (GAWR). This can cause
systems to break and change the
way the vehicle handles. This could
cause loss of control and a crash.
(Continued)
Warning (Continued)
Overloading can also reduce stopping
performance, damage the tires, and
shorten the life of the vehicle.
Tire and Loading Information Label
Label Example
A vehicle specific Tire and Loading
Information label is attached to the
center pillar (B-pillar). The tire and
loading information label shows the
number of occupant seating positions (1), and the maximum vehicle
capacity weight (2) in kilograms and
pounds.
The Tire and Loading Information label
also shows the size of the original
equipment tires (3) and the
recommended cold tire inflation
pressures (4). For more information on
tires and inflation see
Tires0353 and
Tire Pressure 0358.
There is also important loading
information on the vehicle Certification/
Tire label. It may show the Gross
Vehicle Weight Rating (GVWR) and the
Gross Axle Weight Rating (GAWR) for
the front and rear axles. See
“Certification/Tire Label” later in this
section.
“Steps for Determining Correct Load
Limit–
1.Locate the statement "The combined
weight of occupants and cargo
should never exceed XXX kg or
XXX lbs." on your vehicle’s placard.
Page 208 of 443

Chevrolet Tahoe/Suburban Owner Manual (GMNA-Localizing-U.S./Canada/
Mexico-16416971) - 2023 - CRC - 5/16/22
Driving and Operating 207
Example 3
1. Vehicle Capacity Weight for Example 3= 453 kg (1,000 lbs)
2. Subtract Occupant Weight @ 91 kg (200 lbs) × 5 = 453 kg (1,000 lbs)
3. Available Cargo Weight = 0 kg (0 lbs)
Refer to the vehicle's tire and loading
information label for specific
information about the vehicle's capacity
weight and seating positions. The
combined weight of the driver,
passengers, and cargo should never
exceed the vehicle's capacity weight. Certification/Tire Label
A vehicle specific Certification/Tire label
is attached to the center pillar (B-pillar).
The label may shows the size of the
vehicle's original tires and the inflation
pressures needed to obtain the gross
weight capacity of the vehicle. This is
called Gross Vehicle Weight Rating
(GVWR). The GVWR includes the weight
of the vehicle, all occupants, fuel, and
cargo.
The Certification/Tire label also may
show the maximum weights for the
front and rear axles, called Gross Axle
Weight Rating (GAWR). To find out theactual loads on the front and rear axles,
weigh the vehicle at a weigh station.
Your dealer can help with this. Be sure
to spread your load equally on both
sides of the centerline.
The Certification/Tire label may also
include information about the Front
Axle Reserve Capacity.
{Warning
Do not load the vehicle any heavier
than the Gross Vehicle Weight Rating
(GVWR), or either the maximum
front or rear Gross Axle Weight
Rating (GAWR). This can cause
systems to break and change the
way the vehicle handles. This could
cause loss of control and a crash.
Overloading can also reduce stopping
performance, damage the tires, and
shorten the life of the vehicle.
Page 219 of 443

Chevrolet Tahoe/Suburban Owner Manual (GMNA-Localizing-U.S./Canada/
Mexico-16416971) - 2023 - CRC - 5/16/22
218 Driving and Operating
2. Pull the D (Drive) switch on the centerstack.
To shift out of D (Drive): 1. Bring the vehicle to a complete stop.
2. Shift to the desired gear.
Downshifting the transmission in slippery
road conditions could result in skidding. See
“Skidding” underLoss of Control 0198.
Caution
Spinning the tires or holding the vehicle
in one place on a hill using only the
accelerator pedal may damage the
transmission. The repair will not be
covered by the vehicle warranty. If the
vehicle is stuck, do not spin the tires.
When stopping on a hill, use the brakes
to hold the vehicle in place.
Manual Mode
Electronic Range Select (ERS) Mode
ERS or manual mode allows for the selection
of the range of gear positions. Use this
mode when driving downhill or towing a
trailer to limit the top gear and vehicle
speed. The shift position indicator within the
Driver Information Center (DIC) will display a
number next to the L indicating the highest
available gear under manual mode and the
driving conditions when manual mode was
selected.
To use this feature:
1. With the vehicle in D (Drive), press the L (Low) button. 2. Press the plus or minus button to
increase or decrease the gear range
available.
When shifting to L (Low), the transmission
will shift to a preset lower gear range. For
this preset range, the highest gear available
is displayed next to the L in the DIC. See
Driver Information Center (DIC) (Uplevel)
0 126 orDriver Information Center (DIC)
(Base Level) 0123. All gears below that
number are available to use. For example,
when 4 (Fourth) is shown next to the L,
1 (First) through 4 (Fourth) gears are shifted
automatically. To shift to 5 (Fifth) gear, press
the + (Plus) button or shift into D (Drive).
L (Low) will prevent shifting to a lower gear
range if the engine speed is too high.
If vehicle speed is not reduced within the
time allowed, the lower gear range shift will
not be completed. Slow the vehicle, then
press the −(Minus) button to the desired
lower gear range.
While using ERS, cruise control can be used.
Page 220 of 443

Chevrolet Tahoe/Suburban Owner Manual (GMNA-Localizing-U.S./Canada/
Mexico-16416971) - 2023 - CRC - 5/16/22
Driving and Operating 219
Drive Systems
Four-Wheel Drive
If equipped, four-wheel drive engages the
front axle for extra traction.
Read the appropriate section for transfer
case operation before using.
Caution
Do not drive on clean, dry pavement in
4
mand 4n(if equipped) for an extended
period of time. These conditions may
cause premature wear on the vehicle’s
powertrain.
Driving on clean, dry pavement in 4
mor
4
nmay:
.Cause a vibration to be felt in the
steering system.
.Cause tires to wear faster.
{Warning
If equipped with four-wheel drive, the
vehicle will be free to roll if the transfer
case is in N (Neutral), even when the
transmission is in P (Park). You or (Continued)
Warning (Continued)
someone else could be seriously injured.
Be sure the transfer case is in a drive
gear—2
m, 4m, or 4n—or set the
parking brake before placing the transfer
case in N (Neutral). See Shifting Into Park
0 212.
Caution
Extended high-speed operation in 4n
may damage or shorten the life of the
drivetrain.
An engagement noise and bump is normal
when shifting between 4
nand 4mor
N (Neutral), with the engine running.
Shifting into 4
nwill turn Traction Control
and StabiliTrak/Electronic Stability Control
(ESC) off. See Traction Control/Electronic
Stability Control 0225.
Automatic Transfer Case
Two-Speed Transfer Case
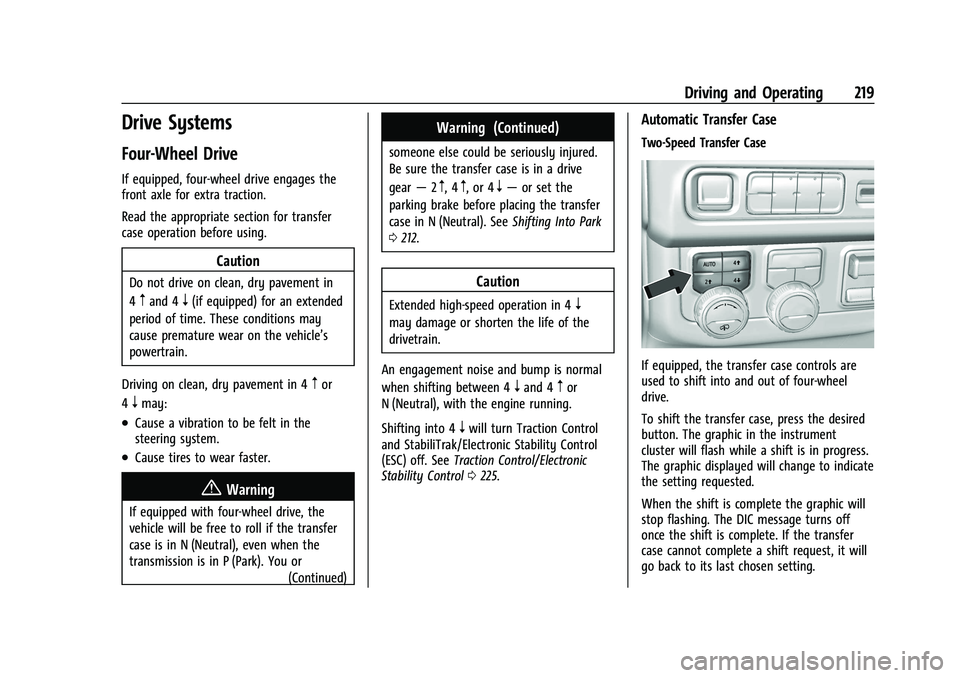
If equipped, the transfer case controls are
used to shift into and out of four-wheel
drive.
To shift the transfer case, press the desired
button. The graphic in the instrument
cluster will flash while a shift is in progress.
The graphic displayed will change to indicate
the setting requested.
When the shift is complete the graphic will
stop flashing. The DIC message turns off
once the shift is complete. If the transfer
case cannot complete a shift request, it will
go back to its last chosen setting.
Page 290 of 443

Chevrolet Tahoe/Suburban Owner Manual (GMNA-Localizing-U.S./Canada/
Mexico-16416971) - 2023 - CRC - 5/16/22
Driving and Operating 289
transmission downshifts too often, a
lower gear may be selected using Manual
Mode. SeeManual Mode 0218.
If equipped, the following driver assistance
features should be turned off when towing
a trailer:
.Park Assist
.Automatic Parking Assist (APA)
.Reverse Automatic Braking (RAB)
If equipped, the following driver assistance
features should be turned to alert or off
when towing a trailer, unless equipped with
Super Cruise:
.Automatic Emergency Braking (AEB)
.Front Pedestrian Braking (FPB)
If equipped with Lane Change Alert (LCA),
the LCA detection zones that extend back
from the side of the vehicle do not move
further back when a trailer is towed. Use
caution while changing lanes when towing a
trailer.
If equipped with Rear Cross Traffic Alert RIM
(RCTA, RTCB, and RAB), these features will be
disabled when towing a trailer.
{Warning
When towing a trailer, exhaust gases
may collect at the rear of the vehicle and
enter if the liftgate, trunk/hatch,
or rear-most window is open.
When towing a trailer:
.Do not drive with the liftgate, trunk/
hatch, or rear-most window open.
.Fully open the air outlets on or under
the instrument panel.
.Also adjust the climate control system
to a setting that brings in only outside
air. See “Climate Control Systems” in
the Index.
For more information about carbon
monoxide, see Engine Exhaust 0214.
Towing a trailer requires experience. The
combination of the vehicle and trailer is
longer and not as responsive as the vehicle
itself. Get used to the handling and braking
of the combination by driving on a level
road surface before driving on public roads.
The trailer structure, the tires, and the
brakes must be all be rated to carry the
intended cargo. Inadequate trailer equipment can cause the combination to
operate in an unexpected or unsafe manner.
Before driving, inspect all trailer hitch parts
and attachments, safety chains, electrical
connectors, lamps, tires, and mirrors. See
Towing Equipment
0296. If the trailer has
electric brakes, start the combination
moving and then manually apply the trailer
brake controller to check the trailer brakes
work. During the trip, occasionally check
that the cargo and trailer are secure and
that the lamps and any trailer brakes are
working.Towing with a Stability Control System
When towing, the stability control system
might be heard. The system reacts to
vehicle movement caused by the trailer,
which mainly occurs during cornering. This is
normal when towing heavier trailers.
Following Distance
Stay at least twice as far behind the vehicle
ahead as you would when driving without a
trailer. This can help to avoid heavy braking
and sudden turns.
Page 292 of 443

Chevrolet Tahoe/Suburban Owner Manual (GMNA-Localizing-U.S./Canada/
Mexico-16416971) - 2023 - CRC - 5/16/22
Driving and Operating 291
2. Let up on the brake pedal.
3. Drive slowly until the trailer is clear ofthe chocks.
4. Stop and have someone pick up and store the chocks.
Launching and Retrieving a Boat
Backing the Trailer into the Water
{Warning
.Have all passengers get out of the
vehicle before backing onto the sloped
part of the ramp. Lower the driver and
passenger side windows before
backing onto the ramp. This will
provide a means of escape in the
unlikely event the vehicle slides into
the water.
.If the boat launch surface is slippery,
have the driver remain in the vehicle
with the brake pedal applied while the
boat is being launched. The boat
launch can be especially slippery at
low tide when part of the ramp was
previously submerged at high tide. Do
not back onto the ramp to launch the
boat if you are not sure the vehicle
can maintain traction.
(Continued)
Warning (Continued)
.Do not move the vehicle if someone is
in the path of the trailer. Some parts
of the trailer might be underwater and
not visible to people who are assisting
in launching the boat.
Disconnect the wiring to the trailer before
backing the trailer into the water to prevent
damage to the electrical circuits on the
trailer. Reconnect the wiring to the trailer
after removing the trailer from the water.
If the trailer has electric brakes that can
function when the trailer is submerged, it
might help to leave the electrical trailer
connector attached to maintain trailer brake
functionality while on the boat ramp.
To back the trailer into the water: 1. If equipped, place the vehicle in Four-Wheel Drive High or Automatic
Four-Wheel Drive.
2. Slowly back down the boat ramp until the boat is floating, but no further than
necessary.
3. Press and hold the brake pedal, but do not shift into P (Park) yet.
4. Have someone place chocks under the front wheels of the vehicle. 5. Gradually release the brake pedal to
allow the chocks to absorb the load of
the trailer.
6. Reapply the brake pedal. Then apply the parking brake and shift into P (Park).
7. Release the brake pedal.
Pulling the Trailer from the Water 1. Press and hold the brake pedal.
2. Start the engine and shift into a gear.
3. Release the parking brake.
4. Let up on the brake pedal.
5. Drive slowly until the tires are clear of the chocks.
6. Stop and have someone pick up and store the chocks.
7. Slowly pull the trailer from the water.
8. Once the vehicle and trailer have been driven from the sloped part of the boat
ramp, the vehicle can be shifted from
four-wheel-drive high. Shift into the drive
mode that is appropriate for the road
conditions.
Page 293 of 443

Chevrolet Tahoe/Suburban Owner Manual (GMNA-Localizing-U.S./Canada/
Mexico-16416971) - 2023 - CRC - 5/16/22
292 Driving and Operating
Caution
If the vehicle tires begin to spin and the
vehicle begins to slide toward the water,
remove your foot from the accelerator
pedal and apply the brake pedal. Seek
help to have the vehicle towed up
the ramp.
Maintenance when Trailer Towing
The vehicle needs service more often when
used to tow trailers. SeeMaintenance
Schedule 0400. It is especially important to
check the engine oil, axle lubricant, belts,
cooling system, and brake system before
and during each trip.
Check periodically that all nuts and bolts on
the trailer hitch are tight.
Engine Cooling when Trailer Towing
The cooling system may temporarily
overheat during severe operating conditions.
See Engine Overheating 0332.
Trailer Towing
If equipped with a diesel engine, see the
Duramax diesel supplement.
Caution
Towing a trailer improperly can damage
the vehicle and result in costly repairs
not covered by the vehicle warranty. To
tow a trailer correctly, follow the
directions in this section and see your
dealer for important information about
towing a trailer with the vehicle.
Trailering is different than just driving the
vehicle by itself. Trailering means changes in
handling, acceleration, braking, durability,
and fuel economy. Successful, safe trailering
takes correct equipment, and it has to be
used properly.
The following information has many
time-tested, important trailering tips and
safety rules. Many of these are important
for your safety and that of your passengers.
Read this section carefully before pulling a
trailer.
Trailer Weight
{Warning
Never exceed the towing capacity for
your vehicle.
Safe trailering requires monitoring the
weight, speed, altitude, road grades, outside
temperature, dimensions of the front of the
trailer, and how frequently the vehicle is
used to tow a trailer.
Trailering Weight Ratings
When towing a trailer, the combined weight
of the vehicle, vehicle contents, trailer, and
trailer contents must be below all of the
maximum weight ratings for the vehicle,
including:
.Gross Combined Weight Rating (GCWR)
.Gross Vehicle Weight Rating (GVWR)
.Maximum Trailer Weight Rating
.Gross Axle Weight Rating-Rear (GAWR-RR)
.Maximum Trailer Tongue Weight Rating
See “Weight-Distributing Hitch Adjustment”
under Towing Equipment 0296 to
determine if equalizer bars are required to
obtain the maximum trailer weight rating.
Page 301 of 443

Chevrolet Tahoe/Suburban Owner Manual (GMNA-Localizing-U.S./Canada/
Mexico-16416971) - 2023 - CRC - 5/16/22
300 Driving and Operating
MeasurementHeight Example 1500 (mm)
H1 1 000
H2 1 060
H2−H1 60
(H2−H1)/3 20
H2–[(H2−H1)/3] 1 040
Tires
.Do not tow a trailer while using a
compact spare tire on the vehicle.
.Tires must be properly inflated to support
loads while towing a trailer. SeeTires
0 353 for instructions on proper tire
inflation.
Safety Chains
Always attach chains between the vehicle
and the trailer, and attach the chains to the
holes on the trailer hitch platform.
Instructions about safety chains may be
provided by the hitch manufacturer or by
the trailer manufacturer.
If the trailer being towed weighs up to
2 271 kg (5,000 lb) with a factory-installed
step bumper, safety chains may be attached to the attaching points on the bumper;
otherwise, safety chains should be attached
to holes on the trailer hitch.
Cross the safety chains under the tongue of
the trailer to help prevent the tongue from
contacting the road if it becomes separated
from the hitch. Always leave just enough
slack so the combination can turn. Never
allow safety chains to drag on the ground.Trailer Brakes
Loaded trailers over 900 kg (2,000 lb) must
be equipped with brake systems and with
brakes for each axle. Trailer braking
equipment conforming to Canadian
Standards Association (CSA) requirement
CAN3-D313, or its equivalent, is
recommended.
When trailers cannot be detected, the
trailer-related DIC messages and/or
Trailering App alerts will not be displayed.
State or local regulations may require
trailers to have their own braking system if
the loaded weight of the trailer exceeds
certain minimums that can vary from state
to state. Read and follow the instructions for
the trailer brakes so they are installed,
adjusted, and maintained properly. Never
attempt to tap into your vehicle's hydraulic
brake system. If you do, both the vehicle
anti-lock brakes and the trailer brakes may
not function, which could result in a crash.