2023 CHEVROLET TAHOE air condition
[x] Cancel search: air conditionPage 167 of 443

Chevrolet Tahoe/Suburban Owner Manual (GMNA-Localizing-U.S./Canada/
Mexico-16416971) - 2023 - CRC - 4/26/22
166 Infotainment System
“Find a
initiate navigation to a POI in the command
in the command.
“Add
way-point to the current route.
“Take me home” :Starts navigation to
Home location set in Google maps.
Onboard Vehicle Commands
These commands can be used to adjust
vehicle temperature, control window
defrosters and obtain fuel information.
“Turn on the A/C” :Turns on the air
conditioning.
“How much gas do I have left” :Find out
how much fuel your vehicle has left.
“Set temperature to
degrees” :Set to a specific temperature
inside your vehicle.
Phone Assistant Voice Recognition
While a device is connected via Bluetooth,
Android Auto, or CarPlay, press and hold
g
on the steering wheel controls to pass
through and launch the Voice Assistant on
the connected mobile phone (e.g, Google
assistant, Siri, etc.).
Phone
Bluetooth (Overview)
The Bluetooth-capable system can interact
with many mobile devices to:
.Place and receive calls in a
hands-free mode.
.Share the device’s address book or
contact list with the vehicle.
.Stream audio (music, podcasts).
.Notify receipt of text messages.
To minimize driver distraction, before
driving, and with the vehicle parked:
.Become familiar with the features of the
mobile device. Organize the phone book
and contact lists clearly and delete
duplicate or rarely used entries.
.Review the controls and operation of the
infotainment system.
.Pair mobile device(s) to the vehicle. The
system may not work with all mobile
devices. See “Pairing”later in this section.
Vehicles with a Bluetooth system can use a
Bluetooth-capable mobile device with a
Hands-Free Profile to make and receive
phone calls. The infotainment system and
voice recognition are used to control the system. The system can be used while the
ignition is on or in accessory mode. The
range of the Bluetooth system can be up to
9.1 m (30 ft). Not all mobile devices support
all functions and not all mobile devices work
with the Bluetooth system. See
Online
Account 0413 for more information about
compatible mobile devices.
Controls
Use the controls on the infotainment display
and the steering wheel to operate the
Bluetooth system.
Steering Wheel Controls
g: Press and release to answer incoming
calls on your connected Bluetooth mobile
device. Press and hold for mobile device
assistant.
c: Press to end a call, decline a call,
or cancel an operation. Press to mute or
unmute the infotainment system when not
on a call.
Infotainment System Controls
For information about how to navigate the
menu system using the infotainment
controls, see Using the System 0146.
Page 175 of 443

Chevrolet Tahoe/Suburban Owner Manual (GMNA-Localizing-U.S./Canada/
Mexico-16416971) - 2023 - CRC - 4/26/22
174 Infotainment System
3. When the second call is active, press themerge icon to conference the three-way
call together.
Ending a Call
.Pression the steering wheel controls.
.Touchbnext to a call to end only
that call.
.Select End on the instrument cluster using
the select control.
Dual Tone Multi-Frequency (DTMF) Tones
The in-vehicle Bluetooth system can send
numbers during a call. This is used when
calling a menu-driven phone system. Use the
Keypad to enter the number.
Apple CarPlay and Android Auto
(Base Radio)
If equipped, Android Auto and/or Apple
CarPlay capability may be available through
a compatible smartphone. If available, the
Android Auto and Apple CarPlay icons will
change from gray to color on the Home
Page of the infotainment display.
To use Android Auto and/or Apple CarPlay: For Wired Phone Projection
1. Download the Android Auto app to your smartphone from the Google Play store.
There is no app required for Apple
CarPlay.
2. Connect your Android phone or Apple iPhone by using the factory-provided
phone USB cable and plugging into a
USB data port. For best performance, it is
highly recommended to use the device’s
factory-provided USB cable, which should
be replaced after significant wear to
maintain connection quality. Aftermarket
or third-party cables may not work.
3. When the phone is first connected to activate Apple CarPlay or Android Auto,
accept the terms and conditions on both
the infotainment system and the phone.
4. Follow the instructions on the phone.
The Android Auto and Apple CarPlay icons
on the Home Page will illuminate depending
on the smartphone. Android Auto and/or
Apple CarPlay may automatically launch
upon USB connection. If not, touch the
Android Auto or Apple CarPlay icon on the
Home Page to launch.
Press
{on the center stack to return to the
Home Page. For Wireless Phone Projection
If equipped, verify your phone is wireless
compatible by visiting the Google Android
Auto or Apple CarPlay support page.
1. Download the Android Auto app to your smartphone from the Google Play store.
There is no app required for Apple
CarPlay.
2. For first time connection, there are two ways to set up wireless projection:
.Connect your Android phone or Apple
iPhone by using the factory-provided
phone USB cable and plugging into a
USB data port. For best performance,
it is highly recommended to use the
device’s factory-provided USB cable,
which should be replaced after
significant wear to maintain
connection quality. Aftermarket or
third-party cables may not work.
.Connecting the phone over Bluetooth.
See Bluetooth (Pairing and Using a
Phone for Uplevel Radio) 0167 or
Bluetooth (Pairing and Using a Phone
for Base Radio) 0170 or
Bluetooth (Overview) 0166.
3. Make sure wireless is turned on the phone for wireless projection to work.
Page 177 of 443

Chevrolet Tahoe/Suburban Owner Manual (GMNA-Localizing-U.S./Canada/
Mexico-16416971) - 2023 - CRC - 4/26/22
176 Infotainment System
3. When the phone is first connected toactivate Apple CarPlay or Android Auto,
accept the terms and conditions on both
the infotainment system and the phone.
4. Follow the instructions on the phone.
The Android Auto and Apple CarPlay icons
on the Home Page will illuminate depending
on the smartphone. Android Auto and/or
Apple CarPlay may automatically launch the
next time the USB is connected. If not,
touch the Android Auto or Apple CarPlay
icon on the Home Page to launch.
Press
{on the center stack to return to the
Home Page.
For Wireless Phone Projection
Verify your phone is wireless compatible by
visiting the Android Auto or Apple CarPlay
support page.
1. Download the Android Auto app to your smartphone from Google Play for phones
running Android 9 and below. There is
no app required for Apple CarPlay or
newer versions of Android. 2. For first time connection, there are two
ways to set up wireless projection:
.Connect your Android phone or Apple
iPhone by using the factory-provided
phone USB cable and plugging into a
USB data port. For best performance,
it is highly recommended to use the
device’s factory-provided USB cable,
which should be replaced after
significant wear to maintain
connection quality. Aftermarket or
third-party cables may not work.
.Connecting the phone over Bluetooth.
See Bluetooth (Pairing and Using a
Phone for Uplevel Radio) 0167 or
Bluetooth (Pairing and Using a Phone
for Base Radio) 0170 or
Bluetooth (Overview) 0166.
3. Make sure Wi-Fi and Bluetooth is turned on the phone for wireless projection
to work.
4. When the phone is first connected to activate Apple CarPlay or Android Auto,
agree to the terms and conditions on
both the infotainment system and the
phone.
5. Follow the instructions on the phone. The Android Auto and Apple CarPlay icons
on the Home Page will illuminate depending
on the smartphone. Android Auto and/or
Apple CarPlay may automatically launch
upon wireless connection. If not, touch the
Android Auto or Apple CarPlay icon on the
Home Page to launch.
Wireless CarPlay and/or Wireless Android
Auto may experience occasional service
disruption due to outside Wi-Fi interference.
To disconnect the phones wireless
projection:
1. Select the Settings icon from the Home Page or the Settings icon on the shortcut
tray near the left of the display.
2. Select Connections.
3. Touch Phones.
4. Touch Option on the phone card to show the cell phone’s or mobile device’s
settings.
5. Turn off Apple CarPlay or Android Auto.
Press
{on the center stack to return to the
Home Page.
Page 187 of 443

Chevrolet Tahoe/Suburban Owner Manual (GMNA-Localizing-U.S./Canada/
Mexico-16416971) - 2023 - CRC - 4/25/22
186 Climate Controls
Climate Controls
Climate Control Systems
Dual Automatic Climate ControlSystem . . . . . . . . . . . . . . . . . . . . . . . . . . . . . . 186
Rear Climate Control System . . . . . . . . . . 189
Air Vents
Air Vents . . . . . . . . . . . . . . . . . . . . . . . . . . . . . . 190
Maintenance
Passenger Compartment Air Filter . . . . . 191
Service . . . . . . . . . . . . . . . . . . . . . . . . . . . . . . . . . 192
Climate Control Systems
Dual Automatic Climate Control System
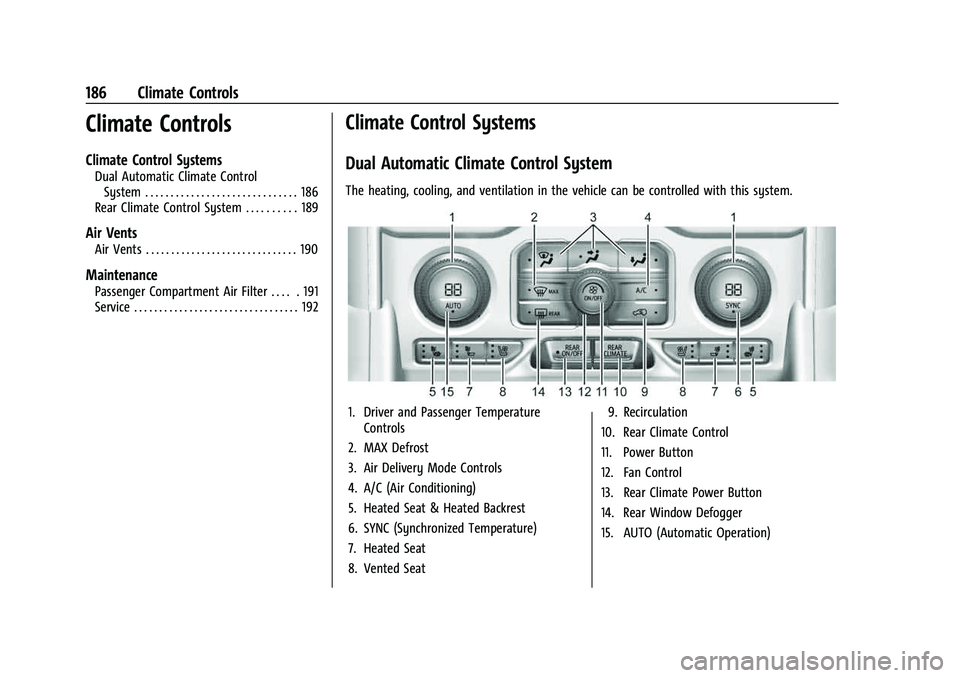
The heating, cooling, and ventilation in the vehicle can be controlled with this system.
1. Driver and Passenger Temperature Controls
2. MAX Defrost
3. Air Delivery Mode Controls
4. A/C (Air Conditioning)
5. Heated Seat & Heated Backrest
6. SYNC (Synchronized Temperature)
7. Heated Seat
8. Vented Seat 9. Recirculation
10. Rear Climate Control
11. Power Button
12. Fan Control
13. Rear Climate Power Button
14. Rear Window Defogger
15. AUTO (Automatic Operation)
Page 188 of 443

Chevrolet Tahoe/Suburban Owner Manual (GMNA-Localizing-U.S./Canada/
Mexico-16416971) - 2023 - CRC - 4/25/22
Climate Controls 187
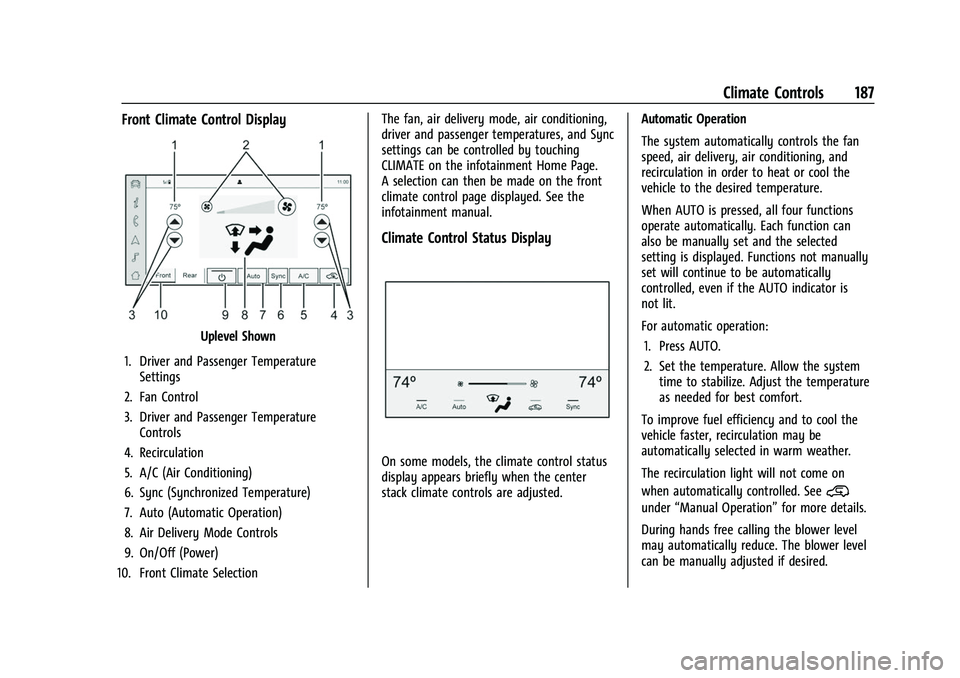
Front Climate Control Display
Uplevel Shown
1. Driver and Passenger Temperature Settings
2. Fan Control
3. Driver and Passenger Temperature Controls
4. Recirculation
5. A/C (Air Conditioning)
6. Sync (Synchronized Temperature)
7. Auto (Automatic Operation)
8. Air Delivery Mode Controls
9. On/Off (Power)
10. Front Climate Selection The fan, air delivery mode, air conditioning,
driver and passenger temperatures, and Sync
settings can be controlled by touching
CLIMATE on the infotainment Home Page.
A selection can then be made on the front
climate control page displayed. See the
infotainment manual.
Climate Control Status Display
On some models, the climate control status
display appears briefly when the center
stack climate controls are adjusted.
Automatic Operation
The system automatically controls the fan
speed, air delivery, air conditioning, and
recirculation in order to heat or cool the
vehicle to the desired temperature.
When AUTO is pressed, all four functions
operate automatically. Each function can
also be manually set and the selected
setting is displayed. Functions not manually
set will continue to be automatically
controlled, even if the AUTO indicator is
not lit.
For automatic operation:
1. Press AUTO.
2. Set the temperature. Allow the system time to stabilize. Adjust the temperature
as needed for best comfort.
To improve fuel efficiency and to cool the
vehicle faster, recirculation may be
automatically selected in warm weather.
The recirculation light will not come on
when automatically controlled. See
@
under “Manual Operation” for more details.
During hands free calling the blower level
may automatically reduce. The blower level
can be manually adjusted if desired.
Page 189 of 443

Chevrolet Tahoe/Suburban Owner Manual (GMNA-Localizing-U.S./Canada/
Mexico-16416971) - 2023 - CRC - 4/25/22
188 Climate Controls
Manual Operation
Fan Control :Turn clockwise or
counterclockwise to increase or decrease the
fan speed. Press the knob to turn the fan
off. When off is selected, a small amount of
air may still come out of the outlets
depending on vehicle speed. If any buttons
are pressed or knobs are turned, the climate
control system will turn on and operate at
the current setting.
Press AUTO to return to automatic
operation.
Driver and Passenger Temperature Control :
The temperature can be adjusted separately
for the driver and passenger.
Turn the knob clockwise or counterclockwise
to increase or decrease the driver or
passenger temperature setting. The driver
side or passenger side temperature display
shows the temperature setting increasing or
decreasing.
SYNC : Press to link the passenger and rear
temperature setting to the driver setting.
The SYNC indicator light will turn on. When
the passenger setting is adjusted, the SYNC
indicator light will turn off. Air Delivery Mode Control :
Press
z,Y,
or
[to change the direction of the
airflow. Any combination of the three
controls can be selected. An indicator light
comes on in the selected mode button.
Changing the mode cancels the automatic
operation and the system goes into manual
mode. Press AUTO to return to automatic
operation.
To change the current mode, select one or
more of the following:
z: Air is directed to the windshield,
outboard a/c outlets, and side window
outlets.
Y: Air is directed to the a/c outlets.
[:Air is directed to the floor outlets,
with some air directed to the windshield,
outboard a/c outlets, and side window
outlets.
0MAX : Air is directed to the windshield
and the fan runs at a higher speed if not
already above a medium fan speed. This
mode overrides the previous mode selected
and clears fog or frost from the windshield
more quickly. When the control is pressed
again, the system returns to the previous
mode setting and fan speed. For best results, clear all snow and ice from
the windshield before defrosting.
@:
Press to turn on recirculation. An
indicator light comes on. Air is recirculated
to quickly cool the inside of the vehicle.
It can also be used to help reduce outside
air and odors that enter the vehicle.
Avoid using recirculation for long periods of
time in cold or damp conditions. Using
recirculation in cold or damp conditions can
result in window fogging.
A/C : Press to turn the air conditioning on
or off. An indicator light comes on to show
that the air conditioning is enabled. If the
fan is turned off, the air conditioner will not
run. The A/C light will stay on even if the
outside temperatures are below freezing.
Rear Window Defogger
1REAR : If equipped, press to turn the
rear window defogger on or off. An indicator
light on the button comes on to show that
the rear window defogger is on.
The rear window defogger only works when
the engine is running. The defogger turns
off if the vehicle is turned off or to
accessory mode.
Page 190 of 443

Chevrolet Tahoe/Suburban Owner Manual (GMNA-Localizing-U.S./Canada/
Mexico-16416971) - 2023 - CRC - 4/25/22
Climate Controls 189
If equipped with heated outside mirrors,
press
fto turn them on or off. SeeHeated
Mirrors 028.
Caution
Using a razor blade or sharp object to
clear the inside rear window can damage
the rear window defogger. Repairs would
not be covered by the vehicle warranty.
Do not clear the inside rear window with
sharp objects.
Remote Start Climate Control Operation : If
Equipped: When the vehicle is started
remotely, the climate control system, rear
window defog— and if equipped, heated or
ventilated seats or a heated steering wheel
— may run based on climate conditions.
When this occurs, the window defog
indicator will not light up as it does
normally. See Remote Vehicle Start 014,
Heated and Ventilated Front Seats 042, and
Heated Steering Wheel 094.
Sensors
The solar sensor, on top of the instrument
panel near the windshield, monitors the
solar heat.
The climate control system uses the sensor
information to adjust the temperature, fan
speed, recirculation, and air delivery mode
for best comfort.
Do not cover the sensor; otherwise the
automatic climate control system may not
work properly. Afterblow Feature
If equipped, under certain conditions, the
fan may stay on or may turn on and off
several times after you turn off and lock the
vehicle. This is normal.
Rear Climate Control System
The rear climate control system is located
on the rear of the center console storage.
The rear climate settings can be adjusted
with this system.
1. Fan Control
2. TEMP (Temperature Control)
3. Heated Rear Seats (If Equipped)
4. MODE (Air Delivery Mode Control)
Page 193 of 443

Chevrolet Tahoe/Suburban Owner Manual (GMNA-Localizing-U.S./Canada/
Mexico-16416971) - 2023 - CRC - 4/25/22
192 Climate Controls
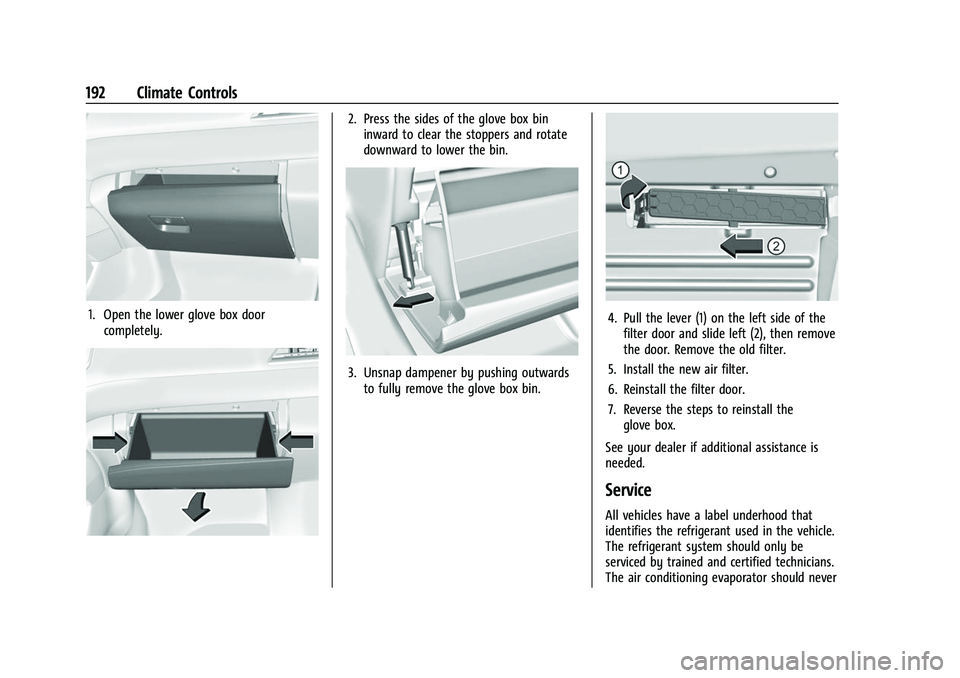
1. Open the lower glove box doorcompletely.
2. Press the sides of the glove box bininward to clear the stoppers and rotate
downward to lower the bin.
3. Unsnap dampener by pushing outwardsto fully remove the glove box bin.
4. Pull the lever (1) on the left side of thefilter door and slide left (2), then remove
the door. Remove the old filter.
5. Install the new air filter.
6. Reinstall the filter door.
7. Reverse the steps to reinstall the glove box.
See your dealer if additional assistance is
needed.
Service
All vehicles have a label underhood that
identifies the refrigerant used in the vehicle.
The refrigerant system should only be
serviced by trained and certified technicians.
The air conditioning evaporator should never