2023 CHEVROLET SILVERADO 2500 remove seats
[x] Cancel search: remove seatsPage 93 of 441
Chevrolet Silverado 2500 HD/3500 HD Owner Manual (GMNA-Localizing-U.
S./Canada/Mexico-15546003) - 2022 - CRC - 5/5/21
92 Seats and Restraints
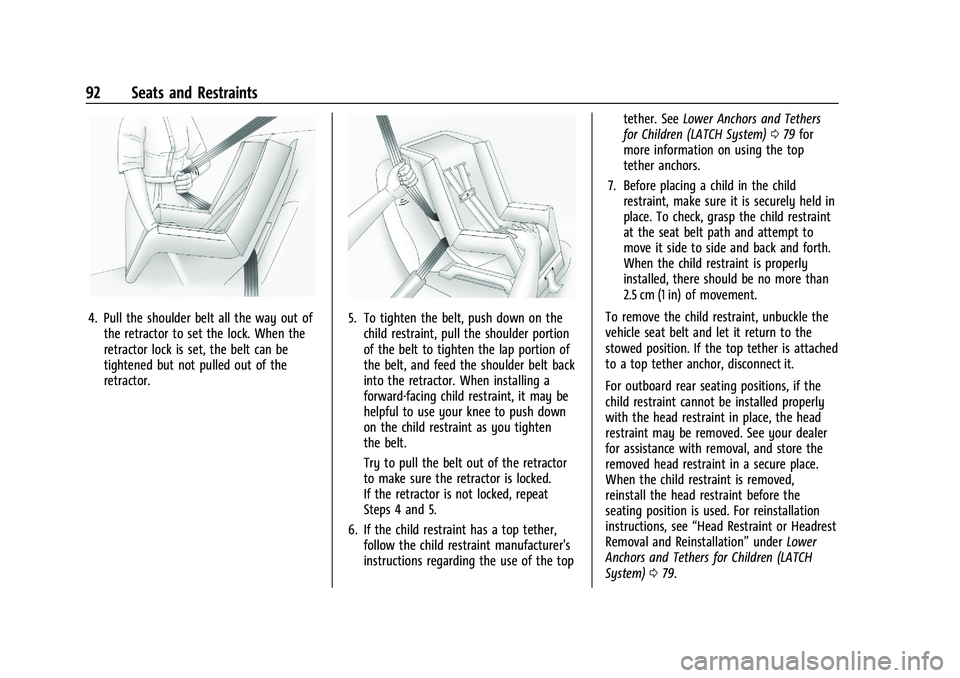
4. Pull the shoulder belt all the way out ofthe retractor to set the lock. When the
retractor lock is set, the belt can be
tightened but not pulled out of the
retractor.5. To tighten the belt, push down on thechild restraint, pull the shoulder portion
of the belt to tighten the lap portion of
the belt, and feed the shoulder belt back
into the retractor. When installing a
forward-facing child restraint, it may be
helpful to use your knee to push down
on the child restraint as you tighten
the belt.
Try to pull the belt out of the retractor
to make sure the retractor is locked.
If the retractor is not locked, repeat
Steps 4 and 5.
6. If the child restraint has a top tether, follow the child restraint manufacturer's
instructions regarding the use of the top tether. See
Lower Anchors and Tethers
for Children (LATCH System) 079 for
more information on using the top
tether anchors.
7. Before placing a child in the child restraint, make sure it is securely held in
place. To check, grasp the child restraint
at the seat belt path and attempt to
move it side to side and back and forth.
When the child restraint is properly
installed, there should be no more than
2.5 cm (1 in) of movement.
To remove the child restraint, unbuckle the
vehicle seat belt and let it return to the
stowed position. If the top tether is attached
to a top tether anchor, disconnect it.
For outboard rear seating positions, if the
child restraint cannot be installed properly
with the head restraint in place, the head
restraint may be removed. See your dealer
for assistance with removal, and store the
removed head restraint in a secure place.
When the child restraint is removed,
reinstall the head restraint before the
seating position is used. For reinstallation
instructions, see “Head Restraint or Headrest
Removal and Reinstallation” underLower
Anchors and Tethers for Children (LATCH
System) 079.
Page 96 of 441

Chevrolet Silverado 2500 HD/3500 HD Owner Manual (GMNA-Localizing-U.
S./Canada/Mexico-15546003) - 2022 - CRC - 5/5/21
Seats and Restraints 95
6. To tighten the belt, push down on thechild restraint, pull the shoulder portion
of the belt to tighten the lap portion of
the belt, and feed the shoulder belt back
into the retractor. When installing a
forward-facing child restraint, it may be
helpful to use your knee to push down
on the child restraint as you tighten
the belt.
Try to pull the belt out of the retractor
to make sure the retractor is locked.
If the retractor is not locked, repeat
Steps 5 and 6.
7. If the vehicle does not have a rear seat and the child restraint manufacturer
recommends using a top tether anchor,
attach the top tether to the top tether anchor. Refer to the instructions that
came with the child restraint and to
Lower Anchors and Tethers for Children
(LATCH System)
079.
8. Before placing a child in the child restraint, make sure it is securely held in
place. To check, grasp the child restraint
at the seat belt path and attempt to
move it side to side and back and forth.
When the child restraint is properly
installed, there should be no more than
2.5 cm (1 in) of movement.
If the airbag is off, the OFF indicator in the
passenger airbag status indicator will come
on and stay on when the vehicle is started.
If a child restraint has been installed and
the ON indicator is lit, see “If the On
Indicator Is Lit for a Child Restraint” under
Passenger Sensing System 067.
To remove the child restraint, unbuckle the
vehicle seat belt and let it return to the
stowed position.
Securing Child Restraints (With
the Seat Belt in the Center
Front Seat)
{Warning
A child in a child restraint in the center
front seat can be badly injured or killed
by the frontal airbags if they inflate.
Never secure a child restraint in the
center front seat. It is always better to
secure a child restraint in a rear seat.
Do not use child restraints in the center
front seat position.
Page 134 of 441
Chevrolet Silverado 2500 HD/3500 HD Owner Manual (GMNA-Localizing-U.
S./Canada/Mexico-15546003) - 2022 - CRC - 5/12/21
Instruments and Controls 133
Automatic High Beam Assist
This setting specifies how the high beams
adjust based on the vehicle environment.
Touch IntelliBeam or Adaptive Headlight
System.
Power Door Locks
Touch and the following may display:
.Open Door Anti Lock Out
.Auto Door Unlock
.Delayed Door Lock
Open Door Anti Lock Out
This setting prevents the driver door from
locking when the door is open. If this
setting is on, the Delayed Door Lock menu
will not be available. If this setting is turned
off, the Delayed Door Lock menu may not
be available until the next ignition cycle.
Touch Off or On.
Auto Door Unlock
This setting allows selection of which doors
will automatically unlock when the vehicle is
shifted into P (Park).
Touch Off, All Doors, or Driver Door. Delayed Door Lock
When on, this feature will delay the locking
of the doors. To override the delay, press
the power door lock switch on the door.
Touch Off or On.
Remote Lock, Unlock, and Start
Touch and the following may display:
.Remote Unlock Light Feedback
.Remote Lock Feedback
.Remote Door Unlock
.Remote Start Auto Cool Seats
.Remote Start Auto Heat Seats
.Remote Window Operation
.Passive Door Unlock
.Passive Door Lock
.Remote Left in Vehicle Alert
.Remote Removed from Vehicle Alert
Remote Unlock Light Feedback
When on, the exterior lamps will flash when
unlocking the vehicle with the RKE
transmitter.
Touch Off or Flash Lights. Remote Lock Feedback
This allows selection of what type of
feedback is given when locking the vehicle
with the RKE transmitter.
Touch Off, Lights and Horn, Lights Only,
or Horn Only.
Remote Door Unlock
This allows selection of which doors will
unlock when pressing
Kon the RKE
transmitter.
Touch All Doors or Driver Door.
Remote Start Auto Cool Seats
If equipped and turned on, this feature will
turn on the ventilated seats when using
remote start on warm days. See Heated and
Ventilated Front Seats 053 and
Remote Vehicle Start 020.
Touch Off or On.
Remote Start Auto Heat Seats
If equipped and turned on, this feature will
turn on the heated seats when using remote
start on cold days. See Heated and
Ventilated Front Seats 053 and
Remote Vehicle Start 020.
Page 135 of 441
Chevrolet Silverado 2500 HD/3500 HD Owner Manual (GMNA-Localizing-U.
S./Canada/Mexico-15546003) - 2022 - CRC - 5/12/21
134 Instruments and Controls
If equipped with Auto Heated Steering
Wheel, this feature will turn on when the
Remote Start Auto Heated Seats turn on.
Touch Off or On.
Remote Window Operation
If equipped, this feature enables remote
operation of the windows with the RKE
transmitter. SeeRemote Keyless Entry (RKE)
System Operation (Key Access) 010 or
Remote Keyless Entry (RKE) System
Operation (Keyless Access) 013.
Touch Off or On.
Passive Door Unlock
This allows the selection of what doors will
unlock when using the button on the driver
door to unlock the vehicle.
Touch Off, All Doors or Driver Door Only.
Passive Door Lock
This allows passive locking to be turned on
or off and selects feedback. See Remote
Keyless Entry (RKE) System Operation (Key
Access) 010 or
Remote Keyless Entry (RKE) System
Operation (Keyless Access) 013.
Touch Off, On with Horn Chirp, or On. Remote Left in Vehicle Alert
This feature sounds an alert when the RKE
transmitter is left in the vehicle. This menu
also enables Remote No Longer In Vehicle
Alert.
Touch Off or On.
Remote Removed from Vehicle Alert
This feature beeps the horn 3 times when
exiting a running vehicle with the
remote key.
Touch Off or On.
Ride Height
Touch and the following may display:
.Automatic Entry/Egress
Automatic Entry/Egress
This feature specifies if the vehicle will
automatically lower to make it easier to
enter or exit the vehicle.
Touch Off or On.
Running Boards
Touch and the following may display:
.Automatic Running Boards
.Deploy Running Boards Automatic Running Boards
This feature specifies the position and use of
the running boards.
Touch Off or On.
Deploy Running Boards
This feature moves the running boards to a
deployed position so they can be used with
the doors closed.
Touch Off or Deploy.
Seating Position
Touch and the following may display:
.Seat Entry Memory
.Seat Exit Memory
Seat Entry Memory
This feature automatically recalls the
previously stored 1 or 2 button positions
when the ignition is changed from off to on
or ACC/ACCESSORY. See Memory Seats050.
Touch Off or On.
Page 147 of 441
Chevrolet Silverado 2500 HD/3500 HD Owner Manual (GMNA-Localizing-U.
S./Canada/Mexico-15546003) - 2022 - CRC - 5/5/21
146 Lighting
Reading Lamps
There are reading lamps on the overhead
console and over the rear seats. These lamps
come on when any door is opened,
Kon
the Remote Keyless Entry (RKE) Transmitter
is pressed, or when the vehicle is turned off.
To operate, the vehicle must be on, or in
Accessory mode, or using Retained Accessory
Power (RAP).
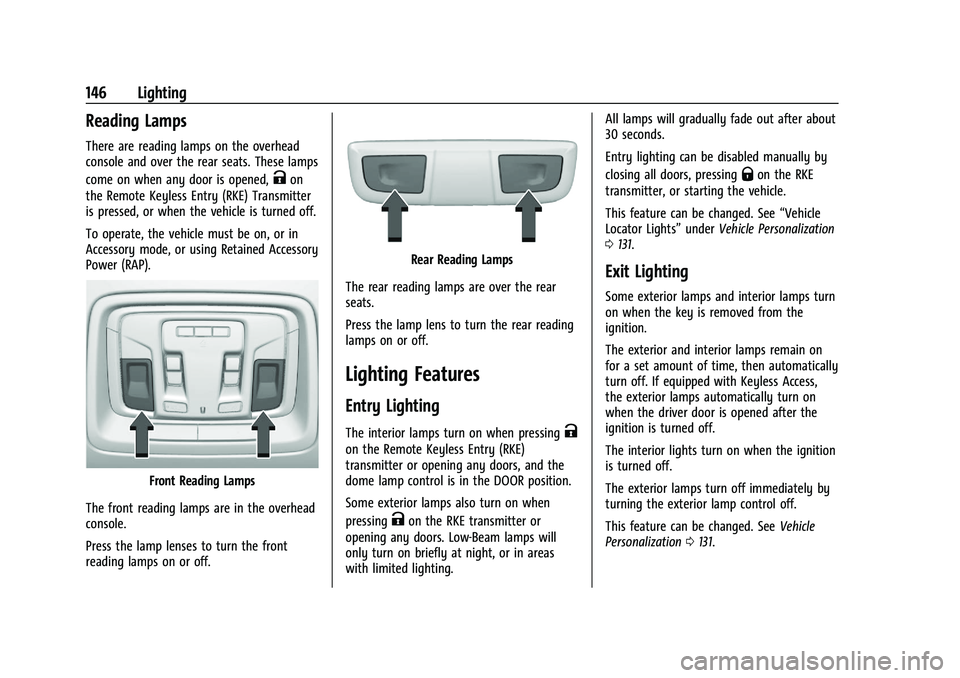
Front Reading Lamps
The front reading lamps are in the overhead
console.
Press the lamp lenses to turn the front
reading lamps on or off.
Rear Reading Lamps
The rear reading lamps are over the rear
seats.
Press the lamp lens to turn the rear reading
lamps on or off.
Lighting Features
Entry Lighting
The interior lamps turn on when pressingK
on the Remote Keyless Entry (RKE)
transmitter or opening any doors, and the
dome lamp control is in the DOOR position.
Some exterior lamps also turn on when
pressing
Kon the RKE transmitter or
opening any doors. Low-Beam lamps will
only turn on briefly at night, or in areas
with limited lighting. All lamps will gradually fade out after about
30 seconds.
Entry lighting can be disabled manually by
closing all doors, pressing
Qon the RKE
transmitter, or starting the vehicle.
This feature can be changed. See “Vehicle
Locator Lights” underVehicle Personalization
0 131.
Exit Lighting
Some exterior lamps and interior lamps turn
on when the key is removed from the
ignition.
The exterior and interior lamps remain on
for a set amount of time, then automatically
turn off. If equipped with Keyless Access,
the exterior lamps automatically turn on
when the driver door is opened after the
ignition is turned off.
The interior lights turn on when the ignition
is turned off.
The exterior lamps turn off immediately by
turning the exterior lamp control off.
This feature can be changed. See Vehicle
Personalization 0131.
Page 359 of 441
Chevrolet Silverado 2500 HD/3500 HD Owner Manual (GMNA-Localizing-U.
S./Canada/Mexico-15546003) - 2022 - CRC - 5/5/21
358 Vehicle Care
Warning (Continued)
or paper towel can be used; however,
use a scraper or wire brush later to
remove all rust or dirt.
Lightly coat the inner diameter of the
wheel hub opening with wheel bearing
grease after a wheel change or tire
rotation to prevent corrosion or rust
build-up.
{Warning
Do not apply grease to the wheel
mounting surface, wheel conical
seats, or the wheel nuts or bolts.
Grease applied to these areas could
cause a wheel to become loose or
come off, resulting in a crash.
When It Is Time for New Tires
Factors, such as maintenance, temperatures,
driving speeds, vehicle loading, and road
conditions affect the wear rate of the tires.
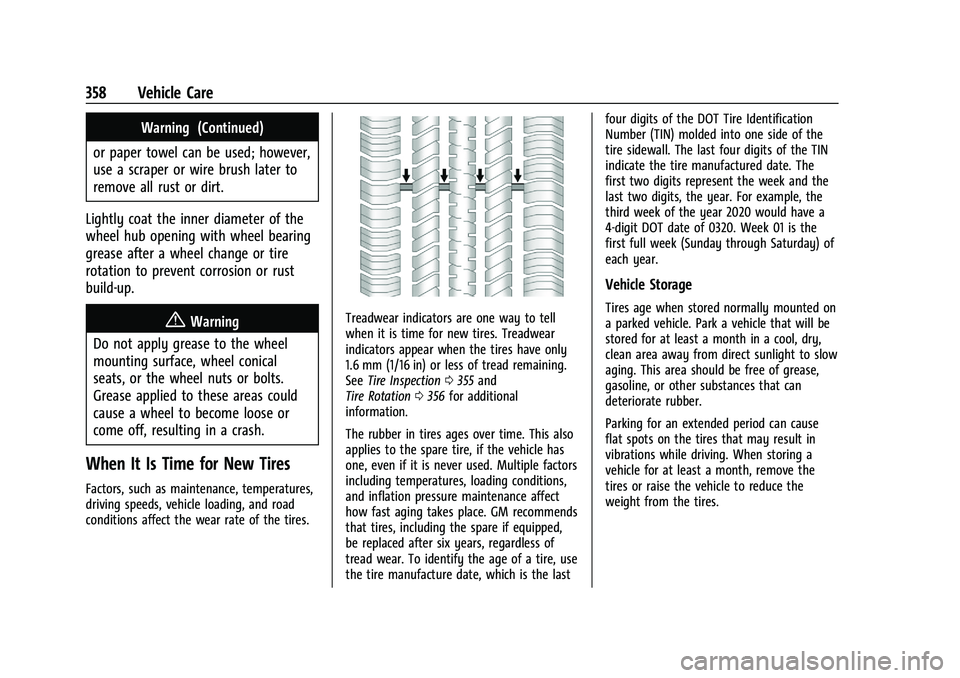
Treadwear indicators are one way to tell
when it is time for new tires. Treadwear
indicators appear when the tires have only
1.6 mm (1/16 in) or less of tread remaining.
See Tire Inspection 0355 and
Tire Rotation 0356 for additional
information.
The rubber in tires ages over time. This also
applies to the spare tire, if the vehicle has
one, even if it is never used. Multiple factors
including temperatures, loading conditions,
and inflation pressure maintenance affect
how fast aging takes place. GM recommends
that tires, including the spare if equipped,
be replaced after six years, regardless of
tread wear. To identify the age of a tire, use
the tire manufacture date, which is the last four digits of the DOT Tire Identification
Number (TIN) molded into one side of the
tire sidewall. The last four digits of the TIN
indicate the tire manufactured date. The
first two digits represent the week and the
last two digits, the year. For example, the
third week of the year 2020 would have a
4-digit DOT date of 0320. Week 01 is the
first full week (Sunday through Saturday) of
each year.
Vehicle Storage
Tires age when stored normally mounted on
a parked vehicle. Park a vehicle that will be
stored for at least a month in a cool, dry,
clean area away from direct sunlight to slow
aging. This area should be free of grease,
gasoline, or other substances that can
deteriorate rubber.
Parking for an extended period can cause
flat spots on the tires that may result in
vibrations while driving. When storing a
vehicle for at least a month, remove the
tires or raise the vehicle to reduce the
weight from the tires.
Page 365 of 441
Chevrolet Silverado 2500 HD/3500 HD Owner Manual (GMNA-Localizing-U.
S./Canada/Mexico-15546003) - 2022 - CRC - 5/5/21
364 Vehicle Care
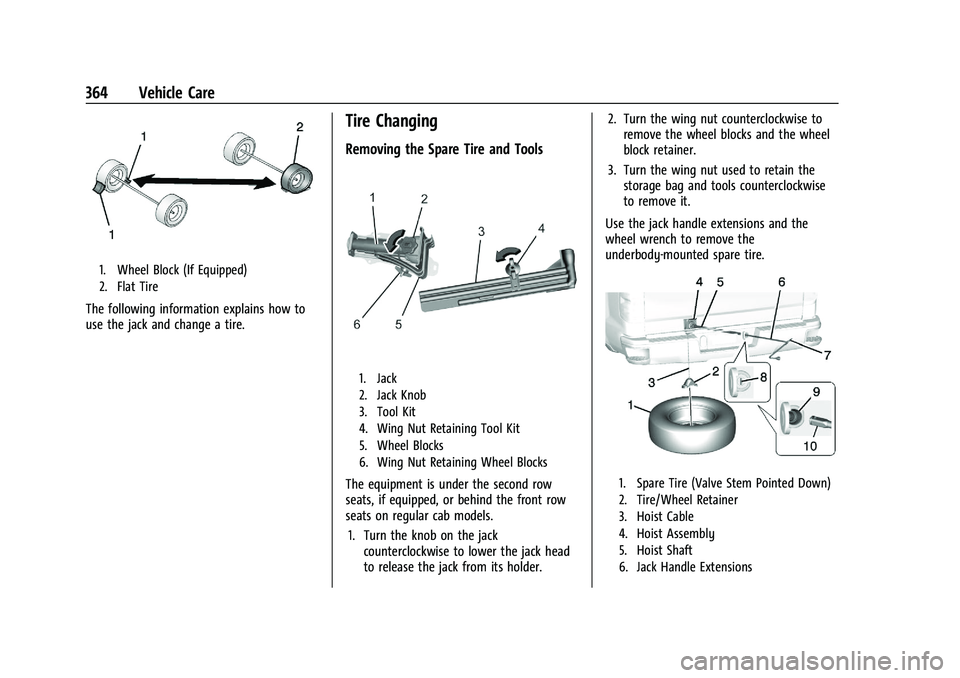
1. Wheel Block (If Equipped)
2. Flat Tire
The following information explains how to
use the jack and change a tire.
Tire Changing
Removing the Spare Tire and Tools
1. Jack
2. Jack Knob
3. Tool Kit
4. Wing Nut Retaining Tool Kit
5. Wheel Blocks
6. Wing Nut Retaining Wheel Blocks
The equipment is under the second row
seats, if equipped, or behind the front row
seats on regular cab models.1. Turn the knob on the jack counterclockwise to lower the jack head
to release the jack from its holder. 2. Turn the wing nut counterclockwise to
remove the wheel blocks and the wheel
block retainer.
3. Turn the wing nut used to retain the storage bag and tools counterclockwise
to remove it.
Use the jack handle extensions and the
wheel wrench to remove the
underbody-mounted spare tire.1. Spare Tire (Valve Stem Pointed Down)
2. Tire/Wheel Retainer
3. Hoist Cable
4. Hoist Assembly
5. Hoist Shaft
6. Jack Handle Extensions
Page 371 of 441
Chevrolet Silverado 2500 HD/3500 HD Owner Manual (GMNA-Localizing-U.
S./Canada/Mexico-15546003) - 2022 - CRC - 5/5/21
370 Vehicle Care
Warning (Continued)
accessory locking wheel nuts. See
Capacities and Specifications0406 for
original equipment wheel nut torque
specifications.
Caution
Improperly tightened wheel nuts can lead
to brake pulsation and rotor damage. To
avoid expensive brake repairs, evenly
tighten the wheel nuts in the proper
sequence and to the proper torque
specification. See Capacities and
Specifications 0406 for the wheel nut
torque specification.
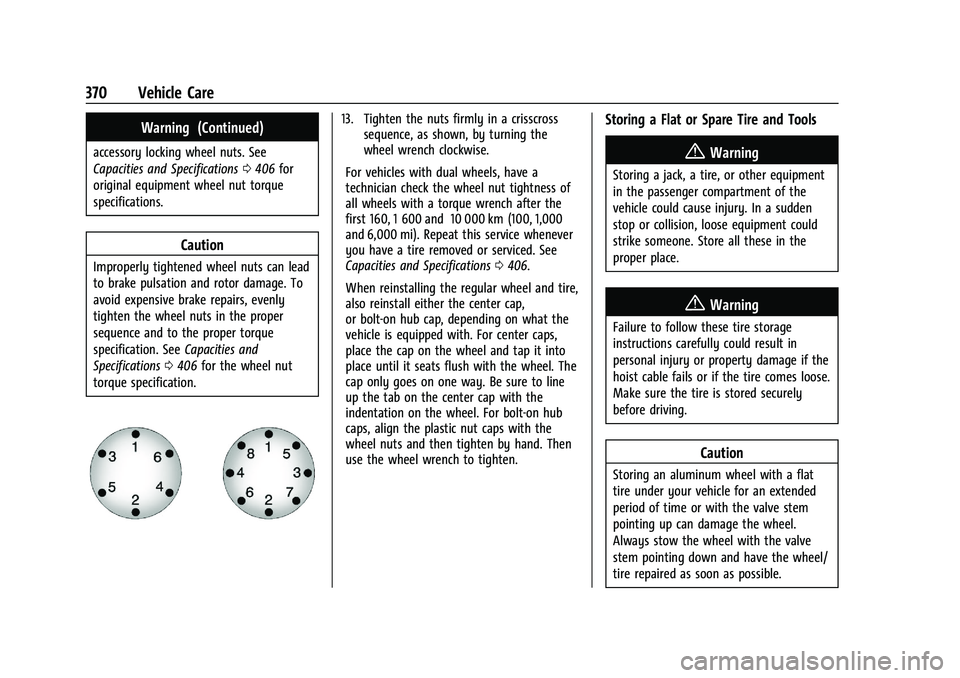
13. Tighten the nuts firmly in a crisscross sequence, as shown, by turning the
wheel wrench clockwise.
For vehicles with dual wheels, have a
technician check the wheel nut tightness of
all wheels with a torque wrench after the
first 160, 1 600 and 10 000 km (100, 1,000
and 6,000 mi). Repeat this service whenever
you have a tire removed or serviced. See
Capacities and Specifications 0406.
When reinstalling the regular wheel and tire,
also reinstall either the center cap,
or bolt-on hub cap, depending on what the
vehicle is equipped with. For center caps,
place the cap on the wheel and tap it into
place until it seats flush with the wheel. The
cap only goes on one way. Be sure to line
up the tab on the center cap with the
indentation on the wheel. For bolt-on hub
caps, align the plastic nut caps with the
wheel nuts and then tighten by hand. Then
use the wheel wrench to tighten.Storing a Flat or Spare Tire and Tools
{Warning
Storing a jack, a tire, or other equipment
in the passenger compartment of the
vehicle could cause injury. In a sudden
stop or collision, loose equipment could
strike someone. Store all these in the
proper place.
{Warning
Failure to follow these tire storage
instructions carefully could result in
personal injury or property damage if the
hoist cable fails or if the tire comes loose.
Make sure the tire is stored securely
before driving.
Caution
Storing an aluminum wheel with a flat
tire under your vehicle for an extended
period of time or with the valve stem
pointing up can damage the wheel.
Always stow the wheel with the valve
stem pointing down and have the wheel/
tire repaired as soon as possible.