2023 CHEVROLET SILVERADO 2500 warning
[x] Cancel search: warningPage 294 of 441

Chevrolet Silverado 2500 HD/3500 HD Owner Manual (GMNA-Localizing-U.
S./Canada/Mexico-15546003) - 2022 - CRC - 5/5/21
Driving and Operating 293
Touch Start to cycle the trailer lamps on and
off to determine if they are working. The
test follows this sequence:1. The running lights turn on first and remain on throughout the sequence.
2. The brake lights turn on for about two seconds.
3. The left turn signal light flashes three times.
4. The right turn signal light flashes three times.
5. The reverse lights turn on for about two seconds.
6. Steps 2–5 repeat for approximately one minute and 45 seconds, or until the
test deactivates.
Touch Stop to stop the test. The test will
automatically end after one minute and
45 seconds.
The sequence also deactivates when any of
the following occur:
.The ignition is turned off.
.The transmission is shifted out of P (Park).
.The brake pedal is pressed.
.The turn signal is activated.
.The hazard warning lights are activated.
Trailering App
If equipped, the Trailering App is on the
Home Page of the infotainment display.
If equipped this feature allows profiles for
connected trailers to be created to view
status, to store and track trailer usage
information, and to set up towing assistance
features.
The Trailering App Preview will appear when
the Trailering App is opened for the first
time from the Home Page. Touch GET
STARTED in the Trailering App to go into
the app.
When a trailer is electrically connected and
a trailer profile has not been created, there
will be an option to create a profile, use a
guest profile, or select Accessory/No trailer.
After the pop-up is displayed three times,
Don’t Remind Me will display and touching
that will turn off the trailer detection
pop-up. To turn the Trailer Detection Alert
on, select ON in the Settings tab.
When a trailer is electrically connected and
after a Trailer Profile has been created, the
trailer detection pop-up will appear with a
list of all of the custom Trailer Profiles made
on the vehicle. To load an existing Trailer
Profile, select one of the Trailer Profiles listed, or load the Guest Trailer Profile by
selecting GUEST TRAILER. Touching
Accessory/No trailer will select Accessory/No
trailer as the active Trailer Profile and will
dismiss the pop- up. Shifting the vehicle
from P (Park) will select Guest Trailer as the
active Trailer Profile and will dismiss the
pop-up.
Create a Trailer Profile
1. Touch Create Profile on the trailer detection pop-up or touch + Add Trailer
Profile in the Trailering App.
2. Create a name for the trailer.
3. Select the hitch type. A checklist profile will be created based on the type
selected.
4. Select Save Profile.
A pop-up will indicate the setup is complete.
Touch DONE to complete the process or
touch TRAILER FEATURE SETUP to set up the
Tow/Haul Mode reminder, Trailer Tire
Pressure Monitoring System, if equipped,
maintenance reminders, or towing
assistance, if equipped.
Import a Trailer Profile
A trailer profile saved to an OnStar account
can be imported to the vehicle.
Page 299 of 441
Chevrolet Silverado 2500 HD/3500 HD Owner Manual (GMNA-Localizing-U.
S./Canada/Mexico-15546003) - 2022 - CRC - 5/5/21
298 Driving and Operating
.The hazard warning lights are activated.
Tires
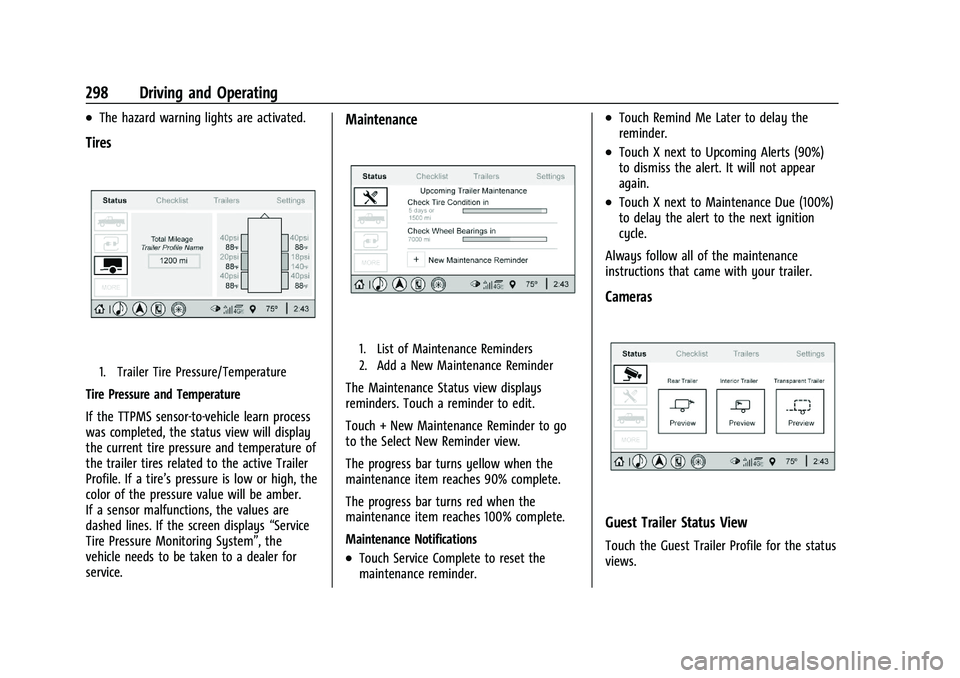
1. Trailer Tire Pressure/Temperature
Tire Pressure and Temperature
If the TTPMS sensor-to-vehicle learn process
was completed, the status view will display
the current tire pressure and temperature of
the trailer tires related to the active Trailer
Profile. If a tire’s pressure is low or high, the
color of the pressure value will be amber.
If a sensor malfunctions, the values are
dashed lines. If the screen displays“Service
Tire Pressure Monitoring System”, the
vehicle needs to be taken to a dealer for
service.
Maintenance
1. List of Maintenance Reminders
2. Add a New Maintenance Reminder
The Maintenance Status view displays
reminders. Touch a reminder to edit.
Touch + New Maintenance Reminder to go
to the Select New Reminder view.
The progress bar turns yellow when the
maintenance item reaches 90% complete.
The progress bar turns red when the
maintenance item reaches 100% complete.
Maintenance Notifications
.Touch Service Complete to reset the
maintenance reminder.
.Touch Remind Me Later to delay the
reminder.
.Touch X next to Upcoming Alerts (90%)
to dismiss the alert. It will not appear
again.
.Touch X next to Maintenance Due (100%)
to delay the alert to the next ignition
cycle.
Always follow all of the maintenance
instructions that came with your trailer.
Cameras
Guest Trailer Status View
Touch the Guest Trailer Profile for the status
views.
Page 304 of 441
Chevrolet Silverado 2500 HD/3500 HD Owner Manual (GMNA-Localizing-U.
S./Canada/Mexico-15546003) - 2022 - CRC - 5/5/21
Driving and Operating 303
If Tow/Haul Mode is off and this setting is
on for a Trailer Profile, each time the
ignition is turned on a reminder will appear
to turn on Tow/Haul Mode when the Trailer
Profile is active.
If Tow/Haul Mode is on and this setting is
on for a Trailer Profile, the reminder will not
appear when the Trailer Profile is active.
Trailer Length Indicator
Touch Trailer Length Indicator to view the
Trailer Length Indicator settings page. If this
setting is ON a guideline is displayed in the
side mirror camera view to indicate the rear
of the attached trailer. If this setting is OFF
the guideline will not be displayed.
This setting will default to OFF if the trailer
length indicator feature is not set up. See
"Towing Assistance" for details on the setup.
Conversions and Add-Ons
Add-On Electrical Equipment
{Warning
The Data Link Connector (DLC) is used for
vehicle service and Emission Inspection/
Maintenance testing. SeeMalfunction
Indicator Lamp (Check Engine Light) 0116.
A device connected to the DLC —such as
an aftermarket fleet or driver-behavior
tracking device —may interfere with
vehicle systems. This could affect vehicle
operation and cause a crash. Such devices
may also access information stored in the
vehicle’s systems.
Caution
Some electrical equipment can damage
the vehicle or cause components to not
work and would not be covered by the
vehicle warranty. Always check with your
dealer before adding electrical equipment.
Add-on equipment can drain the vehicle's
12-volt battery, even if the vehicle is not
operating. The vehicle has an airbag system. Before
attempting to add anything electrical to the
vehicle, see
Servicing the Airbag-Equipped
Vehicle 071 and
Adding Equipment to the Airbag-Equipped
Vehicle 071.
For information on wiring auxiliary switches,
see www.gmupfitter.com or contact your
dealer.
Adding a Snow Plow or Similar
Equipment
Caution
Do not exceed 72 km/h (45 mph) with a
snow plow mounted to the vehicle. The
vehicle could overheat and be damaged.
Before installing a snow plow on the vehicle,
follow these guidelines:
Caution
If the vehicle does not have the snow
plow prep package, RPO VYU, adding a
plow can damage the vehicle, and the
repairs would not be covered by the
vehicle warranty. Unless the vehicle was
built to carry a snow plow, do not add
(Continued)
Page 306 of 441
Chevrolet Silverado 2500 HD/3500 HD Owner Manual (GMNA-Localizing-U.
S./Canada/Mexico-15546003) - 2022 - CRC - 5/5/21
Driving and Operating 305
For example, adding a 318 kg (700 lb) snow
plow actually adds more than 318 kg (700 lb)
to the front axle. Using the formula, if the
snow plow is 122 cm (4 ft) in front of the
front axle and the wheelbase is 305 cm
(10 ft), then:IW = 318 kg (700 lb)
IA = 122 cm (4 ft)
IW.B. = 305 cm (10 ft)
(W x (A + W.B.)/W.B. = (318 x (122 + 305))/305
= 445 kg (980 lb)
This means if the front axle reserve capacity
is more than 445 kg (980 lb), the snow plow
could be added without exceeding the
front GAWR.
Heavier equipment can be added on the
front of the vehicle if less cargo or fewer
passengers are carried, or by positioning
cargo toward the rear. This reduces the load
on the front. However, the front GAWR, rear
GAWR, and Gross Vehicle Weight
Rating (GVWR) must never be exceeded.{Warning
On some vehicles that have certain front
mounted equipment, such as a snow
plow, it may be possible to load the front
axle to the front Gross Axle Weight
Rating (GAWR) but not have enough
weight on the rear axle to have proper
braking performance. If the brakes cannot
work properly, the vehice could crash.
Always follow the snow plow
manufacturer or installer's
recommendation for rear ballast to
ensure a proper front and rear weight
distribution ratio. Maintaining a proper
front and rear weight distribution ratio is
necessary to provide proper braking
performance.
See your dealer for additional advice and
information about using a snow plow on the
vehicle. Also, see Vehicle Load Limits 0220.
Pickup Conversion to Chassis Cab
We are aware that some vehicle owners
might consider having the pickup box
removed and a commercial or recreational
body installed. Owners should be aware
that, as manufactured, there are differences
between a chassis cab and a pickup with the
box removed which could affect vehicle
safety. The components necessary to adapt
a pickup to permit its safe use with a
specialized body should be installed by the
body builder.
Page 309 of 441
Chevrolet Silverado 2500 HD/3500 HD Owner Manual (GMNA-Localizing-U.
S./Canada/Mexico-15546003) - 2022 - CRC - 5/5/21
308 Vehicle Care
GM Accessories are designed to complement
and function with other systems on the
vehicle. See your dealer to accessorize the
vehicle using genuine GM Accessories
installed by a dealer technician.
Also, seeAdding Equipment to the
Airbag-Equipped Vehicle 071.
Vehicle Checks
Doing Your Own Service Work
{Warning
It can be dangerous to work on your
vehicle if you do not have the proper
knowledge, service manual, tools,
or parts. Always follow owner’s manual
procedures and consult the service
manual for your vehicle before doing any
service work.
If doing some of your own service work, use
the proper service manual. It tells you much
more about how to service the vehicle than
this manual can. To order the proper service
manual, see Publication Ordering
Information 0416. This vehicle has an airbag system. Before
attempting to do your own service work,
see
Servicing the Airbag-Equipped Vehicle
0 71.
If equipped with remote vehicle start, open
the hood before performing any service
work to prevent remote starting the vehicle
accidentally. See Remote Vehicle Start 020.
Keep a record with all parts receipts and list
the mileage and the date of any service
work performed. See Maintenance Records
0 404.Caution
Even small amounts of contamination can
cause damage to vehicle systems. Do not
allow contaminants to contact the fluids,
reservoir caps, or dipsticks.
Hood
{Warning
Turn the vehicle off before opening the
hood. If the engine is running with the
hood open, you or others could be
injured.
{Warning
Components under the hood can get hot
from running the engine. To help avoid
the risk of burning unprotected skin,
never touch these components until they
have cooled, and always use a glove or
towel to avoid direct skin contact.
Clear any snow from the hood before
opening.
Page 310 of 441
Chevrolet Silverado 2500 HD/3500 HD Owner Manual (GMNA-Localizing-U.
S./Canada/Mexico-15546003) - 2022 - CRC - 5/5/21
Vehicle Care 309
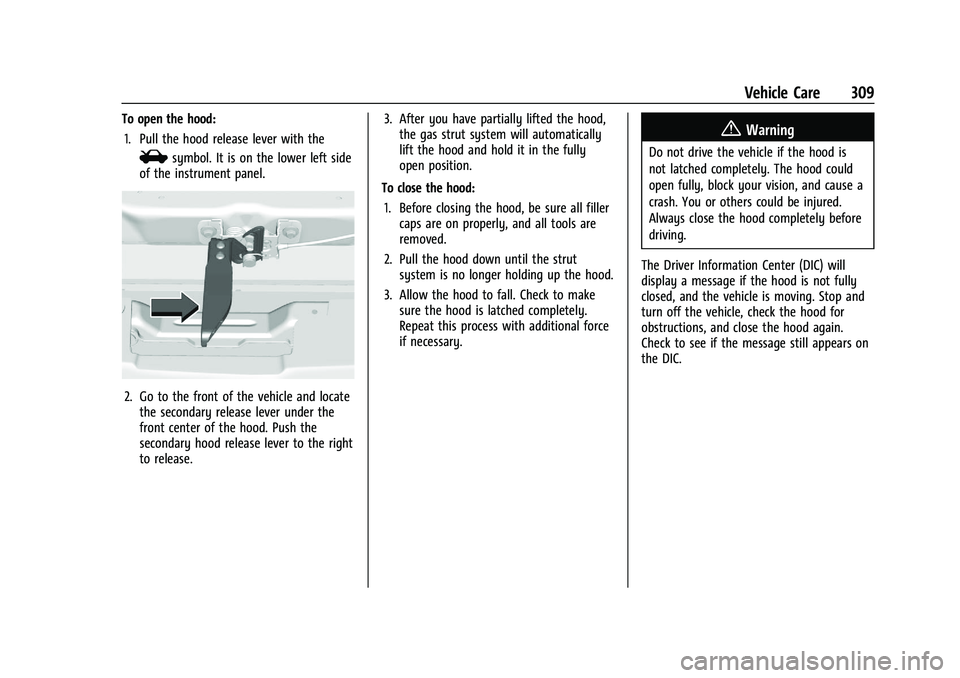
To open the hood:1. Pull the hood release lever with the
isymbol. It is on the lower left side
of the instrument panel.
2. Go to the front of the vehicle and locate the secondary release lever under the
front center of the hood. Push the
secondary hood release lever to the right
to release. 3. After you have partially lifted the hood,
the gas strut system will automatically
lift the hood and hold it in the fully
open position.
To close the hood: 1. Before closing the hood, be sure all filler caps are on properly, and all tools are
removed.
2. Pull the hood down until the strut system is no longer holding up the hood.
3. Allow the hood to fall. Check to make sure the hood is latched completely.
Repeat this process with additional force
if necessary.
{Warning
Do not drive the vehicle if the hood is
not latched completely. The hood could
open fully, block your vision, and cause a
crash. You or others could be injured.
Always close the hood completely before
driving.
The Driver Information Center (DIC) will
display a message if the hood is not fully
closed, and the vehicle is moving. Stop and
turn off the vehicle, check the hood for
obstructions, and close the hood again.
Check to see if the message still appears on
the DIC.
Page 312 of 441
Chevrolet Silverado 2500 HD/3500 HD Owner Manual (GMNA-Localizing-U.
S./Canada/Mexico-15546003) - 2022 - CRC - 5/5/21
Vehicle Care 311
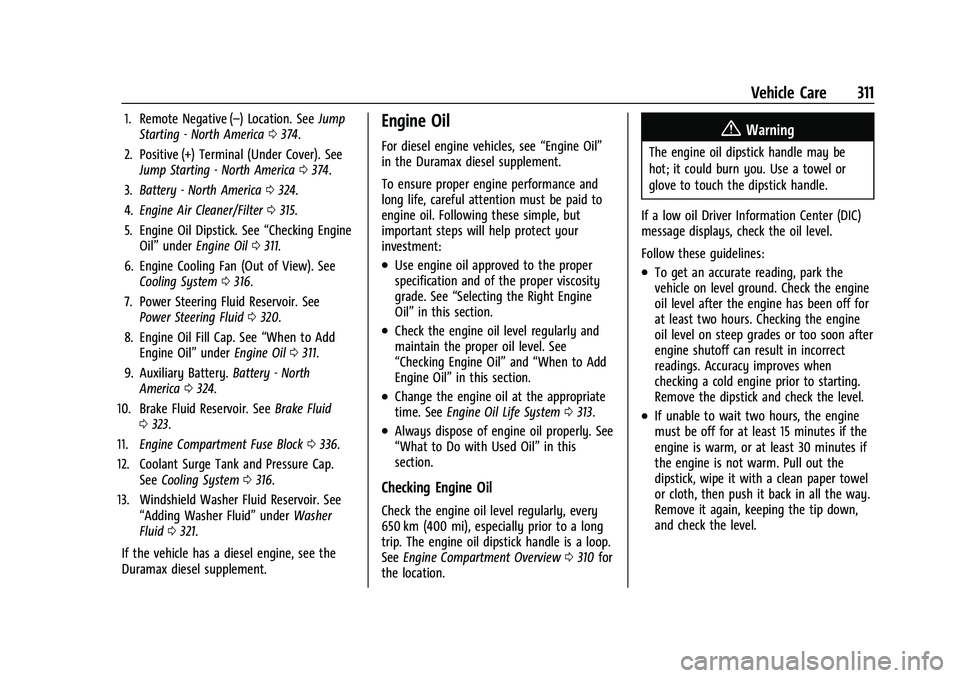
1. Remote Negative (–) Location. SeeJump
Starting - North America 0374.
2. Positive (+) Terminal (Under Cover). See Jump Starting - North America 0374.
3. Battery - North America 0324.
4. Engine Air Cleaner/Filter 0315.
5. Engine Oil Dipstick. See “Checking Engine
Oil” under Engine Oil 0311.
6. Engine Cooling Fan (Out of View). See Cooling System 0316.
7. Power Steering Fluid Reservoir. See Power Steering Fluid 0320.
8. Engine Oil Fill Cap. See “When to Add
Engine Oil” underEngine Oil 0311.
9. Auxiliary Battery. Battery - North
America 0324.
10. Brake Fluid Reservoir. See Brake Fluid
0 323.
11. Engine Compartment Fuse Block 0336.
12. Coolant Surge Tank and Pressure Cap. SeeCooling System 0316.
13. Windshield Washer Fluid Reservoir. See “Adding Washer Fluid” underWasher
Fluid 0321.
If the vehicle has a diesel engine, see the
Duramax diesel supplement.Engine Oil
For diesel engine vehicles, see “Engine Oil”
in the Duramax diesel supplement.
To ensure proper engine performance and
long life, careful attention must be paid to
engine oil. Following these simple, but
important steps will help protect your
investment:
.Use engine oil approved to the proper
specification and of the proper viscosity
grade. See “Selecting the Right Engine
Oil” in this section.
.Check the engine oil level regularly and
maintain the proper oil level. See
“Checking Engine Oil” and“When to Add
Engine Oil” in this section.
.Change the engine oil at the appropriate
time. SeeEngine Oil Life System 0313.
.Always dispose of engine oil properly. See
“What to Do with Used Oil” in this
section.
Checking Engine Oil
Check the engine oil level regularly, every
650 km (400 mi), especially prior to a long
trip. The engine oil dipstick handle is a loop.
See Engine Compartment Overview 0310 for
the location.
{Warning
The engine oil dipstick handle may be
hot; it could burn you. Use a towel or
glove to touch the dipstick handle.
If a low oil Driver Information Center (DIC)
message displays, check the oil level.
Follow these guidelines:
.To get an accurate reading, park the
vehicle on level ground. Check the engine
oil level after the engine has been off for
at least two hours. Checking the engine
oil level on steep grades or too soon after
engine shutoff can result in incorrect
readings. Accuracy improves when
checking a cold engine prior to starting.
Remove the dipstick and check the level.
.If unable to wait two hours, the engine
must be off for at least 15 minutes if the
engine is warm, or at least 30 minutes if
the engine is not warm. Pull out the
dipstick, wipe it with a clean paper towel
or cloth, then push it back in all the way.
Remove it again, keeping the tip down,
and check the level.
Page 314 of 441
Chevrolet Silverado 2500 HD/3500 HD Owner Manual (GMNA-Localizing-U.
S./Canada/Mexico-15546003) - 2022 - CRC - 5/5/21
Vehicle Care 313
Engine Oil Additives/Engine Oil Flushes
Do not add anything to the oil. The
recommended oils meeting the dexos1
specification are all that is needed for good
performance and engine protection.
Engine oil system flushes are not
recommended and could cause engine
damage not covered by the vehicle
warranty.
What to Do with Used Oil
Used engine oil contains certain elements
that can be unhealthy for your skin and
could even cause cancer. Do not let used oil
stay on your skin for very long. Clean your
skin and nails with soap and water, or a
good hand cleaner. Wash or properly
dispose of clothing or rags containing used
engine oil. See the manufacturer's warnings
about the use and disposal of oil products.
Used oil can be a threat to the environment.
If you change your own oil, be sure to drain
all the oil from the filter before disposal.
Never dispose of oil by putting it in the
trash or pouring it on the ground, into
sewers, or into streams or bodies of water.
Recycle it by taking it to a place that
collects used oil.
Engine Oil Life System
When to Change Engine Oil
This vehicle has a computer system that
indicates when to change the engine oil and
filter. This is based on a combination of
factors which include engine revolutions,
engine temperature, and miles driven. Based
on driving conditions, the mileage at which
an oil change is indicated can vary
considerably. For the oil life system to work
properly, the system must be reset every
time the oil is changed.
On some vehicles, when the system has
calculated that oil life has been diminished,
a CHANGE ENGINE OIL SOON message comes
on to indicate that an oil change is
necessary. Change the oil as soon as
possible within the next 1 000 km (600 mi).
It is possible that, if driving under the best
conditions, the oil life system might indicate
that an oil change is not necessary for up to
a year. The engine oil and filter must be
changed at least once a year and, at this
time, the system must be reset. For vehicles
without the CHANGE ENGINE OIL SOON
message, an oil change is needed when the
REMAINING OIL LIFE percentage is near 0%.
Your dealer has trained service people whowill perform this work and reset the system.
It is also important to check the oil regularly
over the course of an oil drain interval and
keep it at the proper level.
If the system is ever reset accidentally, the
oil must be changed at 5 000 km (3,000 mi)
since the last oil change. Remember to reset
the oil life system whenever the oil is
changed.
How to Reset the Engine Oil Life System
Reset the system whenever the engine oil is
changed so that the system can calculate
the next engine oil change. Always reset the
engine oil life to 100% after every oil
change. It will not reset itself. To reset the
engine oil life system:
1. Display the oil life percentage on the DIC. See Driver Information Center (DIC)
(Base Level) 0124 or
Driver Information Center (DIC) (Midlevel
and Uplevel) 0125.
2. Press the thumbwheel on the steering wheel, or the trip odometer reset stem if
the vehicle does not have DIC controls,
for several seconds. When the
confirmation message displays, select
YES. The oil life will change to 100%.