2023 CHEVROLET SILVERADO 1500 bed
[x] Cancel search: bedPage 27 of 463
Chevrolet Silverado 1500 Owner Manual (GMNA-Localizing-U.S./Canada/
Mexico/Paraguay-16515119) - 2023 - CRC - 6/2/22
26 Keys, Doors, and Windows
Caution
Do not open the inner tailgate with the
primary tailgate open if there is a hitch
ball or trailer attached. This may damage
the tailgate.
To close the inner tailgate with the primary
tailgate closed, firmly push or pull it upward
until it latches. Pull it back to be sure it is
latched securely.
To close the inner tailgate with the primary
tailgate open:
.Hold the primary tailgate and firmly close
the inner tailgate.
.Raise the inner tailgate so it meets the
primary tailgate and close together at the
same time.
When using the tailgate step as a load stop,
the load must be secured as the load could
shift. See Cargo Tie-Downs 095.
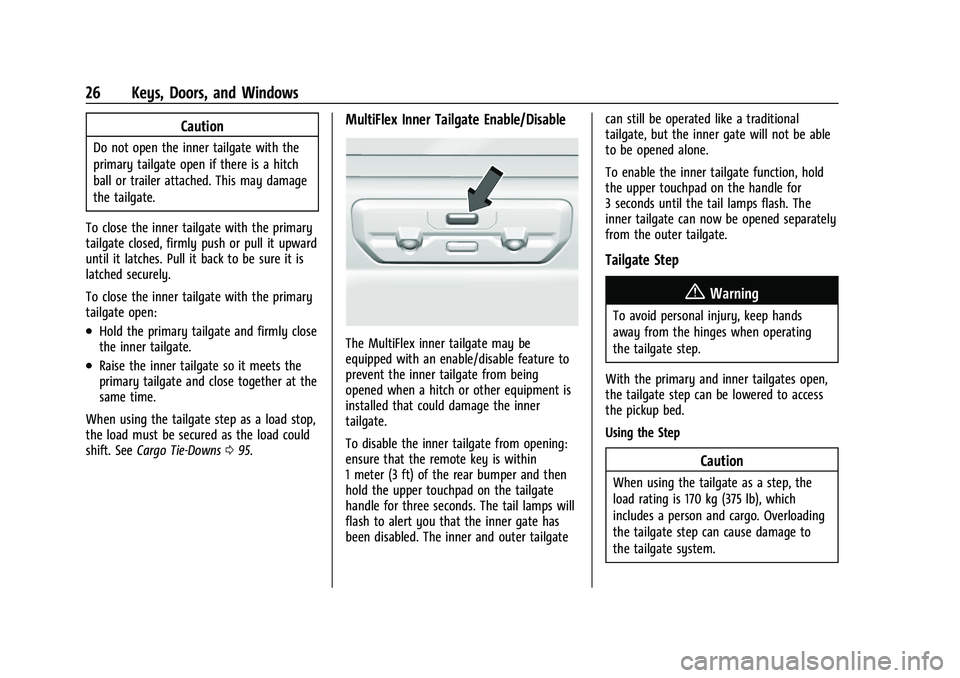
MultiFlex Inner Tailgate Enable/Disable
The MultiFlex inner tailgate may be
equipped with an enable/disable feature to
prevent the inner tailgate from being
opened when a hitch or other equipment is
installed that could damage the inner
tailgate.
To disable the inner tailgate from opening:
ensure that the remote key is within
1 meter (3 ft) of the rear bumper and then
hold the upper touchpad on the tailgate
handle for three seconds. The tail lamps will
flash to alert you that the inner gate has
been disabled. The inner and outer tailgate can still be operated like a traditional
tailgate, but the inner gate will not be able
to be opened alone.
To enable the inner tailgate function, hold
the upper touchpad on the handle for
3 seconds until the tail lamps flash. The
inner tailgate can now be opened separately
from the outer tailgate.
Tailgate Step
{Warning
To avoid personal injury, keep hands
away from the hinges when operating
the tailgate step.
With the primary and inner tailgates open,
the tailgate step can be lowered to access
the pickup bed.
Using the Step
Caution
When using the tailgate as a step, the
load rating is 170 kg (375 lb), which
includes a person and cargo. Overloading
the tailgate step can cause damage to
the tailgate system.
Page 29 of 463
Chevrolet Silverado 1500 Owner Manual (GMNA-Localizing-U.S./Canada/
Mexico/Paraguay-16515119) - 2023 - CRC - 6/2/22
28 Keys, Doors, and Windows
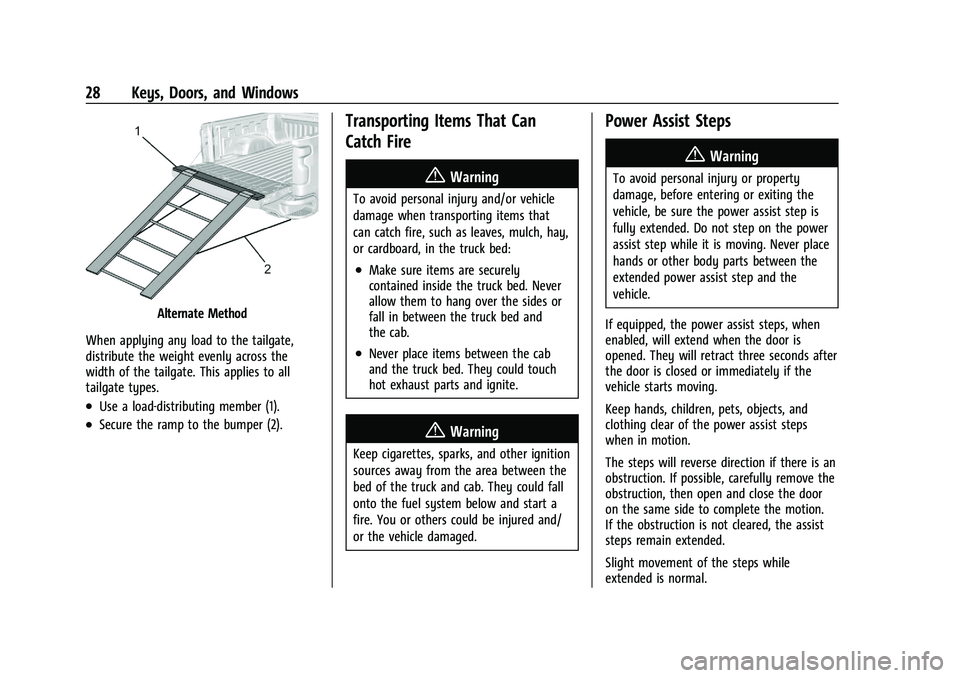
Alternate Method
When applying any load to the tailgate,
distribute the weight evenly across the
width of the tailgate. This applies to all
tailgate types.
.Use a load-distributing member (1).
.Secure the ramp to the bumper (2).
Transporting Items That Can
Catch Fire
{Warning
To avoid personal injury and/or vehicle
damage when transporting items that
can catch fire, such as leaves, mulch, hay,
or cardboard, in the truck bed:
.Make sure items are securely
contained inside the truck bed. Never
allow them to hang over the sides or
fall in between the truck bed and
the cab.
.Never place items between the cab
and the truck bed. They could touch
hot exhaust parts and ignite.
{Warning
Keep cigarettes, sparks, and other ignition
sources away from the area between the
bed of the truck and cab. They could fall
onto the fuel system below and start a
fire. You or others could be injured and/
or the vehicle damaged.
Power Assist Steps
{Warning
To avoid personal injury or property
damage, before entering or exiting the
vehicle, be sure the power assist step is
fully extended. Do not step on the power
assist step while it is moving. Never place
hands or other body parts between the
extended power assist step and the
vehicle.
If equipped, the power assist steps, when
enabled, will extend when the door is
opened. They will retract three seconds after
the door is closed or immediately if the
vehicle starts moving.
Keep hands, children, pets, objects, and
clothing clear of the power assist steps
when in motion.
The steps will reverse direction if there is an
obstruction. If possible, carefully remove the
obstruction, then open and close the door
on the same side to complete the motion.
If the obstruction is not cleared, the assist
steps remain extended.
Slight movement of the steps while
extended is normal.
Page 84 of 463
Chevrolet Silverado 1500 Owner Manual (GMNA-Localizing-U.S./Canada/
Mexico/Paraguay-16515119) - 2023 - CRC - 6/2/22
Seats and Restraints 83
tether and the seat belt. Refer to the
child restraint manufacturer instructions
and the instructions in this manual.
1.1. Find the lower anchors for thedesired seating position.
1.2. Put the child restraint on the seat.
1.3. Attach and tighten the lower attachments on the child restraint
to the lower anchors.
2. For forward-facing child restraints, attach and tighten the top tether to the top
tether anchor, if your vehicle has one.
Follow the child restraint instructions and
the vehicle LATCH anchor weight limits
described at the beginning of this
section, and the following steps:
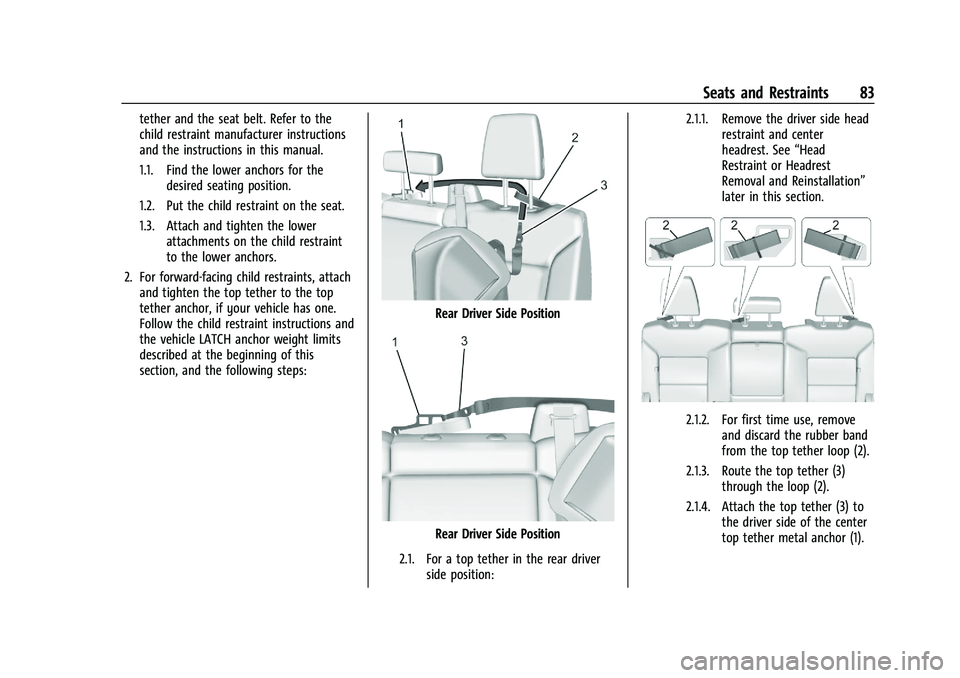
Rear Driver Side Position
Rear Driver Side Position
2.1. For a top tether in the rear driver side position: 2.1.1. Remove the driver side head
restraint and center
headrest. See “Head
Restraint or Headrest
Removal and Reinstallation”
later in this section.
2.1.2. For first time use, remove and discard the rubber band
from the top tether loop (2).
2.1.3. Route the top tether (3) through the loop (2).
2.1.4. Attach the top tether (3) to the driver side of the center
top tether metal anchor (1).
Page 96 of 463
Chevrolet Silverado 1500 Owner Manual (GMNA-Localizing-U.S./Canada/
Mexico/Paraguay-16515119) - 2023 - CRC - 6/2/22
Storage 95
Bench Seat
If equipped with storage, press the latch and
lift to open.
Bucket Seat Press the latch and lift to open.
Floor Console Storage
If equipped with front center seat storage,
unlock with the mechanical key in the
remote key, press the latch, and lift to open.
Additional Storage Features
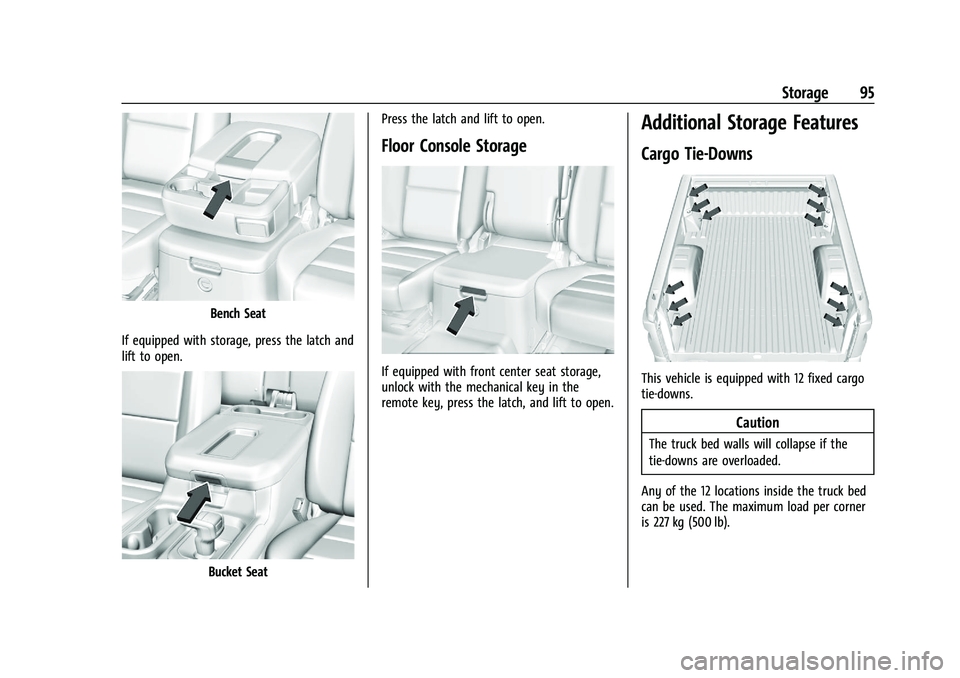
Cargo Tie-Downs
This vehicle is equipped with 12 fixed cargo
tie-downs.
Caution
The truck bed walls will collapse if the
tie-downs are overloaded.
Any of the 12 locations inside the truck bed
can be used. The maximum load per corner
is 227 kg (500 lb).
Page 97 of 463
Chevrolet Silverado 1500 Owner Manual (GMNA-Localizing-U.S./Canada/
Mexico/Paraguay-16515119) - 2023 - CRC - 6/2/22
96 Storage
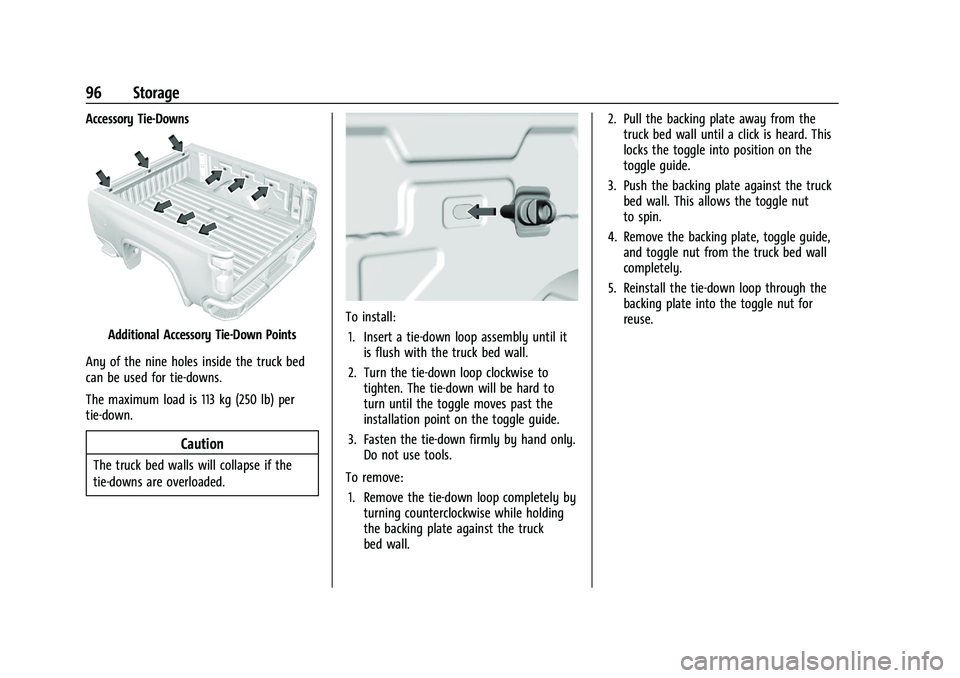
Accessory Tie-Downs
Additional Accessory Tie-Down Points
Any of the nine holes inside the truck bed
can be used for tie-downs.
The maximum load is 113 kg (250 lb) per
tie-down.
Caution
The truck bed walls will collapse if the
tie-downs are overloaded.
To install: 1. Insert a tie-down loop assembly until it is flush with the truck bed wall.
2. Turn the tie-down loop clockwise to tighten. The tie-down will be hard to
turn until the toggle moves past the
installation point on the toggle guide.
3. Fasten the tie-down firmly by hand only. Do not use tools.
To remove: 1. Remove the tie-down loop completely by turning counterclockwise while holding
the backing plate against the truck
bed wall. 2. Pull the backing plate away from the
truck bed wall until a click is heard. This
locks the toggle into position on the
toggle guide.
3. Push the backing plate against the truck bed wall. This allows the toggle nut
to spin.
4. Remove the backing plate, toggle guide, and toggle nut from the truck bed wall
completely.
5. Reinstall the tie-down loop through the backing plate into the toggle nut for
reuse.
Page 103 of 463
Chevrolet Silverado 1500 Owner Manual (GMNA-Localizing-U.S./Canada/
Mexico/Paraguay-16515119) - 2023 - CRC - 6/2/22
102 Instruments and Controls
Caution
Hanging heavy equipment from the
power outlet can cause damage not
covered by the vehicle warranty. The
power outlets are designed for accessory
power plugs only, such as cell phone
charge cords.
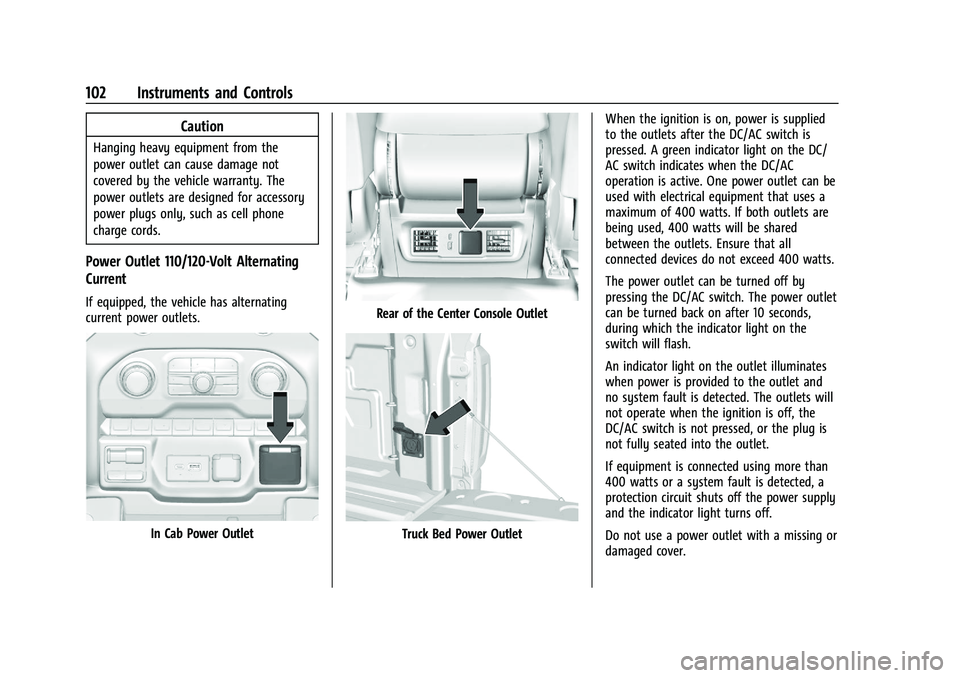
Power Outlet 110/120-Volt Alternating
Current
If equipped, the vehicle has alternating
current power outlets.
In Cab Power Outlet
Rear of the Center Console Outlet
Truck Bed Power OutletWhen the ignition is on, power is supplied
to the outlets after the DC/AC switch is
pressed. A green indicator light on the DC/
AC switch indicates when the DC/AC
operation is active. One power outlet can be
used with electrical equipment that uses a
maximum of 400 watts. If both outlets are
being used, 400 watts will be shared
between the outlets. Ensure that all
connected devices do not exceed 400 watts.
The power outlet can be turned off by
pressing the DC/AC switch. The power outlet
can be turned back on after 10 seconds,
during which the indicator light on the
switch will flash.
An indicator light on the outlet illuminates
when power is provided to the outlet and
no system fault is detected. The outlets will
not operate when the ignition is off, the
DC/AC switch is not pressed, or the plug is
not fully seated into the outlet.
If equipment is connected using more than
400 watts or a system fault is detected, a
protection circuit shuts off the power supply
and the indicator light turns off.
Do not use a power outlet with a missing or
damaged cover.
Page 144 of 463
Chevrolet Silverado 1500 Owner Manual (GMNA-Localizing-U.S./Canada/
Mexico/Paraguay-16515119) - 2023 - CRC - 6/2/22
Lighting 143
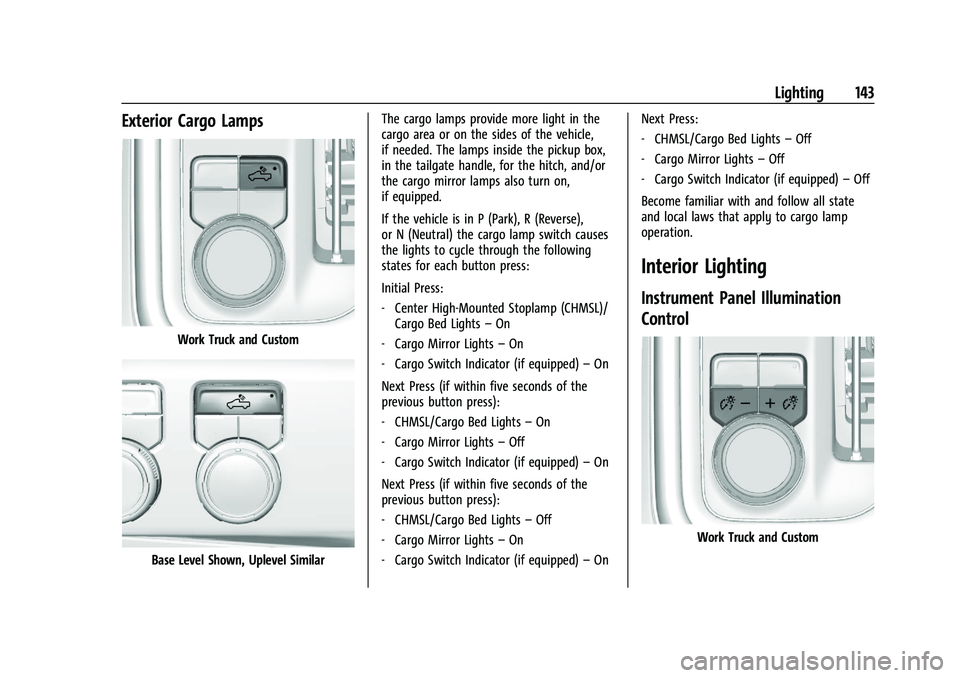
Exterior Cargo Lamps
Work Truck and Custom
Base Level Shown, Uplevel SimilarThe cargo lamps provide more light in the
cargo area or on the sides of the vehicle,
if needed. The lamps inside the pickup box,
in the tailgate handle, for the hitch, and/or
the cargo mirror lamps also turn on,
if equipped.
If the vehicle is in P (Park), R (Reverse),
or N (Neutral) the cargo lamp switch causes
the lights to cycle through the following
states for each button press:
Initial Press:
‐
Center High-Mounted Stoplamp (CHMSL)/
Cargo Bed Lights –On
‐ Cargo Mirror Lights –On
‐ Cargo Switch Indicator (if equipped) –On
Next Press (if within five seconds of the
previous button press):
‐ CHMSL/Cargo Bed Lights –On
‐ Cargo Mirror Lights –Off
‐ Cargo Switch Indicator (if equipped) –On
Next Press (if within five seconds of the
previous button press):
‐ CHMSL/Cargo Bed Lights –Off
‐ Cargo Mirror Lights –On
‐ Cargo Switch Indicator (if equipped) –On Next Press:
‐
CHMSL/Cargo Bed Lights –Off
‐ Cargo Mirror Lights –Off
‐ Cargo Switch Indicator (if equipped) –Off
Become familiar with and follow all state
and local laws that apply to cargo lamp
operation.
Interior Lighting
Instrument Panel Illumination
Control
Work Truck and Custom
Page 164 of 463
Chevrolet Silverado 1500 Owner Manual (GMNA-Localizing-U.S./Canada/
Mexico/Paraguay-16515119) - 2023 - CRC - 6/2/22
Infotainment System 163
Google Assistant on the Home screen, or by
using the wake up words“Hey Google”or
“OK Google.”
However, not all features within these areas
are supported by voice commands and
requires the user to have a valid data
subscription plan in order to use some of
the Google Assistant features.
Using Voice Recognition
Voice recognition becomes available once
the system is initialized. This begins when
the vehicle is turned on. Initialization may
take a few moments.
1. Press
gon the steering wheel controls,
touch Google Assistant on the Home
screen, or use the wake up words “Hey
Google” or“OK Google” to activate voice
recognition. Google Assistant must be set
as the Default Assistant for the
gand
the wake word options to work.
2. Clearly speak one of the commands described later in this section.
Canceling Google Assistant
.Presscon the steering wheel controls
to cancel the Google Assistant request.
Helpful Hints for Speaking Commands
Voice recognition identifies commands that
are naturally stated in sentence form,
or direct commands that state the
application and the task.
For best results:
.Speak the command naturally, not too
fast, not too slow.
.Use direct commands without a lot of
extra words. For example, “Call
at work,” “Play” followed by the artist or
song name, or “Play”followed by the
radio station number.
Direct commands are more clearly
understood by the system. An example of a
direct command is “Dial
If a cell phone number was saved with a
name and a place, the direct command
should include both. For example “Call
Voice Recognition for the Radio
When voice is started, the voice recognition
commands for AM, FM, SiriusXM (if
equipped), and media apps (if supported) are
available. “Play
:Tune to the
radio station frequency identified in the
command (like “nine fifty”).
“Play
radio station frequency identified in the
command (like “one oh one point one”).
“Play channel
SiriusXM” :Tune to the SiriusXM radio
station channel number identified in the
command. This command may require an
online connection.
“Play
Tune to the SiriusXM radio station channel
name identified in the command. This
command may require an online connection.
“Play