2023 CHEVROLET SILVERADO 1500 Flat tow
[x] Cancel search: Flat towPage 32 of 463

Chevrolet Silverado 1500 Owner Manual (GMNA-Localizing-U.S./Canada/
Mexico/Paraguay-16515119) - 2023 - CRC - 6/2/22
Keys, Doors, and Windows 31
Immobilizer Operation
This vehicle has a passive theft-deterrent
system.
The system does not have to be manually
armed or disarmed.
The vehicle is automatically immobilized
when the vehicle is turned off.
The system is automatically disarmed when
the ignition is turned from off to on.
The security light, in the instrument cluster,
comes on if there is a problem with arming
or disarming the theft-deterrent system.
The system has one or more remote keys
matched to an immobilizer control unit in
your vehicle. Only a correctly matched
remote key will start the vehicle. If the
remote key is ever damaged, you may not
be able to start your vehicle.When trying to start the vehicle, the
security light may come on briefly when the
ignition is turned on. If the engine does not
start and the security light stays on, there is
a problem with the system. Turn the
ignition off and try again.
If the vehicle will not change ignition modes
(accessory mode, on, off), and the remote
key appears to be undamaged, try another
remote key. Or, you may try placing the
remote key in the remote key pocket
located in the center console. See
Remote
Key Operation 012.
If the ignition mode will not change with
the other remote key or with the remote
key in the remote key pocket, your vehicle
needs service. If the ignition does change
modes, the first remote key may be faulty.
See your dealer who can service the
theft-deterrent system and have a new
remote key programmed to the vehicle.
It is possible for the immobilizer system to
learn new or replacement remote keys. Up
to eight remote keys can be programmed
for the vehicle. To program additional
remote keys, see "Programming Remote
Keys to the Vehicle" under Remote Key
Operation 012. Do not leave the remote key or device that
disarms or deactivates the vehicle theft
system in the vehicle.
Exterior Mirrors
Convex Mirrors
{Warning
A convex mirror can make things, like
other vehicles, look farther away than
they really are. If you cut too sharply
into the right lane, you could hit a
vehicle on the right. Check the inside
mirror or glance over your shoulder
before changing lanes.
Standard Mirrors
The passenger side mirror is convex shaped.
A convex mirror surface is curved so more
can be seen from the driver seat.
Trailer-Tow Mirrors
The upper portion of both the driver and
passenger mirrors is flat.
Page 57 of 463
Chevrolet Silverado 1500 Owner Manual (GMNA-Localizing-U.S./Canada/
Mexico/Paraguay-16515119) - 2023 - CRC - 6/2/22
56 Seats and Restraints
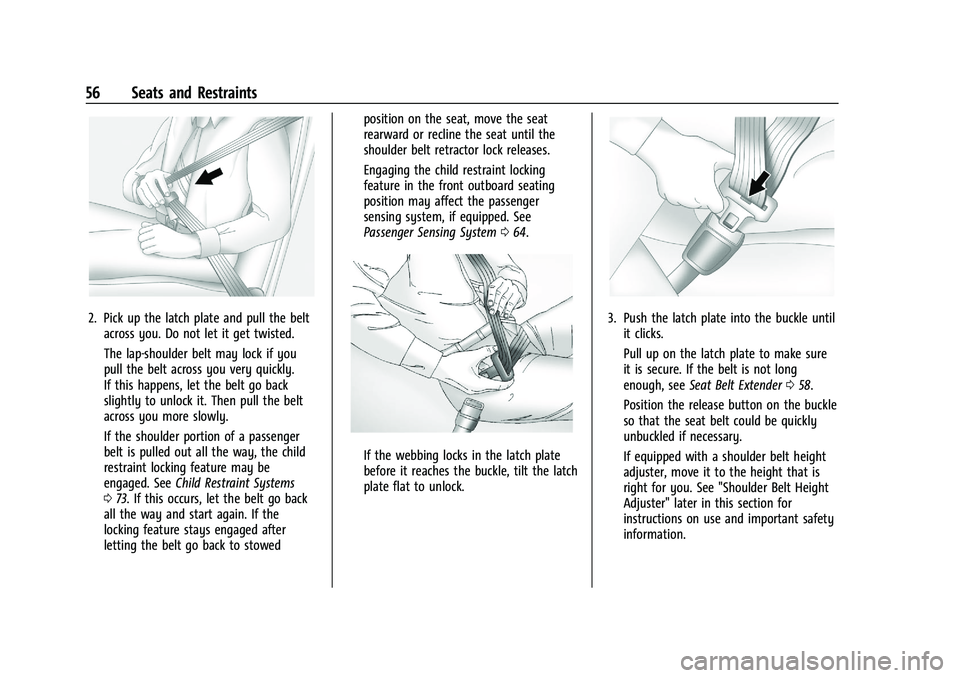
2. Pick up the latch plate and pull the beltacross you. Do not let it get twisted.
The lap-shoulder belt may lock if you
pull the belt across you very quickly.
If this happens, let the belt go back
slightly to unlock it. Then pull the belt
across you more slowly.
If the shoulder portion of a passenger
belt is pulled out all the way, the child
restraint locking feature may be
engaged. See Child Restraint Systems
0 73. If this occurs, let the belt go back
all the way and start again. If the
locking feature stays engaged after
letting the belt go back to stowed position on the seat, move the seat
rearward or recline the seat until the
shoulder belt retractor lock releases.
Engaging the child restraint locking
feature in the front outboard seating
position may affect the passenger
sensing system, if equipped. See
Passenger Sensing System
064.
If the webbing locks in the latch plate
before it reaches the buckle, tilt the latch
plate flat to unlock.
3. Push the latch plate into the buckle until
it clicks.
Pull up on the latch plate to make sure
it is secure. If the belt is not long
enough, see Seat Belt Extender 058.
Position the release button on the buckle
so that the seat belt could be quickly
unbuckled if necessary.
If equipped with a shoulder belt height
adjuster, move it to the height that is
right for you. See "Shoulder Belt Height
Adjuster" later in this section for
instructions on use and important safety
information.
Page 64 of 463
Chevrolet Silverado 1500 Owner Manual (GMNA-Localizing-U.S./Canada/
Mexico/Paraguay-16515119) - 2023 - CRC - 6/2/22
Seats and Restraints 63
designed to inflate in rollovers or rear
impacts. A seat-mounted side impact airbag
is designed to inflate on the side of the
vehicle that is struck.
Roof-rail airbags are designed to inflate in
moderate to severe side crashes depending
on the location of the impact. In addition,
these roof-rail airbags may inflate during a
rollover or in a severe frontal impact.
Roof-rail airbags are not designed to inflate
in rear impacts. Both roof-rail airbags may
inflate when either side of the vehicle is
struck or if the sensing system predicts that
the vehicle is about to roll over on its side,
or in a severe frontal impact.
In any particular crash, no one can say
whether an airbag should have inflated
simply because of the vehicle damage or
repair costs.
What Makes an Airbag Inflate?
In a deployment event, the sensing system
sends an electrical signal triggering a release
of gas from the inflator. Gas from the
inflator fills the airbag causing the bag to
break out of the cover. The inflator, the
airbag, and related hardware are all part of
the airbag module.For airbag locations, see
Where Are the
Airbags? 061.
How Does an Airbag Restrain?
In moderate to severe frontal or near frontal
collisions, even belted occupants can contact
the steering wheel or the instrument panel.
In moderate to severe side collisions, even
belted occupants can contact the inside of
the vehicle.
Airbags supplement the protection provided
by seat belts by distributing the force of the
impact more evenly over the
occupant's body.
Rollover capable roof-rail airbags are
designed to help contain the head and chest
of occupants in the outboard seating
positions in the first and second rows. The
rollover capable roof-rail airbags are
designed to help reduce the risk of full or
partial ejection in rollover events, although
no system can prevent all such ejections.
But airbags would not help in many types
of collisions, primarily because the
occupant's motion is not toward those
airbags. See When Should an Airbag Inflate?
0 62. Airbags should never be regarded as
anything more than a supplement to seat
belts.What Will You See after an
Airbag Inflates?
After frontal and seat-mounted side impact
airbags inflate, they quickly deflate, so
quickly that some people may not even
realize the airbags inflated. Roof-rail airbags
may still be at least partially inflated for
some time after they inflate. Some
components of the airbag module may be
hot for several minutes. For location of the
airbags, see
Where Are the Airbags? 061.
The parts of the airbag that come into
contact with you may be warm, but not too
hot to touch. There may be some smoke
and dust coming from the vents in the
deflated airbags. Airbag inflation does not
prevent the driver from seeing out of the
windshield or being able to steer the
vehicle, nor does it prevent people from
leaving the vehicle.
Page 69 of 463
Chevrolet Silverado 1500 Owner Manual (GMNA-Localizing-U.S./Canada/
Mexico/Paraguay-16515119) - 2023 - CRC - 6/2/22
68 Seats and Restraints
approved by GM for your specific vehicle.
SeeAdding Equipment to the
Airbag-Equipped Vehicle 068 for more
information about modifications that can
affect how the system operates.
The ON indicator may be lit if an object,
such as a briefcase, handbag, grocery bag,
laptop, or other electronic device, is put on
an unoccupied seat. If this is not desired,
remove the object from the seat.
{Warning
Stowing articles under the passenger seat
or between the passenger seat cushion
and seatback may interfere with the
proper operation of the passenger
sensing system.
Servicing the Airbag-Equipped
Vehicle
Airbags affect how the vehicle should be
serviced. There are parts of the airbag
system in several places around the vehicle.
Your dealer and the service manual have
information about servicing the vehicle and
the airbag system. To purchase a service
manual, see Publication Ordering
Information 0437.
{Warning
For up to 10 seconds after the vehicle is
turned off and the battery is
disconnected, an airbag can still inflate
during improper service. You can be
injured if you are close to an airbag
when it inflates. Avoid yellow connectors.
They are probably part of the airbag
system. Be sure to follow proper service
procedures, and make sure the person
performing work for you is qualified to
do so.
Adding Equipment to the
Airbag-Equipped Vehicle
Adding accessories that change the vehicle's
frame, bumper system, height, front end,
or side sheet metal, may keep the airbag
system from working properly.
The operation of the airbag system can also
be affected by changing, including
improperly repairing or replacing, any parts
of the following:
.Airbag system, including airbag modules,
front or side impact sensors, sensing and
diagnostic module, or airbag wiring
.Front seats, including stitching, seams,
or zippers
.Seat belts
.Steering wheel, instrument panel,
overhead console, ceiling trim, or pillar
garnish trim
.Inner door seals, including speakers
Your dealer and the service manual have
information about the location of the airbag
modules and sensors, sensing and diagnostic
module, and airbag wiring along with the
proper replacement procedures.
In addition, the vehicle has a passenger
sensing system for the front outboard
passenger position, which includes sensors
that are part of the passenger seat. The
passenger sensing system may not operate
properly if the original seat trim is replaced
with non-GM covers, upholstery, or trim; or
with GM covers, upholstery, or trim
designed for a different vehicle. Any object,
such as an aftermarket seat heater or a
comfort-enhancing pad or device, installed
under or on top of the seat fabric, could
also interfere with the operation of the
passenger sensing system. This could either
prevent proper deployment of the passenger
airbag(s) or prevent the passenger sensing
Page 93 of 463
Chevrolet Silverado 1500 Owner Manual (GMNA-Localizing-U.S./Canada/
Mexico/Paraguay-16515119) - 2023 - CRC - 6/2/22
92 Seats and Restraints
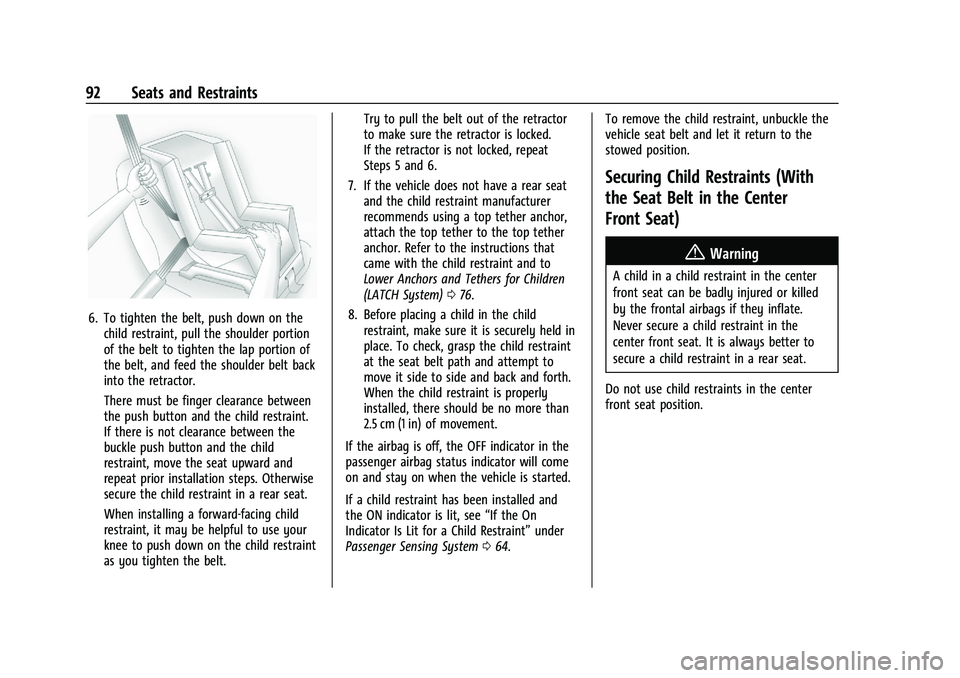
6. To tighten the belt, push down on thechild restraint, pull the shoulder portion
of the belt to tighten the lap portion of
the belt, and feed the shoulder belt back
into the retractor.
There must be finger clearance between
the push button and the child restraint.
If there is not clearance between the
buckle push button and the child
restraint, move the seat upward and
repeat prior installation steps. Otherwise
secure the child restraint in a rear seat.
When installing a forward-facing child
restraint, it may be helpful to use your
knee to push down on the child restraint
as you tighten the belt. Try to pull the belt out of the retractor
to make sure the retractor is locked.
If the retractor is not locked, repeat
Steps 5 and 6.
7. If the vehicle does not have a rear seat and the child restraint manufacturer
recommends using a top tether anchor,
attach the top tether to the top tether
anchor. Refer to the instructions that
came with the child restraint and to
Lower Anchors and Tethers for Children
(LATCH System) 076.
8. Before placing a child in the child restraint, make sure it is securely held in
place. To check, grasp the child restraint
at the seat belt path and attempt to
move it side to side and back and forth.
When the child restraint is properly
installed, there should be no more than
2.5 cm (1 in) of movement.
If the airbag is off, the OFF indicator in the
passenger airbag status indicator will come
on and stay on when the vehicle is started.
If a child restraint has been installed and
the ON indicator is lit, see “If the On
Indicator Is Lit for a Child Restraint” under
Passenger Sensing System 064. To remove the child restraint, unbuckle the
vehicle seat belt and let it return to the
stowed position.
Securing Child Restraints (With
the Seat Belt in the Center
Front Seat)
{Warning
A child in a child restraint in the center
front seat can be badly injured or killed
by the frontal airbags if they inflate.
Never secure a child restraint in the
center front seat. It is always better to
secure a child restraint in a rear seat.
Do not use child restraints in the center
front seat position.
Page 195 of 463
Chevrolet Silverado 1500 Owner Manual (GMNA-Localizing-U.S./Canada/
Mexico/Paraguay-16515119) - 2023 - CRC - 6/2/22
194 Driving and Operating
Side Blind Zone Alert (SBZA) . . . . . . . . . . 289
Lane Change Alert (LCA) . . . . . . . . . . . . . . 290
Lane Keep Assist (LKA) . . . . . . . . . . . . . . . . 292
Fuel
Top Tier Fuel . . . . . . . . . . . . . . . . . . . . . . . . . . 294
Recommended Fuel (2.7L L4 and 5.3LV8 Engines) . . . . . . . . . . . . . . . . . . . . . . . . . 294
Recommended Fuel (6.2L V8 Engine) . . . . . . . . . . . . . . . . . . . . . . . . . . 294
Prohibited Fuels . . . . . . . . . . . . . . . . . . . . . . . 295
Fuels in Foreign Countries . . . . . . . . . . . . . 295
Fuel Additives . . . . . . . . . . . . . . . . . . . . . . . . . 295
Filling the Tank (Pickup Model) . . . . . . . . 295
Filling the Tank (Chassis Cab Model) . . . . . . . . . . . . . . . . . . . . . . . . . . . . . . 297
Filling a Portable Fuel Container . . . . . . 298
Trailer Towing
General Towing Information . . . . . . . . . . 298
Driving Characteristics and
Towing Tips . . . . . . . . . . . . . . . . . . . . . . . . . 299
Trailer Towing . . . . . . . . . . . . . . . . . . . . . . . . . 302
Towing Equipment . . . . . . . . . . . . . . . . . . . . 307
Trailer Sway Control (TSC) . . . . . . . . . . . . . 316
Trailering App . . . . . . . . . . . . . . . . . . . . . . . . . 318
Conversions and Add-Ons
Add-On Electrical Equipment . . . . . . . . . . . 328
Adding a Snow Plow or Similar Equipment . . . . . . . . . . . . . . . . . . . . . . . . . . . 328
Pickup Conversion to Chassis Cab . . . . . 330Driving Information
Driving for Better Fuel Economy
Driving habits can affect fuel mileage. Here
are some driving tips to get the best fuel
economy possible:
.Set the climate controls to the desired
temperature after the engine is started,
or turn them off when not required.
.Avoid fast starts and accelerate smoothly.
.Brake gradually and avoid abrupt stops.
.Avoid idling the engine for long periods
of time.
.When road and weather conditions are
appropriate, use cruise control.
.Always follow posted speed limits or
drive more slowly when conditions
require.
.Keep vehicle tires properly inflated.
.Combine several trips into a single trip.
.Replace the vehicle's tires with the same
TPC Spec number molded into the tire's
sidewall near the size.
.Follow recommended scheduled
maintenance.
Page 206 of 463
Chevrolet Silverado 1500 Owner Manual (GMNA-Localizing-U.S./Canada/
Mexico/Paraguay-16515119) - 2023 - CRC - 6/2/22
Driving and Operating 205
Warning (Continued)
Overloading can also reduce stopping
performance, damage the tires, and
shorten the life of the vehicle.
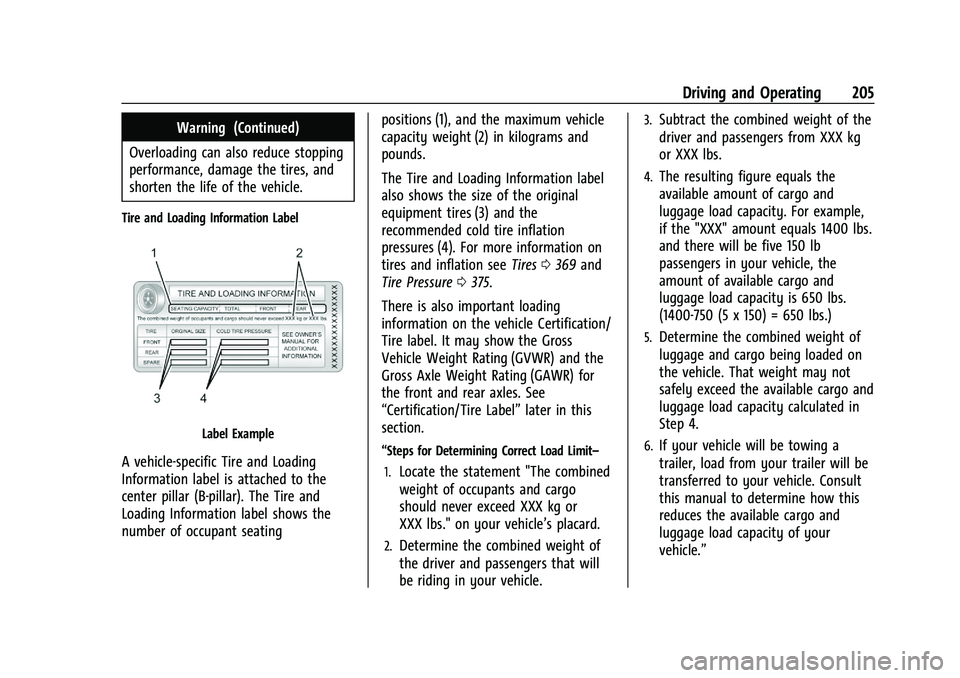
Tire and Loading Information Label
Label Example
A vehicle-specific Tire and Loading
Information label is attached to the
center pillar (B-pillar). The Tire and
Loading Information label shows the
number of occupant seating positions (1), and the maximum vehicle
capacity weight (2) in kilograms and
pounds.
The Tire and Loading Information label
also shows the size of the original
equipment tires (3) and the
recommended cold tire inflation
pressures (4). For more information on
tires and inflation see
Tires0369 and
Tire Pressure 0375.
There is also important loading
information on the vehicle Certification/
Tire label. It may show the Gross
Vehicle Weight Rating (GVWR) and the
Gross Axle Weight Rating (GAWR) for
the front and rear axles. See
“Certification/Tire Label” later in this
section.“Steps for Determining Correct Load Limit–
1.
Locate the statement "The combined
weight of occupants and cargo
should never exceed XXX kg or
XXX lbs." on your vehicle’s placard.
2.Determine the combined weight of
the driver and passengers that will
be riding in your vehicle.
3.Subtract the combined weight of the
driver and passengers from XXX kg
or XXX lbs.
4.The resulting figure equals the
available amount of cargo and
luggage load capacity. For example,
if the "XXX" amount equals 1400 lbs.
and there will be five 150 lb
passengers in your vehicle, the
amount of available cargo and
luggage load capacity is 650 lbs.
(1400-750 (5 x 150) = 650 lbs.)
5.Determine the combined weight of
luggage and cargo being loaded on
the vehicle. That weight may not
safely exceed the available cargo and
luggage load capacity calculated in
Step 4.
6.If your vehicle will be towing a
trailer, load from your trailer will be
transferred to your vehicle. Consult
this manual to determine how this
reduces the available cargo and
luggage load capacity of your
vehicle.”
Page 310 of 463
Chevrolet Silverado 1500 Owner Manual (GMNA-Localizing-U.S./Canada/
Mexico/Paraguay-16515119) - 2023 - CRC - 6/2/22
Driving and Operating 309
MeasurementHeight Example 1500 (mm)
H1 1 000
H2 1 050
H2−H1 50
(H2−H1)/2 25
H2−[(H2−H1)/2] 1 025
Tires
.Do not tow a trailer while using a
compact spare tire on the vehicle.
.Tires must be properly inflated to support
loads while towing a trailer. SeeTires
0 369 for instructions on proper tire
inflation.
Fifth-Wheel and Gooseneck Trailering
Fifth-Wheel and Gooseneck Trailering
Fifth-wheel and gooseneck trailers can be
used with many pickup models. These
trailers place a larger percentage of the
weight (kingpin weight) on the tow vehicle
than conventional trailers. Make sure this
weight does not cause the vehicle to exceed
GAWR or GVWR. Fifth-wheel or gooseneck
kingpin weight should be 15–25% of the
trailer weight up to the maximum amount specified on the Trailering Information Label.
See
“Trailer Weight" under Trailer Towing
0 302.
The hitch should be in the pickup bed so
that its centerline is over or near the rear
axle. Take care that it is not so far forward
that it will contact the back of the cab in
sharp turns. This is especially important for
short box pickups. Trailer pin box extensions
and sliding fifth-wheel hitch assemblies may
be used. There should be at least 15 cm
(6 in) of clearance between the top of the
pickup box and the bottom of the trailer
shelf that extends over the box.
Make sure the hitch is attached to the tow
vehicle frame rails. Do not use the pickup
box for support.
Safety Chains
Always attach safety chains between the
vehicle and the trailer. Instructions about
safety chains may be provided by the hitch
manufacturer or by the trailer manufacturer.
If the trailer being towed weighs up to
2 271 kg (5,000 lb) with a factory-installed
step bumper, safety chains may be attached
to the attaching points on the bumper;
otherwise, safety chains should be attached
to holes on the trailer hitch.
Cross the safety chains under the tongue of
the trailer to help prevent the tongue from
contacting the road if it becomes separated
from the hitch. Always leave enough slack in
the safety chains to allow the combination
to turn. Never allow safety chains to drag
on the ground.