2023 CHEVROLET SILVERADO 1500 page 21
[x] Cancel search: page 21Page 173 of 463
Chevrolet Silverado 1500 Owner Manual (GMNA-Localizing-U.S./Canada/
Mexico/Paraguay-16515119) - 2023 - CRC - 6/2/22
172 Infotainment System
Three-Way Calling
Three-way calling must be supported on the
Bluetooth phone and enabled by the
wireless service carrier to work.
To start a three-way call while in a
current call:1. In the Call View, select Add Call to add another call.
2. Initiate the second call by selecting from Recents, Contacts, or Keypad.
3. When the second call is active, press the merge icon to conference the three-way
call together.
Ending a Call
.Pression the steering wheel controls.
.Touchbnext to a call to end only
that call.
.Select End on the instrument cluster using
the select control.
Dual Tone Multi-Frequency (DTMF) Tones
The in-vehicle Bluetooth system can send
numbers during a call. This is used when
calling a menu-driven phone system. Use the
Keypad to enter the number.
Apple CarPlay and Android Auto
(Base Radio)
If equipped, Android Auto and/or Apple
CarPlay capability may be available through
a compatible smartphone. If available, the
Android Auto and Apple CarPlay icons will
change from gray to color on the Home
Page of the infotainment display.
To use Android Auto and/or Apple CarPlay:
For Wired Phone Projection
1. Download the Android Auto app to your smartphone from the Google Play store.
There is no app required for Apple
CarPlay.
2. Connect your Android phone or Apple iPhone by using the factory-provided
phone USB cable and plugging into a
USB data port. For best performance, it is
highly recommended to use the device’s
factory-provided USB cable, which should
be replaced after significant wear to
maintain connection quality. Aftermarket
or third-party cables may not work.
3. When the phone is first connected to activate Apple CarPlay or Android Auto,
accept the terms and conditions on both
the infotainment system and the phone. 4. Follow the instructions on the phone.
The Android Auto and Apple CarPlay icons
on the Home Page will illuminate depending
on the smartphone. Android Auto and/or
Apple CarPlay may automatically launch
upon USB connection. If not, touch the
Android Auto or Apple CarPlay icon on the
Home Page to launch.
Press
{on the center stack to return to the
Home Page.
For Wireless Phone Projection
If equipped, verify your phone is wireless
compatible by visiting the Google Android
Auto or Apple CarPlay support page.
1. Download the Android Auto app to your smartphone from the Google Play store.
There is no app required for Apple
CarPlay.
2. For first time connection, there are two ways to set up wireless projection:
.Connect your Android phone or Apple
iPhone by using the factory-provided
phone USB cable and plugging into a
USB data port. For best performance,
it is highly recommended to use the
device’s factory-provided USB cable,
which should be replaced after
Page 174 of 463
Chevrolet Silverado 1500 Owner Manual (GMNA-Localizing-U.S./Canada/
Mexico/Paraguay-16515119) - 2023 - CRC - 6/2/22
Infotainment System 173
significant wear to maintain
connection quality. Aftermarket or
third-party cables may not work.
.Connecting the phone over Bluetooth.
SeeBluetooth (Pairing and Using a
Phone for Uplevel Radio) 0165 or
Bluetooth (Pairing and Using a Phone
for Base Radio) 0168 or
Bluetooth (Overview) 0164.
3. Make sure wireless is turned on the phone for wireless projection to work.
4. When the phone is first connected to activate Apple CarPlay or Android Auto,
agree to the terms and conditions on
both the infotainment system and the
phone.
5. Follow the instructions on the phone.
The Android Auto and Apple CarPlay icons
on the Home Page will illuminate depending
on the smartphone. Android Auto and/or
Apple CarPlay may automatically launch
upon wireless connection. If not, touch the
Android Auto or Apple CarPlay icon on the
Home Page to launch.
Wireless Carplay and/or Wireless Android
Auto may experience occasional service
disruption due to outside Wi-Fi interference. To disconnect the phones wireless
projection:
1. Select Settings from the Home Page.
2. Select Phones
3. Touch
4or the pencil icon next to the
phone to be disconnected.
4. Turn off Apple CarPlay or Android Auto.
Press
{on the center stack to return to the
Home Page.
Features are subject to change. For further
information on how to set up Android Auto
and Apple CarPlay in the vehicle, visit your
brand website. See Online Account0432 for
details.
Android Auto is provided by Google and is
subject to Google’s terms and privacy policy.
Apple CarPlay is provided by Apple and is
subject to Apple’s terms and privacy policy.
Data plan rates apply. For Android Auto
support and to see if your phone is
compatible, see https://support.google.com/
androidauto. For Apple CarPlay support and
to see if your phone is compatible, see
www.apple.com/ios/carplay/. Apple or
Google may change or suspend availability
at any time. Android Auto, Android, Google, Google Play, and other marks are
trademarks of Google Inc.; Apple CarPlay is a
trademark of Apple Inc.
Press
{on the center stack to exit Android
Auto or Apple CarPlay. To enter back into
Android Auto or Apple CarPlay, press and
hold
{on the center stack.
Apple CarPlay and Android Auto can be
disabled from the infotainment system. To
do this, touch Home, Settings, and then
touch the Apps tab along the top of the
display. Use the On/Off toggled to turn off
Apple CarPlay or Android Auto.
Apple CarPlay and Android Auto
(Uplevel Radio)
If equipped, Android Auto and/or Apple
CarPlay capability may be available through
a compatible smartphone. If available, the
Android Auto and Apple CarPlay icons will
change from gray to color on the Home
Page of the infotainment display.
Page 175 of 463
Chevrolet Silverado 1500 Owner Manual (GMNA-Localizing-U.S./Canada/
Mexico/Paraguay-16515119) - 2023 - CRC - 6/2/22
174 Infotainment System
To use Android Auto and/or Apple CarPlay:
For Wired Phone Projection1. Download the Android Auto app to your smartphone from Google Play for phones
running Android 9 and below. There is
no app required for Apple CarPlay or
newer versions of Android.
2. Connect your Android phone or Apple iPhone by using the factory-provided
phone USB cable and plugging into a
USB data port. For best performance, it is
highly recommended to use the device’s
factory-provided USB cable, which should
be replaced after significant wear to
maintain connection quality. Aftermarket
or third-party cables may not work.
3. When the phone is first connected to activate Apple CarPlay or Android Auto,
accept the terms and conditions on both
the infotainment system and the phone.
4. Follow the instructions on the phone.
The Android Auto and Apple CarPlay icons
on the Home Page will illuminate depending
on the smartphone. Android Auto and/or
Apple CarPlay may automatically launch the
next time the USB is connected. If not,
touch the Android Auto or Apple CarPlay
icon on the Home Page to launch. Press{on the center stack to return to the
Home Page.
For Wireless Phone Projection
Verify your phone is wireless compatible by
visiting the Android Auto or Apple CarPlay
support page.
1. Download the Android Auto app to your smartphone from Google Play for phones
running Android 9 and below. There is
no app required for Apple CarPlay or
newer versions of Android.
2. For first time connection, there are two ways to set up wireless projection:
.Connect your Android phone or Apple
iPhone by using the factory-provided
phone USB cable and plugging into a
USB data port. For best performance,
it is highly recommended to use the
device’s factory-provided USB cable,
which should be replaced after
significant wear to maintain
connection quality. Aftermarket or
third-party cables may not work.
.Connecting the phone over Bluetooth.
See Bluetooth (Pairing and Using a
Phone for Uplevel Radio) 0165 or Bluetooth (Pairing and Using a Phone
for Base Radio)
0168 or
Bluetooth (Overview) 0164.
3. Make sure Wi-Fi and Bluetooth is turned on the phone for wireless projection
to work.
4. When the phone is first connected to activate Apple CarPlay or Android Auto,
agree to the terms and conditions on
both the infotainment system and the
phone.
5. Follow the instructions on the phone.
The Android Auto and Apple CarPlay icons
on the Home Page will illuminate depending
on the smartphone. Android Auto and/or
Apple CarPlay may automatically launch
upon wireless connection. If not, touch the
Android Auto or Apple CarPlay icon on the
Home Page to launch.
Wireless CarPlay and/or Wireless Android
Auto may experience occasional service
disruption due to outside Wi-Fi interference.
To disconnect the phones wireless
projection: 1. Select the Settings icon from the Home Page or the Settings icon on the shortcut
tray near the left of the display.
2. Select Connections.
Page 176 of 463
Chevrolet Silverado 1500 Owner Manual (GMNA-Localizing-U.S./Canada/
Mexico/Paraguay-16515119) - 2023 - CRC - 6/2/22
Infotainment System 175
3. Touch Phones.
4. Touch Option on the phone card to showthe cell phone’s or mobile device’s
settings.
5. Turn off Apple CarPlay or Android Auto.
Press
{on the center stack to return to the
Home Page.
Features are subject to change. For further
information on how to set up Android Auto
and Apple CarPlay in the vehicle, visit your
brand website. See Online Account0432 for
details.
Android Auto is provided by Google and is
subject to Google’s terms and privacy policy.
Apple CarPlay is provided by Apple and is
subject to Apple’s terms and privacy policy.
Data plan rates apply. For Android Auto
support and to see if your phone is
compatible, see https:/www.android.com/
auto/compatability. For Apple CarPlay
support and to see if your phone is
compatible, see www.apple.com/ios/carplay/
. Apple or Google may change or suspend
availability at any time. Google, Android,
Android Auto, Google Maps, and other
marks are trademarks of Google LLC. Apple
CarPlay is a trademark of Apple Inc. Press
{on the center stack to exit Android
Auto or Apple CarPlay. To enter back into
Android Auto or Apple CarPlay, press and
hold
{on the center stack.
Settings
Settings (Base Radio)
The settings menu may be organized into
three categories. Select the desired category
by touching System, Apps, or Vehicle.
To access the menus:
1. Touch Settings on the Home Page on the infotainment display.
2. Touch the desired category to display a list of available options.
3. Touch to select the desired feature setting.
4. Touch the options on the infotainment display to disable or enable a feature.
5. Touch
zto go to the top level of the
Settings menu.
System
The menu may contain the following:
Time / Date
Allows setting of the clock.
Language
Sets the display language used on the
infotainment display. It may also use the
selected language for voice recognition and
audio feedback.
Phones
Allows connecting to a different cell phone
or mobile device source, disconnect a cell
phone or media device, or delete a cell
phone or media device.
Wi-Fi Networks
Shows connected and available Wi-Fi
networks.
If a 4G LTE data package is not active on the
vehicle, the infotainment system can be
connected to an external protected Wi-Fi
network, such as a mobile device or home
hotspot, to utilize connected services.
Wi-Fi Hotspot
Allows adjustment of different Wi-Fi
features.
Page 178 of 463
Chevrolet Silverado 1500 Owner Manual (GMNA-Localizing-U.S./Canada/
Mexico/Paraguay-16515119) - 2023 - CRC - 6/2/22
Infotainment System 177
Trailering
Adjusts different trailering settings.
Teen Driver
SeeTeen Driver 0179.
Valet Mode
This will lock the infotainment system and
steering wheel controls. It may also limit
access to vehicle storage locations,
if equipped.
To enable valet mode: 1. Enter a four-digit code on the keypad.
2. Select Enter to go to the confirmation screen.
3. Re-enter the four-digit code.
Touch Lock or Unlock to lock or unlock the
system. Touch Back to go back to the
previous menu.
Settings (Uplevel Radio)
To access the Settings menus: 1. Touch Settings on the Home Page on the infotainment display.
2. Touch the desired category to display a list of available options. 3. Touch to select the desired feature
setting.
4. Touch the options on the infotainment display to disable or enable a feature.
5. Touch
Sto go back.
The Settings menu may contain the
following:
Connections
The menu may contain the following:
Phones
Allows connecting to a different cell phone
or mobile device source, disconnect a cell
phone or media device, or delete a cell
phone or media device.
Wi-Fi Networks
Shows connected and available Wi-Fi
networks.
Wi-Fi Hotspot
Allows adjustment of different Wi-Fi
features.
Vehicle-to-Phone Sharing
Vehicle
The menu may contain the following: Teen Driver
See
Teen Driver 0179.
Rear Seat Reminder
Allows for a chime and a message when the
rear door has been opened before or during
operation of the vehicle.
Buckle to Drive
This feature can prevent shifting out of Park
when the driver, and if applicable the front
passenger, seat belt is not buckled. See
Buckle To Drive 053.
Climate and Air Quality
Adjusts different climate settings.
Collision/Detection Systems
Adjusts different driver assistance system
settings.
Comfort and Convenience
Adjusts different comfort and convenience
settings.
Lighting
Adjusts different lighting settings.
Power Door Locks
Adjusts different door lock settings.
Page 180 of 463
Chevrolet Silverado 1500 Owner Manual (GMNA-Localizing-U.S./Canada/
Mexico/Paraguay-16515119) - 2023 - CRC - 6/2/22
Infotainment System 179
Legal Information
Touch to view legal and license information.
Updates
This menu allows adjustment of the vehicle
update settings.
Google
This menu allows adjustment of the Google
settings.
Teen Driver
If equipped, this allows multiple keys to be
registered for beginner drivers to encourage
safe driving habits. When the vehicle is
started with a Teen Driver key, it will
automatically activate certain safety
systems, allow setting of some features, and
limit the use of others. The Report Card will
record vehicle data about driving behavior
that can be viewed later. When the vehicle
is started with a registered key, the Driver
Information Center (DIC) displays a message
that Teen Driver is active.
To access:1. Touch Settings on the Home Page, then touch Vehicle, and then Teen Driver. 2. Create a Personal Identification Number
(PIN) by choosing a four-digit PIN.
Re-enter the PIN to confirm. To change
the PIN, touch Change PIN.
The PIN is required to:
.Set up/Add or remove keys.
.Change Teen Driver settings.
.Change or clear the Teen Driver PIN.
.Access or delete Report Card data.
Set up/Add keys to activate Teen Driver and
assign restrictions to the key:
Any vehicle key can be registered, up to a
maximum of eight keys. Label the key to
tell it apart from the other keys.
For a pushbutton start system: 1. Start the vehicle.
2. For automatic transmissions, the vehicle must be in P (Park). For manual
transmissions, the vehicle must be
stopped with the parking brake set.
3. From the Settings menu, touch Vehicle and then Teen Driver.
4. Enter the PIN.
5. Place the remote key you wish to register in the transmitter pocket. The
key does not need to be the one that started the vehicle. See
Remote Key
Operation 012 for transmitter pocket
location.
6. From the Teen Driver menu, touch Setup Keys or Add/Remove Teen Driver Keys.
.If the remote key has not previously
been registered, the option to add
the key displays. Touch Add and a
confirmation message displays. Teen
Driver restrictions will be applied
whenever this remote key is used to
operate the vehicle.
.If the remote key has already been
registered, the option to remove the
key displays. If Remove is touched,
the remote key is no longer
registered. A confirmation message
displays, and Teen Driver restrictions
will not be applied if this remote key
is used to operate the vehicle.
In vehicles with a pushbutton start system,
if a Teen Driver and a non-Teen Driver key
are both present at start up, the vehicle will
recognize the non-Teen Driver key to start
the vehicle. The Teen Driver settings will not
be active.
For a keyed ignition system: 1. Start the vehicle.
Page 189 of 463
Chevrolet Silverado 1500 Owner Manual (GMNA-Localizing-U.S./Canada/
Mexico/Paraguay-16515119) - 2023 - CRC - 6/2/22
188 Climate Controls
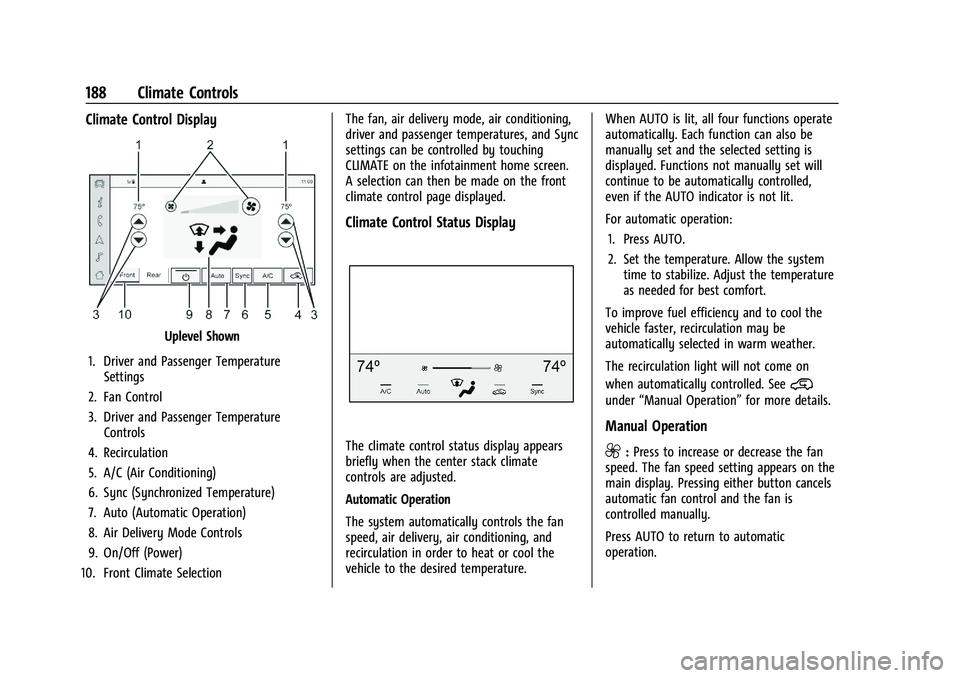
Climate Control Display
Uplevel Shown
1. Driver and Passenger Temperature Settings
2. Fan Control
3. Driver and Passenger Temperature Controls
4. Recirculation
5. A/C (Air Conditioning)
6. Sync (Synchronized Temperature)
7. Auto (Automatic Operation)
8. Air Delivery Mode Controls
9. On/Off (Power)
10. Front Climate Selection The fan, air delivery mode, air conditioning,
driver and passenger temperatures, and Sync
settings can be controlled by touching
CLIMATE on the infotainment home screen.
A selection can then be made on the front
climate control page displayed.
Climate Control Status Display
The climate control status display appears
briefly when the center stack climate
controls are adjusted.
Automatic Operation
The system automatically controls the fan
speed, air delivery, air conditioning, and
recirculation in order to heat or cool the
vehicle to the desired temperature.
When AUTO is lit, all four functions operate
automatically. Each function can also be
manually set and the selected setting is
displayed. Functions not manually set will
continue to be automatically controlled,
even if the AUTO indicator is not lit.
For automatic operation:
1. Press AUTO.
2. Set the temperature. Allow the system time to stabilize. Adjust the temperature
as needed for best comfort.
To improve fuel efficiency and to cool the
vehicle faster, recirculation may be
automatically selected in warm weather.
The recirculation light will not come on
when automatically controlled. See
@
under “Manual Operation” for more details.
Manual Operation
9:Press to increase or decrease the fan
speed. The fan speed setting appears on the
main display. Pressing either button cancels
automatic fan control and the fan is
controlled manually.
Press AUTO to return to automatic
operation.
Page 263 of 463
Chevrolet Silverado 1500 Owner Manual (GMNA-Localizing-U.S./Canada/
Mexico/Paraguay-16515119) - 2023 - CRC - 6/2/22
262 Driving and Operating
wheel until the steering wheel light bar
turns green, and then release the steering
wheel when it is safe to do so.
{Warning
To help prevent crashes before making a
lane change:
.Always check mirrors.
.Glance over your shoulder.
.Use the turn signals.
Super Cruise Lane Change
Super Cruise can steer to perform a single
lane change under certain conditions when
requested by the driver or initiated by the
Super Cruise System.
To request a lane change:
On Demand Lane Changes 1. Verify the lane next to your vehicle is clear and conditions are safe to make a
lane change.
2. Use the turn signal lever to activate the turn signal in the direction of the desired
lane change.
3. Return the turn signal lever to the neutral position after the lane change.
See Turn and Lane-Change Signals 0141. 4. To cancel a lane change, return the turn
signal lever to the neutral position, move
the lever in the opposite direction of the
lane change, or steer manually at
any time.
Automatic Lane Changes
Super Cruise System may initiate a single
lane change when enabled through vehicle
settings under following conditions:.The Super Cruise System may initiate a
lane change to the left to pass a slower
moving vehicle ahead and a subsequent
lane change to right to return to your
original lane.
.Super Cruise System may initiate a lane
change to left or right when current lane
is ending ahead.
.To cancel a Super Cruise lane change,
return the turn signal lever to the neutral
position or move the turn signal lever.
.Super Cruise may initiate an automatic
lane change to left or right when a
slower moving vehicle is detected in the
adjacent ending lane to provide space for
merging vehicle.
If Super Cruise detects that traffic is clear,
Super Cruise will steer the vehicle to
perform the lane change. A message appears on the Driver Information Center (DIC)
during the lane change to provide more
information on the status of the lane
change.
Super Cruise Lane Change functionality is
only available on Super Cruise capable
Divided Roads.
Super Cruise Lane Change may be disabled
when a trailer or other accessories (e.g. bike
rack, cargo tray, etc.) are detected. Do not
use Super Cruise Lane Change when towing
a trailer.
The Super Cruise Lane Change feature can
be customized to be Off, On Demand Lane
Change, or On Demand Lane Change &
Automatic Lane Change through the vehicle
personalization menu. Touch the Settings
icon on the infotainment home page. Select
“Vehicle”
to display the list of available
options and select “Super Cruise Lane
Change”.
{Warning
Super Cruise Lane Change may not detect
a vehicle in an adjacent lane. Always
supervise the driving task and monitor
traffic conditions when using the Super
(Continued)