2023 CHEVROLET SILVERADO 1500 heating
[x] Cancel search: heatingPage 240 of 463
Chevrolet Silverado 1500 Owner Manual (GMNA-Localizing-U.S./Canada/
Mexico/Paraguay-16515119) - 2023 - CRC - 6/2/22
Driving and Operating 239
To turn off both TCS and StabiliTrak/ESC,
press and hold
guntil the Traction Off light
iand StabiliTrak/ESC Off lightgcome on
and stay on in the instrument cluster and
the ESC OFF message appears in the DIC. To
turn TCS and StabiliTrak/ESC on again, press
and release
g. The Traction Off lightiand
StabiliTrak/ESC Off light
gin the instrument
cluster turn off.
StabiliTrak/ESC will automatically turn on if
the vehicle exceeds 56 km/h (35 mph). TCS
will remain off until
gis pressed or until
the ignition is turned off and then back on.
Adding accessories can affect the vehicle
performance. See Accessories and
Modifications 0332.
Stability Control Interaction with
Off-Road Mode (ZR2 Only)
The TCS and StabiliTrak/ESC calibrations are
different while in Off-Road Mode. They
provide optimum performance in an off-road
environment.
Pressing and releasing
gdisables TCS and
changes the StabiliTrak/ESC calibration to
allow a greater difference between vehicle
path and intended path. This reduces the amount of correction StabiliTrak/ESC will
provide in the event the vehicle is not
traveling on the intended path.
To turn off only TCS, press and release
g.
iandgwill display in the instrument
cluster. To turn TCS on again, press and
release
g.iandgin the instrument
cluster will turn off.
To turn off both TCS and StabiliTrak/ESC,
press and hold
guntil a StabiliTrak/ESC off
message displays in the instrument cluster
and the ESC OFF message appears in the
DIC. To turn TCS and StabiliTrak/ESC on
again, press and release
g.iandgin the
instrument cluster will turn off.
StabiliTrak/ESC will not automatically turn
on while in Off-Road Mode. TCS and
StabiliTrak/ESC will remain off in Off-Road
Mode until
gis pressed or the ignition is
turned off and then back on.
Hill Descent Control (HDC)
If equipped, Hill Descent Control (HDC) sets
and maintains vehicle speed while driving
down steep grades in a forward or reverse
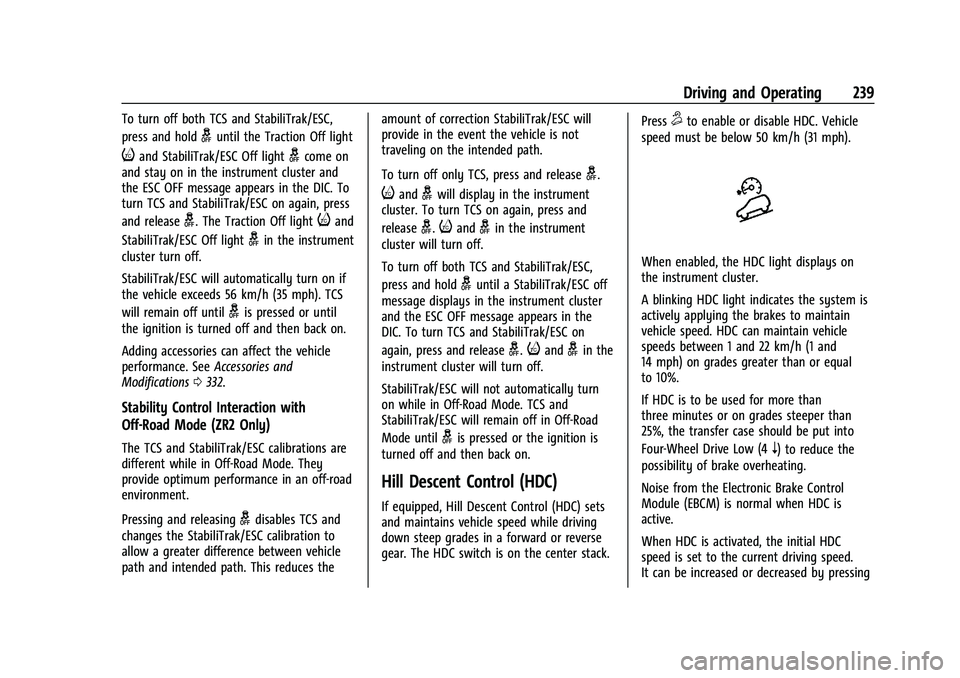
gear. The HDC switch is on the center stack. Press
5to enable or disable HDC. Vehicle
speed must be below 50 km/h (31 mph).
When enabled, the HDC light displays on
the instrument cluster.
A blinking HDC light indicates the system is
actively applying the brakes to maintain
vehicle speed. HDC can maintain vehicle
speeds between 1 and 22 km/h (1 and
14 mph) on grades greater than or equal
to 10%.
If HDC is to be used for more than
three minutes or on grades steeper than
25%, the transfer case should be put into
Four-Wheel Drive Low (4
n) to reduce the
possibility of brake overheating.
Noise from the Electronic Brake Control
Module (EBCM) is normal when HDC is
active.
When HDC is activated, the initial HDC
speed is set to the current driving speed.
It can be increased or decreased by pressing
Page 302 of 463
Chevrolet Silverado 1500 Owner Manual (GMNA-Localizing-U.S./Canada/
Mexico/Paraguay-16515119) - 2023 - CRC - 6/2/22
Driving and Operating 301
Driving on Grades
Reduce speed and shift to a lower gear
before starting down a long or steep
downhill grade. If the transmission is not
shifted down, the brakes may overheat and
result in reduced braking efficiency.
The vehicle can tow in D (Drive). Shift the
transmission to a lower gear if the
transmission shifts too often under heavy
loads and/or hilly conditions.
When towing at higher altitudes, engine
coolant will boil at a lower temperature
than at lower altitudes. If the engine is
turned off immediately after towing at high
altitude on steep uphill grades, the vehicle
could show signs similar to engine
overheating. To avoid this, let the engine
run, preferably on level ground, with the
transmission in P (Park) for a few minutes
before turning the engine off. If the
overheat warning comes on, seeEngine
Overheating 0346.
Viewing Systems
If equipped, the viewing systems on the
vehicle can improve visibility while hitching,
backing, and driving with a trailer. See
Driver Assistance Systems 0272.
Parking on Hills
{Warning
To prevent serious injury or death,
always park your vehicle and trailer on a
level surface when possible.
When parking your vehicle and your trailer
on a hill: 1. Press and hold the brake pedal, but do not shift into P (Park). Turn the wheels
toward the curb if facing downhill or
into traffic if facing uphill.
2. Have someone place chocks under the trailer wheels.
3. Gradually release the brake pedal to allow the chocks to absorb the load of
the trailer.
4. Reapply the brake pedal. Then apply the parking brake and shift into P (Park).
5. Release the brake pedal.
Leaving After Parking on a Hill
1. Apply and hold the brake pedal.
.Start the vehicle.
.Shift into the desired gear.
.Release the parking brake. 2. Let up on the brake pedal.
3. Drive slowly until the trailer is clear of
the chocks.
4. Stop and have someone pick up and store the chocks.
Launching and Retrieving a Boat
Backing the Trailer into the Water
{Warning
.Have all passengers get out of the
vehicle before backing onto the sloped
part of the ramp. Lower the driver and
passenger side windows before
backing onto the ramp. This will
provide a means of escape in the
unlikely event the vehicle slides into
the water.
.If the boat launch surface is slippery,
have the driver remain in the vehicle
with the brake pedal applied while the
boat is being launched. The boat
launch can be especially slippery at
low tide when part of the ramp was
previously submerged at high tide. Do
not back onto the ramp to launch the
boat if you are not sure the vehicle
can maintain traction.
(Continued)
Page 303 of 463
Chevrolet Silverado 1500 Owner Manual (GMNA-Localizing-U.S./Canada/
Mexico/Paraguay-16515119) - 2023 - CRC - 6/2/22
302 Driving and Operating
Warning (Continued)
.Do not move the vehicle if someone is
in the path of the trailer. Some parts
of the trailer might be underwater and
not visible to people who are assisting
in launching the boat.
Disconnect the trailer wiring before backing
the trailer into the water to prevent damage
to the electrical circuits. Reconnect the
wiring to the trailer after removing the
trailer from the water. If the trailer has
electric brakes that can function when the
trailer is submerged, it might help to leave
the electrical trailer connector attached to
maintain trailer brake functionality while on
the boat ramp.
To back the trailer into the water: 1. If equipped, place the vehicle in Four-Wheel Drive High or Automatic
Four-Wheel Drive.
2. Slowly back down the boat ramp until the boat is floating, but no further than
necessary.
3. Press and hold the brake pedal, but do not shift into P (Park) yet.
4. Have someone place chocks under the front wheels of the vehicle. 5. Gradually release the brake pedal to
allow the chocks to absorb the load of
the trailer.
6. Reapply the brake pedal. Then apply the parking brake and shift into P (Park).
7. Release the brake pedal.
Pulling the Trailer from the Water
To pull the trailer out of the water: 1. Press and hold the brake pedal.
2. Start the engine and shift into gear.
3. Release the parking brake.
4. Let up on the brake pedal.
5. Drive slowly until the tires are clear of the chocks.
6. Stop and have someone pick up and store the chocks.
7. Slowly pull the trailer from the water.
8. Once the vehicle and trailer have been driven from the sloped part of the boat
ramp, the vehicle can be shifted from
four-wheel-drive high. Shift into the drive
mode that is appropriate for the road
conditions.
Caution
If the vehicle tires begin to spin and the
vehicle begins to slide toward the water,
remove your foot from the accelerator
pedal and apply the brake pedal. Seek
help to have the vehicle towed up
the ramp.
Maintenance when Trailer Towing
The vehicle needs service more often when
used to tow trailers. See Maintenance
Schedule 0417. It is especially important to
check the engine oil, axle lubricant, belts,
cooling system, and brake system before
and during each trip.
Check periodically to see that all nuts and
bolts on the trailer hitch are tight.
Engine Cooling When Trailer Towing
The cooling system may temporarily
overheat during severe operating conditions.
See Engine Overheating 0346.
Trailer Towing
If equipped with a diesel engine, see the
Duramax diesel supplement.
Page 332 of 463
Chevrolet Silverado 1500 Owner Manual (GMNA-Localizing-U.S./Canada/
Mexico/Paraguay-16515119) - 2023 - CRC - 6/2/22
Vehicle Care 331
Vehicle Care
General Information
General Information . . . . . . . . . . . . . . . . . . . 332
California Perchlorate MaterialsRequirements . . . . . . . . . . . . . . . . . . . . . . . . 332
Accessories and Modifications . . . . . . . . . 332
Vehicle Checks
Doing Your Own Service Work . . . . . . . . . 333
Hood . . . . . . . . . . . . . . . . . . . . . . . . . . . . . . . . . . 333
Engine Compartment Overview . . . . . . . . 335
Engine Oil . . . . . . . . . . . . . . . . . . . . . . . . . . . . . 338
Engine Oil Life System . . . . . . . . . . . . . . . . 340
Automatic Transmission Fluid . . . . . . . . . 340
Engine Air Filter Life System . . . . . . . . . . . 341
Engine Air Cleaner/Filter . . . . . . . . . . . . . . . 341
Cooling System . . . . . . . . . . . . . . . . . . . . . . . . 343
Engine Overheating . . . . . . . . . . . . . . . . . . . 346
Overheated Engine Protection Operating Mode . . . . . . . . . . . . . . . . . . . . . 347
Engine Fan . . . . . . . . . . . . . . . . . . . . . . . . . . . . 348
Washer Fluid . . . . . . . . . . . . . . . . . . . . . . . . . . 348
Brakes . . . . . . . . . . . . . . . . . . . . . . . . . . . . . . . . 349
Brake Pad Life System . . . . . . . . . . . . . . . . 349
Brake Fluid . . . . . . . . . . . . . . . . . . . . . . . . . . . . 350
Battery - North America . . . . . . . . . . . . . . . 351
Four-Wheel Drive . . . . . . . . . . . . . . . . . . . . . . 353
Front Axle . . . . . . . . . . . . . . . . . . . . . . . . . . . . . 354
Rear Axle . . . . . . . . . . . . . . . . . . . . . . . . . . . . . . 354 Automatic Transmission Shift Lock
Control Function Check (Mechanical
Shifter) . . . . . . . . . . . . . . . . . . . . . . . . . . . . . . 354
Park Brake and P (Park) Mechanism Check . . . . . . . . . . . . . . . . . . . . . . . . . . . . . . . . 354
Wiper Blade Replacement . . . . . . . . . . . . . 355
Glass Replacement . . . . . . . . . . . . . . . . . . . . . 355
Windshield Replacement . . . . . . . . . . . . . . . 355
Gas Strut(s) . . . . . . . . . . . . . . . . . . . . . . . . . . . 356Headlamp Aiming
Front Headlamp Aiming . . . . . . . . . . . . . . . 356
Bulb Replacement
Bulb Replacement . . . . . . . . . . . . . . . . . . . . . 357
Halogen Bulbs . . . . . . . . . . . . . . . . . . . . . . . . . 357
LED Lighting . . . . . . . . . . . . . . . . . . . . . . . . . . . 357
Headlamps, Front Turn Signal, Sidemarker, and Parking Lamps . . . . . . 357
Taillamps, Turn Signal, Stoplamps, and Back-Up Lamps . . . . . . . . . . . . . . . . . . . . . . 358
Center High-Mounted Stoplamp (CHMSL) and Cargo Lamp . . . . . . . . . . . . 359
License Plate Lamp . . . . . . . . . . . . . . . . . . . . 359
Electrical System
Electrical System Overload . . . . . . . . . . . . 360
Fuses and Circuit Breakers . . . . . . . . . . . . . 361
Engine Compartment Fuse Block . . . . . . 362
Instrument Panel Fuse Block (Left) . . . . 365
Instrument Panel Fuse Block (Right) . . . 367
Wheels and Tires
Tires . . . . . . . . . . . . . . . . . . . . . . . . . . . . . . . . . . 369
All-Season Tires . . . . . . . . . . . . . . . . . . . . . . . 370
Winter Tires . . . . . . . . . . . . . . . . . . . . . . . . . . . 370
All-Terrain Tires . . . . . . . . . . . . . . . . . . . . . . . 370
Tire Sidewall Labeling . . . . . . . . . . . . . . . . . . 371
Tire Designations . . . . . . . . . . . . . . . . . . . . . . 372
Tire Terminology and Definitions . . . . . . 374
Tire Pressure . . . . . . . . . . . . . . . . . . . . . . . . . . 375
Tire Pressure Monitor System . . . . . . . . . 377
Tire Pressure Monitor Operation . . . . . . . 377
Tire Inspection . . . . . . . . . . . . . . . . . . . . . . . . . 381
Tire Rotation . . . . . . . . . . . . . . . . . . . . . . . . . . 382
When It Is Time for New Tires . . . . . . . . 383
Buying New Tires . . . . . . . . . . . . . . . . . . . . . 383
Different Size Tires and Wheels . . . . . . . 385
Uniform Tire Quality Grading . . . . . . . . . 385
Wheel Alignment and Tire Balance . . . . 386
Wheel Replacement . . . . . . . . . . . . . . . . . . . 386
Tire Chains . . . . . . . . . . . . . . . . . . . . . . . . . . . . 387
If a Tire Goes Flat . . . . . . . . . . . . . . . . . . . . . 387
Tire Changing . . . . . . . . . . . . . . . . . . . . . . . . . 389
Full-Size Spare Tire . . . . . . . . . . . . . . . . . . . . 399
Jump Starting
Jump Starting - North America . . . . . . . . 399
Towing the Vehicle
Transporting a Disabled Vehicle . . . . . . . 402
Recreational Vehicle Towing . . . . . . . . . . . 403
Page 344 of 463
Chevrolet Silverado 1500 Owner Manual (GMNA-Localizing-U.S./Canada/
Mexico/Paraguay-16515119) - 2023 - CRC - 6/2/22
Vehicle Care 343
Cooling System
If the vehicle has the Duramax diesel
engine, see the Duramax diesel supplement.
The cooling system allows the engine to
maintain the correct working temperature.
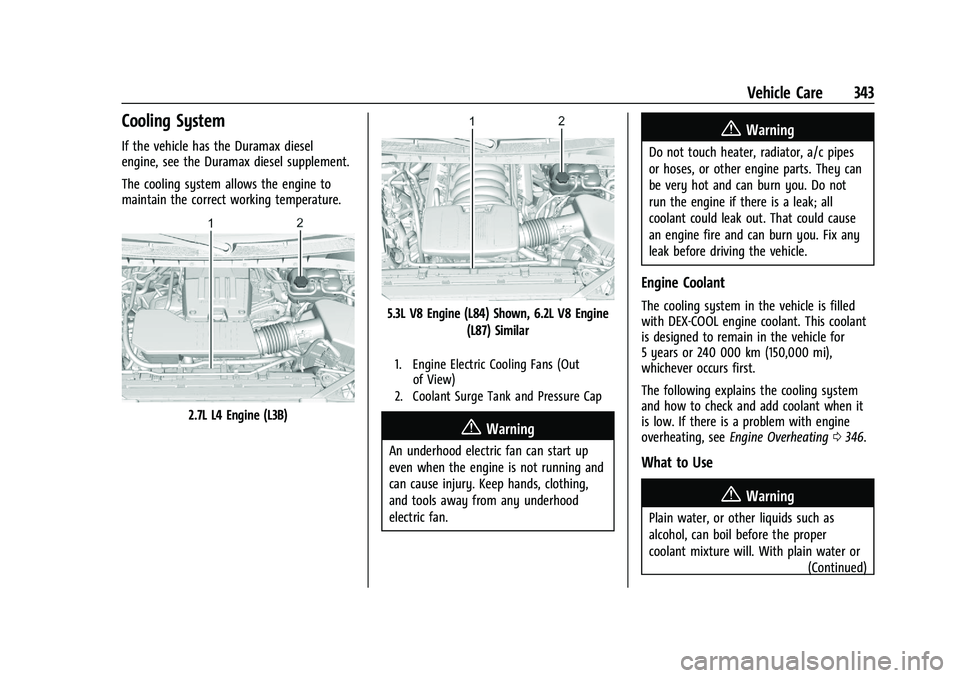
2.7L L4 Engine (L3B)
5.3L V8 Engine (L84) Shown, 6.2L V8 Engine(L87) Similar
1. Engine Electric Cooling Fans (Outof View)
2. Coolant Surge Tank and Pressure Cap
{Warning
An underhood electric fan can start up
even when the engine is not running and
can cause injury. Keep hands, clothing,
and tools away from any underhood
electric fan.
{Warning
Do not touch heater, radiator, a/c pipes
or hoses, or other engine parts. They can
be very hot and can burn you. Do not
run the engine if there is a leak; all
coolant could leak out. That could cause
an engine fire and can burn you. Fix any
leak before driving the vehicle.
Engine Coolant
The cooling system in the vehicle is filled
with DEX-COOL engine coolant. This coolant
is designed to remain in the vehicle for
5 years or 240 000 km (150,000 mi),
whichever occurs first.
The following explains the cooling system
and how to check and add coolant when it
is low. If there is a problem with engine
overheating, see Engine Overheating 0346.
What to Use
{Warning
Plain water, or other liquids such as
alcohol, can boil before the proper
coolant mixture will. With plain water or
(Continued)
Page 347 of 463
Chevrolet Silverado 1500 Owner Manual (GMNA-Localizing-U.S./Canada/
Mexico/Paraguay-16515119) - 2023 - CRC - 6/2/22
346 Vehicle Care
1. Remove the coolant surge tank pressurecap when the cooling system, including
the coolant surge tank pressure cap and
upper radiator hose, is no longer hot.
Turn the pressure cap slowly
counterclockwise about one full turn. If a
hiss is heard, wait for that to stop.
A hiss means there is still some
pressure left.
2. Keep turning the pressure cap slowly, and remove it.
3. Fill the coolant surge tank with the proper mixture to the full cold mark.
4. With the coolant surge tank pressure cap off, start the engine and let it run until
the engine coolant temperature gauge
indicates approximately 90 °C (195 °F).
By this time, the coolant level inside the
coolant surge tank may be lower. If the
level is lower, add more of the proper
mixture to the coolant surge tank until
the level reaches the indicated mark.
5. Replace the pressure cap tightly.
6. Verify coolant level after the engine is shut off and the coolant is cold.
If necessary, repeat coolant fill procedure
Steps 1–6.Caution
If the pressure cap is not tightly installed,
coolant loss and engine damage may
occur. Be sure the cap is properly and
tightly secured.
Engine Overheating
If the vehicle has the Duramax diesel
engine, see the Duramax diesel supplement.
Caution
Do not run the engine if there is a leak
in the engine cooling system. This can
cause a loss of all coolant and can
damage the system and vehicle. Have
any leaks fixed right away.
The vehicle has several indicators to warn of
engine overheating.
There is a coolant temperature gauge in the
vehicle's instrument cluster. See Engine
Coolant Temperature Gauge 0112.
In addition, there are ENGINE OVERHEATED
STOP ENGINE, ENGINE OVERHEATED IDLE
ENGINE, and ENGINE POWER IS REDUCED
messages in the Driver Information
Center (DIC). If the decision is made not to lift the hood
when this warning appears, get service help
right away. See
Roadside Assistance Program
0 433.
If the decision is made to lift the hood,
make sure the vehicle is parked on a level
surface.
2.7L L4, 5.3L V8, and 6.2L V8 Engines
Check to see if the engine cooling fans are
running. If the engine is overheating, the
fans should be running. If they are not, do
not continue to run the engine and have the
vehicle serviced.
If the engine or transmission detects an
impending hot fluid condition, then the
transmission may force upshifts to limit
temperatures. Downshifts may also be
prevented in this instance. Normal operation
may continue unless the display indicates
there is a hot condition and engine should
be idled.
Page 370 of 463
Chevrolet Silverado 1500 Owner Manual (GMNA-Localizing-U.S./Canada/
Mexico/Paraguay-16515119) - 2023 - CRC - 6/2/22
Vehicle Care 369
FusesUsage
F33 Body Control Module 4
F34 –
F40 –
F41 –
F42 Electric Park Brake Switch
F43 –
F44 Shifter Interface Board F45 Radio Low
F46 –
F47 –
F48 Transmission Control Module
F49 Body Control Module 1 F50 –
F51 Battery 1
F52 Battery 2
F53 –
F54 Sunroof F55 Driver Power Seat
F56 DC/DC Converter Battery 1 Fuses
Usage
F57 DC/DC Converter Battery 2
F58 –
Circuit
Breakers Usage
1 Accessory Power Outlet 1
2 –
3 –
4 –
Relays Usage
K1 –
K2 Retained Accessory Power/ Accessory 1
K4 –
K5 –
Wheels and Tires
Tires
Every new GM vehicle has high-quality
tires made by a leading tire
manufacturer. See the warranty manual for information regarding the tire
warranty and where to get service. For
additional information refer to the tire
manufacturer.
{Warning
.Poorly maintained and improperly
used tires are dangerous.
.Overloading the tires can cause
overheating as a result of too
much flexing. There could be a
blowout and a serious crash. See
Vehicle Load Limits
0204.
.Underinflated tires pose the same
danger as overloaded tires. The
resulting crash could cause serious
injury. Check all tires frequently to
maintain the recommended
pressure. Tire pressure should be
checked when the tires are cold.
.Overinflated tires are more likely
to be cut, punctured, or broken by
a sudden impact —such as when
hitting a pothole. Keep tires at the
recommended pressure.
(Continued)
Page 377 of 463
Chevrolet Silverado 1500 Owner Manual (GMNA-Localizing-U.S./Canada/
Mexico/Paraguay-16515119) - 2023 - CRC - 6/2/22
376 Vehicle Care
{Warning
Neither tire underinflation nor
overinflation is good. Underinflated
tires, or tires that do not have
enough air, can result in:
.Tire overloading and overheating,
which could lead to a blowout
.Premature or irregular wear
.Poor handling
.Reduced fuel economy for
internal combustion engine
vehicles
.Reduced range for electric vehicles
Overinflated tires, or tires that have
too much air, can result in:
.Unusual wear
.Poor handling
.Rough ride
.Needless damage from road
hazards The Tire and Loading Information label
on the vehicle indicates the original
equipment tires and the correct cold
tire inflation pressures. The
recommended pressure is the minimum
air pressure needed to support the
vehicle's maximum load carrying
capacity.
For additional information regarding
how much weight the vehicle can carry,
and an example of the Tire and Loading
Information label, see
Vehicle Load
Limits 0204. How the vehicle is loaded
affects vehicle handling and ride
comfort. Never load the vehicle with
more weight than it was designed to
carry.
When to Check
Check the pressure of the tires once a
month or more.
Do not forget the spare, if the vehicle
has one. See Full-Size Spare Tire 0399
for additional information. How to Check
Use a good quality pocket-type gauge
to check tire pressure. Proper tire
inflation cannot be determined by
looking at the tire. Check the tire
inflation pressure when the tires are
cold, meaning the vehicle has not been
driven for at least three hours or no
more than 1.6 km (1 mi).
Remove the valve cap from the tire
valve stem. Press the tire gauge firmly
onto the valve to get a pressure
measurement. If the cold tire inflation
pressure matches the recommended
pressure on the Tire and Loading
Information label, no further adjustment
is necessary. If the inflation pressure is
low, add air until the recommended
pressure is reached. If the inflation
pressure is high, press on the metal
stem in the center of the tire valve to
release air.
Re-check the tire pressure with the tire
gauge.