2023 CHEVROLET SILVERADO 1500 fuel cap
[x] Cancel search: fuel capPage 330 of 463
Chevrolet Silverado 1500 Owner Manual (GMNA-Localizing-U.S./Canada/
Mexico/Paraguay-16515119) - 2023 - CRC - 6/2/22
Driving and Operating 329
To safely carry a snow plow on the vehicle:
.With a snow plow attached, the engine
coolant temperature gauge may show a
higher temperature than while driving
without one. The snow plow could block
the airflow to the radiator. This could be
more noticeable as vehicle speed
increases. At speeds above 72 km/h
(45 mph), this may cause the engine
coolant to overheat. Move or angle the
snow plow blade to allow increased
airflow to the radiator.
.To increase the airflow, move the snow
plow blade position.
.If driving more than 24 km/h (15 mph),
angle the plow blade position.
.Make sure the weight on the front and
rear axles does not exceed the axle rating
for each.
.Follow the snowplow manufacturer’s
recommendations for any rear ballast that
may be required. Rear ballast may be
required to ensure a proper front and rear
weight distribution ratio even though the
actual weight at the front axle may be
less than the front axle rating.
.The snowplow manufacturer or installer
can assist in determining the amount of
rear ballast required to ensure that thevehicle with the attached snowplow does
not exceed the GVW rating, the front and
rear axle ratings, or the front and rear
weight distribution ratio (refer to the GM
Upfitter Manual).
Front axle reserve capacity is the difference
between the Front Gross Axle Weight
Rating (GAWR) and the front axle weight of
the vehicle with full fuel, passengers, and
any other cargo. This is the amount of
weight that can be added to the front axle
before reaching the Front GAWR.
To calculate the amount of weight any front
accessory, such as a snow plow, is adding to
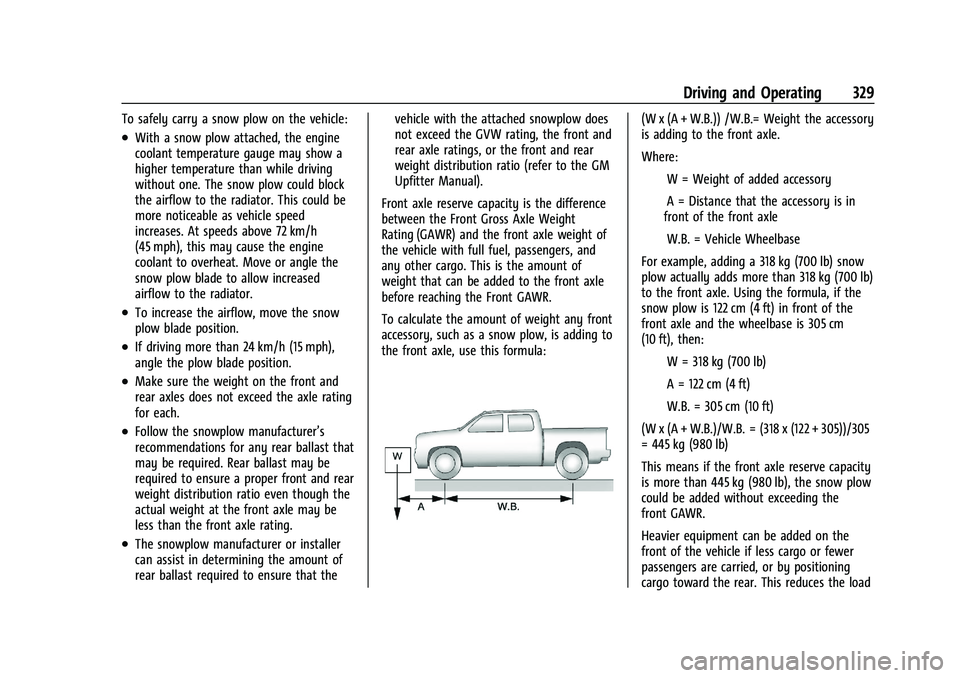
the front axle, use this formula:
(W x (A + W.B.)) /W.B.= Weight the accessory
is adding to the front axle.
Where: IW = Weight of added accessory
IA = Distance that the accessory is in
front of the front axle
IW.B. = Vehicle Wheelbase
For example, adding a 318 kg (700 lb) snow
plow actually adds more than 318 kg (700 lb)
to the front axle. Using the formula, if the
snow plow is 122 cm (4 ft) in front of the
front axle and the wheelbase is 305 cm
(10 ft), then: IW = 318 kg (700 lb)
IA = 122 cm (4 ft)
IW.B. = 305 cm (10 ft)
(W x (A + W.B.)/W.B. = (318 x (122 + 305))/305
= 445 kg (980 lb)
This means if the front axle reserve capacity
is more than 445 kg (980 lb), the snow plow
could be added without exceeding the
front GAWR.
Heavier equipment can be added on the
front of the vehicle if less cargo or fewer
passengers are carried, or by positioning
cargo toward the rear. This reduces the load
Page 352 of 463
Chevrolet Silverado 1500 Owner Manual (GMNA-Localizing-U.S./Canada/
Mexico/Paraguay-16515119) - 2023 - CRC - 6/2/22
Vehicle Care 351
Always clean the brake fluid reservoir cap
and the area around the cap before
removing it.
Do not top off the brake fluid. Adding fluid
does not correct a leak. If fluid is added
when the linings are worn, there will be too
much fluid when new brake linings are
installed. Add or remove fluid, as necessary,
only when work is done on the brake
hydraulic system.
{Warning
If too much brake fluid is added, it can
spill on the engine and burn, if the
engine is hot enough. You or others could
be burned, and the vehicle could be
damaged. Add brake fluid only when
work is done on the brake hydraulic
system.
When the brake fluid falls to a low level,
the brake warning light comes on. See Brake
System Warning Light 0118.
Brake fluid absorbs water over time which
degrades the effectiveness of the brake fluid.
Replace brake fluid at the specified intervals
to prevent increased stopping distance. See
Maintenance Schedule 0417. What to Add
Use only GM approved DOT 4 brake fluid
from a clean, sealed container. See
Recommended Fluids and Lubricants
0421.
{Warning
The wrong or contaminated brake fluid
could result in damage to the brake
system. This could result in the loss of
braking leading to a possible injury.
Always use the proper GM approved
brake fluid.
Caution
If brake fluid is spilled on the vehicle's
painted surfaces, the paint finish can be
damaged. Immediately wash off any
painted surface.
Battery - North America
The original equipment battery is
maintenance free. Do not remove the cap
and do not add fluid.
Refer to the replacement number shown on
the original battery label when a new
battery is needed. See Engine Compartment
Overview 0335 for battery location. Stop/Start System
Vehicles equipped with a 2.7L L3B, , 5.3L L84
or 6.2L L87 are equipped with a Stop/Start
system to shut off the engine to help
conserve fuel. See
Stop/Start System 0213.
Vehicles with the Stop/Start system have an
Absorbed Glass Mat (AGM) 12-volt battery.
Installation of a standard 12-volt battery will
result in reduced 12-volt battery life. When
using a 12-volt battery charger on the 12-volt
AGM battery, some chargers have an AGM
battery setting on the charger. If available,
use the AGM setting on the charger to limit
charge voltage to 14.8 volts. Follow the
charger manufacturer’s instructions.
{Warning
WARNING: Battery posts, terminals and
related accessories can expose you to
chemicals including lead and lead
compounds, which are known to the
State of California to cause cancer and
birth defects or other reproductive harm.
Wash hands after handling. For more
information go to
www.P65Warnings.ca.gov.
See California Proposition 65 Warning 01.
Page 366 of 463
Chevrolet Silverado 1500 Owner Manual (GMNA-Localizing-U.S./Canada/
Mexico/Paraguay-16515119) - 2023 - CRC - 6/2/22
Vehicle Care 365
FusesUsage
76 Electric Running Board
78 Engine Control Module
79 Cabin Coll Pump
80 Powertrain Sensor 1 81 Trailer Stop/Turn Lamp Right
82 Trailer Interface Module 1
83 FTZM –Fuel Tank Zone
Module
84 Trailer Battery 85 –
86 Engine Control Module 87 Injector B Even
88 O2 B Sensor
89 O2 A sensor
90 Injector A Odd 91 –
92 Aeroshutter Relays
Usage
5 Rear Defog
18 DC/AC Inverter
23 Fuel Heater
35 Park Lamp/Front Grille Lamp
36 Run/Crank
43 Secondary Axle Motor
59 A/C Clutch
64 Starter Motor 70 Starter Motor 77 PowertrainInstrument Panel Fuse Block (Left)
The left instrument panel fuse block access
door is on the driver side edge of the
instrument panel.
The vehicle may not be equipped with all of
the fuses, relays, and features shown.
Pull off the cover to access the fuse block.
A fuse puller is available in the left
instrument panel end cap.
Page 377 of 463
Chevrolet Silverado 1500 Owner Manual (GMNA-Localizing-U.S./Canada/
Mexico/Paraguay-16515119) - 2023 - CRC - 6/2/22
376 Vehicle Care
{Warning
Neither tire underinflation nor
overinflation is good. Underinflated
tires, or tires that do not have
enough air, can result in:
.Tire overloading and overheating,
which could lead to a blowout
.Premature or irregular wear
.Poor handling
.Reduced fuel economy for
internal combustion engine
vehicles
.Reduced range for electric vehicles
Overinflated tires, or tires that have
too much air, can result in:
.Unusual wear
.Poor handling
.Rough ride
.Needless damage from road
hazards The Tire and Loading Information label
on the vehicle indicates the original
equipment tires and the correct cold
tire inflation pressures. The
recommended pressure is the minimum
air pressure needed to support the
vehicle's maximum load carrying
capacity.
For additional information regarding
how much weight the vehicle can carry,
and an example of the Tire and Loading
Information label, see
Vehicle Load
Limits 0204. How the vehicle is loaded
affects vehicle handling and ride
comfort. Never load the vehicle with
more weight than it was designed to
carry.
When to Check
Check the pressure of the tires once a
month or more.
Do not forget the spare, if the vehicle
has one. See Full-Size Spare Tire 0399
for additional information. How to Check
Use a good quality pocket-type gauge
to check tire pressure. Proper tire
inflation cannot be determined by
looking at the tire. Check the tire
inflation pressure when the tires are
cold, meaning the vehicle has not been
driven for at least three hours or no
more than 1.6 km (1 mi).
Remove the valve cap from the tire
valve stem. Press the tire gauge firmly
onto the valve to get a pressure
measurement. If the cold tire inflation
pressure matches the recommended
pressure on the Tire and Loading
Information label, no further adjustment
is necessary. If the inflation pressure is
low, add air until the recommended
pressure is reached. If the inflation
pressure is high, press on the metal
stem in the center of the tire valve to
release air.
Re-check the tire pressure with the tire
gauge.
Page 410 of 463
Chevrolet Silverado 1500 Owner Manual (GMNA-Localizing-U.S./Canada/
Mexico/Paraguay-16515119) - 2023 - CRC - 6/2/22
Vehicle Care 409
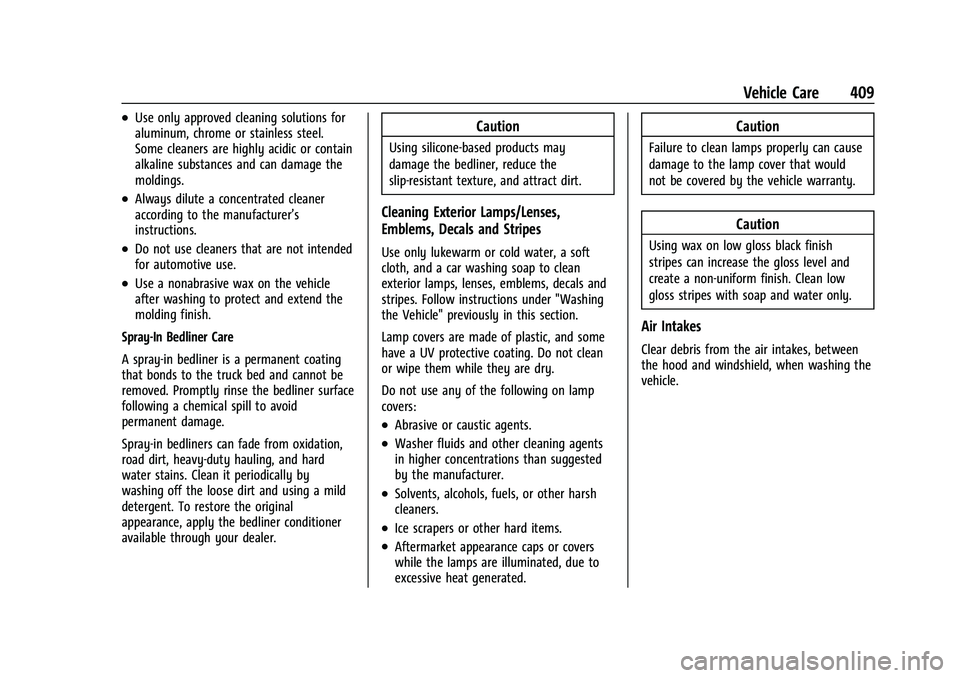
.Use only approved cleaning solutions for
aluminum, chrome or stainless steel.
Some cleaners are highly acidic or contain
alkaline substances and can damage the
moldings.
.Always dilute a concentrated cleaner
according to the manufacturer’s
instructions.
.Do not use cleaners that are not intended
for automotive use.
.Use a nonabrasive wax on the vehicle
after washing to protect and extend the
molding finish.
Spray-In Bedliner Care
A spray-in bedliner is a permanent coating
that bonds to the truck bed and cannot be
removed. Promptly rinse the bedliner surface
following a chemical spill to avoid
permanent damage.
Spray-in bedliners can fade from oxidation,
road dirt, heavy-duty hauling, and hard
water stains. Clean it periodically by
washing off the loose dirt and using a mild
detergent. To restore the original
appearance, apply the bedliner conditioner
available through your dealer.
Caution
Using silicone-based products may
damage the bedliner, reduce the
slip-resistant texture, and attract dirt.
Cleaning Exterior Lamps/Lenses,
Emblems, Decals and Stripes
Use only lukewarm or cold water, a soft
cloth, and a car washing soap to clean
exterior lamps, lenses, emblems, decals and
stripes. Follow instructions under "Washing
the Vehicle" previously in this section.
Lamp covers are made of plastic, and some
have a UV protective coating. Do not clean
or wipe them while they are dry.
Do not use any of the following on lamp
covers:
.Abrasive or caustic agents.
.Washer fluids and other cleaning agents
in higher concentrations than suggested
by the manufacturer.
.Solvents, alcohols, fuels, or other harsh
cleaners.
.Ice scrapers or other hard items.
.Aftermarket appearance caps or covers
while the lamps are illuminated, due to
excessive heat generated.
Caution
Failure to clean lamps properly can cause
damage to the lamp cover that would
not be covered by the vehicle warranty.
Caution
Using wax on low gloss black finish
stripes can increase the gloss level and
create a non-uniform finish. Clean low
gloss stripes with soap and water only.
Air Intakes
Clear debris from the air intakes, between
the hood and windshield, when washing the
vehicle.
Page 423 of 463
Chevrolet Silverado 1500 Owner Manual (GMNA-Localizing-U.S./Canada/
Mexico/Paraguay-16515119) - 2023 - CRC - 6/2/22
422 Service and Maintenance
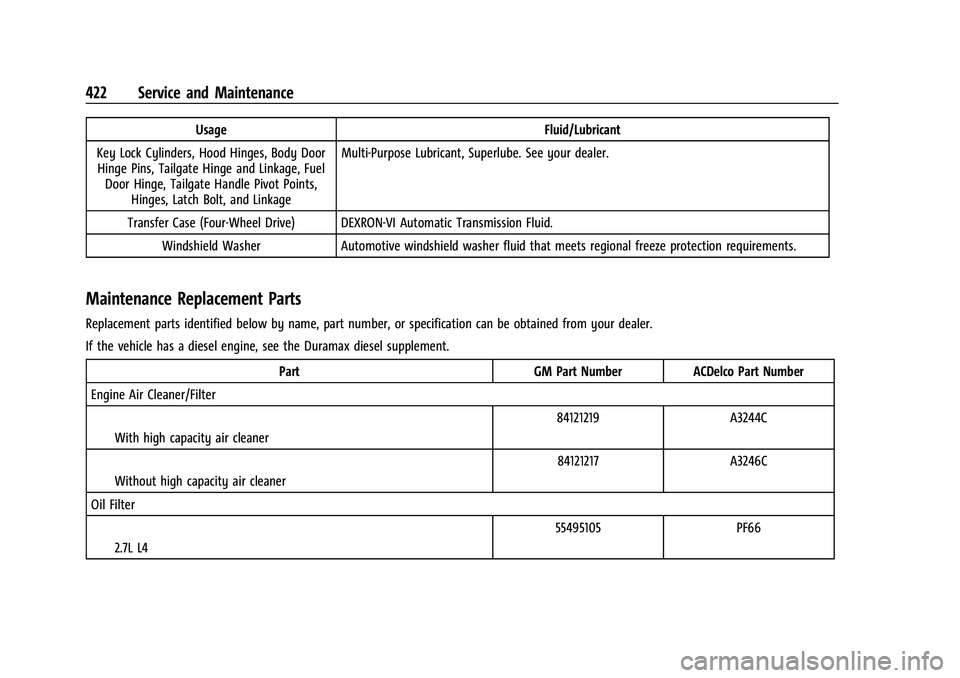
UsageFluid/Lubricant
Key Lock Cylinders, Hood Hinges, Body Door Hinge Pins, Tailgate Hinge and Linkage, Fuel Door Hinge, Tailgate Handle Pivot Points, Hinges, Latch Bolt, and Linkage Multi-Purpose Lubricant, Superlube. See your dealer.
Transfer Case (Four-Wheel Drive) DEXRON-VI Automatic Transmission Fluid. Windshield Washer Automotive windshield washer fluid that meets regional freeze protection requirements.
Maintenance Replacement Parts
Replacement parts identified below by name, part number, or specification can be obtained from your dealer.
If the vehicle has a diesel engine, see the Duramax diesel supplement.
Part GM Part Number ACDelco Part Number
Engine Air Cleaner/Filter
IWith high capacity air cleaner 84121219 A3244C
IWithout high capacity air cleaner 84121217 A3246C
Oil Filter I2.7L L4 55495105 PF66
Page 428 of 463
Chevrolet Silverado 1500 Owner Manual (GMNA-Localizing-U.S./Canada/
Mexico/Paraguay-16515119) - 2023 - CRC - 6/2/22
Technical Data 427
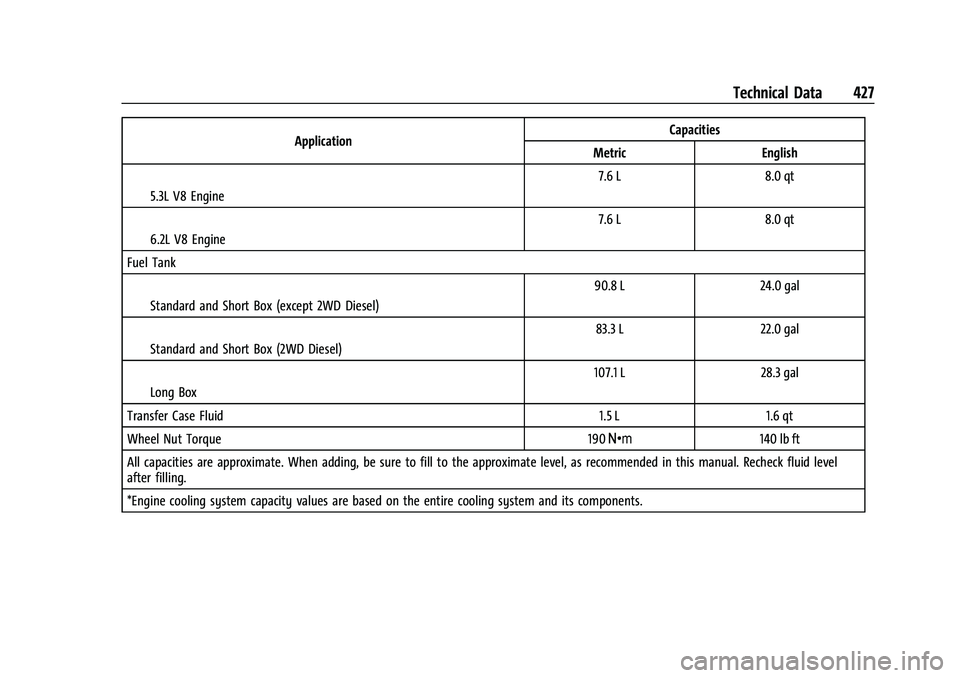
ApplicationCapacities
Metric English
I5.3L V8 Engine 7.6 L
8.0 qt
I6.2L V8 Engine 7.6 L
8.0 qt
Fuel Tank IStandard and Short Box (except 2WD Diesel) 90.8 L
24.0 gal
IStandard and Short Box (2WD Diesel) 83.3 L
22.0 gal
ILong Box 107.1 L
28.3 gal
Transfer Case Fluid 1.5 L1.6 qt
Wheel Nut Torque 190Y 140 lb ft
All capacities are approximate. When adding, be sure to fill to the approximate level, as recommended in this manual. Recheck fluid level
after filling.
*Engine cooling system capacity values are based on the entire cooling system and its components.