2023 CHEVROLET SILVERADO 1500 display
[x] Cancel search: displayPage 327 of 463
Chevrolet Silverado 1500 Owner Manual (GMNA-Localizing-U.S./Canada/
Mexico/Paraguay-16515119) - 2023 - CRC - 6/2/22
326 Driving and Operating
set up for the Accessory/No Trailer Profile.
The Accessory/No Trailer profile cannot be
edited.
No Trailer Connected
When there is no trailer connected, Trailer
Profiles cannot be activated but most
options can be edited.
Trailer Brake Gain Memory
The system can store the brake gain setting
of a Trailer Profile or a Guest Trailer Profile.
When a Trailer Profile or Guest Trailer Profile
is selected, and a brake gain setting is set
for that Trailer Profile, a quick notice will
appear to indicate that the system has
recalled that profile's brake gain setting.
If a Trailer Profile is already active and the
brake gain setting had been set for that
Trailer Profile, the quick notice will trigger
whenever the vehicle is turned on.
If there was an error in setting the brake
gain for a Trailer Profile, there will be a
notification. This pop-up will not appear if
the Guest Trailer Profile is active or if there
is no trailer connected.Trailer brake gain should be set for a specific
trailering condition and must be adjusted
anytime vehicle loading, trailer loading,
or road surface conditions change.
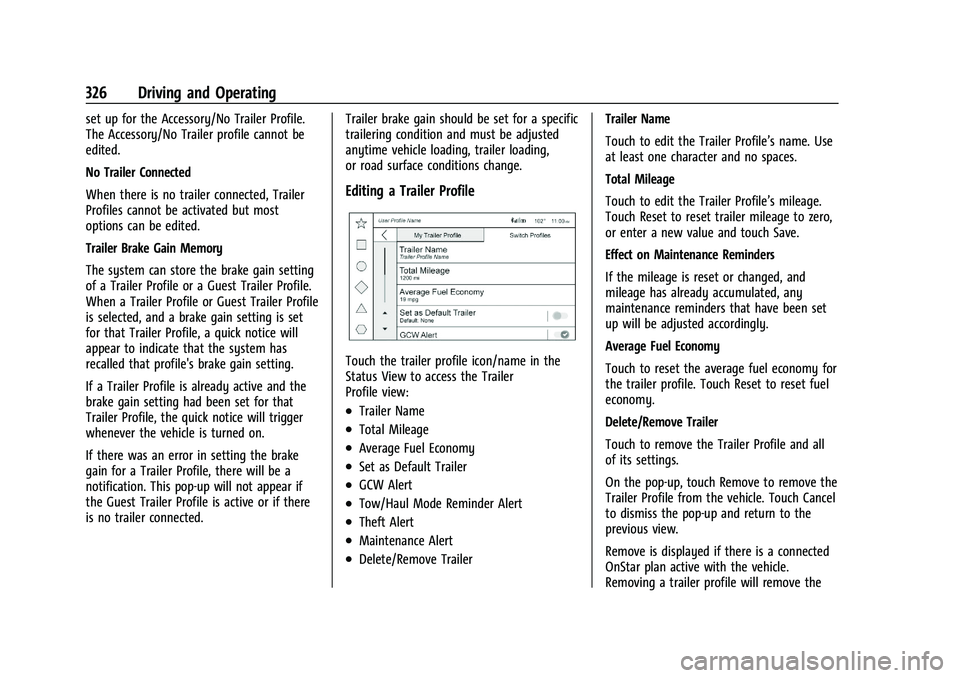
Editing a Trailer Profile
Touch the trailer profile icon/name in the
Status View to access the Trailer
Profile view:
.Trailer Name
.Total Mileage
.Average Fuel Economy
.Set as Default Trailer
.GCW Alert
.Tow/Haul Mode Reminder Alert
.Theft Alert
.Maintenance Alert
.Delete/Remove TrailerTrailer Name
Touch to edit the Trailer Profile’s name. Use
at least one character and no spaces.
Total Mileage
Touch to edit the Trailer Profile’s mileage.
Touch Reset to reset trailer mileage to zero,
or enter a new value and touch Save.
Effect on Maintenance Reminders
If the mileage is reset or changed, and
mileage has already accumulated, any
maintenance reminders that have been set
up will be adjusted accordingly.
Average Fuel Economy
Touch to reset the average fuel economy for
the trailer profile. Touch Reset to reset fuel
economy.
Delete/Remove Trailer
Touch to remove the Trailer Profile and all
of its settings.
On the pop-up, touch Remove to remove the
Trailer Profile from the vehicle. Touch Cancel
to dismiss the pop-up and return to the
previous view.
Remove is displayed if there is a connected
OnStar plan active with the vehicle.
Removing a trailer profile will remove the
Page 335 of 463
Chevrolet Silverado 1500 Owner Manual (GMNA-Localizing-U.S./Canada/
Mexico/Paraguay-16515119) - 2023 - CRC - 6/2/22
334 Vehicle Care
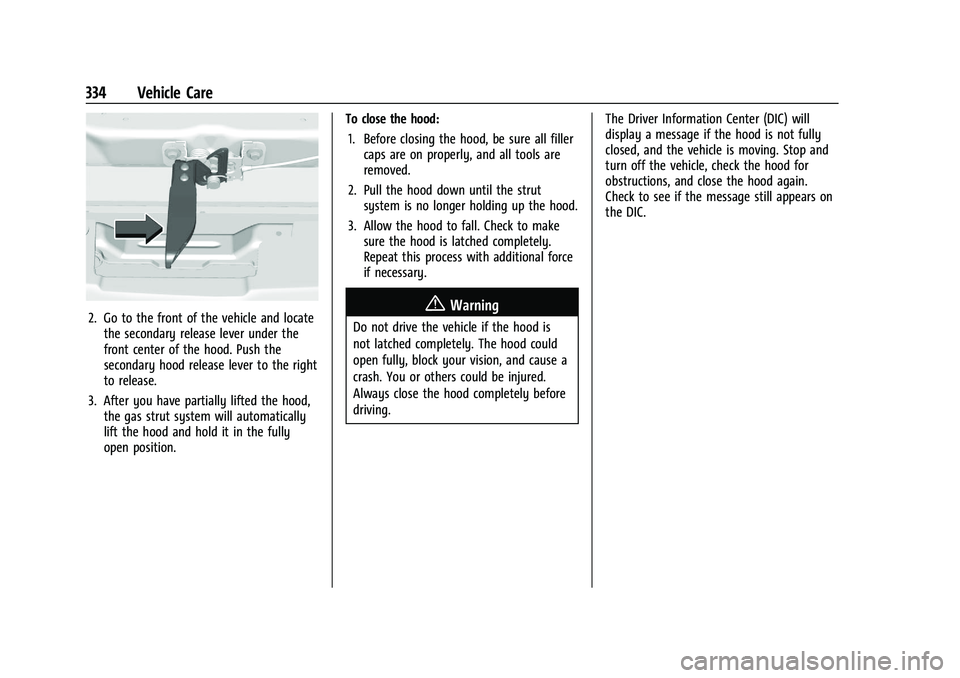
2. Go to the front of the vehicle and locatethe secondary release lever under the
front center of the hood. Push the
secondary hood release lever to the right
to release.
3. After you have partially lifted the hood, the gas strut system will automatically
lift the hood and hold it in the fully
open position. To close the hood:
1. Before closing the hood, be sure all filler caps are on properly, and all tools are
removed.
2. Pull the hood down until the strut system is no longer holding up the hood.
3. Allow the hood to fall. Check to make sure the hood is latched completely.
Repeat this process with additional force
if necessary.{Warning
Do not drive the vehicle if the hood is
not latched completely. The hood could
open fully, block your vision, and cause a
crash. You or others could be injured.
Always close the hood completely before
driving. The Driver Information Center (DIC) will
display a message if the hood is not fully
closed, and the vehicle is moving. Stop and
turn off the vehicle, check the hood for
obstructions, and close the hood again.
Check to see if the message still appears on
the DIC.
Page 339 of 463
Chevrolet Silverado 1500 Owner Manual (GMNA-Localizing-U.S./Canada/
Mexico/Paraguay-16515119) - 2023 - CRC - 6/2/22
338 Vehicle Care
11. Windshield Washer Fluid Reservoir. See“Adding Washer Fluid” underWasher
Fluid 0348.
Engine Oil
To ensure proper engine performance and
long life, careful attention must be paid to
engine oil. Following these simple, but
important steps will help protect your
investment:
.Use engine oil approved to the proper
specification and of the proper viscosity
grade. See “Selecting the Right Engine
Oil” in this section.
.Check the engine oil level regularly and
maintain the proper oil level. See
“Checking Engine Oil” and“When to Add
Engine Oil” in this section.
.Change the engine oil at the appropriate
time. SeeEngine Oil Life System 0340.
.Always dispose of engine oil properly. See
“What to Do with Used Oil” in this
section.
Checking Engine Oil
Check the engine oil level regularly, every
650 km (400 mi), especially prior to a long
trip. The engine oil dipstick handle is a loop.
See Engine Compartment Overview 0335 for
the location.
{Warning
The engine oil dipstick handle may be
hot; it could burn you. Use a towel or
glove to touch the dipstick handle.
If a low oil Driver Information Center (DIC)
message displays, check the oil level.
Follow these guidelines:
.To get an accurate reading, park the
vehicle on level ground. Check the engine
oil level after the engine has been off for
at least two hours. Checking the engine
oil level on steep grades or too soon after
engine shutoff can result in incorrect
readings. Accuracy improves when
checking a cold engine prior to starting.
Remove the dipstick and check the level.
.If unable to wait two hours, the engine
must be off for at least 15 minutes if the
engine is warm, or at least 30 minutes if
the engine is not warm. Pull out the dipstick, wipe it with a clean paper towel
or cloth, then push it back in all the way.
Remove it again, keeping the tip down,
and check the level.
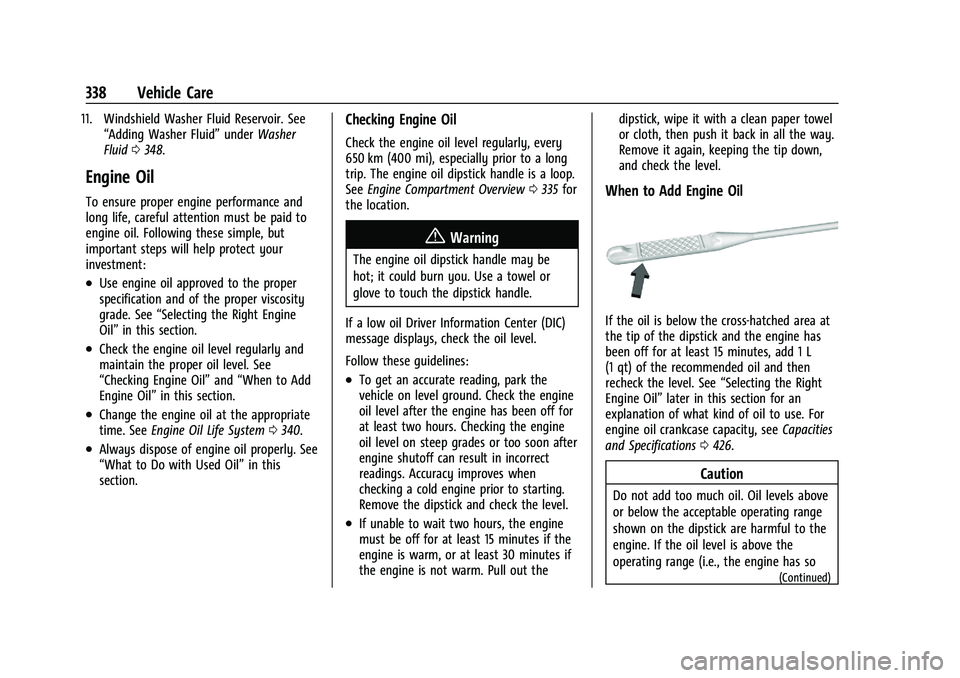
When to Add Engine Oil
If the oil is below the cross-hatched area at
the tip of the dipstick and the engine has
been off for at least 15 minutes, add 1 L
(1 qt) of the recommended oil and then
recheck the level. See
“Selecting the Right
Engine Oil” later in this section for an
explanation of what kind of oil to use. For
engine oil crankcase capacity, see Capacities
and Specifications 0426.
Caution
Do not add too much oil. Oil levels above
or below the acceptable operating range
shown on the dipstick are harmful to the
engine. If the oil level is above the
operating range (i.e., the engine has so
(Continued)
Page 341 of 463
Chevrolet Silverado 1500 Owner Manual (GMNA-Localizing-U.S./Canada/
Mexico/Paraguay-16515119) - 2023 - CRC - 6/2/22
340 Vehicle Care
Engine Oil Life System
When to Change Engine Oil
This vehicle has a computer system that
indicates when to change the engine oil and
filter. This is based on a combination of
factors which include engine revolutions,
engine temperature, and miles driven. Based
on driving conditions, the mileage at which
an oil change is indicated can vary
considerably. For the oil life system to work
properly, the system must be reset every
time the oil is changed.
On some vehicles, when the system has
calculated that oil life has been diminished,
a CHANGE ENGINE OIL SOON message comes
on to indicate that an oil change is
necessary. Change the oil as soon as
possible within the next 1 000 km (600 mi).
It is possible that, if driving under the best
conditions, the oil life system might indicate
that an oil change is not necessary for up to
a year. The engine oil and filter must be
changed at least once a year and, at this
time, the system must be reset. For vehicles
without the CHANGE ENGINE OIL SOON
message, an oil change is needed when the
REMAINING OIL LIFE percentage is near 0%.
Your dealer has trained service people whowill perform this work and reset the system.
It is also important to check the oil regularly
over the course of an oil drain interval and
keep it at the proper level.
If the system is ever reset accidentally, the
oil must be changed at 5 000 km (3,000 mi)
since the last oil change. Remember to reset
the oil life system whenever the oil is
changed.
How to Reset the Engine Oil Life System
Reset the system whenever the engine oil is
changed so that the system can calculate
the next engine oil change. Always reset the
engine oil life to 100% after every oil
change. It will not reset itself. To reset the
engine oil life system:
1. Display the oil life percentage on the DIC. See Driver Information Center (DIC)
(Base Level) 0126 or
Driver Information Center (DIC) (Uplevel)
0 127.
2. Press the thumbwheel on the steering wheel, or the trip odometer reset stem if
the vehicle does not have DIC controls,
for several seconds. When the
confirmation message displays, select
YES. The oil life will change to 100%. The oil life system can also be reset as
follows:
1. Display the oil life percentage on the DIC. See Driver Information Center (DIC)
(Base Level) 0126 or
Driver Information Center (DIC) (Uplevel)
0 127.
2. Fully press the accelerator pedal slowly three times within five seconds.
3. If the display changes to 100%, the system is reset.
If the vehicle has a CHANGE ENGINE OIL
SOON message and it comes back on when
the vehicle is started and/or the oil
life percentage is near 0%, the engine oil
life system has not been reset. Repeat the
procedure.
Automatic Transmission Fluid
When to Check and Change Automatic
Transmission Fluid
It is usually not necessary to check the
transmission fluid level. The only reason for
fluid loss is a transmission leak or
overheated transmission. This vehicle is not
equipped with a transmission fluid level
dipstick. There is a special procedure for
checking and changing the transmission fluid
Page 342 of 463
Chevrolet Silverado 1500 Owner Manual (GMNA-Localizing-U.S./Canada/
Mexico/Paraguay-16515119) - 2023 - CRC - 6/2/22
Vehicle Care 341
in these vehicles. Because this procedure is
difficult, this should be done at the dealer.
Contact the dealer for additional information
or the procedure can be found in the service
manual. SeePublication Ordering
Information 0437.
Caution
Use of the incorrect automatic
transmission fluid may damage the
vehicle, and the damage may not be
covered by the vehicle warranty. Always
use the correct automatic transmission
fluid. See Recommended Fluids and
Lubricants 0421.
Change the fluid and filter at the scheduled
maintenance intervals listed in Maintenance
Schedule 0417. Be sure to use the
transmission fluid listed in Recommended
Fluids and Lubricants 0421.
Engine Air Filter Life System
If equipped, this feature provides the engine
air filter’s remaining life and best timing for
a change. The timing to change an engine
air filter depends on driving and
environmental conditions.
When to Change the Engine Air Filter
When the Driver Information Center (DIC)
displays a message to replace the engine air
filter at the next oil change, follow this
timing.
When the DIC displays a message to replace
the engine air filter soon, replace the engine
air filter at the earliest convenience.
The system must be reset after the engine
air filter is changed.
If the DIC displays a message to check the
engine air filter system, see your dealer.
How to Reset the Engine Air Filter Life
System
To reset:
1. Place the vehicle in P (Park).
2. Display the Air Filter Life on the DIC. See Driver Information Center (DIC) (Base
Level) 0126 or
Driver Information Center (DIC) (Uplevel)
0 127.
3. Press
Ton the steering wheel, or press
the trip odometer reset stem if the
vehicle does not have DIC controls, to
move to the Reset/Disable display area. Select Reset then press the thumbwheel
or press the reset stem for several
seconds.
4. Press the thumbwheel or the reset stem to confirm the reset.
Engine Air Cleaner/Filter
The engine air cleaner/filter is on the driver
side of the engine compartment. See Engine
Compartment Overview 0335.
When to Inspect the Engine Air Cleaner/
Filter
If the vehicle is not equipped with the
engine air filter life system see Maintenance
Schedule 0417 for intervals on inspecting
and replacing the engine air cleaner filter.
How to Inspect/Replace the Engine Air
Cleaner/Filter
Do not start or run the engine with the
engine air cleaner/filter housing open.
Before removing the engine air cleaner/
filter, clear any dirt and debris away from
the engine air cleaner/filter housing and
nearby components. Remove the engine air
cleaner/filter. Lightly tap and shake the
engine air cleaner/filter (away from the
vehicle), to release loose dust and dirt.
Page 347 of 463
Chevrolet Silverado 1500 Owner Manual (GMNA-Localizing-U.S./Canada/
Mexico/Paraguay-16515119) - 2023 - CRC - 6/2/22
346 Vehicle Care
1. Remove the coolant surge tank pressurecap when the cooling system, including
the coolant surge tank pressure cap and
upper radiator hose, is no longer hot.
Turn the pressure cap slowly
counterclockwise about one full turn. If a
hiss is heard, wait for that to stop.
A hiss means there is still some
pressure left.
2. Keep turning the pressure cap slowly, and remove it.
3. Fill the coolant surge tank with the proper mixture to the full cold mark.
4. With the coolant surge tank pressure cap off, start the engine and let it run until
the engine coolant temperature gauge
indicates approximately 90 °C (195 °F).
By this time, the coolant level inside the
coolant surge tank may be lower. If the
level is lower, add more of the proper
mixture to the coolant surge tank until
the level reaches the indicated mark.
5. Replace the pressure cap tightly.
6. Verify coolant level after the engine is shut off and the coolant is cold.
If necessary, repeat coolant fill procedure
Steps 1–6.Caution
If the pressure cap is not tightly installed,
coolant loss and engine damage may
occur. Be sure the cap is properly and
tightly secured.
Engine Overheating
If the vehicle has the Duramax diesel
engine, see the Duramax diesel supplement.
Caution
Do not run the engine if there is a leak
in the engine cooling system. This can
cause a loss of all coolant and can
damage the system and vehicle. Have
any leaks fixed right away.
The vehicle has several indicators to warn of
engine overheating.
There is a coolant temperature gauge in the
vehicle's instrument cluster. See Engine
Coolant Temperature Gauge 0112.
In addition, there are ENGINE OVERHEATED
STOP ENGINE, ENGINE OVERHEATED IDLE
ENGINE, and ENGINE POWER IS REDUCED
messages in the Driver Information
Center (DIC). If the decision is made not to lift the hood
when this warning appears, get service help
right away. See
Roadside Assistance Program
0 433.
If the decision is made to lift the hood,
make sure the vehicle is parked on a level
surface.
2.7L L4, 5.3L V8, and 6.2L V8 Engines
Check to see if the engine cooling fans are
running. If the engine is overheating, the
fans should be running. If they are not, do
not continue to run the engine and have the
vehicle serviced.
If the engine or transmission detects an
impending hot fluid condition, then the
transmission may force upshifts to limit
temperatures. Downshifts may also be
prevented in this instance. Normal operation
may continue unless the display indicates
there is a hot condition and engine should
be idled.
Page 348 of 463
Chevrolet Silverado 1500 Owner Manual (GMNA-Localizing-U.S./Canada/
Mexico/Paraguay-16515119) - 2023 - CRC - 6/2/22
Vehicle Care 347
If Steam is Coming from the Engine
Compartment
{Warning
Steam and scalding liquids from a hot
cooling system are under pressure.
Turning the pressure cap, even a little,
can cause them to come out at high
speed and you could be burned. Never
turn the cap when the cooling system,
including the pressure cap, is hot. Wait
for the cooling system and pressure cap
to cool.
If No Steam is Coming from the Engine
Compartment
The ENGINE OVERHEATED STOP ENGINE or
the ENGINE OVERHEATED IDLE ENGINE
message, along with a low coolant
condition, can indicate a serious problem.
The 2.7L L4 engine will shut down
automatically if the ENGINE OVERHEATED
STOP ENGINE message displays.
If there is an engine overheat warning, but
no steam is seen or heard, the problem may
not be too serious. Sometimes the engine
can get a little too hot when the vehicle:
.Climbs a long hill on a hot day.
.Stops after high-speed driving.
.Idles for long periods in traffic.
.Tows a trailer; seeTrailer Towing0302.
If the ENGINE OVERHEATED STOP ENGINE or
the ENGINE OVERHEATED IDLE ENGINE
message appears with no sign of steam, try
this for a minute or so: 1. Turn the air conditioning off.
2. Turn the heater on to the highest temperature and to the highest fan
speed. Open the windows as necessary.
3. When it is safe to do so, pull off the road, shift to P (Park) or N (Neutral) and
let the engine idle.
If the temperature overheat gauge is no
longer in the overheat zone or an overheat
warning no longer displays, the vehicle can
be driven. Continue to drive the vehicle
slowly for about 10 minutes. Keep a safe
vehicle distance from the vehicle in front.
If the warning does not come back on,
continue to drive normally and have the
cooling system checked for proper fill and
function.
If the warning continues, pull over, stop, and
park the vehicle right away. If there is still no sign of steam and the
vehicle is equipped with an engine driven
cooling fan, push down the accelerator until
the engine speed is about twice as fast as
normal idle speed for at least five minutes
while the vehicle is parked. If the warning is
still there, turn off the engine and get
everyone out of the vehicle until it
cools down.
If there is no sign of steam, idle the engine
for five minutes while parked. If the warning
is still displayed, turn off the engine until it
cools down.
Overheated Engine Protection
Operating Mode
If an overheated engine condition exists and
the ENGINE POWER IS REDUCED message
displays, an overheat protection mode which
alternates firing groups of cylinders helps to
prevent engine damage. In this mode, a loss
in power and engine performance will be
noticed. This operating mode allows the
vehicle to be driven to a safe place in an
emergency. Driving extended distances and/
or towing a trailer in the overheat
protection mode should be avoided.
Page 349 of 463
Chevrolet Silverado 1500 Owner Manual (GMNA-Localizing-U.S./Canada/
Mexico/Paraguay-16515119) - 2023 - CRC - 6/2/22
348 Vehicle Care
If the engine or transmission detects an
impending hot fluid condition, then the
transmission may force upshifts to limit
temperatures. Downshifts may also be
prevented in this instance. Normal operation
may continue unless the display indicates
there is a hot condition and engine should
be idled.
Caution
After driving in the overheated engine
protection operating mode, the engine oil
will be severely degraded. Any repairs
performed before the engine is cool may
cause engine damage. Allow the engine
to cool before attempting any repair.
Repair the cause of coolant loss, change
the oil, and reset the oil life system. See
Engine Oil0338.
Engine Fan
If the vehicle has the Duramax diesel
engine, see the Duramax diesel supplement.
The vehicle has electric cooling fan(s). The
fans may be heard spinning at low speed
during most everyday driving. The fans may
turn off if no cooling is required. Under
heavy vehicle loading, trailer towing, high outside temperatures, or operation of the air
conditioning system, the fans may change
to high speed and an increase in fan noise
may be heard. This is normal and indicates
that the cooling system is functioning
properly. The fans will change to low speed
when additional cooling is no longer
required.
The electric engine cooling fans may run
after the engine has been turned off. This is
normal and no service is required.
Washer Fluid
What to Use
When windshield washer fluid needs to be
added, be sure to read the manufacturer's
instructions before use. Use a fluid that has
sufficient protection against freezing in an
area where the temperature may fall below
freezing.
Adding Washer Fluid
The vehicle has a low washer fluid message
on the DIC that comes on when the washer
fluid is low. The message is displayed for
15 seconds at the start of each ignition cycle.
When the WASHER FLUID LOW ADD FLUID
message displays, washer fluid will need to
be added to the windshield washer fluid
reservoir.
Open the cap with the washer symbol on it.
Add washer fluid until the tank is full. See
Engine Compartment Overview
0335 for
reservoir location.
Caution
.Do not use washer fluid that contains
any type of water repellent coating.
This can cause the wiper blades to
chatter or skip.
.Do not use engine coolant (antifreeze)
in the windshield washer. It can
damage the windshield washer system
and paint.
(Continued)