2023 CHEVROLET SILVERADO 1500 change
[x] Cancel search: changePage 350 of 463
Chevrolet Silverado 1500 Owner Manual (GMNA-Localizing-U.S./Canada/
Mexico/Paraguay-16515119) - 2023 - CRC - 6/2/22
Vehicle Care 349
Caution (Continued)
.Do not mix water with ready-to-use
washer fluid. Water can cause the
solution to freeze and damage the
washer fluid tank and other parts of
the washer system.
.When using concentrated washer fluid,
follow the manufacturer instructions
for adding water.
.Fill the washer fluid tank only
three-quarters full when it is very cold.
This allows for fluid expansion if
freezing occurs, which could damage
the tank if it is completely full.
Brakes
Disc brake linings have built-in wear
indicators that make a high-pitched warning
sound when the brake linings are worn and
new linings are needed. The sound can come
and go or can be heard all the time when
the vehicle is moving, except when applying
the brake pedal firmly.
{Warning
The brake wear warning sound means
that soon the brakes will not work well.
That could lead to a crash. When the
brake wear warning sound is heard, have
the vehicle serviced.
Caution
Continuing to drive with worn-out brake
linings could result in costly brake
repairs.
Some driving conditions or climates can
cause a brake squeal when the brakes are
first applied, clearing up following several
applications. This does not mean something
is wrong with the brakes.
Properly torqued wheel nuts are necessary
to help prevent brake pulsation. When tires
are rotated, inspect brake linings for wear
and evenly tighten wheel nuts in the proper
sequence to torque specifications. See
Capacities and Specifications 0426.
Brake pads should be replaced as complete
axle sets.
Brake Pedal Travel
See your dealer if the brake pedal does not
return to normal height, or if there is a
rapid increase in pedal travel. This could be
a sign that brake service may be required.
Replacing Brake System Parts
Always replace brake system parts with
new, approved replacement parts. If this is
not done, the brakes may not work
properly. The braking performance can
change in many ways if the wrong brake
parts are installed or if parts are improperly
installed.
Brake Pad Life System
When to Change Brake Pads
This vehicle has a system that estimates the
remaining life of the front and rear brake
pads. Brake pad life is displayed in the
Driver Information Center (DIC), along with
a percentage for each axle. The system must
be reset every time the brake pads are
changed.
When the system has determined that the
brake pads need to be replaced, a message
will display, which may include mileage
remaining.
Page 354 of 463
Chevrolet Silverado 1500 Owner Manual (GMNA-Localizing-U.S./Canada/
Mexico/Paraguay-16515119) - 2023 - CRC - 6/2/22
Vehicle Care 353
3. Cover the negative battery cable clamp,and negative battery post with a
non-conductive material to prevent any
contact with the negative battery cable.
Negative Battery Cable Reconnection
Caution
When reconnecting the battery:
.Use the original nut from the vehicle
to secure the negative battery cable.
Do not use a different nut. If you
need a replacement nut, see your
dealer.
.Tighten the nut with a hand tool. Do
not use an impact wrench or power
tools to tighten the nut.
The vehicle could be damaged if these
guidelines are not followed.
Caution
Do not use paints, lubricants, or corrosion
inhibitors on the nut that secures the
negative battery cable to the vehicle. This
could damage the vehicle. For vehicles equipped with the Stop/Start
system:
1. Install the negative battery cable to the battery sensor stud.
2. Install the negative battery cable nut to the battery sensor stud and tighten.
3. Turn the ignition on.
For vehicles not equipped with the Stop/
Start system: 1. Install the negative battery cable clamp to the negative battery post.
2. Tighten the negative battery cable nut.
3. Turn the ignition on.
Four-Wheel Drive
Transfer Case
When to Check Lubricant
Refer to Maintenance Schedule 0417 to
determine when to check the lubricant.
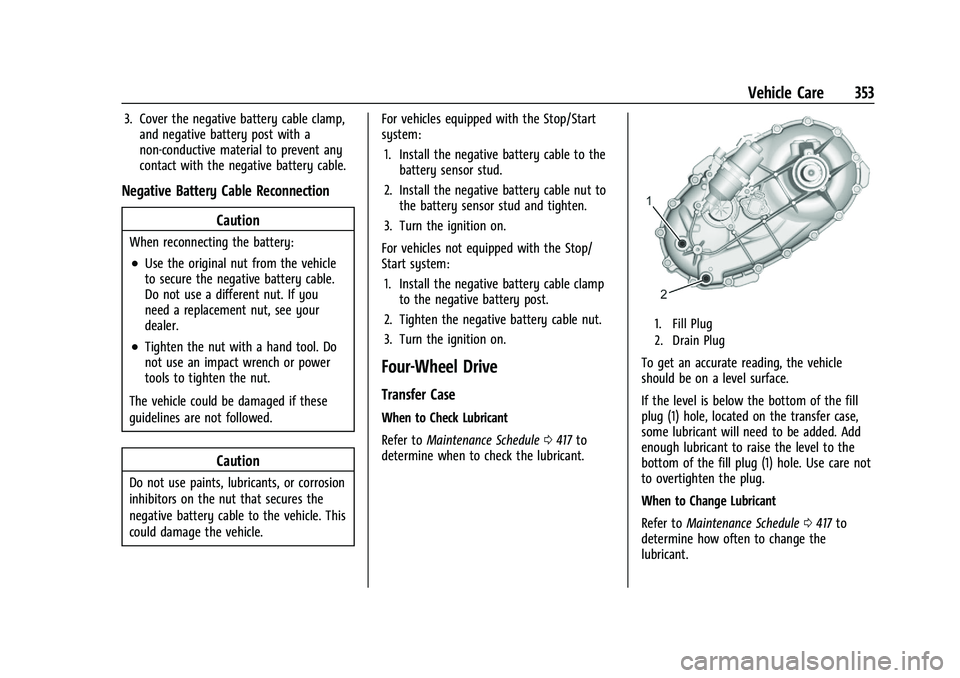
1. Fill Plug
2. Drain Plug
To get an accurate reading, the vehicle
should be on a level surface.
If the level is below the bottom of the fill
plug (1) hole, located on the transfer case,
some lubricant will need to be added. Add
enough lubricant to raise the level to the
bottom of the fill plug (1) hole. Use care not
to overtighten the plug.
When to Change Lubricant
Refer to Maintenance Schedule 0417 to
determine how often to change the
lubricant.
Page 371 of 463
Chevrolet Silverado 1500 Owner Manual (GMNA-Localizing-U.S./Canada/
Mexico/Paraguay-16515119) - 2023 - CRC - 6/2/22
370 Vehicle Care
Warning (Continued)
.Worn or old tires can cause a
crash. If the tread is badly worn,
replace them.
.Replace any tires that have been
damaged by impacts with
potholes, curbs, etc.
.Improperly repaired tires can cause
a crash. Only your dealer or an
authorized tire service center
should repair, replace, dismount,
and mount the tires.
.Do not spin the tires in excess of
56 km/h (35 mph) on slippery
surfaces such as snow, mud, ice,
etc. Excessive spinning may cause
the tires to explode.
All-Season Tires
This vehicle may come with all-season tires.
These tires are designed to provide good
overall performance on most road surfaces
and weather conditions. Original equipment
tires designed to GM's specific tire
performance criteria have a TPC specification
code molded onto the sidewall. Originalequipment all-season tires can be identified
by the last two characters of this TPC code,
which will be
“MS.”
Consider installing winter tires on the
vehicle if frequent driving on snow or
ice-covered roads is expected. All-season tires
provide adequate performance for most
winter driving conditions, but they may not
offer the same level of traction or
performance as winter tires on snow or
ice-covered roads. See Winter Tires0370.
Winter Tires
This vehicle was not originally equipped
with winter tires. Winter tires are designed
for increased traction on snow and
ice-covered roads. Consider installing winter
tires on the vehicle if frequent driving on ice
or snow covered roads is expected. See your
dealer for details regarding winter tire
availability and proper tire selection. Also,
see Buying New Tires 0383.
With winter tires, there may be decreased
dry road traction, increased road noise, and
shorter tread life. After changing to winter
tires, be alert for changes in vehicle
handling and braking. If using winter tires:
.Use tires of the same brand and tread
type on all four wheel positions.
.Use only radial ply tires of the same size,
load range, and speed rating as the
original equipment tires.
Winter tires with the same speed rating as
the original equipment tires may not be
available for H, V, W, Y, and ZR speed rated
tires. If winter tires with a lower speed
rating are chosen, never exceed the tire's
maximum speed capability.
All-Terrain Tires
This vehicle may have all-terrain or
mud-terrain tires. These tires provide good
performance on most road surfaces, weather
conditions, and for off-road driving. See
Off-Road Driving 0197.
The tread pattern on these tires may wear
more unevenly than other tires. Consider
rotating the tires more frequently than at
12 000 km (7,500 mi) intervals if irregular
wear is noted when the tires are inspected.
See Tire Inspection 0381.
Page 384 of 463
Chevrolet Silverado 1500 Owner Manual (GMNA-Localizing-U.S./Canada/
Mexico/Paraguay-16515119) - 2023 - CRC - 6/2/22
Vehicle Care 383
Lightly coat the inner diameter of the
wheel hub opening with wheel bearing
grease after a wheel change or tire
rotation to prevent corrosion or rust
build-up.
{Warning
Do not apply grease to the wheel
mounting surface, wheel conical
seats, or the wheel nuts or bolts.
Grease applied to these areas could
cause a wheel to become loose or
come off, resulting in a crash.
When It Is Time for New Tires
Factors, such as maintenance, temperatures,
driving speeds, vehicle loading, and road
conditions affect the wear rate of the tires.
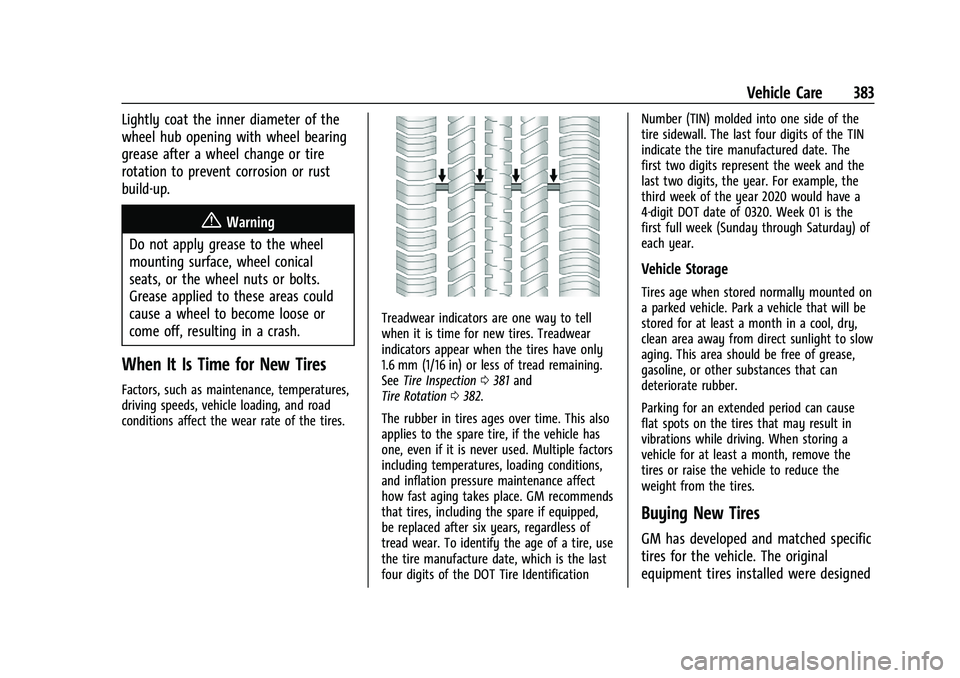
Treadwear indicators are one way to tell
when it is time for new tires. Treadwear
indicators appear when the tires have only
1.6 mm (1/16 in) or less of tread remaining.
See Tire Inspection 0381 and
Tire Rotation 0382.
The rubber in tires ages over time. This also
applies to the spare tire, if the vehicle has
one, even if it is never used. Multiple factors
including temperatures, loading conditions,
and inflation pressure maintenance affect
how fast aging takes place. GM recommends
that tires, including the spare if equipped,
be replaced after six years, regardless of
tread wear. To identify the age of a tire, use
the tire manufacture date, which is the last
four digits of the DOT Tire Identification Number (TIN) molded into one side of the
tire sidewall. The last four digits of the TIN
indicate the tire manufactured date. The
first two digits represent the week and the
last two digits, the year. For example, the
third week of the year 2020 would have a
4-digit DOT date of 0320. Week 01 is the
first full week (Sunday through Saturday) of
each year.
Vehicle Storage
Tires age when stored normally mounted on
a parked vehicle. Park a vehicle that will be
stored for at least a month in a cool, dry,
clean area away from direct sunlight to slow
aging. This area should be free of grease,
gasoline, or other substances that can
deteriorate rubber.
Parking for an extended period can cause
flat spots on the tires that may result in
vibrations while driving. When storing a
vehicle for at least a month, remove the
tires or raise the vehicle to reduce the
weight from the tires.
Buying New Tires
GM has developed and matched specific
tires for the vehicle. The original
equipment tires installed were designed
Page 389 of 463
Chevrolet Silverado 1500 Owner Manual (GMNA-Localizing-U.S./Canada/
Mexico/Paraguay-16515119) - 2023 - CRC - 6/2/22
388 Vehicle Care
If a front tire fails, the flat tire creates a
drag that pulls the vehicle toward that side.
Take your foot off the accelerator pedal and
grip the steering wheel firmly. Steer to
maintain lane position, and then gently
brake to a stop, well off the road,
if possible.
A rear blowout, particularly on a curve, acts
much like a skid and may require the same
correction as used in a skid. Stop pressing
the accelerator pedal and steer to straighten
the vehicle. It may be very bumpy and
noisy. Gently brake to a stop, well off the
road, if possible.
{Warning
Driving on a flat tire will cause
permanent damage to the tire.
Re-inflating a tire after it has been driven
on while severely underinflated or flat
may cause a blowout and a serious crash.
Never attempt to re-inflate a tire that has
been driven on while severely
underinflated or flat. Have your dealer or
an authorized tire service center repair or
replace the flat tire as soon as possible.
{Warning
Lifting a vehicle and getting under it to
do maintenance or repairs is dangerous
without the appropriate safety equipment
and training. If a jack is provided with
the vehicle, it is designed only for
changing a flat tire. If it is used for
anything else, you or others could be
badly injured or killed if the vehicle slips
off the jack. If a jack is provided with the
vehicle, only use it for changing a
flat tire.
If a tire goes flat, avoid further tire and
wheel damage by driving slowly to a level
place, well off the road, if possible. Turn on
the hazard warning flashers. See Hazard
Warning Flashers 0140.
If your vehicle is loaded at or near
maximum cargo capacity, it may be difficult
to fit the jack under the vehicle due to the
environment (shoulder slope, road debris,
etc.). Removal of some weight may improve
the ability to fit the jack under the vehicle
at the correct jacking location.
{Warning
Changing a tire can be dangerous. The
vehicle can slip off the jack and roll over
or fall causing injury or death. Find a
level place to change the tire. To help
prevent the vehicle from moving:
1. Set the parking brake firmly.
2. Shift the vehicle to P (Park).
3. For vehicles with four-wheel drive with an N (Neutral) transfer case
position, be sure the transfer case is
in a drive gear —not in N (Neutral).
4. Turn off the engine and do not restart while the vehicle is raised.
5. Do not allow passengers to remain in the vehicle.
6. Place wheel blocks, if equipped, on both sides of the tire at the opposite
corner of the tire being changed.
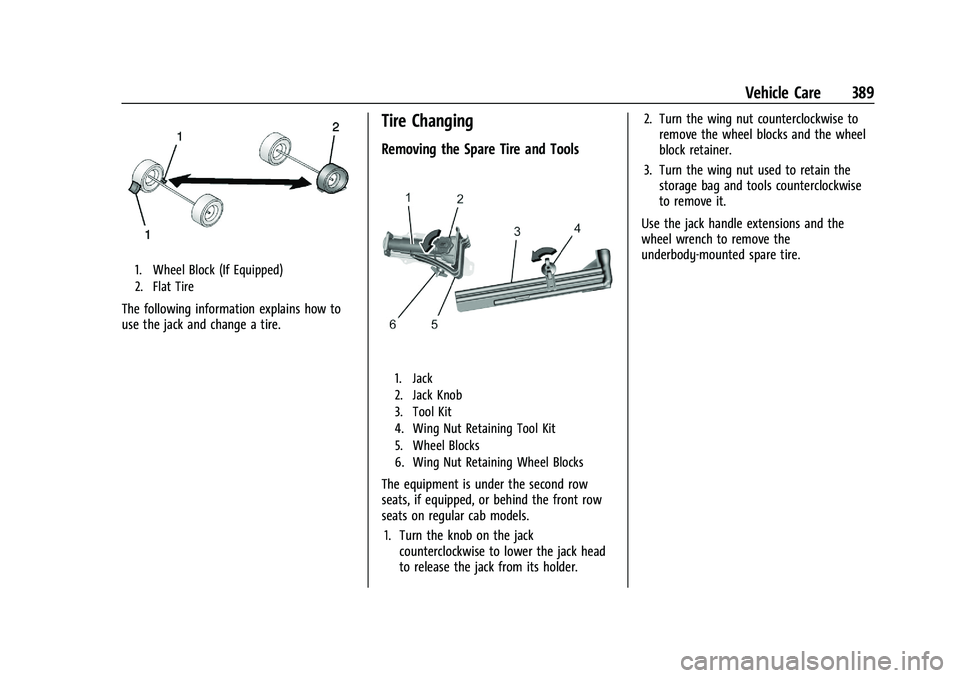
When the vehicle has a flat tire (2), use the
following example as a guide to assist in the
placement of the wheel blocks (1),
if equipped.
Page 390 of 463
Chevrolet Silverado 1500 Owner Manual (GMNA-Localizing-U.S./Canada/
Mexico/Paraguay-16515119) - 2023 - CRC - 6/2/22
Vehicle Care 389
1. Wheel Block (If Equipped)
2. Flat Tire
The following information explains how to
use the jack and change a tire.
Tire Changing
Removing the Spare Tire and Tools
1. Jack
2. Jack Knob
3. Tool Kit
4. Wing Nut Retaining Tool Kit
5. Wheel Blocks
6. Wing Nut Retaining Wheel Blocks
The equipment is under the second row
seats, if equipped, or behind the front row
seats on regular cab models.1. Turn the knob on the jack counterclockwise to lower the jack head
to release the jack from its holder. 2. Turn the wing nut counterclockwise to
remove the wheel blocks and the wheel
block retainer.
3. Turn the wing nut used to retain the storage bag and tools counterclockwise
to remove it.
Use the jack handle extensions and the
wheel wrench to remove the
underbody-mounted spare tire.
Page 413 of 463
Chevrolet Silverado 1500 Owner Manual (GMNA-Localizing-U.S./Canada/
Mexico/Paraguay-16515119) - 2023 - CRC - 6/2/22
412 Vehicle Care
Interior Care
To prevent dirt particle abrasions, regularly
clean the vehicle's interior. Before using
cleaners, read and follow all safety
instructions on the label. While cleaning the
interior, open the doors and windows to get
proper ventilation. Newspapers or dark
garments can transfer color to the vehicle’s
interior.
Caution
Immediately remove cleaners, hand
lotions, sunscreen, and insect repellent
from all interior surfaces or permanent
damage may result.
Caution
Use cleaners specifically designed for the
surfaces being cleaned to prevent
permanent damage to the vehicle. Apply
all cleaners directly to a cleaning cloth.
Do not spray cleaners on any switches or
controls.
When using liquid soap cleaners, follow the
directions on the specific cleaner or soap
solution for dilution instructions.
Caution
To prevent damage:
.Never use a razor or any other sharp
object to remove soil from any interior
surface
.Never use a brush with stiff bristles.
.Never rub any surface aggressively or
with too much pressure.
.Do not get any exposed electrical
components wet.
.Do not use laundry detergents or
dishwashing soaps with degreasers. Do
not use solutions that contain strong
or caustic soap.
.Do not heavily saturate the upholstery
when cleaning.
.Do not use solvents or cleaners
containing solvents.
.Do not use disinfecting wipes that are
scented or contain bleach. Do not use
wipes or cleaners that show a color
transfer to the wipe or change the
appearance of the interior surface
when used.
(Continued)
Caution (Continued)
.Do not use scented or gel-type hand
sanitizers. If hand sanitizer comes in
contact with interior surfaces of the
vehicle, blot immediately and clean
with a soft cloth dampened with a
mild soap and water solution.
Interior Glass
To clean, use a microfiber cloth fabric
dampened with water. Wipe droplets left
behind with a clean dry cloth. If necessary,
use a commercial glass cleaner after
cleaning with plain water.
Caution
To prevent scratching, never use abrasive
cleaners on automotive glass. Abrasive
cleaners or aggressive cleaning may
damage the rear window defogger.
Cleaning the windshield with water during
the first three to six months of ownership
will reduce tendency to fog.
Speaker Covers
Vacuum around a speaker cover gently, so
that the speaker will not be damaged. Clean
spots with water and mild soap.
Page 414 of 463
Chevrolet Silverado 1500 Owner Manual (GMNA-Localizing-U.S./Canada/
Mexico/Paraguay-16515119) - 2023 - CRC - 6/2/22
Vehicle Care 413
Coated Moldings
Coated moldings should be cleaned.
.When lightly soiled, wipe with a sponge
or soft, lint-free cloth dampened with
water.
.When heavily soiled, use warm soapy
water.
Vinyl/Rubber
If equipped with vinyl floor and rubber floor
mats, use a soft cloth and/or brush
dampened with water to remove dust and
loose dirt. For more thorough cleaning, use
a mild soap and water solution.
{Warning
Do not use cleaners that contain silicone,
wax-based products, or cleaners that
increase gloss on vinyl/rubber floor and
mats. These cleaners can permanently
change the appearance and feel of the
vinyl/rubber and can make the floor
slippery. Your foot could slip while
operating the vehicle, and you could lose
control, resulting in a crash. You or
others could be injured.
Fabric/Carpet/Suede
Start by vacuuming the surface using a soft
brush attachment. If a rotating vacuum
brush attachment is being used, only use it
on the floor carpet. Before cleaning, gently
remove as much of the soil as possible:
.Gently blot liquids with a paper towel.
Continue blotting until no more soil can
be removed.
.For solid soils, remove as much as
possible prior to vacuuming.
To clean: 1. Saturate a clean, lint-free colorfast cloth with water. Microfiber cloth is
recommended to prevent lint transfer to
the fabric or carpet.
2. Remove excess moisture by gently wringing until water does not drip from
the cleaning cloth.
3. Start on the outside edge of the soil and gently rub toward the center. Fold the
cleaning cloth to a clean area frequently
to prevent forcing the soil into the
fabric.
4. Continue gently rubbing the soiled area until there is no longer any color
transfer from the soil to the cleaning
cloth. 5. If the soil is not completely removed,
use a mild soap solution followed only
by plain water.
If the soil is not completely removed, it may
be necessary to use a commercial upholstery
cleaner or spot lifter. Test a small hidden
area for colorfastness before using a
commercial upholstery cleaner or spot lifter.
If ring formation occurs, clean the entire
fabric or carpet.
After cleaning, use a paper towel to blot
excess moisture.
Cleaning High Gloss Surfaces and Vehicle
Information and Radio Displays
Use a microfiber cloth on high gloss surfaces
or vehicle displays. First, use a soft bristle
brush to remove dirt that can scratch the
surface. Then gently clean by rubbing with a
microfiber cloth. Never use window cleaners
or solvents. Periodically hand wash the
microfiber cloth separately, using mild soap.
Do not use bleach or fabric softener. Rinse
thoroughly and air dry before next use.