2023 CHEVROLET SILVERADO 1500 steering
[x] Cancel search: steeringPage 341 of 463
Chevrolet Silverado 1500 Owner Manual (GMNA-Localizing-U.S./Canada/
Mexico/Paraguay-16515119) - 2023 - CRC - 6/2/22
340 Vehicle Care
Engine Oil Life System
When to Change Engine Oil
This vehicle has a computer system that
indicates when to change the engine oil and
filter. This is based on a combination of
factors which include engine revolutions,
engine temperature, and miles driven. Based
on driving conditions, the mileage at which
an oil change is indicated can vary
considerably. For the oil life system to work
properly, the system must be reset every
time the oil is changed.
On some vehicles, when the system has
calculated that oil life has been diminished,
a CHANGE ENGINE OIL SOON message comes
on to indicate that an oil change is
necessary. Change the oil as soon as
possible within the next 1 000 km (600 mi).
It is possible that, if driving under the best
conditions, the oil life system might indicate
that an oil change is not necessary for up to
a year. The engine oil and filter must be
changed at least once a year and, at this
time, the system must be reset. For vehicles
without the CHANGE ENGINE OIL SOON
message, an oil change is needed when the
REMAINING OIL LIFE percentage is near 0%.
Your dealer has trained service people whowill perform this work and reset the system.
It is also important to check the oil regularly
over the course of an oil drain interval and
keep it at the proper level.
If the system is ever reset accidentally, the
oil must be changed at 5 000 km (3,000 mi)
since the last oil change. Remember to reset
the oil life system whenever the oil is
changed.
How to Reset the Engine Oil Life System
Reset the system whenever the engine oil is
changed so that the system can calculate
the next engine oil change. Always reset the
engine oil life to 100% after every oil
change. It will not reset itself. To reset the
engine oil life system:
1. Display the oil life percentage on the DIC. See Driver Information Center (DIC)
(Base Level) 0126 or
Driver Information Center (DIC) (Uplevel)
0 127.
2. Press the thumbwheel on the steering wheel, or the trip odometer reset stem if
the vehicle does not have DIC controls,
for several seconds. When the
confirmation message displays, select
YES. The oil life will change to 100%. The oil life system can also be reset as
follows:
1. Display the oil life percentage on the DIC. See Driver Information Center (DIC)
(Base Level) 0126 or
Driver Information Center (DIC) (Uplevel)
0 127.
2. Fully press the accelerator pedal slowly three times within five seconds.
3. If the display changes to 100%, the system is reset.
If the vehicle has a CHANGE ENGINE OIL
SOON message and it comes back on when
the vehicle is started and/or the oil
life percentage is near 0%, the engine oil
life system has not been reset. Repeat the
procedure.
Automatic Transmission Fluid
When to Check and Change Automatic
Transmission Fluid
It is usually not necessary to check the
transmission fluid level. The only reason for
fluid loss is a transmission leak or
overheated transmission. This vehicle is not
equipped with a transmission fluid level
dipstick. There is a special procedure for
checking and changing the transmission fluid
Page 342 of 463
Chevrolet Silverado 1500 Owner Manual (GMNA-Localizing-U.S./Canada/
Mexico/Paraguay-16515119) - 2023 - CRC - 6/2/22
Vehicle Care 341
in these vehicles. Because this procedure is
difficult, this should be done at the dealer.
Contact the dealer for additional information
or the procedure can be found in the service
manual. SeePublication Ordering
Information 0437.
Caution
Use of the incorrect automatic
transmission fluid may damage the
vehicle, and the damage may not be
covered by the vehicle warranty. Always
use the correct automatic transmission
fluid. See Recommended Fluids and
Lubricants 0421.
Change the fluid and filter at the scheduled
maintenance intervals listed in Maintenance
Schedule 0417. Be sure to use the
transmission fluid listed in Recommended
Fluids and Lubricants 0421.
Engine Air Filter Life System
If equipped, this feature provides the engine
air filter’s remaining life and best timing for
a change. The timing to change an engine
air filter depends on driving and
environmental conditions.
When to Change the Engine Air Filter
When the Driver Information Center (DIC)
displays a message to replace the engine air
filter at the next oil change, follow this
timing.
When the DIC displays a message to replace
the engine air filter soon, replace the engine
air filter at the earliest convenience.
The system must be reset after the engine
air filter is changed.
If the DIC displays a message to check the
engine air filter system, see your dealer.
How to Reset the Engine Air Filter Life
System
To reset:
1. Place the vehicle in P (Park).
2. Display the Air Filter Life on the DIC. See Driver Information Center (DIC) (Base
Level) 0126 or
Driver Information Center (DIC) (Uplevel)
0 127.
3. Press
Ton the steering wheel, or press
the trip odometer reset stem if the
vehicle does not have DIC controls, to
move to the Reset/Disable display area. Select Reset then press the thumbwheel
or press the reset stem for several
seconds.
4. Press the thumbwheel or the reset stem to confirm the reset.
Engine Air Cleaner/Filter
The engine air cleaner/filter is on the driver
side of the engine compartment. See Engine
Compartment Overview 0335.
When to Inspect the Engine Air Cleaner/
Filter
If the vehicle is not equipped with the
engine air filter life system see Maintenance
Schedule 0417 for intervals on inspecting
and replacing the engine air cleaner filter.
How to Inspect/Replace the Engine Air
Cleaner/Filter
Do not start or run the engine with the
engine air cleaner/filter housing open.
Before removing the engine air cleaner/
filter, clear any dirt and debris away from
the engine air cleaner/filter housing and
nearby components. Remove the engine air
cleaner/filter. Lightly tap and shake the
engine air cleaner/filter (away from the
vehicle), to release loose dust and dirt.
Page 369 of 463
Chevrolet Silverado 1500 Owner Manual (GMNA-Localizing-U.S./Canada/
Mexico/Paraguay-16515119) - 2023 - CRC - 6/2/22
368 Vehicle Care
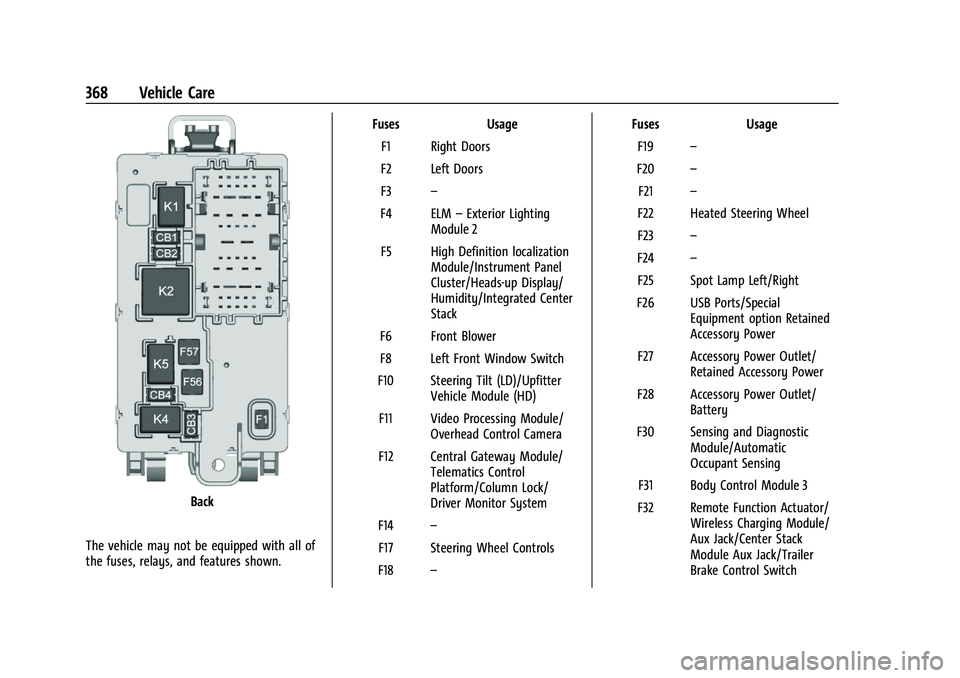
Back
The vehicle may not be equipped with all of
the fuses, relays, and features shown. Fuses Usage
F1 Right Doors
F2 Left Doors
F3 –
F4 ELM –Exterior Lighting
Module 2
F5 High Definition localization Module/Instrument Panel
Cluster/Heads-up Display/
Humidity/Integrated Center
Stack
F6 Front Blower
F8 Left Front Window Switch
F10 Steering Tilt (LD)/Upfitter Vehicle Module (HD)
F11 Video Processing Module/ Overhead Control Camera
F12 Central Gateway Module/ Telematics Control
Platform/Column Lock/
Driver Monitor System
F14 –
F17 Steering Wheel Controls
F18 – Fuses Usage
F19 –
F20 –
F21 –
F22 Heated Steering Wheel
F23 –
F24 –
F25 Spot Lamp Left/Right
F26 USB Ports/Special Equipment option Retained
Accessory Power
F27 Accessory Power Outlet/ Retained Accessory Power
F28 Accessory Power Outlet/ Battery
F30 Sensing and Diagnostic Module/Automatic
Occupant Sensing
F31 Body Control Module 3
F32 Remote Function Actuator/ Wireless Charging Module/
Aux Jack/Center Stack
Module Aux Jack/Trailer
Brake Control Switch
Page 389 of 463
Chevrolet Silverado 1500 Owner Manual (GMNA-Localizing-U.S./Canada/
Mexico/Paraguay-16515119) - 2023 - CRC - 6/2/22
388 Vehicle Care
If a front tire fails, the flat tire creates a
drag that pulls the vehicle toward that side.
Take your foot off the accelerator pedal and
grip the steering wheel firmly. Steer to
maintain lane position, and then gently
brake to a stop, well off the road,
if possible.
A rear blowout, particularly on a curve, acts
much like a skid and may require the same
correction as used in a skid. Stop pressing
the accelerator pedal and steer to straighten
the vehicle. It may be very bumpy and
noisy. Gently brake to a stop, well off the
road, if possible.
{Warning
Driving on a flat tire will cause
permanent damage to the tire.
Re-inflating a tire after it has been driven
on while severely underinflated or flat
may cause a blowout and a serious crash.
Never attempt to re-inflate a tire that has
been driven on while severely
underinflated or flat. Have your dealer or
an authorized tire service center repair or
replace the flat tire as soon as possible.
{Warning
Lifting a vehicle and getting under it to
do maintenance or repairs is dangerous
without the appropriate safety equipment
and training. If a jack is provided with
the vehicle, it is designed only for
changing a flat tire. If it is used for
anything else, you or others could be
badly injured or killed if the vehicle slips
off the jack. If a jack is provided with the
vehicle, only use it for changing a
flat tire.
If a tire goes flat, avoid further tire and
wheel damage by driving slowly to a level
place, well off the road, if possible. Turn on
the hazard warning flashers. See Hazard
Warning Flashers 0140.
If your vehicle is loaded at or near
maximum cargo capacity, it may be difficult
to fit the jack under the vehicle due to the
environment (shoulder slope, road debris,
etc.). Removal of some weight may improve
the ability to fit the jack under the vehicle
at the correct jacking location.
{Warning
Changing a tire can be dangerous. The
vehicle can slip off the jack and roll over
or fall causing injury or death. Find a
level place to change the tire. To help
prevent the vehicle from moving:
1. Set the parking brake firmly.
2. Shift the vehicle to P (Park).
3. For vehicles with four-wheel drive with an N (Neutral) transfer case
position, be sure the transfer case is
in a drive gear —not in N (Neutral).
4. Turn off the engine and do not restart while the vehicle is raised.
5. Do not allow passengers to remain in the vehicle.
6. Place wheel blocks, if equipped, on both sides of the tire at the opposite
corner of the tire being changed.
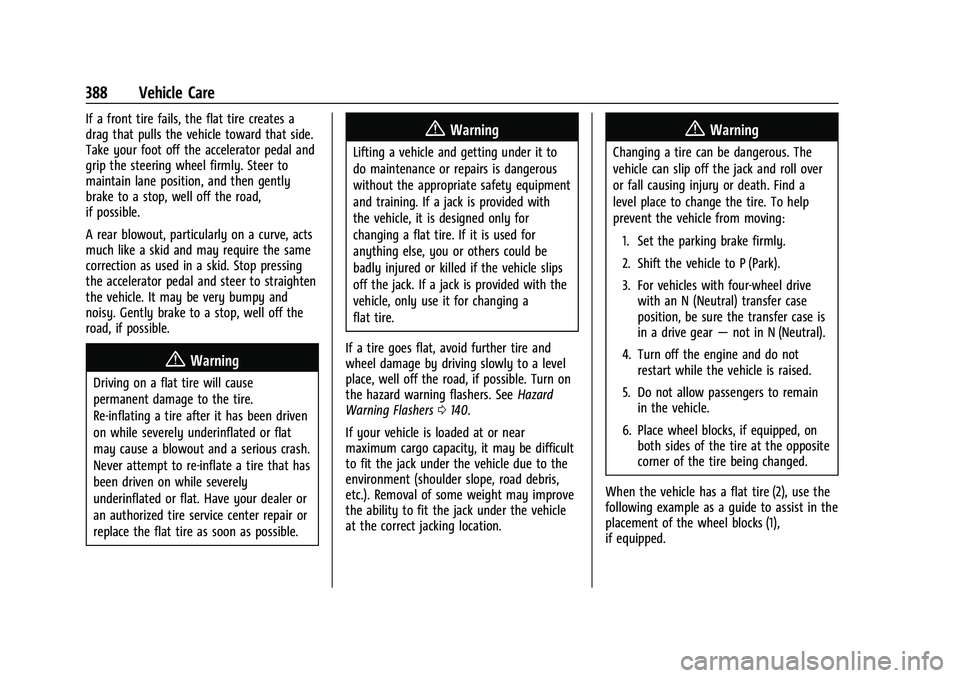
When the vehicle has a flat tire (2), use the
following example as a guide to assist in the
placement of the wheel blocks (1),
if equipped.
Page 406 of 463
Chevrolet Silverado 1500 Owner Manual (GMNA-Localizing-U.S./Canada/
Mexico/Paraguay-16515119) - 2023 - CRC - 6/2/22
Vehicle Care 405
Only dinghy tow four-wheel-drive vehicles
with a two-speed transfer case that have an
N (Neutral) and a 4
n(Four-Wheel Drive
Low) setting.
{Warning
Shifting a four-wheel-drive vehicle's
transfer case into N (Neutral) can allow
the vehicle to move even if the
transmission is in P (Park). You or others
could be injured. Set the parking brake
and use wheel blocks before shifting the
transfer case to N (Neutral).
To dinghy tow: 1. Position the vehicle being towed behind the tow vehicle, facing forward and on a
level surface.
2. Securely attach the vehicle being towed to the tow vehicle.
3. Apply the parking brake and start the engine.
4. Shift the transfer case to N (Neutral). See “Shifting into N (Neutral)” under
Four-Wheel Drive 0230.
5. With the engine running, release the parking brake and verify that the
transfer case is in N (Neutral) by shifting the transmission to D (Drive) and then to
R (Reverse). There should be no
movement while shifting the
transmission.
6. Shift the transmission to P (Park).
7. Release the parking brake.
8. Turn the vehicle off.
9. Turn on the ignition without starting the engine. To do this, take your foot off the
brake pedal then press and hold ENGINE
START/STOP for five seconds until the
green light on the button is illuminated.
See Ignition Positions 0211.
{Warning
To avoid death, serious injury,
or property damage, before dinghy
towing the vehicle, always disconnect and
secure the negative battery cable and
cover the negative battery post and cable
with a non-conductive material. If the
battery is left connected or the battery
cable contacts the post, the Electric
Parking Brake may activate during
towing, which could cause a crash. 10. Disconnect the negative (–) battery
cable. See “Negative Battery Cable
Disconnection” inBattery - North
America 0351.
Caution
If the steering column is locked, vehicle
damage may occur.
11. Move the steering wheel to make sure the steering column is unlocked.
12. For column shift transmissions, verify the transmission is in P (Park). Failing to put
the transmission into Park before flat
towing can damage the transmission.
13. Keep the remote key outside of the vehicle and manually lock the doors.
Access the vehicle by using the key in
the door lock. See Door Locks019.
Disconnecting the Towed Vehicle
Before disconnecting from the tow vehicle: 1. Park on a level surface. Secure the vehicle with wheel blocks.
2. Re-connect the negative (–) battery. See Battery - North America 0351.
3. Turn on the ignition without starting the engine. With your foot off the brake
pedal, press and hold ENGINE START/
Page 412 of 463
Chevrolet Silverado 1500 Owner Manual (GMNA-Localizing-U.S./Canada/
Mexico/Paraguay-16515119) - 2023 - CRC - 6/2/22
Vehicle Care 411
Caution (Continued)
or brushes. Use only GM approved
cleaners. Do not drive the vehicle through
an automatic car wash that uses silicon
carbide tire/wheel cleaning brushes.
Damage could occur and the repairs
would not be covered by the vehicle
warranty.
Brake System
Visually inspect brake lines and hoses for
proper hook-up, binding, leaks, cracks,
chafing, etc. Inspect disc brake pads for wear
and rotors for surface condition. Inspect
drum brake linings/shoes for wear or cracks.
Inspect all other brake parts.
Steering, Suspension, and Chassis
Components
Visually inspect steering, suspension, and
chassis components for damaged, loose,
or missing parts or signs of wear at least
once a year.
Inspect power steering for proper
attachment, connections, binding, cracks,
chafing, etc.Visually check constant velocity joint boots
and axle seals for leaks.
Caution
Lubrication of applicable suspension
points should not be done unless the
temperature is
−12 °C (10 °F) or higher,
or damage could result.
Body Component Lubrication
Lubricate all key lock cylinders, hood hinges,
liftgate hinges, and the steel fuel door hinge
unless the components are plastic. Applying
silicone grease on weatherstrips with a clean
cloth will make them last longer, seal better,
and not stick or squeak.
Underbody Maintenance
At least twice a year, spring and fall, use
plain water to flush any corrosive materials
from the underbody. Take care to
thoroughly clean any areas where mud and
other debris can collect. If equipped with
power assist steps, extend them and then
use a high pressure wash to clean all joints
and gaps.
Do not directly power wash the transfer
case and/or front/rear axle output seals.
High pressure water can overcome the seals and contaminate the fluid. Contaminated
fluid will decrease the life of the transfer
case and/or axles and should be replaced.
Sheet Metal Damage
If the vehicle is damaged and requires sheet
metal repair or replacement, make sure the
body repair shop applies anti-corrosion
material to parts repaired or replaced to
restore corrosion protection.
Original manufacturer replacement parts will
provide the corrosion protection while
maintaining the vehicle warranty.
Finish Damage
Quickly repair minor chips and scratches
with touch-up materials available from your
dealer to avoid corrosion. Larger areas of
finish damage can be corrected in your
dealer's body and paint shop.
Chemical Paint Spotting
Airborne pollutants can fall upon and attack
painted vehicle surfaces causing blotchy,
ring-shaped discolorations, and small,
irregular dark spots etched into the paint
surface. Refer to
“Finish Care”previously in
this section.
Page 421 of 463
Chevrolet Silverado 1500 Owner Manual (GMNA-Localizing-U.S./Canada/
Mexico/Paraguay-16515119) - 2023 - CRC - 6/2/22
420 Service and Maintenance
Systems, Fluids, and Visible Leak
Inspection
.Engine oil
.Transmission
.Drive axle
.Transfer case
.Engine cooling system
.Power steering, if equipped
.Fuel system
.Windshield washer fluid
Tire Inspection
.Tire pressure, tread depth, and wear
.Rotation, if applicable
.Alignment check, optional
.Reset tire pressure monitor
.Check tire sealant expiration date,
if equipped
.Check spare tire, if equipped
Brakes
.Check brake system
Visible and Functional Inspections
.Seat belt components
.Exhaust system
.Accelerator pedal
.Passenger compartment air filter,
if equipped
.Engine air filter
.Hoses
.Belts
.Shocks and struts
.Steering components
.Axle boots or driveshaft and u-joints
.Compartment lift struts, if equipped
.Floor mats secured, no interference with
pedals
.Horn
.Ignition lock, if equipped
.Starter switch
.Evaporative control system
Lubricate
.Chassis components
Special Application Services
.Severe Commercial Use Vehicles Only:
Lubricate chassis components every oil
change.
.Have underbody flushing service
performed. See "Underbody Maintenance"
in Exterior Care 0407.
Page 438 of 463
Chevrolet Silverado 1500 Owner Manual (GMNA-Localizing-U.S./Canada/
Mexico/Paraguay-16515119) - 2023 - CRC - 6/2/22
Customer Information 437
If a Crash Occurs
If there has been an injury, call emergency
services for help. Do not leave the scene of
a crash until all matters have been taken
care of. Move the vehicle only if its position
puts you in danger, or you are instructed to
move it by a police officer.
Give only the necessary information to
police and other parties involved in the
crash.
For emergency towing seeRoadside
Assistance Program 0433.
Gather the following information:
.Driver name, address, and telephone
number
.Driver license number
.Owner name, address, and telephone
number
.Vehicle license plate number
.Vehicle make, model, and model year
.Vehicle Identification Number (VIN)
.Insurance company and policy number
.General description of the damage to the
other vehicle Choose a reputable repair facility that uses
quality replacement parts. See
“Collision
Parts” earlier in this section.
If the airbag has inflated, see What Will You
See after an Airbag Inflates? 063.
Managing the Vehicle Damage Repair
Process
In the event that the vehicle requires
damage repairs, GM recommends that you
take an active role in its repair. If you have
a pre-determined repair facility of choice,
take the vehicle there, or have it towed
there. Specify to the facility that any
required replacement collision parts be
original equipment parts, either new
Genuine GM parts or recycled original GM
parts. Remember, recycled parts will not be
covered by the GM vehicle warranty.
Insurance pays the bill for the repair, but
you must live with the repair. Depending on
your policy limits, your insurance company
may initially value the repair using
aftermarket parts. Discuss this with the
repair professional, and insist on Genuine
GM parts. Remember, if the vehicle is
leased, you may be obligated to have the vehicle repaired with Genuine GM parts,
even if your insurance coverage does not
pay the full cost.
If another party's insurance company is
paying for the repairs, you are not obligated
to accept a repair valuation based on that
insurance company's collision policy repair
limits, as you have no contractual limits
with that company. In such cases, you can
have control of the repair and parts choices
as long as the cost stays within reasonable
limits.
Publication Ordering Information
Service Manuals
Service manuals have the diagnosis and
repair information on the engine/propulsion,
transmission, axle, suspension, brakes,
electrical system, steering system, body, etc.
Customer Literature
Owner’s manuals are written specifically for
owners and are intended to provide basic
operational information about the vehicle.
The owner’s manual includes the
Maintenance Schedule for all models.