2023 CHEVROLET MALIBU light
[x] Cancel search: lightPage 159 of 332
Chevrolet Malibu Owner Manual (GMNA-Localizing-U.S./Canada-
16273584) - 2023 - CRC - 9/28/22
158 Climate Controls
To change the current mode, select one or
more of the following modes:
0:Clears the windows of fog or moisture.
Air is directed to the windshield.
{: Air is directed to the instrument
panel outlets.
z: Air is directed to the floor outlets.
0MAX : Air is directed to the windshield
and the fan runs at a higher speed. This
mode overrides the previous mode selected
and clears fog or frost from the windshield
more quickly. When the button is pressed
again, the system returns to the previous
mode setting and fan speed. The current
mode setting and fan speed appear in the
display screen.
For best results, clear all snow and ice from
the windshield before defrosting.
A/C : Press to turn the air conditioning
system on or off. This status appears in the
display screen. If the fan control is turned
off or the outside temperature falls below
freezing, the air conditioner will not run.
@: Press to turn on recirculation. An
indicator light comes on and the status
appears in the display screen. Air is recirculated to quickly cool the inside of the
vehicle or to reduce the entry of outside air
and odors.
Rear Window Defogger
K:
Press to turn the rear window defogger
on or off. An indicator light on the button
comes on to show that the rear window
defogger is on. The defogger turns off when
the vehicle is turned to off or to
accessory mode.
The upper lines on the rear window are
antenna grids and are not intended to
defrost the glass.
The rear window defogger can be set to
automatic operation. To turn Auto Defog off
or on, select Settings > Climate and Air
Quality > Auto Rear Defog > Select ON or
OFF. When Auto Rear Defog is selected, the
rear window defogger turns on
automatically when the interior temperature
is cold and the outside temperature is about
7 °C (44 °F) and below. The auto rear
defogger turns off automatically.
If the vehicle is equipped with heated
outside mirrors, they turn on when the rear
window defogger button is on and help to
clear fog or frost from the surface of the
mirror. See Heated Mirrors 022.
Caution
Do not try to clear frost or other material
from the inside of the front windshield
and rear window with a razor blade or
anything else that is sharp. This may
damage the rear window defogger grid
and affect the radio's ability to pick up
stations clearly. The repairs would not be
covered by the vehicle warranty.
Remote Start Climate Control Operation :
If equipped with remote start, the climate
control system may run when the vehicle is
started remotely. The system will determine
the best mode and temperature setting for
operation. Once the vehicle is started with
the Engine Start/Stop button, the climate
control system will begin to operate at the
last customer selected operating mode and
temperature. If equipped with heated or
ventilated seats, they may come on during a
remote start. See Remote Vehicle Start 013
and
Heated and Ventilated Front Seats 034.
Page 161 of 332
Chevrolet Malibu Owner Manual (GMNA-Localizing-U.S./Canada-
16273584) - 2023 - CRC - 9/28/22
160 Climate Controls
The fan, air delivery mode, air conditioning,
driver and passenger temperatures, and Sync
settings can be controlled by touching
CLIMATE on the infotainment Home Page or
the climate button in the climate control
display application tray. A selection can then
be made on the front climate control page
displayed. See the infotainment manual.
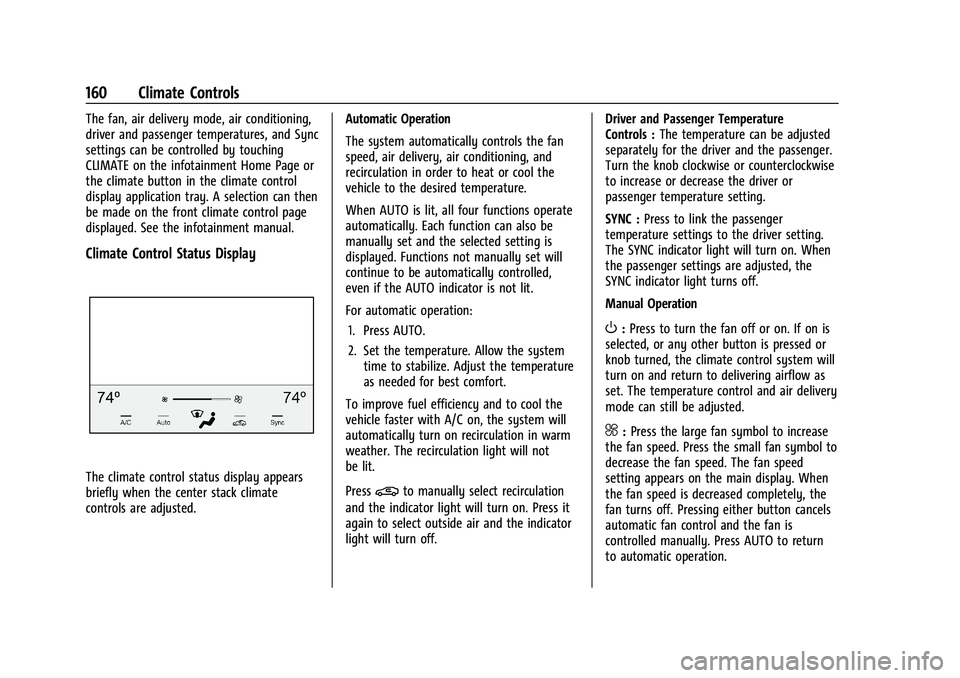
Climate Control Status Display
The climate control status display appears
briefly when the center stack climate
controls are adjusted.Automatic Operation
The system automatically controls the fan
speed, air delivery, air conditioning, and
recirculation in order to heat or cool the
vehicle to the desired temperature.
When AUTO is lit, all four functions operate
automatically. Each function can also be
manually set and the selected setting is
displayed. Functions not manually set will
continue to be automatically controlled,
even if the AUTO indicator is not lit.
For automatic operation:
1. Press AUTO.
2. Set the temperature. Allow the system time to stabilize. Adjust the temperature
as needed for best comfort.
To improve fuel efficiency and to cool the
vehicle faster with A/C on, the system will
automatically turn on recirculation in warm
weather. The recirculation light will not
be lit.
Press@to manually select recirculation
and the indicator light will turn on. Press it
again to select outside air and the indicator
light will turn off. Driver and Passenger Temperature
Controls :
The temperature can be adjusted
separately for the driver and the passenger.
Turn the knob clockwise or counterclockwise
to increase or decrease the driver or
passenger temperature setting.
SYNC : Press to link the passenger
temperature settings to the driver setting.
The SYNC indicator light will turn on. When
the passenger settings are adjusted, the
SYNC indicator light turns off.
Manual Operation
O: Press to turn the fan off or on. If on is
selected, or any other button is pressed or
knob turned, the climate control system will
turn on and return to delivering airflow as
set. The temperature control and air delivery
mode can still be adjusted.
^: Press the large fan symbol to increase
the fan speed. Press the small fan symbol to
decrease the fan speed. The fan speed
setting appears on the main display. When
the fan speed is decreased completely, the
fan turns off. Pressing either button cancels
automatic fan control and the fan is
controlled manually. Press AUTO to return
to automatic operation.
Page 162 of 332
Chevrolet Malibu Owner Manual (GMNA-Localizing-U.S./Canada-
16273584) - 2023 - CRC - 9/28/22
Climate Controls 161
Air Delivery Mode Controls :PressX,Y,
or
[to change the direction of the
airflow. Any combination of the three
buttons can be selected. The indicator light
in the button will turn on. The current mode
appears in the display screen. Pressing any
button cancels automatic air delivery control
and the direction of the airflow is controlled
manually. Press AUTO to return to
automatic operation.
To change the current mode, select one or
more of the following modes:
X: Air is directed to the windshield.
Y:Air is directed to the instrument panel
outlets.
[: Air is directed to the floor outlets.
0MAX : Air is directed to the windshield,
the fan runs at a higher speed, and the
temperature of the air is increased if not
already at maximum. This mode overrides
the previous mode selected and clears fog or
frost from the windshield more quickly.
When the button is pressed again, the
system returns to the previous mode setting
and fan speed. For best results, clear all snow and ice from
the windshield before defrosting.
A/C :
Press to turn the air conditioning
system on or off. If the fan control is turned
off or the outside temperature falls below
freezing, the air conditioner will not run.
Pressing this button cancels automatic air
conditioning and turns off the air
conditioner. Press AUTO to return to
automatic operation and the air conditioner
runs automatically as needed. When the
indicator light is on, the air conditioner runs
automatically to cool the air inside the
vehicle or to dry the air needed to defog
the windshield faster.
M: Press to turn on recirculation. An
indicator light comes on. Air is recirculated
to quickly cool the inside of the vehicle or
to reduce the entry of outside air and odors.
If selected during cool or cold weather, the
windshield and windows may fog. Turn off
recirculation to help clear the windshield
and windows. Auto Defog :
The climate control system
may have a sensor to automatically detect
high humidity inside the vehicle. When high
humidity is detected, the climate control
system may adjust to outside air supply and
turn on the air conditioner. The fan speed
may slightly increase to help prevent
fogging. If the climate control system does
not detect possible window fogging, it
returns to normal operation.
To turn Auto Defog off or on, select
Settings > Climate and Air Quality > Auto
Defog > Select ON or OFF.
Rear Window Defogger
K: Press to turn the rear window defogger
on or off. An indicator light on the button
comes on to show that the rear window
defogger is on. The rear window defogger
only works when the vehicle is on. The
defogger turns off when the vehicle is
turned off or to accessory mode.
The upper lines on the rear window are
antenna grids and are not intended to
defrost the glass.
Page 170 of 332
Chevrolet Malibu Owner Manual (GMNA-Localizing-U.S./Canada-
16273584) - 2023 - CRC - 9/28/22
Driving and Operating 169
Loss of Control
Skidding
There are three types of skids that
correspond to the vehicle's three control
systems:
.Braking Skid—wheels are not rolling.
.Steering or Cornering Skid —too much
speed or steering in a curve causes tires
to slip and lose cornering force.
.Acceleration Skid —too much throttle
causes the driving wheels to spin.
Defensive drivers avoid most skids by taking
reasonable care suited to existing conditions,
and by not overdriving those conditions. But
skids are always possible.
If the vehicle starts to slide, follow these
suggestions:
.Ease your foot off the accelerator pedal
and steer the way you want the vehicle
to go. The vehicle may straighten out. Be
ready for a second skid if it occurs.
.Slow down and adjust your driving
according to weather conditions. Stopping
distance can be longer and vehicle control
can be affected when traction is reduced
by water, snow, ice, gravel, or other
material on the road. Learn to recognize warning clues
—such as enough water,
ice, or packed snow on the road to make
a mirrored surface —and slow down
when you have any doubt.
.Try to avoid sudden steering, acceleration,
or braking, including reducing vehicle
speed by shifting to a lower gear. Any
sudden changes could cause the tires to
slide.
Remember: Antilock brakes help avoid only
the braking skid.
Driving on Wet Roads
Rain and wet roads can reduce vehicle
traction and affect your ability to stop and
accelerate. Always drive slower in these
types of driving conditions and avoid driving
through large puddles and deep-standing or
flowing water.
{Warning
Wet brakes can cause crashes. They
might not work as well in a quick stop
and could cause pulling to one side. You
could lose control of the vehicle. (Continued)
Warning (Continued)
After driving through a large puddle of
water or a car/vehicle wash, lightly apply
the brake pedal until the brakes work
normally.
Flowing or rushing water creates strong
forces. Driving through flowing water
could cause the vehicle to be carried
away. If this happens, you and other
vehicle occupants could drown. Do not
ignore police warnings and be very
cautious about trying to drive through
flowing water.
Hydroplaning
Hydroplaning is dangerous. Water can build
up under the vehicle's tires so they actually
ride on the water. This can happen if the
road is wet enough and you are going fast
enough. When the vehicle is hydroplaning, it
has little or no contact with the road.
There is no hard and fast rule about
hydroplaning. The best advice is to slow
down when the road is wet.
Page 172 of 332
Chevrolet Malibu Owner Manual (GMNA-Localizing-U.S./Canada-
16273584) - 2023 - CRC - 9/28/22
Driving and Operating 171
.Allow greater following distance and
watch for slippery spots. Icy patches can
occur on otherwise clear roads in shaded
areas. The surface of a curve or an
overpass can remain icy when the
surrounding roads are clear. Avoid sudden
steering maneuvers and braking while
on ice.
.Turn off cruise control.
Blizzard Conditions
Stop the vehicle in a safe place and signal
for help. Stay with the vehicle unless there
is help nearby. If possible, use Roadside
Assistance. SeeRoadside Assistance Program
0 303. To get help and keep everyone in the
vehicle safe:
.Turn on the hazard warning flashers.
.Tie a red cloth to an outside mirror.
{Warning
Snow can trap engine exhaust under the
vehicle. This may cause exhaust gases to
get inside. Engine exhaust contains
carbon monoxide (CO), which cannot be
seen or smelled. It can cause
unconsciousness and even death.
(Continued)
Warning (Continued)
If the vehicle is stuck in snow:
.Clear snow from the base of the
vehicle, especially any blocking the
exhaust pipe.
.Open a window about 5 cm (2 in) on
the vehicle side that is away from the
wind, to bring in fresh air.
.Fully open the air outlets on or under
the instrument panel.
.Adjust the climate control system to
circulate the air inside the vehicle and
set the fan speed to the highest
setting. See“Climate Control Systems.”
For more information about CO, see
Engine Exhaust 0181.
To save fuel, run the engine for short
periods to warm the vehicle and then shut
the engine off and partially close the
window. Moving about to keep warm also
helps.
If it takes time for help to arrive, when
running the engine, push the accelerator
pedal slightly so the engine runs faster than
the idle speed. This keeps the battery charged to restart the vehicle and to signal
for help with the headlamps. Do this as
little as possible, to save fuel.
If the Vehicle Is Stuck
Slowly and cautiously spin the wheels to
free the vehicle when stuck in sand, mud,
ice, or snow.
The Traction Control System (TCS) can often
help to free a stuck vehicle. See
Traction
Control/Electronic Stability Control 0186.
If TCS cannot free the vehicle, turn TCS off
and use the rocking method. See “Rocking
the Vehicle to Get it Out” following.
{Warning
If the vehicle's tires spin at high speed,
they can explode, and you or others
could be injured. The vehicle can
overheat, causing an engine compartment
fire or other damage. Spin the wheels as
little as possible and avoid going above
56 km/h (35 mph).
Rocking the Vehicle to Get it Out
Turn the steering wheel left and right to
clear the area around the front wheels. Turn
off any traction system. Shift back and forth
Page 173 of 332
Chevrolet Malibu Owner Manual (GMNA-Localizing-U.S./Canada-
16273584) - 2023 - CRC - 9/28/22
172 Driving and Operating
between R (Reverse) and a low forward gear,
spinning the wheels as little as possible. To
prevent transmission wear, wait until the
wheels stop spinning before shifting gears.
Release the accelerator pedal while shifting,
and press lightly on the accelerator pedal
when the transmission is in gear. Slowly
spinning the wheels in the forward and
reverse directions causes a rocking motion
that could free the vehicle. If that does not
get the vehicle out after a few tries, it
might need to be towed out. If the vehicle
does need to be towed out, seeTransporting
a Disabled Vehicle 0278.
Vehicle Load Limits
It is very important to know how much
weight the vehicle can carry. This
weight is called the vehicle capacity
weight and includes the weight of all
occupants, cargo, and all
nonfactory-installed options. Two labels
on the vehicle may show how much
weight it may properly carry: the Tire
and Loading Information label and the
Certification label.
{Warning
Do not load the vehicle any heavier
than the Gross Vehicle Weight Rating
(GVWR), or either the maximum
front or rear Gross Axle Weight
Rating (GAWR). This can cause
systems to break and change the
way the vehicle handles. This could
cause loss of control and a crash.
Overloading can also reduce stopping
performance, damage the tires, and
shorten the life of the vehicle.
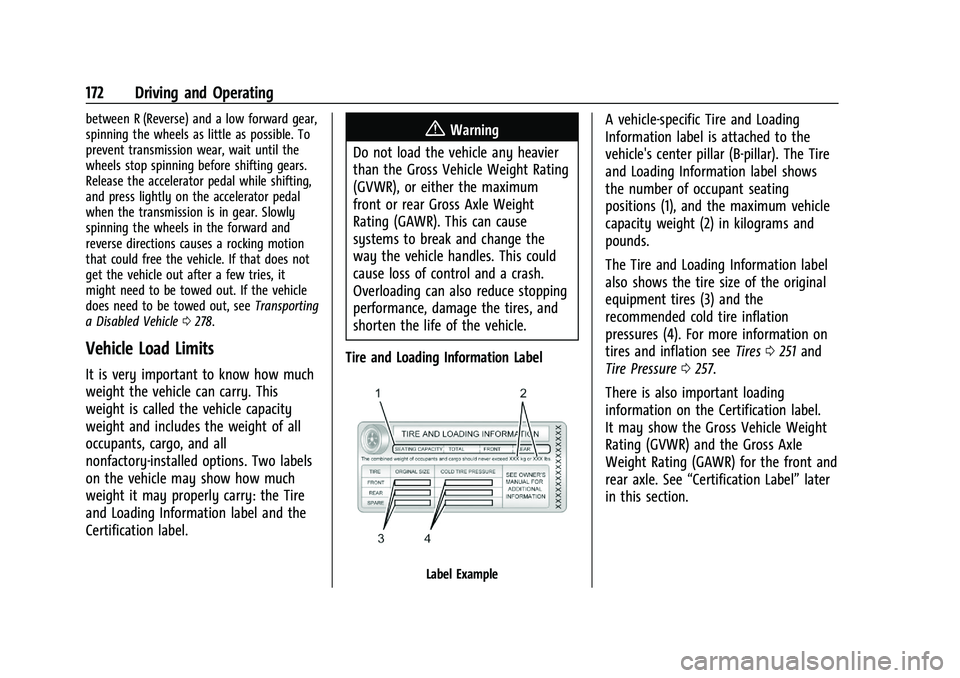
Tire and Loading Information Label
Label Example
A vehicle-specific Tire and Loading
Information label is attached to the
vehicle's center pillar (B-pillar). The Tire
and Loading Information label shows
the number of occupant seating
positions (1), and the maximum vehicle
capacity weight (2) in kilograms and
pounds.
The Tire and Loading Information label
also shows the tire size of the original
equipment tires (3) and the
recommended cold tire inflation
pressures (4). For more information on
tires and inflation see Tires0251 and
Tire Pressure 0257.
There is also important loading
information on the Certification label.
It may show the Gross Vehicle Weight
Rating (GVWR) and the Gross Axle
Weight Rating (GAWR) for the front and
rear axle. See “Certification Label” later
in this section.
Page 177 of 332
Chevrolet Malibu Owner Manual (GMNA-Localizing-U.S./Canada-
16273584) - 2023 - CRC - 9/28/22
176 Driving and Operating
Stopping the Engine/LOCK/OFF (No Indicator
Lights) :When the vehicle is stopped, press
ENGINE START/STOP once to turn the
engine off.
If the vehicle is in P (Park), the ignition will
turn off, and Retained Accessory Power (RAP)
will remain active. See Retained Accessory
Power (RAP) 0179.
If the vehicle is not in P (Park), the ignition
will return to accessory mode and display
the message SHIFT TO PARK in the Driver
Information Center (DIC). When the vehicle is
shifted into P (Park), the ignition will
turn off.
Do not turn the engine off when the vehicle
is moving. This will cause a loss of power
assist in the brake and steering systems and
disable the airbags.
If the vehicle must be shut off in an
emergency: 1. Brake using a firm and steady pressure. Do not pump the brakes repeatedly. This
may deplete power assist, requiring
increased brake pedal force. 2. Shift the vehicle to N (Neutral). This can
be done while the vehicle is moving.
After shifting to N (Neutral), firmly apply
the brakes and steer the vehicle to a
safe location.
3. Come to a complete stop, shift to P (Park), and turn the ignition off. The
shift lever must be in P (Park) to turn the
ignition off.
4. Set the parking brake. See Electric
Parking Brake 0185.
{Warning
Turning off the vehicle while moving may
cause loss of power assist in the brake
and steering systems and disable the
airbags. While driving, only shut the
vehicle off in an emergency.
If the vehicle cannot be pulled over and
must be shut off while driving, press and
hold ENGINE START/STOP for longer than
two seconds, or press twice in five seconds.
Accessory (Amber Indicator Light) : This
mode allows you to use some electrical
accessories when the engine is off. With the ignition off, pressing the button
one time without the brake pedal applied
will place the ignition system in
accessory mode.
The ignition will switch from accessory
mode to off after five minutes to prevent
battery run down.
ON/RUN/START (Green Indicator Light) :
This
mode is for driving and starting. With the
ignition off, and the brake pedal applied,
pressing the button once will turn the
ignition on. Once engine cranking begins,
release the button. Engine cranking will
continue until the engine starts. See Starting
the Engine 0177. The ignition will then
remain on.
Service Mode
This power mode is available for service and
diagnostics, and to verify the proper
operation of the malfunction indicator lamp
as may be required for emission inspection
purposes. With the vehicle off, and the
brake pedal not applied, pressing and
holding the button for more than
five seconds will place the vehicle in Service
Mode. The instruments and audio systems
will operate as they do with the ignition on,
but the vehicle will not be able to be driven.
Page 185 of 332
Chevrolet Malibu Owner Manual (GMNA-Localizing-U.S./Canada-
16273584) - 2023 - CRC - 9/28/22
184 Driving and Operating
2. Press + (Plus) or−(Minus) on the shift
lever to increase or decrease the gear
range available.
When you shift from D (Drive) to L (Low),
the transmission will shift to a
pre-determined lower gear range. The
highest gear available for this
pre-determined range is displayed next to
the L in the DIC. See Driver Information
Center (DIC) (Base Level) 095 or
Driver Information Center (DIC) (Uplevel)
0 98. The number displayed in the DIC is
the highest gear that the transmission will
be allowed to operate in. This means that
all gears below that number are available.
For example, when 4 (Fourth) is shown next
to the L, 1 (First) through 4 (Fourth) gears
are automatically shifted by the vehicle. The
transmission will not shift into 5 (Fifth) until
the + (Plus) button is used or you shift back
into D (Drive).
While in L (Low), the transmission will
prevent shifting to a lower gear range if the
engine speed is too high. You have a brief
period of time to slow the vehicle. If vehicle
speed is not reduced within the time
allowed, the lower gear range shift will not be completed. You must further slow the
vehicle, then press
−(Minus) to the desired
lower gear range.
Brakes
Electric Brake Boost
Vehicles equipped with electric brake boost
have hydraulic brake circuits that are
electronically controlled when the brake
pedal is applied during normal operation.
The system performs routine tests and turns
off within a few minutes after the vehicle is
shutdown. Noise may be heard during this
time. If the brake pedal is pressed during
the tests or when the electric brake boost
system is off, a noticeable change in pedal
force and travel may be felt. This is normal.
Antilock Brake System (ABS)
The Antilock Brake System (ABS) helps
prevent a braking skid and maintain steering
while braking hard.
ABS performs a system check when the
vehicle is first driven. A momentary motor
or clicking noise may be heard while this
test is going on, and the brake pedal may
move slightly. This is normal.
If there is a problem with ABS, this warning
light stays on. See Antilock Brake System
(ABS) Warning Light 090.
ABS does not change the time needed to
get a foot on the brake pedal and does not
always decrease stopping distance. If you
get too close to the vehicle ahead, there will
not be enough time to apply the brakes if
that vehicle suddenly slows or stops. Always
leave enough room ahead to stop, even
with ABS.
Using ABS
Do not pump the brakes. Just hold the brake
pedal down firmly. Hearing or feeling ABS
operate is normal.
Braking in Emergencies
ABS allows steering and braking at the same
time. In many emergencies, steering can
help even more than braking.