2023 CHEVROLET MALIBU turn signal
[x] Cancel search: turn signalPage 209 of 332
Chevrolet Malibu Owner Manual (GMNA-Localizing-U.S./Canada-
16273584) - 2023 - CRC - 9/28/22
208 Driving and Operating
are also warned of vehicles rapidly
approaching from up to 70 m (230 ft) behind
the vehicle.
How the System Works
The LCA symbol lights up in the side mirrors
when the system detects a moving vehicle
in the next lane over that is in the side
blind zone or rapidly approaching that zone
from behind. A lit LCA symbol indicates it
may be unsafe to change lanes. Before
making a lane change, check the LCA
display, check mirrors, glance over your
shoulder, and use the turn signals.
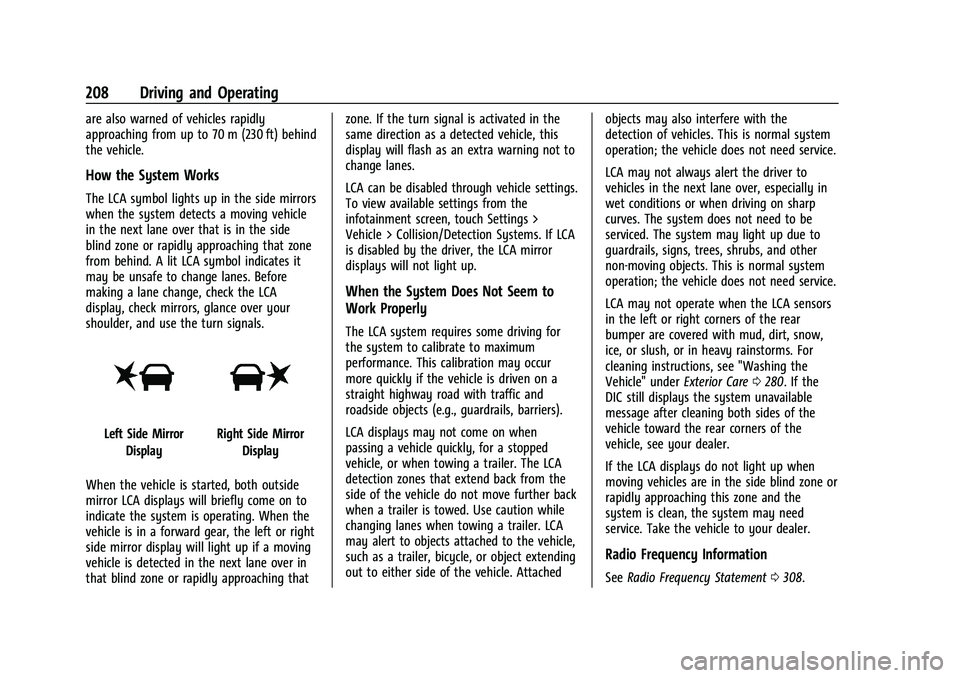
Left Side MirrorDisplayRight Side Mirror Display
When the vehicle is started, both outside
mirror LCA displays will briefly come on to
indicate the system is operating. When the
vehicle is in a forward gear, the left or right
side mirror display will light up if a moving
vehicle is detected in the next lane over in
that blind zone or rapidly approaching that zone. If the turn signal is activated in the
same direction as a detected vehicle, this
display will flash as an extra warning not to
change lanes.
LCA can be disabled through vehicle settings.
To view available settings from the
infotainment screen, touch Settings >
Vehicle > Collision/Detection Systems. If LCA
is disabled by the driver, the LCA mirror
displays will not light up.
When the System Does Not Seem to
Work Properly
The LCA system requires some driving for
the system to calibrate to maximum
performance. This calibration may occur
more quickly if the vehicle is driven on a
straight highway road with traffic and
roadside objects (e.g., guardrails, barriers).
LCA displays may not come on when
passing a vehicle quickly, for a stopped
vehicle, or when towing a trailer. The LCA
detection zones that extend back from the
side of the vehicle do not move further back
when a trailer is towed. Use caution while
changing lanes when towing a trailer. LCA
may alert to objects attached to the vehicle,
such as a trailer, bicycle, or object extending
out to either side of the vehicle. Attached
objects may also interfere with the
detection of vehicles. This is normal system
operation; the vehicle does not need service.
LCA may not always alert the driver to
vehicles in the next lane over, especially in
wet conditions or when driving on sharp
curves. The system does not need to be
serviced. The system may light up due to
guardrails, signs, trees, shrubs, and other
non-moving objects. This is normal system
operation; the vehicle does not need service.
LCA may not operate when the LCA sensors
in the left or right corners of the rear
bumper are covered with mud, dirt, snow,
ice, or slush, or in heavy rainstorms. For
cleaning instructions, see "Washing the
Vehicle" under
Exterior Care0280. If the
DIC still displays the system unavailable
message after cleaning both sides of the
vehicle toward the rear corners of the
vehicle, see your dealer.
If the LCA displays do not light up when
moving vehicles are in the side blind zone or
rapidly approaching this zone and the
system is clean, the system may need
service. Take the vehicle to your dealer.
Radio Frequency Information
See Radio Frequency Statement 0308.
Page 210 of 332
Chevrolet Malibu Owner Manual (GMNA-Localizing-U.S./Canada-
16273584) - 2023 - CRC - 9/28/22
Driving and Operating 209
Lane Keep Assist (LKA)
If equipped, LKA may help avoid crashes due
to unintentional lane departures. This
system uses a camera to detect lane
markings between approximately 60 km/h
(37 mph) and 180 km/h (112 mph). It may
assist by gently turning the steering wheel
if the vehicle approaches a detected lane
marking. It may also provide a Lane
Departure Warning (LDW) alert if the vehicle
crosses a detected lane marking. LKA can be
overridden by turning the steering wheel.
This system is not intended to keep the
vehicle centered in the lane. LKA will not
assist and alert if the turn signal is active in
the direction of lane departure, or if it
detects that you are accelerating, braking or
actively steering.
{Warning
The LKA system does not continuously
steer the vehicle. It may not keep the
vehicle in the lane or give a Lane
Departure Warning (LDW) alert, even if a
lane marking is detected.(Continued)
Warning (Continued)
The LKA and LDW systems may not:
.Provide an alert or enough steering
assist to avoid a lane departure or
crash.
.Detect lane markings under poor
weather or visibility conditions. This
can occur if the windshield or
headlamps are blocked by dirt, snow,
or ice; if they are not in proper
condition; or if the sun shines directly
into the camera.
.Detect road edges.
.Detect lanes on winding or hilly roads.
If LKA only detects lane markings on one
side of the road, it will only assist or
provide an LDW alert when approaching
the lane on the side where it has
detected a lane marking. Even with LKA
and LDW, you must steer the vehicle.
Always keep your attention on the road
and maintain proper vehicle position
within the lane, or vehicle damage,
injury, or death could occur. Always keep
the windshield, headlamps, and camera (Continued)
Warning (Continued)
sensors clean and in good repair. Do not
use LKA in bad weather conditions or on
roads with unclear lane markings, such as
construction zones.
{Warning
Using LKA while towing a trailer or on
slippery roads could cause loss of control
of the vehicle and a crash. Turn the
system off.
How the System Works
LKA uses a camera sensor installed on the
windshield ahead of the rearview mirror to
detect lane markings. It may provide brief
steering assist if it detects an unintended
lane departure. It may further provide an
audible alert indicating that a lane marking
has been crossed.
To turn LKA on and off, press
Aon the
steering wheel. If equipped, the indicator
light on the button comes on when LKA is
on and turns off when LKA is disabled.
Page 216 of 332
Chevrolet Malibu Owner Manual (GMNA-Localizing-U.S./Canada-
16273584) - 2023 - CRC - 9/28/22
Driving and Operating 215
equipment can cause the combination to
operate in an unexpected or unsafe manner.
Before driving, inspect all trailer hitch parts
and attachments, safety chains, electrical
connectors, lamps, tires, and mirrors. See
Towing Equipment0217. If the trailer has
electric brakes, start the combination
moving and then manually apply the trailer
brake controller to check that the trailer
brakes work. During the trip, occasionally
check that the cargo and trailer are secure
and that the lamps and any trailer brakes
are working.
Towing with a Stability Control System
When towing, the stability control system
might be heard. The system reacts to
vehicle movement caused by the trailer,
which mainly occurs during cornering. This is
normal when towing heavier trailers.
Following Distance
Stay at least twice as far behind the vehicle
ahead as you would when driving without a
trailer. This can help to avoid heavy braking
and sudden turns.
Passing
More passing distance is needed when
towing a trailer. The combination of the
vehicle and trailer will not accelerate as
quickly and is much longer than the vehicle
alone. It is necessary to go much farther
beyond the passed vehicle before returning
to the lane. Pass on level roadways. Avoid
passing on hills.
Backing Up
Hold the bottom of the steering wheel with
one hand. To move the trailer to the left,
move that hand to the left. To move the
trailer to the right, move that hand to the
right. Always back up slowly and, if possible,
have someone guide you.
Making Turns
Caution
Turn more slowly and make wider arcs
when towing a trailer to prevent damage
to your vehicle. Making very sharp turns
could cause the trailer to contact the
vehicle. Make wider turns than normal when towing,
so trailer will not go over soft shoulders,
over curbs, or strike road signs, trees,
or other objects. Always signal turns well in
advance. Do not steer or brake suddenly.
Driving on Grades
Reduce speed and shift to a lower gear
before starting down a long or steep
downhill grade. If the transmission is not
shifted down, the brakes may overheat and
result in reduced braking efficiency.
Shift the transmission to a lower gear if the
transmission shifts too often under heavy
loads and/or hilly conditions.
When towing at higher altitudes, engine
coolant will boil at a lower temperature
than at lower altitudes. If the engine is
turned off immediately after towing at high
altitude on steep uphill grades, the vehicle
could show signs similar to engine
overheating. To avoid this, let the engine
run, preferably on level ground, with the
transmission in P (Park) for a few minutes
before turning the engine off. If the
overheat warning comes on, see
Engine
Overheating 0232.
Page 219 of 332
Chevrolet Malibu Owner Manual (GMNA-Localizing-U.S./Canada-
16273584) - 2023 - CRC - 9/28/22
218 Driving and Operating
Never attach rental hitches or other
bumper-type hitches. Only use
frame-mounted hitches that do not attach to
the bumper.
Always seal any holes in your vehicle if the
trailer hitch removed. If not sealed, dirt,
water, and carbon monoxide (CO) from the
exhaust may enter your vehicle. SeeEngine
Exhaust 0181.
Consider using mechanical sway controls
with any trailer. Ask a trailering professional
about sway controls or refer to the trailer
manufacturer's recommendations and
instructions.
Tires
.Do not tow a trailer while using a
compact spare tire on the vehicle.
.Tires must be properly inflated to support
loads while towing a trailer. See Tires
0 251 for instructions on proper tire
inflation.
Safety Chains
Always attach chains between the vehicle
and the trailer, and attach the chains to the
holes on the trailer hitch platform. Instructions about safety chains may be
provided by the hitch manufacturer or by
the trailer manufacturer.
Cross the safety chains under the tongue of
the trailer to help prevent the tongue from
contacting the road if it becomes separated
from the hitch. Always leave just enough
slack so the combination can turn. Never
allow safety chains to drag on the ground.
State or local regulations may require
trailers to have their own braking system if
the loaded weight of the trailer exceeds
certain minimums that can vary from state
to state. Read and follow the instructions for
the trailer brakes so they are installed,
adjusted, and maintained properly. Never
attempt to tap into your vehicle's hydraulic
brake system. If you do, both the vehicle
antilock brakes and the trailer brakes may
not function, which could result in a crash.
Trailer Lamps
Always check all trailer lamps are working at
the beginning of each trip, and periodically
on longer trips.
Turn Signals When Towing a Trailer
When properly connected, the trailer turn
signals will illuminate to indicate the vehicle
is turning, changing lanes, or stopping.
When towing a trailer, the arrows on the
instrument cluster will illuminate even if the
trailer is not properly connected or the bulbs
are burned out.
Trailer Tires
Special Trailer (ST) tires differ from vehicle
tires. Trailer tires are designed with stiff
sidewalls to help prevent sway and to
support heavy loads. These features can
make it difficult to determine if the trailer
tire pressures are low only based on a visual
inspection.
Always check all trailer tire pressures before
each trip when the tires are cool. Low trailer
tire pressure is a leading cause of trailer tire
blow-outs.
Trailer tires deteriorate over time. The trailer
tire sidewall will show the week and year
the tire was manufactured. Many trailer tire
manufacturers recommend replacing tires
more than six years old.
Page 221 of 332
Chevrolet Malibu Owner Manual (GMNA-Localizing-U.S./Canada-
16273584) - 2023 - CRC - 9/28/22
220 Vehicle Care
Vehicle Care
General Information
General Information . . . . . . . . . . . . . . . . . . . 221
California Perchlorate MaterialsRequirements . . . . . . . . . . . . . . . . . . . . . . . . 221
Accessories and Modifications . . . . . . . . . 221
Vehicle Checks
Doing Your Own Service Work . . . . . . . . . 222
Hood . . . . . . . . . . . . . . . . . . . . . . . . . . . . . . . . . . 222
Engine Compartment Overview . . . . . . . . 224
Engine Oil . . . . . . . . . . . . . . . . . . . . . . . . . . . . . 225
Engine Oil Life System . . . . . . . . . . . . . . . . . 227
Automatic Transmission Fluid . . . . . . . . . 228
Engine Air Filter Life System . . . . . . . . . . 228
Engine Air Cleaner/Filter . . . . . . . . . . . . . . . 228
Cooling System . . . . . . . . . . . . . . . . . . . . . . . 229
Engine Overheating . . . . . . . . . . . . . . . . . . . . 232
Washer Fluid . . . . . . . . . . . . . . . . . . . . . . . . . . 233
Brakes . . . . . . . . . . . . . . . . . . . . . . . . . . . . . . . . . 234
Brake Fluid . . . . . . . . . . . . . . . . . . . . . . . . . . . . 234
Battery - North America . . . . . . . . . . . . . . . 235
Automatic Transmission Shift Lock Control Function Check . . . . . . . . . . . . . . 236
Park Brake and P (Park) Mechanism Check . . . . . . . . . . . . . . . . . . . . . . . . . . . . . . . . 237
Wiper Blade Replacement . . . . . . . . . . . . . 237
Windshield Replacement . . . . . . . . . . . . . . 238
Gas Strut(s) . . . . . . . . . . . . . . . . . . . . . . . . . . . 238
Headlamp Aiming
Front Headlamp Aiming . . . . . . . . . . . . . . . 239
Bulb Replacement
Bulb Replacement . . . . . . . . . . . . . . . . . . . . . 239
Halogen Bulbs . . . . . . . . . . . . . . . . . . . . . . . . . 239
LED Lighting . . . . . . . . . . . . . . . . . . . . . . . . . . . 239
Headlamps, Front Turn Signal, Sidemarker, and Parking Lamps . . . . . . 239
Taillamps, Turn Signal, Stoplamps, and Back-Up Lamps (LS and LT) . . . . . . . . . . 240
Taillamps, Turn Signal, Stoplamps, and Back-Up Lamps (LT and Premier) . . . . . 241
License Plate Lamp . . . . . . . . . . . . . . . . . . . . 242
Electrical System
High Voltage Devices and Wiring . . . . . . 242
Electrical System Overload . . . . . . . . . . . . 243
Fuses and Circuit Breakers . . . . . . . . . . . . . 244
Engine Compartment Fuse Block . . . . . . 245
Instrument Panel Fuse Block . . . . . . . . . . 249
Wheels and Tires
Tires . . . . . . . . . . . . . . . . . . . . . . . . . . . . . . . . . . . 251
All-Season Tires . . . . . . . . . . . . . . . . . . . . . . . . 251
Winter Tires . . . . . . . . . . . . . . . . . . . . . . . . . . . 252
Low-Profile Tires . . . . . . . . . . . . . . . . . . . . . . . 252
Tire Sidewall Labeling . . . . . . . . . . . . . . . . . 252
Tire Designations . . . . . . . . . . . . . . . . . . . . . . 254
Tire Terminology and Definitions . . . . . . 255
Tire Pressure . . . . . . . . . . . . . . . . . . . . . . . . . . 257 Tire Pressure for High-Speed
Operation . . . . . . . . . . . . . . . . . . . . . . . . . . . 258
Tire Pressure Monitor System . . . . . . . . . 259
Tire Pressure Monitor Operation . . . . . . 260
Tire Inspection . . . . . . . . . . . . . . . . . . . . . . . . 263
Tire Rotation . . . . . . . . . . . . . . . . . . . . . . . . . . 263
When It Is Time for New Tires . . . . . . . . 264
Buying New Tires . . . . . . . . . . . . . . . . . . . . . 265
Different Size Tires and Wheels . . . . . . . 266
Uniform Tire Quality Grading . . . . . . . . . 266
Wheel Alignment and Tire Balance . . . . 268
Wheel Replacement . . . . . . . . . . . . . . . . . . . 268
Tire Chains . . . . . . . . . . . . . . . . . . . . . . . . . . . . 268
If a Tire Goes Flat . . . . . . . . . . . . . . . . . . . . . 269
Tire Changing . . . . . . . . . . . . . . . . . . . . . . . . . 270
Compact Spare Tire . . . . . . . . . . . . . . . . . . . . 275
Jump Starting
Jump Starting - North America . . . . . . . . 275
Towing the Vehicle
Transporting a Disabled Vehicle . . . . . . . 278
Recreational Vehicle Towing . . . . . . . . . . . 279
Appearance Care
Exterior Care . . . . . . . . . . . . . . . . . . . . . . . . . . 280
Interior Care . . . . . . . . . . . . . . . . . . . . . . . . . . 284
Floor Mats . . . . . . . . . . . . . . . . . . . . . . . . . . . . 287
Page 240 of 332
Chevrolet Malibu Owner Manual (GMNA-Localizing-U.S./Canada-
16273584) - 2023 - CRC - 9/28/22
Vehicle Care 239
Liftgate
Headlamp Aiming
Front Headlamp Aiming
Headlamp aim has been preset and should
need no further adjustment.
If the vehicle is damaged in a crash, the
headlamp aim may be affected.
If adjustment to the headlamps is necessary,
see your dealer.
Bulb Replacement
For the proper type of replacement bulbs,
or any bulb changing procedure not listed in
this section, contact your dealer.
Caution
Do not replace incandescent bulbs with
aftermarket LED replacement bulbs. This
can cause damage to the vehicle electrical
system.
Halogen Bulbs
{Warning
Halogen bulbs have pressurized gas inside
and can burst if you drop or scratch the
bulb. You or others could be injured. Be
sure to read and follow the instructions
on the bulb package.
LED Lighting
This vehicle has several LED lamps. For
replacement of any LED lighting assembly,
contact your dealer.
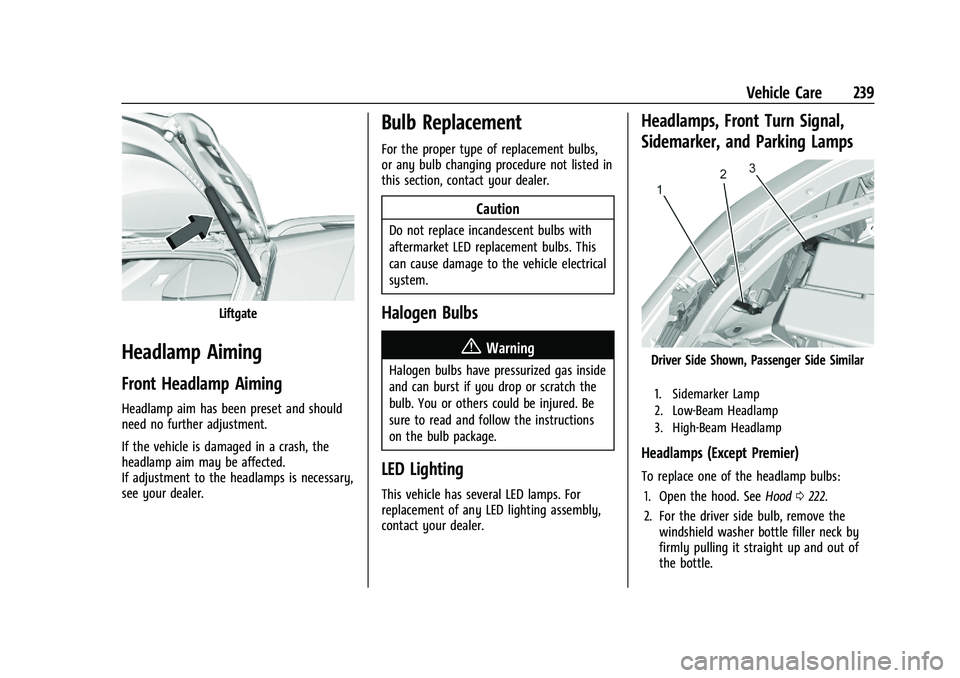
Headlamps, Front Turn Signal,
Sidemarker, and Parking Lamps
Driver Side Shown, Passenger Side Similar
1. Sidemarker Lamp
2. Low-Beam Headlamp
3. High-Beam Headlamp
Headlamps (Except Premier)
To replace one of the headlamp bulbs:1. Open the hood. See Hood0222.
2. For the driver side bulb, remove the windshield washer bottle filler neck by
firmly pulling it straight up and out of
the bottle.
Page 241 of 332
Chevrolet Malibu Owner Manual (GMNA-Localizing-U.S./Canada-
16273584) - 2023 - CRC - 9/28/22
240 Vehicle Care
3. For the passenger side bulb, remove theengine air cleaner housing by gripping
firmly and pulling straight up.
4. Remove the cover from the back of the headlamp assembly by turning it
counterclockwise.
5. Press the retaining tab on the electrical connector to disconnect.
6. Remove the bulb from the lamp assembly by turning counterclockwise.
7. Replace the bulb and reverse Steps 1–6 to reinstall.
Headlamps (Premier)
See your dealer for replacement.
Front Turn Signal and Parking Lamps
See your dealer for replacement.
Taillamps, Turn Signal, Stoplamps,
and Back-Up Lamps (LS and LT)
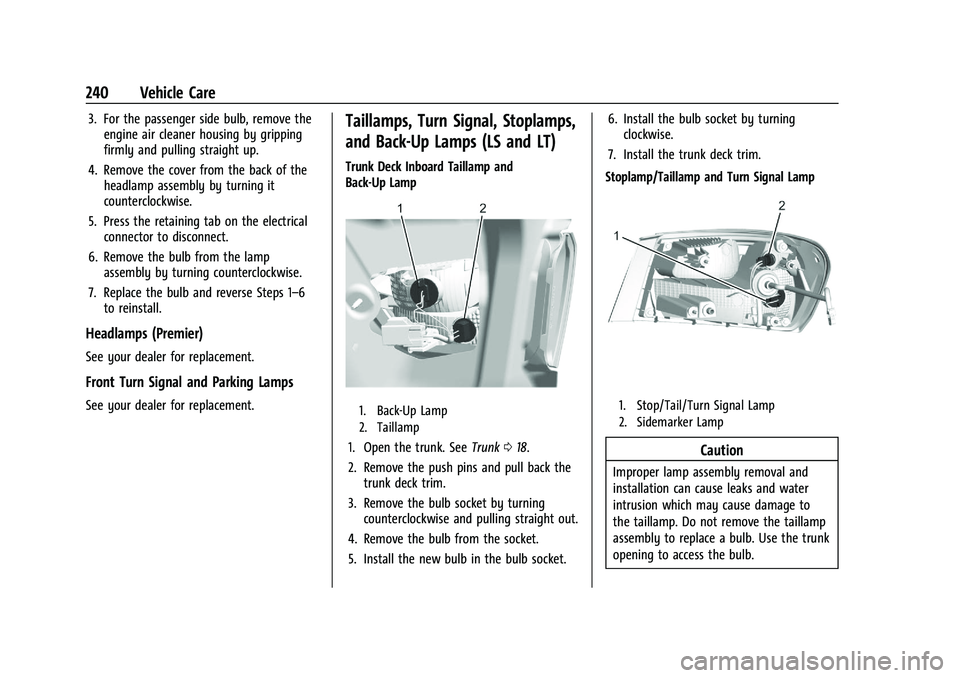
Trunk Deck Inboard Taillamp and
Back-Up Lamp
1. Back-Up Lamp
2. Taillamp
1. Open the trunk. See Trunk018.
2. Remove the push pins and pull back the trunk deck trim.
3. Remove the bulb socket by turning counterclockwise and pulling straight out.
4. Remove the bulb from the socket.
5. Install the new bulb in the bulb socket. 6. Install the bulb socket by turning
clockwise.
7. Install the trunk deck trim.
Stoplamp/Taillamp and Turn Signal Lamp
1. Stop/Tail/Turn Signal Lamp
2. Sidemarker Lamp
Caution
Improper lamp assembly removal and
installation can cause leaks and water
intrusion which may cause damage to
the taillamp. Do not remove the taillamp
assembly to replace a bulb. Use the trunk
opening to access the bulb.
Page 242 of 332
Chevrolet Malibu Owner Manual (GMNA-Localizing-U.S./Canada-
16273584) - 2023 - CRC - 9/28/22
Vehicle Care 241
To replace any one of these bulbs:1. Open the trunk. See Trunk018.
2. Remove the push pins and pull the trunk trim away from the taillamp assembly.
3. Remove three hex-nuts from each stud.
4. Remove the lamp by pulling it straight back.
5. Remove the bulb socket from the taillamp assembly by turning it
counterclockwise.
6. Remove the bulb from the socket by turning the bulb counterclockwise
one-quarter turn and pulling it
straight out.
7. Install a new bulb into the socket.
8. Install the bulb socket into the taillamp assembly by turning it clockwise.
9. Install the trunk trim, hex nuts, and push pins.Taillamps, Turn Signal, Stoplamps,
and Back-Up Lamps (LT and
Premier)
Caution
Improper lamp assembly removal and
installation can cause leaks and water
intrusion which may cause damage to
the taillamp. Do not remove the taillamp
assembly to replace a bulb. Use the trunk
opening to access the bulb.
The stoplamp/taillamp and trunk deck
inboard taillamp are LEDs. To replace, see
your dealer.
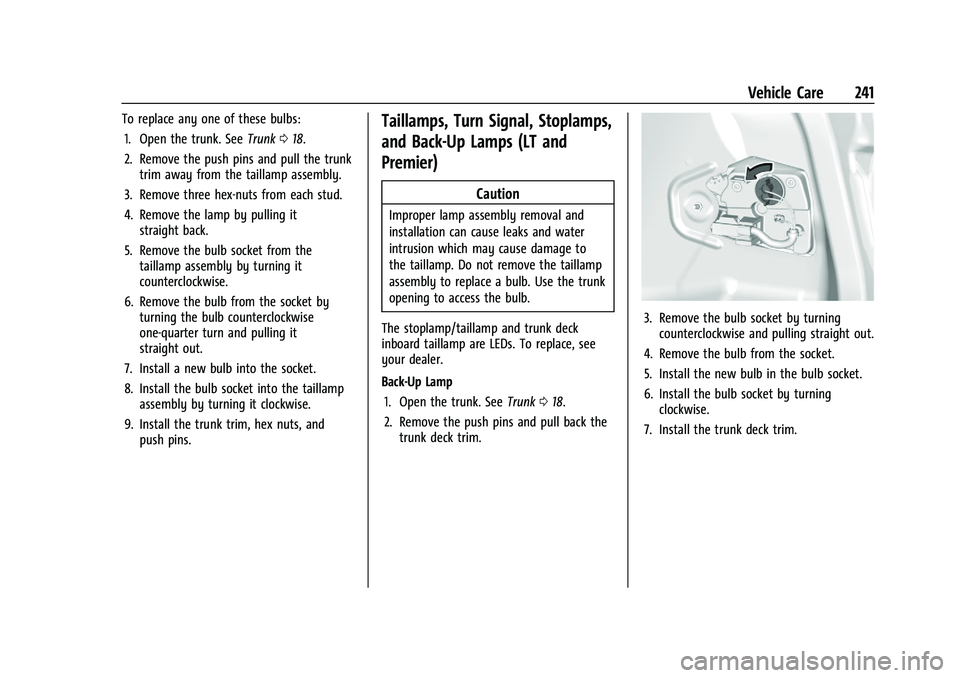
Back-Up Lamp 1. Open the trunk. See Trunk018.
2. Remove the push pins and pull back the trunk deck trim.
3. Remove the bulb socket by turningcounterclockwise and pulling straight out.
4. Remove the bulb from the socket.
5. Install the new bulb in the bulb socket.
6. Install the bulb socket by turning clockwise.
7. Install the trunk deck trim.