2023 CHEVROLET EQUINOX set clock
[x] Cancel search: set clockPage 12 of 360
Chevrolet Equinox Owner Manual (GMNA-Localizing-U.S./Canada-
16540728) - 2023 - crc - 6/16/22
Keys, Doors, and Windows 11
To view available settings from the
infotainment screen, touch Settings >
Vehicle > Remote Lock, Unlock, Start.
Keyless Liftgate Opening
When the doors are locked, press the touch
pad on the liftgate handle to open the
liftgate if the remote key is within
1 m (3 ft).
Key Access
To access a vehicle with a dead remote key
battery, seeDoor Locks015.
Programming Remote Keys to the
Vehicle
Only remote keys programmed to the
vehicle will work. If a remote key is lost or
stolen, a replacement can be purchased and
programmed through your dealer. The
vehicle can be reprogrammed so that lost or
stolen remote keys no longer work. Each
vehicle can have up to eight remote keys
matched to it.
Programming with Recognized Remote Keys
A new remote key can be programmed to
the vehicle when there are two recognized
remote keys. To program, the vehicle must be off and all
of the remote keys, both currently
recognized and new, must be with you.
1. Remove the key from the remote key.
2. Remove the key lock cylinder cap on the driver door handle. See Door Locks015.
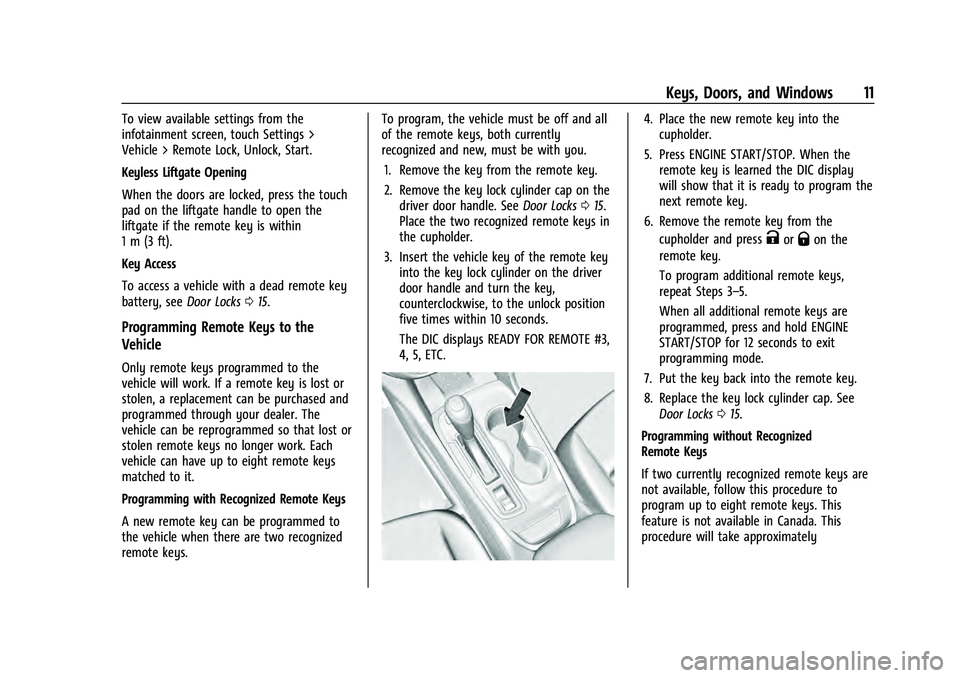
Place the two recognized remote keys in
the cupholder.
3. Insert the vehicle key of the remote key into the key lock cylinder on the driver
door handle and turn the key,
counterclockwise, to the unlock position
five times within 10 seconds.
The DIC displays READY FOR REMOTE #3,
4, 5, ETC.
4. Place the new remote key into thecupholder.
5. Press ENGINE START/STOP. When the remote key is learned the DIC display
will show that it is ready to program the
next remote key.
6. Remove the remote key from the cupholder and press
KorQon the
remote key.
To program additional remote keys,
repeat Steps 3–5.
When all additional remote keys are
programmed, press and hold ENGINE
START/STOP for 12 seconds to exit
programming mode.
7. Put the key back into the remote key.
8. Replace the key lock cylinder cap. See Door Locks 015.
Programming without Recognized
Remote Keys
If two currently recognized remote keys are
not available, follow this procedure to
program up to eight remote keys. This
feature is not available in Canada. This
procedure will take approximately
Page 83 of 360
Chevrolet Equinox Owner Manual (GMNA-Localizing-U.S./Canada-
16540728) - 2023 - crc - 6/16/22
82 Instruments and Controls
1:Push the windshield wiper lever
forward to spray washer fluid on the rear
window. The lever automatically returns to
its original position when released.
{Warning
In freezing weather, do not use the
washer until the windshield is warmed.
Otherwise the washer fluid can form ice
on the windshield, blocking your vision.
Rear Wiper Arm Assembly Protection
When using an automatic car wash, move
the rear wiper control to OFF to disable the
rear wiper. In some vehicles, if the
transmission is in N (Neutral) and the
vehicle speed is very slow, the rear wiper
will automatically park.
The wiper operations return to normal when
the transmission is no longer in N (Neutral)
or the vehicle speed has increased.
Reverse Gear Wipes
If the rear wiper control is off, the rear
wiper will automatically operate
continuously when the transmission is in
R (Reverse), and the front windshield wiper
is performing low or high speed wipes.
If the rear wiper control is off, the transmission is in R (Reverse), and the front
windshield wiper is performing interval
wipes, then the rear wiper automatically
performs interval wipes.
This feature can be turned on or off. Go to
Settings > Vehicle > Comfort and
Convenience > Auto Wipe in Reverse Gear >
Select ON or OFF.
The windshield washer reservoir is used for
the windshield and rear window. Check the
fluid level if either washer is not working.
See
Washer Fluid 0260.
Compass
The vehicle may have a compass display on
the Driver Information Center (DIC). The
compass receives its heading and other
information from the Global Positioning
System (GPS) antenna, StabiliTrak/Electronic
Stability Control (ESC), and vehicle speed
information.
The compass system is designed to operate
for a certain number of miles or degrees of
turn before needing a signal from the GPS
satellites. When the compass display shows
CAL, drive the vehicle for a short distance in
an open area where it can receive a GPS signal. The compass system will
automatically determine when a GPS signal
is restored and provide a heading again.
Clock
Set the time and date using the
infotainment system. See "Time/Date" under
Settings
0155.
Power Outlets
The vehicle has two 12-volt accessory power
outlets, which can be used to plug in
electrical equipment, such as a cell phone or
MP3 player.
There are power outlets:
.On the center stack below the climate
control system.
.In the rear cargo area.
To use the outlet, remove the cover.
Caution
Leaving electrical equipment plugged in
for an extended period of time while the
vehicle is off will drain the battery.
Always unplug electrical equipment when
(Continued)
Page 157 of 360
Chevrolet Equinox Owner Manual (GMNA-Localizing-U.S./Canada-
16540728) - 2023 - crc - 6/16/22
156 Infotainment System
Refer to the User Terms and Privacy
Statement for important details. To view,
touch the Settings icon on the Home Page
of the infotainment display.
The settings menu may be organized into
four categories. Select the desired category
by touching System, Apps, Vehicle,
or Personal.
To access the personalization menus:1. Touch Settings on the Home Page on the infotainment display.
2. Touch the desired category to display a list of available options.
3. Touch to select the desired feature setting.
4. Touch the options on the infotainment display to disable or enable a feature.
5. Touch
zto go to the top level of the
Settings menu.
System
The menu may contain the following:
Time / Date
Allows setting of the clock. Language
Sets the display language used on the
infotainment display. It may also use the
selected language for voice recognition and
audio feedback.
Phones
Allows connecting to a different cell phone
or mobile device source, disconnect a cell
phone or media device, or delete a cell
phone or media device.
Wi-Fi Networks
Shows connected and available Wi-Fi
networks.
If a 4G LTE data package is not active on the
vehicle, the infotainment system can be
connected to an external protected Wi-Fi
network, such as a mobile device or home
hotspot, to utilize connected services.
Wi-Fi Hotspot
Allows adjustment of different Wi-Fi
features.
Privacy
Allows adjustment of the infotainment
privacy settings.Device Remote Access
Allows devices that can interact with vehicle
features and access data.
Display
Allows adjustment of the infotainment
display.
Sounds
Allows adjustment of the infotainment
system sounds.
Voice
Allows adjustment of the infotainment voice
recognition features.
Favorites
Allows adjustment of the infotainment
favorite settings.
Updates
If equipped, the vehicle can download and
install select software updates over a
wireless connection. The system will prompt
for certain updates to be downloaded and
installed. There is also an option to check
for updates manually.
To manually check for updates, touch
Settings on the Home Page and select the
System tab. Go to the Vehicle Software
Page 172 of 360
Chevrolet Equinox Owner Manual (GMNA-Localizing-U.S./Canada-
16540728) - 2023 - crc - 6/16/22
Climate Controls 171
Dual Automatic Climate Control System
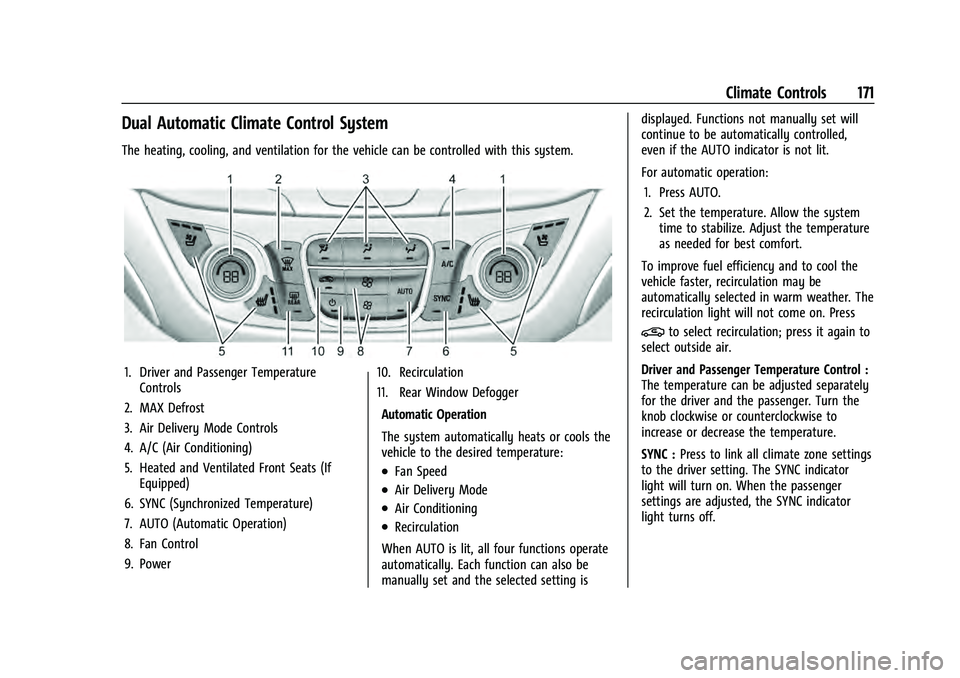
The heating, cooling, and ventilation for the vehicle can be controlled with this system.
1. Driver and Passenger TemperatureControls
2. MAX Defrost
3. Air Delivery Mode Controls
4. A/C (Air Conditioning)
5. Heated and Ventilated Front Seats (If Equipped)
6. SYNC (Synchronized Temperature)
7. AUTO (Automatic Operation)
8. Fan Control
9. Power 10. Recirculation
11. Rear Window Defogger
Automatic Operation
The system automatically heats or cools the
vehicle to the desired temperature:
.Fan Speed
.Air Delivery Mode
.Air Conditioning
.Recirculation
When AUTO is lit, all four functions operate
automatically. Each function can also be
manually set and the selected setting is displayed. Functions not manually set will
continue to be automatically controlled,
even if the AUTO indicator is not lit.
For automatic operation:
1. Press AUTO.
2. Set the temperature. Allow the system time to stabilize. Adjust the temperature
as needed for best comfort.
To improve fuel efficiency and to cool the
vehicle faster, recirculation may be
automatically selected in warm weather. The
recirculation light will not come on. Press
@to select recirculation; press it again to
select outside air.
Driver and Passenger Temperature Control :
The temperature can be adjusted separately
for the driver and the passenger. Turn the
knob clockwise or counterclockwise to
increase or decrease the temperature.
SYNC : Press to link all climate zone settings
to the driver setting. The SYNC indicator
light will turn on. When the passenger
settings are adjusted, the SYNC indicator
light turns off.
Page 295 of 360
Chevrolet Equinox Owner Manual (GMNA-Localizing-U.S./Canada-
16540728) - 2023 - crc - 6/16/22
294 Vehicle Care
Warning (Continued)
1. Set the parking brake firmly.
2. Put the vehicle in P (Park).
3. Turn the vehicle off and do notrestart the vehicle while it is raised.
4. Do not allow passengers to remain in the vehicle.
5. Place wheel blocks, if equipped, on both sides of the tire at the opposite
corner of the tire being changed.
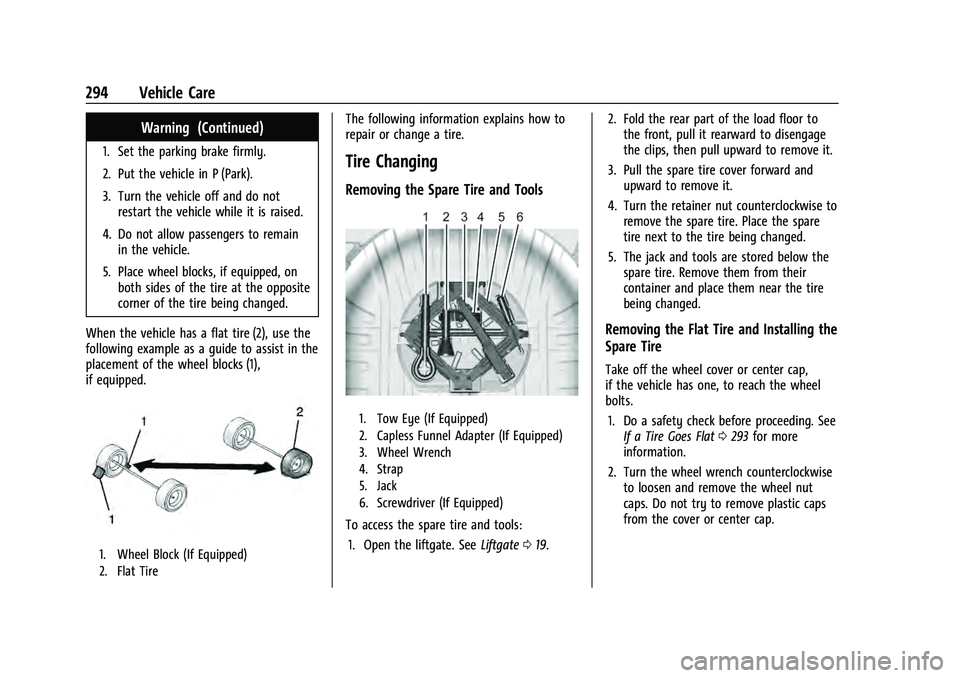
When the vehicle has a flat tire (2), use the
following example as a guide to assist in the
placement of the wheel blocks (1),
if equipped.
1. Wheel Block (If Equipped)
2. Flat Tire
The following information explains how to
repair or change a tire.
Tire Changing
Removing the Spare Tire and Tools
1. Tow Eye (If Equipped)
2. Capless Funnel Adapter (If Equipped)
3. Wheel Wrench
4. Strap
5. Jack
6. Screwdriver (If Equipped)
To access the spare tire and tools: 1. Open the liftgate. See Liftgate019. 2. Fold the rear part of the load floor to
the front, pull it rearward to disengage
the clips, then pull upward to remove it.
3. Pull the spare tire cover forward and upward to remove it.
4. Turn the retainer nut counterclockwise to remove the spare tire. Place the spare
tire next to the tire being changed.
5. The jack and tools are stored below the spare tire. Remove them from their
container and place them near the tire
being changed.
Removing the Flat Tire and Installing the
Spare Tire
Take off the wheel cover or center cap,
if the vehicle has one, to reach the wheel
bolts.
1. Do a safety check before proceeding. See If a Tire Goes Flat 0293 for more
information.
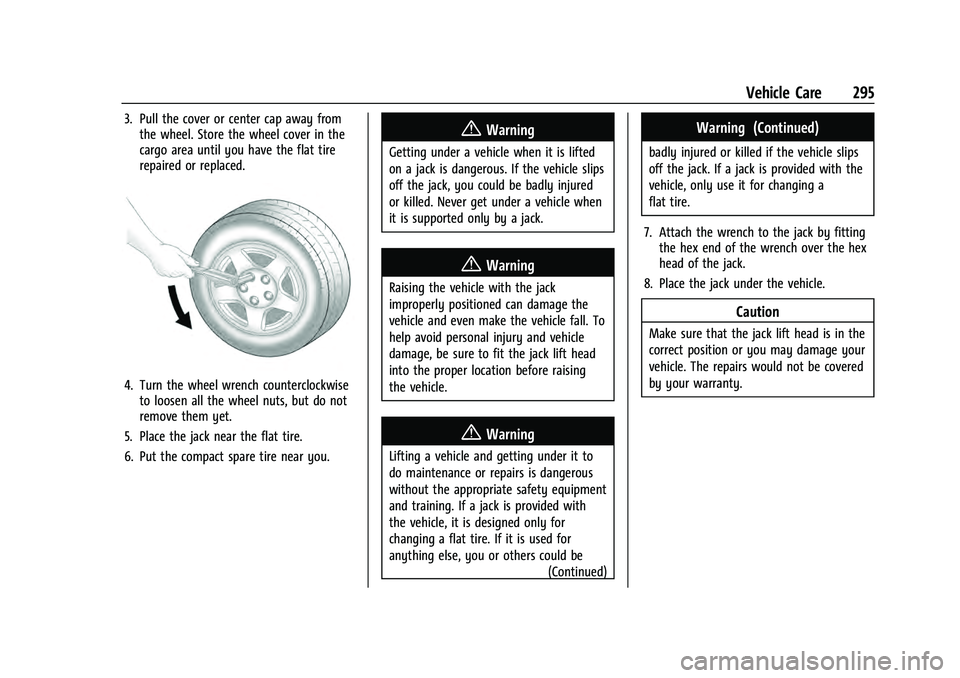
2. Turn the wheel wrench counterclockwise to loosen and remove the wheel nut
caps. Do not try to remove plastic caps
from the cover or center cap.
Page 296 of 360
Chevrolet Equinox Owner Manual (GMNA-Localizing-U.S./Canada-
16540728) - 2023 - crc - 6/16/22
Vehicle Care 295
3. Pull the cover or center cap away fromthe wheel. Store the wheel cover in the
cargo area until you have the flat tire
repaired or replaced.
4. Turn the wheel wrench counterclockwiseto loosen all the wheel nuts, but do not
remove them yet.
5. Place the jack near the flat tire.
6. Put the compact spare tire near you.
{Warning
Getting under a vehicle when it is lifted
on a jack is dangerous. If the vehicle slips
off the jack, you could be badly injured
or killed. Never get under a vehicle when
it is supported only by a jack.
{Warning
Raising the vehicle with the jack
improperly positioned can damage the
vehicle and even make the vehicle fall. To
help avoid personal injury and vehicle
damage, be sure to fit the jack lift head
into the proper location before raising
the vehicle.
{Warning
Lifting a vehicle and getting under it to
do maintenance or repairs is dangerous
without the appropriate safety equipment
and training. If a jack is provided with
the vehicle, it is designed only for
changing a flat tire. If it is used for
anything else, you or others could be (Continued)
Warning (Continued)
badly injured or killed if the vehicle slips
off the jack. If a jack is provided with the
vehicle, only use it for changing a
flat tire.
7. Attach the wrench to the jack by fitting the hex end of the wrench over the hex
head of the jack.
8. Place the jack under the vehicle.
Caution
Make sure that the jack lift head is in the
correct position or you may damage your
vehicle. The repairs would not be covered
by your warranty.