2023 CHEVROLET EQUINOX length
[x] Cancel search: lengthPage 23 of 360
Chevrolet Equinox Owner Manual (GMNA-Localizing-U.S./Canada-
16540728) - 2023 - crc - 6/16/22
22 Keys, Doors, and Windows
Caution
Attempting to move the liftgate too
quickly and with excessive force may
result in damage to the vehicle.
Operate the liftgate manually with a
smooth motion and moderate speed. The
system includes a feature which limits the
manual closing speed to protect the
components.
Hands-Free Operation
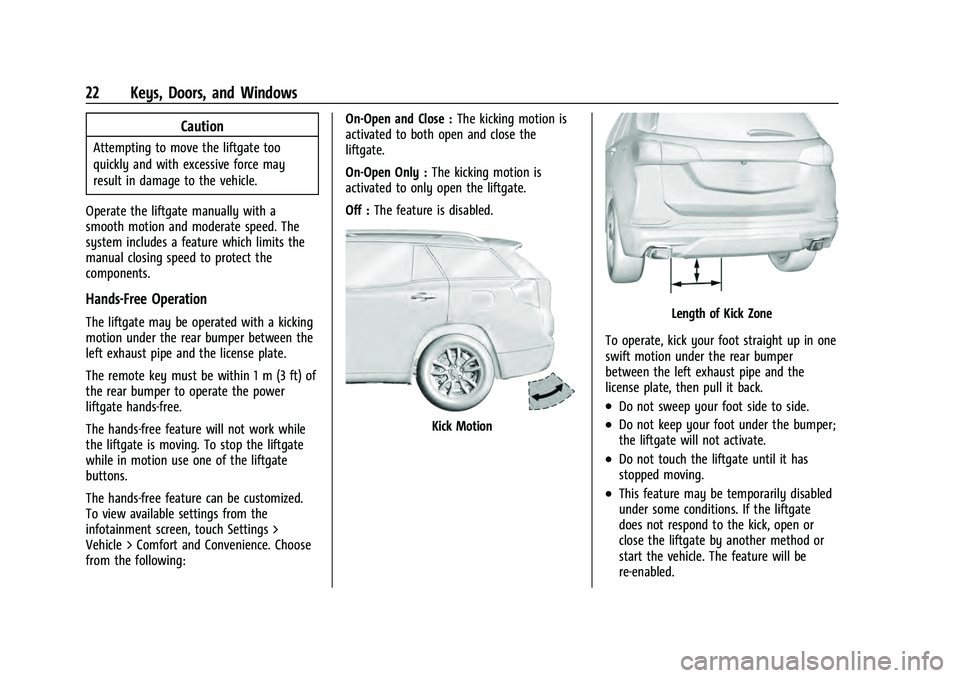
The liftgate may be operated with a kicking
motion under the rear bumper between the
left exhaust pipe and the license plate.
The remote key must be within 1 m (3 ft) of
the rear bumper to operate the power
liftgate hands-free.
The hands-free feature will not work while
the liftgate is moving. To stop the liftgate
while in motion use one of the liftgate
buttons.
The hands-free feature can be customized.
To view available settings from the
infotainment screen, touch Settings >
Vehicle > Comfort and Convenience. Choose
from the following: On-Open and Close :
The kicking motion is
activated to both open and close the
liftgate.
On-Open Only : The kicking motion is
activated to only open the liftgate.
Off : The feature is disabled.
Kick Motion
Length of Kick Zone
To operate, kick your foot straight up in one
swift motion under the rear bumper
between the left exhaust pipe and the
license plate, then pull it back.
.Do not sweep your foot side to side.
.Do not keep your foot under the bumper;
the liftgate will not activate.
.Do not touch the liftgate until it has
stopped moving.
.This feature may be temporarily disabled
under some conditions. If the liftgate
does not respond to the kick, open or
close the liftgate by another method or
start the vehicle. The feature will be
re-enabled.
Page 59 of 360
Chevrolet Equinox Owner Manual (GMNA-Localizing-U.S./Canada-
16540728) - 2023 - crc - 6/16/22
58 Seats and Restraints
Child Restraints
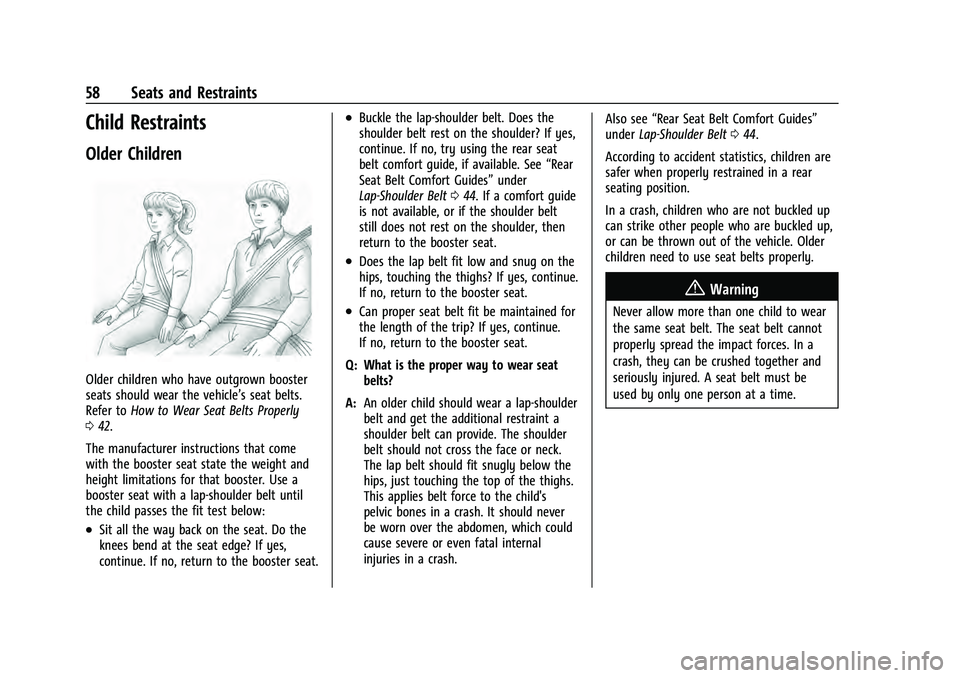
Older Children
Older children who have outgrown booster
seats should wear the vehicle’s seat belts.
Refer toHow to Wear Seat Belts Properly
0 42.
The manufacturer instructions that come
with the booster seat state the weight and
height limitations for that booster. Use a
booster seat with a lap-shoulder belt until
the child passes the fit test below:
.Sit all the way back on the seat. Do the
knees bend at the seat edge? If yes,
continue. If no, return to the booster seat.
.Buckle the lap-shoulder belt. Does the
shoulder belt rest on the shoulder? If yes,
continue. If no, try using the rear seat
belt comfort guide, if available. See “Rear
Seat Belt Comfort Guides” under
Lap-Shoulder Belt 044. If a comfort guide
is not available, or if the shoulder belt
still does not rest on the shoulder, then
return to the booster seat.
.Does the lap belt fit low and snug on the
hips, touching the thighs? If yes, continue.
If no, return to the booster seat.
.Can proper seat belt fit be maintained for
the length of the trip? If yes, continue.
If no, return to the booster seat.
Q: What is the proper way to wear seat belts?
A: An older child should wear a lap-shoulder
belt and get the additional restraint a
shoulder belt can provide. The shoulder
belt should not cross the face or neck.
The lap belt should fit snugly below the
hips, just touching the top of the thighs.
This applies belt force to the child's
pelvic bones in a crash. It should never
be worn over the abdomen, which could
cause severe or even fatal internal
injuries in a crash. Also see
“Rear Seat Belt Comfort Guides”
under Lap-Shoulder Belt 044.
According to accident statistics, children are
safer when properly restrained in a rear
seating position.
In a crash, children who are not buckled up
can strike other people who are buckled up,
or can be thrown out of the vehicle. Older
children need to use seat belts properly.
{Warning
Never allow more than one child to wear
the same seat belt. The seat belt cannot
properly spread the impact forces. In a
crash, they can be crushed together and
seriously injured. A seat belt must be
used by only one person at a time.
Page 69 of 360
Chevrolet Equinox Owner Manual (GMNA-Localizing-U.S./Canada-
16540728) - 2023 - crc - 6/16/22
68 Seats and Restraints
{Warning
To reduce the risk of serious or fatal
injuries during a crash, do not attach
more than one child restraint to a single
anchor. Attaching more than one child
restraint to a single anchor could cause
the anchor or attachment to come loose
or even break during a crash. A child or
others could be injured.
{Warning
Children can be seriously injured or
strangled if a shoulder belt is wrapped
around their neck. The shoulder belt can
tighten but cannot be loosened if it is
locked. The shoulder belt locks when it is
pulled all the way out of the retractor.
It unlocks when the shoulder belt is
allowed to go all the way back into the
retractor, but it cannot do this if it is
wrapped around a child’s neck. If the
shoulder belt is locked and tightened
around a child’s neck, the only way to
loosen the belt is to cut it.(Continued)
Warning (Continued)
Buckle any unused seat belts behind the
child restraint so children cannot reach
them. Pull the shoulder belt all the way
out of the retractor to set the lock, and
tighten the belt behind the child restraint
after the child restraint has been
installed.
Caution
Do not let the LATCH attachments rub
against the vehicle’s seat belts. This may
damage these parts. If necessary, move
buckled seat belts to avoid rubbing the
LATCH attachments.
Do not fold the rear seatback when the
seat is occupied. Do not fold the empty
rear seat with a seat belt buckled. This
could damage the seat belt or the seat.
Unbuckle and return the seat belt to its
stowed position, before folding the seat.
If you need to secure more than one child
restraint in the rear seat, see Where to Put
the Restraint 063. 1. Attach and tighten the lower
attachments to the lower anchors. If the
child restraint does not have lower
attachments or the desired seating
position does not have lower anchors,
secure the child restraint with the top
tether and the seat belt. Refer to the
child restraint manufacturer instructions
and the instructions in this manual.
1.1. Find the lower anchors for the desired seating position.
1.2. Put the child restraint on the seat.
1.3. Attach and tighten the lower attachments on the child restraint
to the lower anchors.
2. If the child restraint manufacturer recommends that the top tether be
attached, adjust the top tether to its full
length and attach it to the anchor. Refer
to the child restraint instructions and the
following steps:
2.1. Find the top tether anchor.
2.2. Route, attach and tighten the top tether according to your child
restraint instructions and the
following instructions:
Page 163 of 360
Chevrolet Equinox Owner Manual (GMNA-Localizing-U.S./Canada-
16540728) - 2023 - crc - 6/16/22
162 Infotainment System
To delete Report Card data, do one of the
following:
.From the Report Card display, touch
Reset.
.Touch Clear PIN and All Teen Driver Keys
from the Teen Driver menu. This will also
unregister any Teen Driver keys and
delete the PIN.
Forgotten PIN
See your dealer to reset the PIN.
Trademarks and License
Agreements
FCC Information
See Radio Frequency Statement 0335.
"Made for iPhone," means that an electronic
accessory has been designed to connect
specifically to iPhone, and has been certified
by the developer to meet Apple
performance standards. Apple is not responsible for the operation of this device
or its compliance with safety and regulatory
standards. Please note that the use of this
accessory with iPhone may affect wireless
performance. iPhone are trademarks of
Apple Inc., registered in the U.S. and other
countries.
Trial length and service availability may vary
by model, model year or trim. Service will
automatically stop at the end of your trial
subscription period unless you decide to
continue service. If you do not wish to enjoy
your trial, you can cancel by calling the
number below. All SiriusXM services require
a subscription, each sold separately by
SiriusXM after the trial period. Service
subject to the applicable SiriusXM Customer
Agreement and Privacy Policy, visit
www.siriusxm.com (USA) or www.siriusxm.ca
(Canada) to see complete terms and how to
cancel which includes calling 1-866-635-2349
(USA) or 1-888-539-7474 (Canada). Some
services and features are subject to device
capabilities and location availability. Content
varies by SiriusXM subscription package. All
fees, content and features are subject to
change.
SiriusXM with 360L: Some features,
including steaming content and listening
recommendations, require an active OnStar
Connected Access plan and may vary by
vehicle model. Content varies by SiriusXM
subscription plan. GM connected vehicle
services vary by vehicle model and require
active service plan, working electrical
system, cell reception and GPS signal. See
onstar.com for details and limitations.
SiriusXM, Pandora, Stitcher and all related
logos are trademarks of Sirius XM Radio Inc.
and its respective subsidiaries.
SiriusXM satellite service is only available in
the 48 contiguous United States (and Puerto
Rico with limited availability) and Canada.
In Canada: Some deterioration of service
may occur in extreme northern latitudes.
This is beyond the control of SiriusXM.
Explicit Language Notice: Channels with
frequent explicit language are indicated with
an
“XL” preceding the channel name.
Family-friendly packages are available by
contacting SiriusXM:
Page 196 of 360
Chevrolet Equinox Owner Manual (GMNA-Localizing-U.S./Canada-
16540728) - 2023 - crc - 6/16/22
Driving and Operating 195
Engine Heater
{Warning
Do not plug in the engine block heater
while the vehicle is parked in a garage or
under a carport. Property damage or
personal injury may result. Always park
the vehicle in a clear open area away
from buildings or structures.
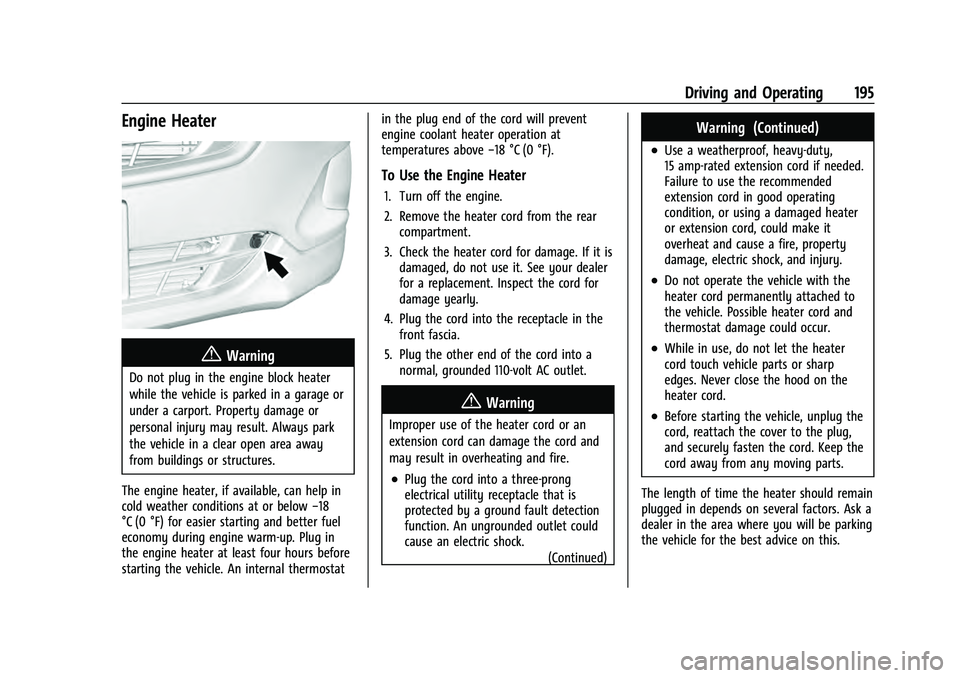
The engine heater, if available, can help in
cold weather conditions at or below −18
°C (0 °F) for easier starting and better fuel
economy during engine warm-up. Plug in
the engine heater at least four hours before
starting the vehicle. An internal thermostat in the plug end of the cord will prevent
engine coolant heater operation at
temperatures above
−18 °C (0 °F).
To Use the Engine Heater
1. Turn off the engine.
2. Remove the heater cord from the rear
compartment.
3. Check the heater cord for damage. If it is damaged, do not use it. See your dealer
for a replacement. Inspect the cord for
damage yearly.
4. Plug the cord into the receptacle in the front fascia.
5. Plug the other end of the cord into a normal, grounded 110-volt AC outlet.
{Warning
Improper use of the heater cord or an
extension cord can damage the cord and
may result in overheating and fire.
.Plug the cord into a three-prong
electrical utility receptacle that is
protected by a ground fault detection
function. An ungrounded outlet could
cause an electric shock.
(Continued)
Warning (Continued)
.Use a weatherproof, heavy-duty,
15 amp-rated extension cord if needed.
Failure to use the recommended
extension cord in good operating
condition, or using a damaged heater
or extension cord, could make it
overheat and cause a fire, property
damage, electric shock, and injury.
.Do not operate the vehicle with the
heater cord permanently attached to
the vehicle. Possible heater cord and
thermostat damage could occur.
.While in use, do not let the heater
cord touch vehicle parts or sharp
edges. Never close the hood on the
heater cord.
.Before starting the vehicle, unplug the
cord, reattach the cover to the plug,
and securely fasten the cord. Keep the
cord away from any moving parts.
The length of time the heater should remain
plugged in depends on several factors. Ask a
dealer in the area where you will be parking
the vehicle for the best advice on this.
Page 265 of 360
Chevrolet Equinox Owner Manual (GMNA-Localizing-U.S./Canada-
16540728) - 2023 - crc - 6/16/22
264 Vehicle Care
.To check the parking brake's holding
ability: With the engine running and the
transmission in N (Neutral), slowly remove
foot pressure from the regular brake
pedal. Do this until the vehicle is held by
the parking brake only.
.To check the P (Park) mechanism's holding
ability: With the engine running, shift to
P (Park). Then release the parking brake
followed by the regular brake.
Contact your dealer if service is required.
Wiper Blade Replacement
Windshield wiper blades should be replaced
periodically. See Maintenance Schedule
0 316.
Replacement blades come in different types
and are removed in different ways. For
proper type and length, see Maintenance
Replacement Parts 0321.
Caution
Allowing the wiper arm to touch the
windshield when no wiper blade is
installed could damage the windshield.
Any damage that occurs would not be
(Continued)
Caution (Continued)
covered by the vehicle warranty. Do not
allow the wiper arm to touch the
windshield.
Front Wiper Blade Replacement
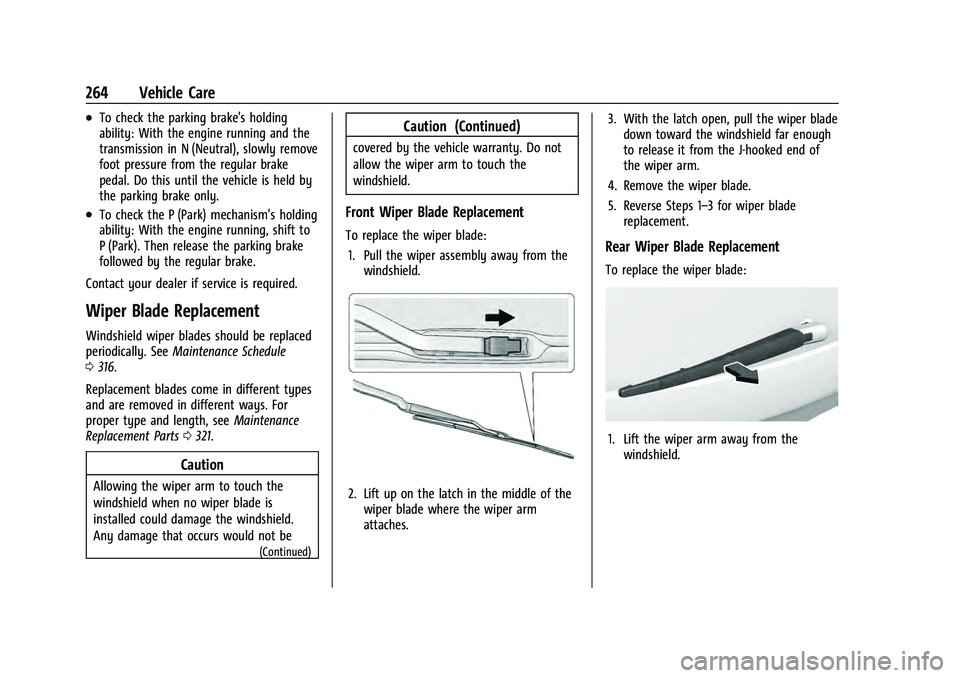
To replace the wiper blade:
1. Pull the wiper assembly away from the windshield.
2. Lift up on the latch in the middle of the
wiper blade where the wiper arm
attaches. 3. With the latch open, pull the wiper blade
down toward the windshield far enough
to release it from the J-hooked end of
the wiper arm.
4. Remove the wiper blade.
5. Reverse Steps 1–3 for wiper blade replacement.
Rear Wiper Blade Replacement
To replace the wiper blade:
1. Lift the wiper arm away from thewindshield.