2023 CHEVROLET EQUINOX bulb
[x] Cancel search: bulbPage 111 of 360
Chevrolet Equinox Owner Manual (GMNA-Localizing-U.S./Canada-
16540728) - 2023 - crc - 6/16/22
110 Instruments and Controls
(3 mi) of driving. During driving the bars will
shift to always reflect the most recent
distance on the right side. Press
Vto open
the menu while this display is active to clear
the graph. Select yes or no and press
V.
Oil Pressure : Oil pressure is displayed in
either kilopascal (kPa) or in pounds per
square inch (psi). Oil pressure can vary with
engine speed, outside temperature, and oil
viscosity. On some models, the oil pump will
vary engine oil pressure according to engine
needs. Oil pressure may change quickly as
the engine speed or load varies. This is
normal. If the oil pressure warning light or
DIC message indicates oil pressure outside
the normal operating range, check the
vehicle's oil as soon as possible.
Vehicle Messages
Messages displayed on the DIC indicate the
status of the vehicle or some action that
may be needed to correct a condition.
Multiple messages may appear one after
another. The messages that do not require
immediate action can be acknowledged and
cleared by pressing
V. The messages that
require immediate action cannot be cleared
until that action is performed.
All messages should be taken seriously;
clearing the message does not correct the
problem.
If a SERVICE message appears, see your
dealer.
Follow the instructions given in the
messages. The system displays messages
regarding the following topics:
.Service Messages
.Fluid Levels
.Vehicle Security
.Brakes
.Steering
.Ride Control Systems
.Driver Assistance Systems
.Cruise Control
.Lighting and Bulb Replacement
.Wiper/Washer Systems
.Doors and Windows
.Seat Belts
.Airbag Systems
.Engine and Transmission
.Tire Pressure
.Battery
Engine Power Messages
ENGINE POWER IS REDUCED
This message displays when the vehicle's
propulsion power is reduced. A reduction in
propulsion power can affect the vehicle's
ability to accelerate. If this message is on,
but there is no observed reduction in
performance, proceed to your destination.
Under certain conditions the performance
may be reduced the next time the vehicle is
driven. The vehicle may be driven while this
message is on, but maximum acceleration
and speed may be reduced. Anytime this
message stays on, or displays repeatedly,
the vehicle should be taken to your dealer
for service as soon as possible.
Under certain operating conditions,
propulsion will be disabled. Try restarting
after the ignition has been off for
30 seconds.
Page 118 of 360

Chevrolet Equinox Owner Manual (GMNA-Localizing-U.S./Canada-
16540728) - 2023 - crc - 6/16/22
Lighting 117
Hazard Warning Flashers
|:Press to make the front and rear turn
signal lamps flash on and off. This warns
others that you are having trouble.
Press
|again to turn the flashers off.
Turn and Lane-Change Signals
Move the lever all the way up or down to
signal a turn.
An arrow on the instrument cluster flashes
in the direction of the turn or lane change.
Raise or lower the lever until the arrow
starts to flash to signal a lane change. Hold
it there until the lane change is completed.
If the lever is briefly pressed and released,
the turn signal flashes three times.
The turn and lane-change signal can be
turned off manually by moving the lever
back to its original position.
If after signaling a turn or lane change, the
arrow flashes rapidly or does not come on, a
signal bulb may be burned out. Replace any burned out bulbs. If a bulb is
not burned out, check the fuse. See
Fuses
and Circuit Breakers 0271.
Fog Lamps
The ignition and parking lamps or
headlamps must be on for the front fog
lamps to work.
If equipped, the front fog lamps provide
extra illumination to the sides of the road
and improve visibility in fog or snow.
#:Press to turn the fog lamps on or off.
An indicator light on the instrument cluster
comes on when the fog lamps are on.
Some localities have laws that require the
headlamps to be on along with the fog
lamps.
Page 246 of 360
Chevrolet Equinox Owner Manual (GMNA-Localizing-U.S./Canada-
16540728) - 2023 - crc - 6/16/22
Driving and Operating 245
2. Pull the bottom edge of the coverrearward.
3. Disengage the cover at the upper attachments (1) and remove.
Consider using mechanical sway controls
with any trailer. Ask a trailering professional
about sway controls or refer to the trailer
manufacturer's recommendations and
instructions.
Tires
.Do not tow a trailer while using a
compact spare tire on the vehicle.
.Tires must be properly inflated to support
loads while towing a trailer. See Tires
0 277 for instructions on proper tire
inflation.
Safety Chains
Always attach chains between the vehicle
and the trailer, and attach the chains to the
holes on the trailer hitch platform.
Instructions about safety chains may be
provided by the hitch manufacturer or by
the trailer manufacturer.
Cross the safety chains under the tongue of
the trailer to help prevent the tongue from
contacting the road if it becomes separated from the hitch. Always leave just enough
slack so the combination can turn. Never
allow safety chains to drag on the ground.
Trailer Brakes
Loaded trailers over 450 kg (1,000 lb) must
be equipped with brake systems and with
brakes for each axle. Trailer braking
equipment conforming to Canadian
Standards Association (CSA) requirement
CAN3-D313, or its equivalent, is
recommended.
State or local regulations may require
trailers to have their own braking system if
the loaded weight of the trailer exceeds
certain minimums that can vary from state
to state. Read and follow the instructions for
the trailer brakes so they are installed,
adjusted, and maintained properly. Never
attempt to tap into your vehicle's hydraulic
brake system. If you do, both the vehicle
anti-lock brakes and the trailer brakes may
not function, which could result in a crash.
Trailer Lamps
Always check all trailer lamps are working at
the beginning of each trip, and periodically
on longer trips.
Turn Signals When Towing a Trailer
When properly connected, the trailer turn
signals should will illuminate to indicate the
vehicle is turning, changing lanes,
or stopping. When towing a trailer, the
arrows on the instrument cluster will
illuminate even if the trailer is not properly
connected or the bulbs are burned out.
Trailer Tires
Special Trailer (ST) tires differ from vehicle
tires. Trailer tires are designed with stiff
sidewalls to help prevent sway and to
support heavy loads. These features can
make it difficult to determine if the trailer
tire pressures are low only based on a visual
inspection.
Always check all trailer tire pressures before
each trip when the tires are cool. Low trailer
tire pressure is a leading cause of trailer tire
blow-outs.
Trailer tires deteriorate over time. The trailer
tire sidewall will show the week and year
the tire was manufactured. Many trailer tire
manufacturers recommend replacing tires
more than six years old.
Page 248 of 360
Chevrolet Equinox Owner Manual (GMNA-Localizing-U.S./Canada-
16540728) - 2023 - crc - 6/16/22
Vehicle Care 247
Vehicle Care
General Information
General Information . . . . . . . . . . . . . . . . . . . 248
California Perchlorate MaterialsRequirements . . . . . . . . . . . . . . . . . . . . . . . . 248
Accessories and Modifications . . . . . . . . . 248
Vehicle Checks
Doing Your Own Service Work . . . . . . . . 248
Hood . . . . . . . . . . . . . . . . . . . . . . . . . . . . . . . . . . 249
Engine Compartment Overview . . . . . . . . 251
Engine Oil . . . . . . . . . . . . . . . . . . . . . . . . . . . . . 252
Engine Oil Life System . . . . . . . . . . . . . . . . 254
Automatic Transmission Fluid . . . . . . . . . . 255
Engine Air Filter Life System . . . . . . . . . . . 255
Engine Air Cleaner/Filter . . . . . . . . . . . . . . . 255
Cooling System . . . . . . . . . . . . . . . . . . . . . . . . 257
Engine Overheating . . . . . . . . . . . . . . . . . . . 259
Washer Fluid . . . . . . . . . . . . . . . . . . . . . . . . . . 260
Brakes . . . . . . . . . . . . . . . . . . . . . . . . . . . . . . . . . 261
Brake Fluid . . . . . . . . . . . . . . . . . . . . . . . . . . . . 262
Battery - North America . . . . . . . . . . . . . . . 263
All-Wheel Drive . . . . . . . . . . . . . . . . . . . . . . . . 263
Park Brake and P (Park) Mechanism Check . . . . . . . . . . . . . . . . . . . . . . . . . . . . . . . . 263
Wiper Blade Replacement . . . . . . . . . . . . . 264
Windshield Replacement . . . . . . . . . . . . . . 265
Gas Strut(s) . . . . . . . . . . . . . . . . . . . . . . . . . . . 265
Headlamp Aiming
Front Headlamp Aiming . . . . . . . . . . . . . . . 266
Bulb Replacement
Bulb Replacement . . . . . . . . . . . . . . . . . . . . . 266
Halogen Bulbs . . . . . . . . . . . . . . . . . . . . . . . . 266
High Intensity Discharge (HID) Lighting . . . . . . . . . . . . . . . . . . . . . . . . . . . . . 267
LED Lighting . . . . . . . . . . . . . . . . . . . . . . . . . . . 267
Headlamps . . . . . . . . . . . . . . . . . . . . . . . . . . . . 267
Front Turn Signal and Fog Lamps . . . . . 268
Taillamps . . . . . . . . . . . . . . . . . . . . . . . . . . . . . . 268
License Plate Lamp . . . . . . . . . . . . . . . . . . . . 268
Electrical System
Electrical System Overload . . . . . . . . . . . . 269
Fuses and Circuit Breakers . . . . . . . . . . . . . 271
Engine Compartment Fuse Block . . . . . . . 271
Instrument Panel Fuse Block . . . . . . . . . . . 273
Rear Compartment Fuse Block . . . . . . . . . 275
Wheels and Tires
Tires . . . . . . . . . . . . . . . . . . . . . . . . . . . . . . . . . . . 277
All-Season Tires . . . . . . . . . . . . . . . . . . . . . . . . 277
Winter Tires . . . . . . . . . . . . . . . . . . . . . . . . . . . 278
Tire Sidewall Labeling . . . . . . . . . . . . . . . . . 278
Tire Designations . . . . . . . . . . . . . . . . . . . . . . 280
Tire Terminology and Definitions . . . . . 280
Tire Pressure . . . . . . . . . . . . . . . . . . . . . . . . . . 282
Tire Pressure Monitor System . . . . . . . . . 283
Tire Pressure Monitor Operation . . . . . . 284 Tire Inspection . . . . . . . . . . . . . . . . . . . . . . . . 287
Tire Rotation . . . . . . . . . . . . . . . . . . . . . . . . . . 287
When It Is Time for New Tires . . . . . . . . 288
Buying New Tires . . . . . . . . . . . . . . . . . . . . . 289
Different Size Tires and Wheels . . . . . . . 290
Uniform Tire Quality Grading . . . . . . . . . 290
Wheel Alignment and Tire Balance . . . . 292
Wheel Replacement . . . . . . . . . . . . . . . . . . . 292
Tire Chains . . . . . . . . . . . . . . . . . . . . . . . . . . . . 292
If a Tire Goes Flat . . . . . . . . . . . . . . . . . . . . . 293
Tire Changing . . . . . . . . . . . . . . . . . . . . . . . . . 294
Compact Spare Tire . . . . . . . . . . . . . . . . . . . 299
Jump Starting
Jump Starting - North America . . . . . . . . 300
Towing the Vehicle
Transporting a Disabled Vehicle . . . . . . . 302
Recreational Vehicle Towing . . . . . . . . . . . 304
Appearance Care
Exterior Care . . . . . . . . . . . . . . . . . . . . . . . . . . 306
Interior Care . . . . . . . . . . . . . . . . . . . . . . . . . . . 310
Floor Mats . . . . . . . . . . . . . . . . . . . . . . . . . . . . . 313
Page 267 of 360
Chevrolet Equinox Owner Manual (GMNA-Localizing-U.S./Canada-
16540728) - 2023 - crc - 6/16/22
266 Vehicle Care
Hood
Trunk
Liftgate
Headlamp Aiming
Front Headlamp Aiming
Headlamp aim has been preset and should
need no further adjustment.
If the vehicle is damaged in a crash, the
headlamp aim may be affected.
If adjustment to the headlamps is necessary,
see your dealer.
Bulb Replacement
For the proper type of replacement bulbs,
or any bulb changing procedure not listed in
this section, contact your dealer.
Caution
Do not replace incandescent bulbs with
aftermarket LED replacement bulbs. This
can cause damage to the vehicle electrical
system.
Halogen Bulbs
{Warning
Halogen bulbs have pressurized gas inside
and can burst if you drop or scratch the
bulb. You or others could be injured. Be
sure to read and follow the instructions
on the bulb package.
Page 268 of 360
Chevrolet Equinox Owner Manual (GMNA-Localizing-U.S./Canada-
16540728) - 2023 - crc - 6/16/22
Vehicle Care 267
High Intensity Discharge (HID)
Lighting
{Warning
The High Intensity Discharge (HID)
lighting system operates at a very high
voltage. If you try to service any of the
system components, you could be
seriously injured. Have your dealer or a
qualified technician service them.
After an HID headlamp bulb has been
replaced, the beam might be a slightly
different shade than it was originally. This is
normal.
LED Lighting
This vehicle has several LED lamps. For
replacement of any LED lighting assembly,
contact your dealer.
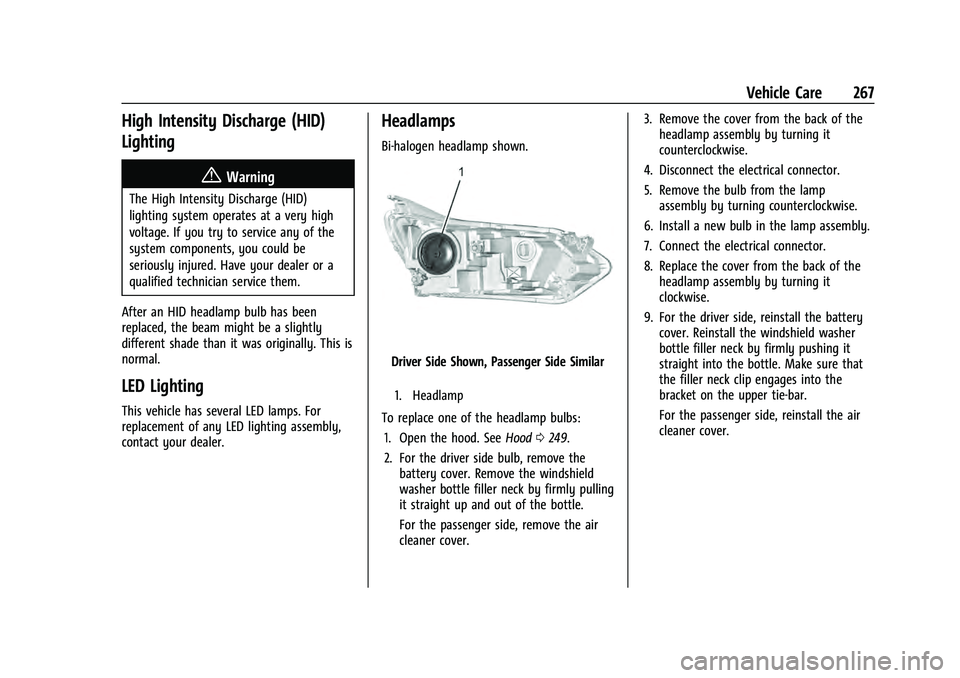
Headlamps
Bi-halogen headlamp shown.
Driver Side Shown, Passenger Side Similar
1. Headlamp
To replace one of the headlamp bulbs: 1. Open the hood. See Hood0249.
2. For the driver side bulb, remove the battery cover. Remove the windshield
washer bottle filler neck by firmly pulling
it straight up and out of the bottle.
For the passenger side, remove the air
cleaner cover. 3. Remove the cover from the back of the
headlamp assembly by turning it
counterclockwise.
4. Disconnect the electrical connector.
5. Remove the bulb from the lamp assembly by turning counterclockwise.
6. Install a new bulb in the lamp assembly.
7. Connect the electrical connector.
8. Replace the cover from the back of the headlamp assembly by turning it
clockwise.
9. For the driver side, reinstall the battery cover. Reinstall the windshield washer
bottle filler neck by firmly pushing it
straight into the bottle. Make sure that
the filler neck clip engages into the
bracket on the upper tie-bar.
For the passenger side, reinstall the air
cleaner cover.
Page 269 of 360
Chevrolet Equinox Owner Manual (GMNA-Localizing-U.S./Canada-
16540728) - 2023 - crc - 6/16/22
268 Vehicle Care
Front Turn Signal and Fog Lamps
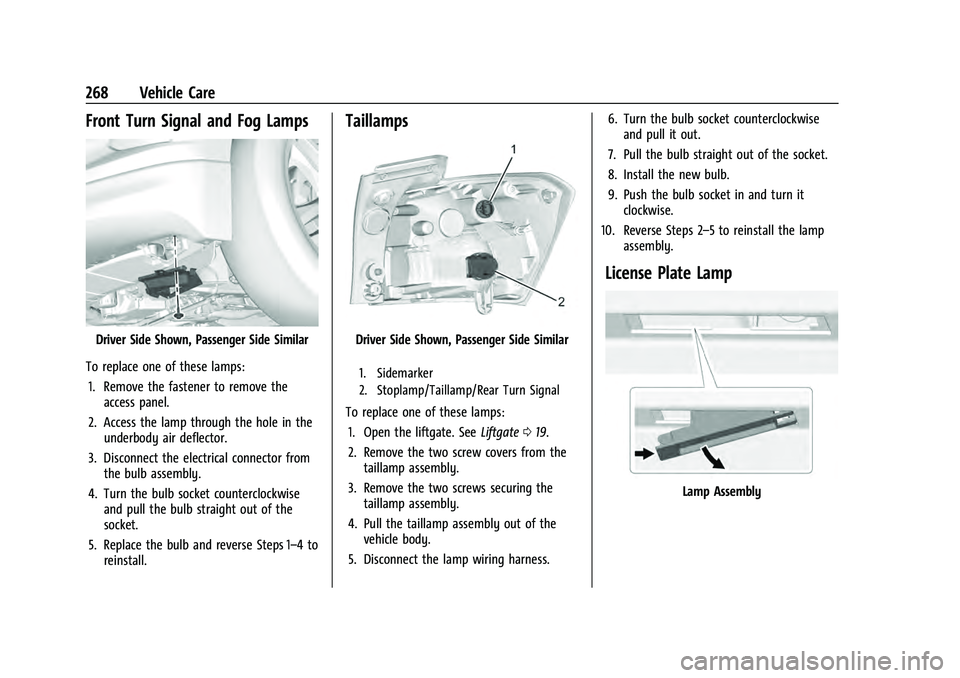
Driver Side Shown, Passenger Side Similar
To replace one of these lamps: 1. Remove the fastener to remove the access panel.
2. Access the lamp through the hole in the underbody air deflector.
3. Disconnect the electrical connector from the bulb assembly.
4. Turn the bulb socket counterclockwise and pull the bulb straight out of the
socket.
5. Replace the bulb and reverse Steps 1–4 to reinstall.
Taillamps
Driver Side Shown, Passenger Side Similar
1. Sidemarker
2. Stoplamp/Taillamp/Rear Turn Signal
To replace one of these lamps:
1. Open the liftgate. See Liftgate019.
2. Remove the two screw covers from the taillamp assembly.
3. Remove the two screws securing the taillamp assembly.
4. Pull the taillamp assembly out of the vehicle body.
5. Disconnect the lamp wiring harness. 6. Turn the bulb socket counterclockwise
and pull it out.
7. Pull the bulb straight out of the socket.
8. Install the new bulb.
9. Push the bulb socket in and turn it clockwise.
10. Reverse Steps 2–5 to reinstall the lamp assembly.
License Plate Lamp
Lamp Assembly
Page 270 of 360
Chevrolet Equinox Owner Manual (GMNA-Localizing-U.S./Canada-
16540728) - 2023 - crc - 6/16/22
Vehicle Care 269
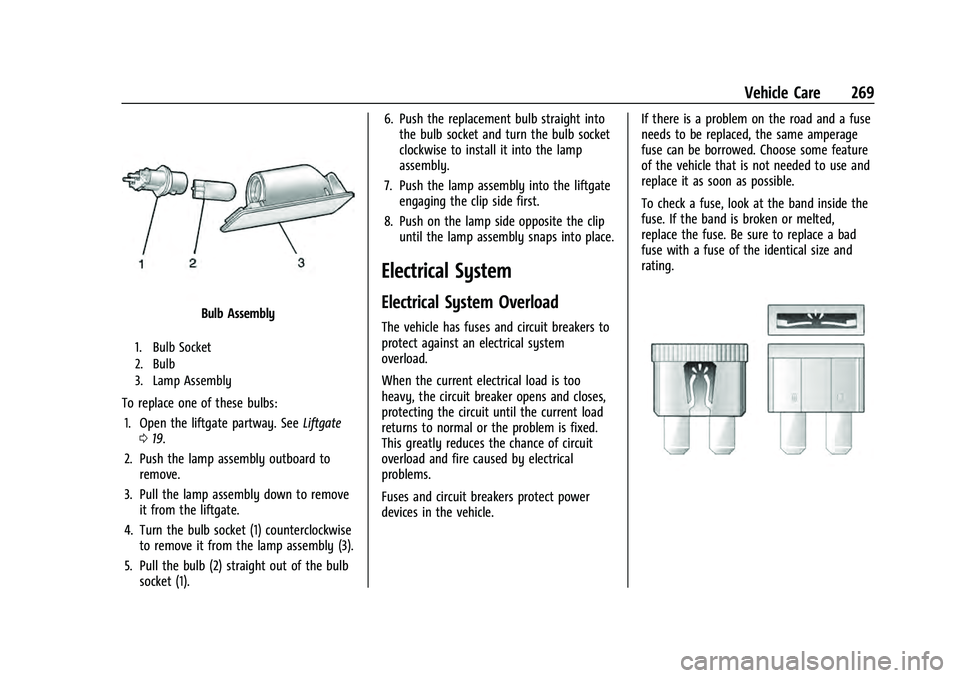
Bulb Assembly
1. Bulb Socket
2. Bulb
3. Lamp Assembly
To replace one of these bulbs:1. Open the liftgate partway. See Liftgate
0 19.
2. Push the lamp assembly outboard to remove.
3. Pull the lamp assembly down to remove it from the liftgate.
4. Turn the bulb socket (1) counterclockwise to remove it from the lamp assembly (3).
5. Pull the bulb (2) straight out of the bulb socket (1). 6. Push the replacement bulb straight into
the bulb socket and turn the bulb socket
clockwise to install it into the lamp
assembly.
7. Push the lamp assembly into the liftgate engaging the clip side first.
8. Push on the lamp side opposite the clip until the lamp assembly snaps into place.
Electrical System
Electrical System Overload
The vehicle has fuses and circuit breakers to
protect against an electrical system
overload.
When the current electrical load is too
heavy, the circuit breaker opens and closes,
protecting the circuit until the current load
returns to normal or the problem is fixed.
This greatly reduces the chance of circuit
overload and fire caused by electrical
problems.
Fuses and circuit breakers protect power
devices in the vehicle. If there is a problem on the road and a fuse
needs to be replaced, the same amperage
fuse can be borrowed. Choose some feature
of the vehicle that is not needed to use and
replace it as soon as possible.
To check a fuse, look at the band inside the
fuse. If the band is broken or melted,
replace the fuse. Be sure to replace a bad
fuse with a fuse of the identical size and
rating.