2023 CHEVROLET CORVETTE brake
[x] Cancel search: brakePage 173 of 351
Chevrolet Corvette Owner Manual (GMNA-Localizing-U.S./Canada/Mexico-
16287457) - 2023 - CRC - 3/10/22
172 Driving and Operating
1. Ease off the accelerator and then,if there is nothing in the way, steer the
vehicle so that it straddles the edge of
the pavement.
2. Turn the steering wheel about one-eighth of a turn, until the right front
tire contacts the pavement edge.
3. Turn the steering wheel to go straight down the roadway.
Loss of Control
Skidding
There are three types of skids that
correspond to the vehicle's three control
systems:
.Braking Skid —wheels are not rolling.
.Steering or Cornering Skid —too much
speed or steering in a curve causes tires
to slip and lose cornering force.
.Acceleration Skid —too much throttle
causes the driving wheels to spin.
Defensive drivers avoid most skids by taking
reasonable care suited to existing conditions,
and by not overdriving those conditions. But
skids are always possible. If the vehicle starts to slide, follow these
suggestions:
.Ease your foot off the accelerator pedal
and steer the way you want the vehicle
to go. The vehicle may straighten out. Be
ready for a second skid if it occurs.
.Slow down and adjust your driving
according to weather conditions. Stopping
distance can be longer and vehicle control
can be affected when traction is reduced
by water, snow, ice, gravel, or other
material on the road. Learn to recognize
warning clues
—such as enough water,
ice, or packed snow on the road to make
a mirrored surface —and slow down
when you have any doubt.
.Try to avoid sudden steering, acceleration,
or braking, including reducing vehicle
speed by shifting to a lower gear. Any
sudden changes could cause the tires to
slide.
Remember: Antilock brakes help avoid only
the braking skid.
Track Events and Competitive
Driving
All Z06 models or Stingray models equipped
with Z51 performance package can be used
for track events and competitive driving. For
additional details on vehicle track
preparation, see Chevrolet.com > Corvette
Experience > Guides > Track Prep Guide.
{Danger
High-performance features are intended
for use only on closed tracks by
experienced and qualified drivers and
should not be used on public roads.
High-speed driving, aggressive cornering,
hard braking, and other high-performance
driving can be dangerous. Improper driver
inputs for the conditions may result in
loss of control of the vehicle, which could
injure or kill you or others. Always drive
safely.
Participating in track events or other
competitive driving without following the
instructions provided may affect the vehicle
warranty. See the warranty manual before
Page 175 of 351

Chevrolet Corvette Owner Manual (GMNA-Localizing-U.S./Canada/Mexico-
16287457) - 2023 - CRC - 3/10/22
174 Driving and Operating
Engine Cooling
If reduced performance is experienced during
track events or competitive driving, turning
off the A/C will help to improve engine
performance.
Maintain a mixture of 40% DEX-COOL
coolant and 60% clean, drinkable water to
optimize engine performance.
Fuel
Unleaded gasoline, rated at 93 octane or
higher, is required.
Caution
Some high octane fuels contain additives
and compounds that may damage the
vehicle and void the vehicle warranty. See
Prohibited Fuels0227.
Dual Clutch Transmission (DCT) Fluid
The transmission fluid and external canister
filter should be changed after every 24 hours
of track use. Change the fluid and external
canister filter as soon as possible if
prompted by the transmission fluid life
monitor that remaining fluid life is low. Stingray
Add an additional 2 L (2 qt) of DCT
transmission fluid before track use. It is not
required to remove the additional 2 L (2 qt)
of DCT fluid after the track event.
Any transmission level set or change should
be performed at your dealer.
Z06
Additional transmission fluid is not required
for the Z06. The Z06 comes track ready
from the factory.
Brakes
Battery Disconnect
Disconnect the battery before servicing the
hydraulic brake system. It is critical to
disconnect the battery before bleeding the
system, replacing the pads, or any other
work. The battery must be disconnected to
prevent the brake master cylinder from
pressurizing the hydraulic system during its
automated self diagnostic tests that can
occur when a door is opened or the remote
key is present.
{Warning
To avoid personal injury and/or vehicle
damage, always disconnect the battery
before performing service work on the
hydraulic brake system. Bleeding the
brake system with the battery connected
can lead to the system diagnosing a leak
or air in the braking system. A Diagnostic
Trouble Code (DTC) may set and vehicle
speed may be limited.
Brake Fluid
Replace existing brake fluid with a qualified
high performance DOT 4 brake fluid from a
sealed container. Brake fluid with a dry
boiling point >310 °C (590 °F) is qualified.
If high performance brake fluid is used,
replace it with GM approved brake fluid
before driving on public roads. If high
performance brake fluid is in the vehicle and
the age of the brake fluid is over a month
old or unknown, replace the brake fluid
before track events and competitive driving.
Do not use silicone or DOT-5 brake fluids.
Check the fluid level before each competitive
driving event.
Page 176 of 351
Chevrolet Corvette Owner Manual (GMNA-Localizing-U.S./Canada/Mexico-
16287457) - 2023 - CRC - 3/10/22
Driving and Operating 175
Brake System Flushing and Bleeding
The J55, J56, and J57 brake systems require
specific processes for bleeding and fluid
flushing. These can be found in the service
manual.
Properly bleeding the brake system is
required for proper operation of the
hydraulic brake system.
Brake Leak Detection
The hydraulic braking system has advanced
diagnostic capability to help detect hydraulic
leaks, trapped air, and other performance
issues. These diagnostics are active when
the hydraulic system is powered. To avoid
inadvertently setting a leak DTC, disconnect
the battery before servicing the brake
system.
If the vehicle sets a DTC related to a brake
system leak, the Brake System Warning
Light will come on and vehicle speed may
be limited to 100 kph (62 mph). Any time a
leak DTC is set, the vehicle should be
inspected carefully for evidence of a leak
and should be repaired immediately. See
your dealer.Brake Fade Warning Assist
The Brake Fade Warning Assist system
monitors brake system performance. If the
system detects brake fade, or if the brake
fluid is near the boiling point, the driver will
be alerted.
The Brake Fade Warning Assist system is
designed for use with the factory-installed
brake pads or GM approved replacement
pads. If the brake pads on the vehicle need
to be replaced, use GM approved brake
pads. If this is not done, the brake fade
warning system may not function properly.
Stage 1 :
The Driver Information Center (DIC)
displays a “Reduce Braking to Avoid
Overheating” message, a chime sounds and
brake pedal effort and travel is increased.
When the message displays, the driver
should back up braking points and reduce
brake usage in order to reduce brake
temperature. This will allow for continued
lapping with no speed limitations. Stage 2 :
The Driver Information Center
(DIC) displays a “Brakes Overheated Service
Now” message, a chime sounds, and brake
pedal effort and travel is further increased.
This code indicates that the brake fluid
temperature is excessive and is about to
boil. The system limits vehicle speed to
100KPH/62MPH. The driver should
immediately start a cool down lap if on the
track. If this message displays, the vehicle
needs to be serviced. The brake system
needs to cool down, and the brake fluid
must be immediately flushed with DOT4 for
street use, or to a qualified DOT4 race fluid
for track use. Boiled brake fluid is
compromised and must be replaced.
Brake Burnishing
Caution
Performing the brake burnish procedure
on a base brake system can result in
brake damage.
Page 177 of 351
Chevrolet Corvette Owner Manual (GMNA-Localizing-U.S./Canada/Mexico-
16287457) - 2023 - CRC - 3/10/22
176 Driving and Operating
Caution
The new vehicle break-in period should be
completed before performing the brake
burnish procedure, otherwise damage
may occur to the powertrain/engine. See
New Vehicle Break-In0189.
Caution
Brake pedal fade will occur during any
track burnish procedure and can cause
brake pedal travel and force to increase.
This could extend stopping distance until
the brakes are fully burnished.
New brake pads must be burnished before
racing or other competitive driving.
When this procedure is performed as
instructed, it will not damage the brakes.
The brake pads will smoke and produce an
odor. The braking force and pedal travel
may increase. After the procedure, the brake
pads may appear white at the rotor contact.
Perform this procedure only on dry
pavement, in a safe manner, and in
compliance with all local and state
ordinances/laws regarding motor vehicle
operation. Brake Burnishing Procedure for J55 (Stingray
with Z51) and J56 (Z06 Standard) Brakes
This brake burnish procedure should only be
performed on vehicles with the Z06 with
J56, or Z51 with J55 factory equipped brake
systems.
1. Using the friction bubble in the Cluster Performance menu, apply the brakes 25
times starting at 100 km/h (60 mph) to
50 km/h (30 mph) while decelerating at
0.4 g. See Instrument Cluster 079. This
is a medium brake application. Drive for
at least 1 km (0.6 mi) between applying
the brakes. This first step may be
skipped if there are more than 320 km
(200 mi) on the brake pads.
2. Apply the brakes 25 times starting at 100 km/h (60 mph) to 25 km/h (15 mph)
while decelerating at 0.8 g. This is a hard
brake application without activating the
Antilock Brake System (ABS). Drive for at
least 1 km (0.6 mi) between applications.
Depending on conditions, some increase
in brake pedal travel and brake pedal
force may be experienced.
3. Cool down: Drive at 100 km/h (60 mph) for approximately 15 km (10 mi) without
using the brakes. 4. Apply the brakes 25 times from
100 km/h (60 mph) to 50 km/h (30 mph)
while decelerating at 0.4 g. This is a
medium brake application. Drive for at
least 1 km (0.6 mi) between applications.
As with all high performance brake systems,
some amount of brake squeal is normal.
Brake Burnishing Procedure for Z06 with
Available J57 Carbon Ceramic Brakes
This brake burnish procedure should only be
run on Z06 vehicles with J57 factory
equipped brake systems.
Perform this procedure only on dry
pavement, in a safe manner, and in
compliance with all local and state
ordinances regarding motor vehicle
operation. 1. Using the friction bubble in the Cluster Performance menu, apply the brakes 25
times starting at 100 km/h (60 mph) to
50 km/h (30 mph) while decelerating at
0.4 g. This is a medium brake
application. Drive for at least 1.6 km
(1.0 mi) between applications. This first
step may be skipped if there are more
than 320 km (200 mi) on the brake pads.
Page 178 of 351
Chevrolet Corvette Owner Manual (GMNA-Localizing-U.S./Canada/Mexico-
16287457) - 2023 - CRC - 3/10/22
Driving and Operating 177
2. Apply the brakes 20 times starting at100 km/h (60 mph) to 25 km/h (15 mph)
while decelerating at 0.8 g. This is a
hard brake application. Drive for at least
1.6 km (1.0 mi) between applications.
3. Apply the brakes 12 times starting at 100 km/h (60 mph) to 8 km/h (5 mph)
while decelerating at 0.8 g. This is a
hard brake application. Accelerate as
rapidly as possible without activating
traction control between applications.
4. Cool down: Drive at 100 km/h (60 mph) for approximately 15 km (10 mi) without
using the brakes.
As with all high performance brake systems,
some amount of brake squeal is normal.
Alternative Closed Course Brake Burnishing
Procedure for J55 (Stingray with Z51), J56
(Z06 Standard), and J57 (Z06 Carbon Ceramic)
Brakes
This brake burnish procedure should be run
on vehicles with the Z51 with J55, Z06 with
J56, or Z06 with J57 factory equipped brake
systems. This procedure should only be run on a
track and only on dry pavement. Brake
pedal fade will occur during this track
burnish procedure and can cause brake pedal
travel and force to increase. This could
extend stopping distance until the brakes
are fully burnished.
1. Start track lapping at lower speeds and lower braking efforts for three minutes
of driving. Allow for increased braking
distances due to reduced brake output.
2. After Step 1, increase speed and braking effort for the next six minutes of
lapping, gradually ending up at 90%
effort. Continue to allow for increased
braking distance due to reduced brake
output.
3. Cool the brakes by lapping with minimal light braking for six minutes. Brake Cooling Kit
Before any track event, high speed driving
event, or competitive driving, the following
should be completed:
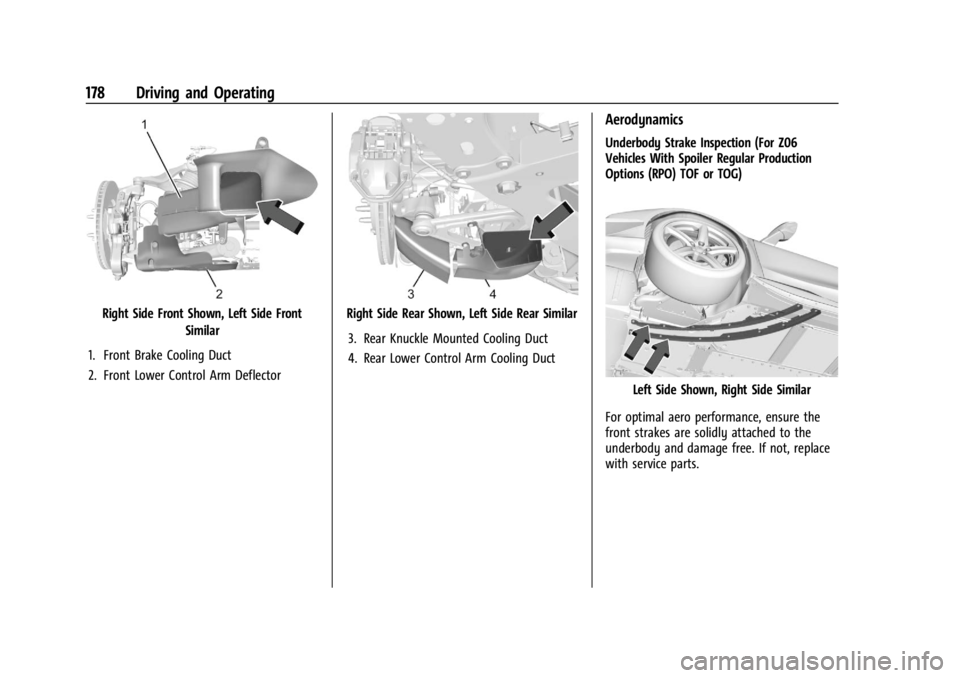
.Ensure all brake cooling parts are
correctly and securely installed.
.Install the rear lower control arm cooling
ducts per the instructions included with
the kit. After any track event or
competitive driving, remove the rear
lower control arm cooling ducts. These
parts are for track use only. Removing the
ducts helps prevent debris from being
channeled into the rear brakes during
regular use of the vehicle.
.Inspect for and remove any blockage in
the ducts.
.Inspect and replace any duct that has
damage.
Page 179 of 351
Chevrolet Corvette Owner Manual (GMNA-Localizing-U.S./Canada/Mexico-
16287457) - 2023 - CRC - 3/10/22
178 Driving and Operating
Right Side Front Shown, Left Side FrontSimilar
1. Front Brake Cooling Duct
2. Front Lower Control Arm DeflectorRight Side Rear Shown, Left Side Rear Similar
3. Rear Knuckle Mounted Cooling Duct
4. Rear Lower Control Arm Cooling Duct
Aerodynamics
Underbody Strake Inspection (For Z06
Vehicles With Spoiler Regular Production
Options (RPO) TOF or TOG)
Left Side Shown, Right Side Similar
For optimal aero performance, ensure the
front strakes are solidly attached to the
underbody and damage free. If not, replace
with service parts.
Page 181 of 351
Chevrolet Corvette Owner Manual (GMNA-Localizing-U.S./Canada/Mexico-
16287457) - 2023 - CRC - 3/10/22
180 Driving and Operating
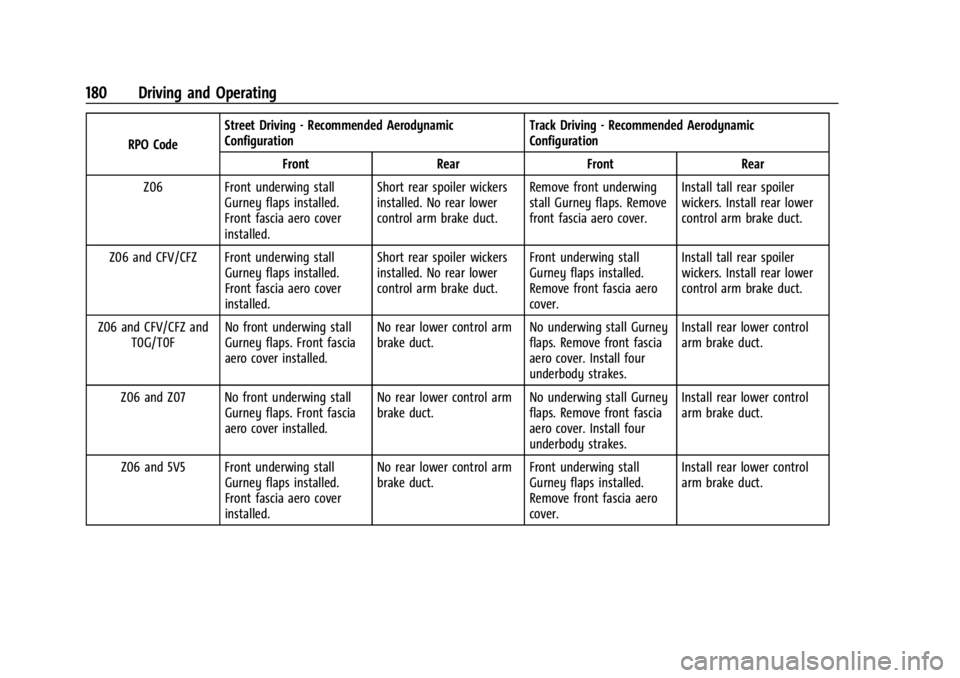
RPO CodeStreet Driving - Recommended Aerodynamic
Configuration
Track Driving - Recommended Aerodynamic
Configuration
Front RearFront Rear
Z06 Front underwing stall Gurney flaps installed.
Front fascia aero cover
installed. Short rear spoiler wickers
installed. No rear lower
control arm brake duct.
Remove front underwing
stall Gurney flaps. Remove
front fascia aero cover.Install tall rear spoiler
wickers. Install rear lower
control arm brake duct.
Z06 and CFV/CFZ Front underwing stall Gurney flaps installed.
Front fascia aero cover
installed. Short rear spoiler wickers
installed. No rear lower
control arm brake duct.
Front underwing stall
Gurney flaps installed.
Remove front fascia aero
cover.Install tall rear spoiler
wickers. Install rear lower
control arm brake duct.
Z06 and CFV/CFZ and T0G/T0F No front underwing stall
Gurney flaps. Front fascia
aero cover installed. No rear lower control arm
brake duct.
No underwing stall Gurney
flaps. Remove front fascia
aero cover. Install four
underbody strakes.Install rear lower control
arm brake duct.
Z06 and Z07 No front underwing stall Gurney flaps. Front fascia
aero cover installed. No rear lower control arm
brake duct.
No underwing stall Gurney
flaps. Remove front fascia
aero cover. Install four
underbody strakes.Install rear lower control
arm brake duct.
Z06 and 5V5 Front underwing stall Gurney flaps installed.
Front fascia aero cover
installed. No rear lower control arm
brake duct.
Front underwing stall
Gurney flaps installed.
Remove front fascia aero
cover.Install rear lower control
arm brake duct.
Page 184 of 351
Chevrolet Corvette Owner Manual (GMNA-Localizing-U.S./Canada/Mexico-
16287457) - 2023 - CRC - 3/10/22
Driving and Operating 183
Rear (per corner)
.Caster: 0 degrees
.Camber: -2.0 degrees
.Toe (total): 0.1 degrees toe in
.Thrust Angle: 0 degrees
Z06 with Z07 Performance Package Equipped
With Carbon Fiber Wheels (RPOs ROY
and ROZ)
When participating in Track Events or
Competitive Driving with these wheels, a
proper cool down without hot soaking the
wheels is critical.
.On a typical road course 3.2–6.5 km
(2-4 miles) long per lap, one cool down
lap without using the brakes will suffice.
If the track being driven is shorter than
3.2 km (2 mi), perform two cool down
laps without using the brakes.
.If adequate cool down without using the
brakes cannot be achieved (i.e., red flag
on track, have to stop unexpectedly, etc.),
the key is to not have one area of the
wheels exposed to the "chimney effect"
of the heat that rises off of a stationary
hot brake rotor. This can be prevented by
very low speed driving of the car such
that the entire circumference of the wheel is exposed to the heat. Rolling the
car back and forth in a small space is
better than sitting still with hot brakes.
Driving on Wet Roads
Rain and wet roads can reduce vehicle
traction and affect your ability to stop and
accelerate. Always drive slower in these
types of driving conditions and avoid driving
through large puddles and deep-standing or
flowing water.
{Warning
Wet brakes can cause crashes. They
might not work as well in a quick stop
and could cause pulling to one side. You
could lose control of the vehicle.
After driving through a large puddle of
water or a car/vehicle wash, lightly apply
the brake pedal until the brakes work
normally.
Flowing or rushing water creates strong
forces. Driving through flowing water
could cause the vehicle to be carried
away. If this happens, you and other
vehicle occupants could drown. Do not
(Continued)
Warning (Continued)
ignore police warnings and be very
cautious about trying to drive through
flowing water.
Caution
Driving through deep puddles or standing
water can cause water to come in
through the engine air intake and
damage the engine. If deep puddles or
standing water cannot be avoided,
proceed with caution and do not exceed
8 km/h (5 mph). Do not drive through
water that may come close to or cover
the vehicle’s underbody.
Hydroplaning
Hydroplaning is dangerous. Water can build
up under the vehicle's tires so they actually
ride on the water. This can happen if the
road is wet enough and you are going fast
enough. When the vehicle is hydroplaning, it
has little or no contact with the road.
There is no hard and fast rule about
hydroplaning. The best advice is to slow
down when the road is wet.