2023 CHEVROLET CORVETTE maintenance
[x] Cancel search: maintenancePage 235 of 351

Chevrolet Corvette Owner Manual (GMNA-Localizing-U.S./Canada/Mexico-
16287457) - 2023 - CRC - 3/10/22
234 Vehicle Care
Position the service jack and lifting pad
under the frame rail shipping slot
reinforcement.
For more information, seeDoing Your Own
Service Work 0234.
Vehicle Checks
Doing Your Own Service Work
{Warning
It can be dangerous to work on your
vehicle if you do not have the proper
knowledge, service manual, tools,
or parts. Always follow owner’s manual
procedures and consult the service
manual for your vehicle before doing any
service work.
If doing some of your own service work, use
the proper service manual. It tells you much
more about how to service the vehicle than
this manual can. To order the proper service
manual, see Publication Ordering
Information 0327. This vehicle has an airbag system. Before
attempting to do your own service work,
see
Servicing the Airbag-Equipped Vehicle
0 59.
If equipped with remote vehicle start, open
the hatch/trunk before performing any
service work to prevent remote starting the
vehicle accidentally. See Remote Vehicle
Start 012.
Keep a record with all parts receipts and list
the mileage and the date of any service
work performed. See Maintenance Records
0 313.
Caution
Even small amounts of contamination can
cause damage to vehicle systems. Do not
allow contaminants to contact the fluids,
reservoir caps, or dipsticks.
Underhood Compartment
Overview
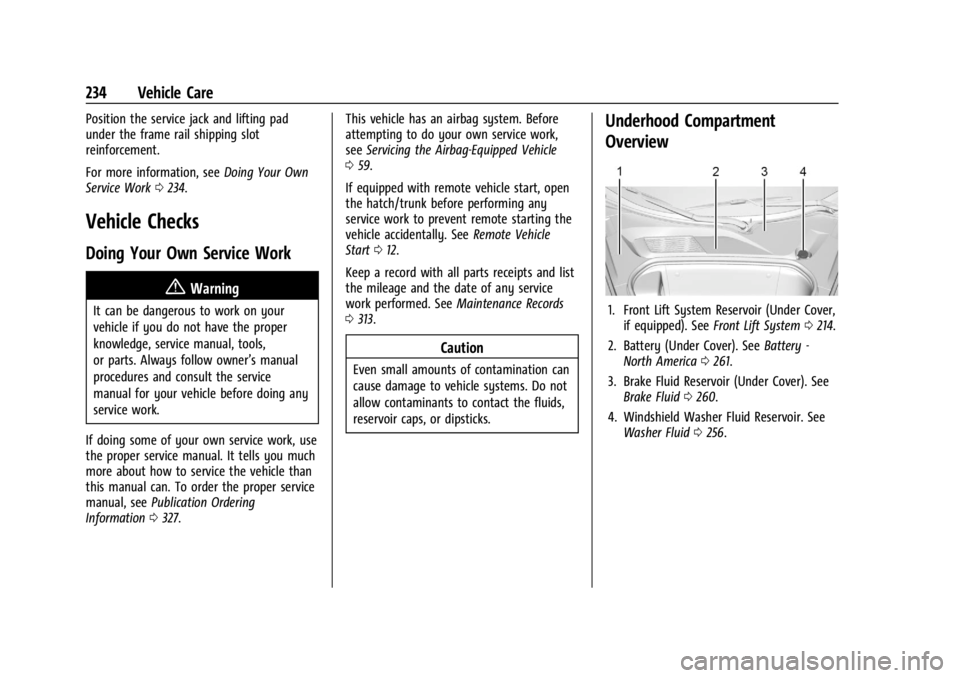
1. Front Lift System Reservoir (Under Cover,
if equipped). See Front Lift System 0214.
2. Battery (Under Cover). See Battery -
North America 0261.
3. Brake Fluid Reservoir (Under Cover). See Brake Fluid 0260.
4. Windshield Washer Fluid Reservoir. See Washer Fluid 0256.
Page 245 of 351

Chevrolet Corvette Owner Manual (GMNA-Localizing-U.S./Canada/Mexico-
16287457) - 2023 - CRC - 3/10/22
244 Vehicle Care
3. Remove the engine oil drain plug (1)from the bottom of the engine oil tank.
Drain plug removal will let the oil drain
from the external oil tank. Allow the oil
to drain.
4. Inspect the drain plug O-ring seal (2) and replace if it is damaged. Reinstall the
drain plug into the oil tank by rotating it
to a stop.
5. Remove the engine oil drain plug (3) from the bottom of the engine
crankcase. Drain plug removal will let the
residual oil drain from crankcase sump.
Allow the oil to drain.
6. Inspect the drain plug O-ring seal (4) and replace if it is damaged. Reinstall the
drain plug into the crankcase sump and
tighten them to 25 Y(18 lb ft).
7. Remove the engine oil filter cap (5) and filter (7) and allow the oil to drain.
8. Install the engine oil filter cap (5) with a new engine oil filter cap seal ring (6) and
the new oil filter element (7) and hand
tighten. See Maintenance Replacement
Parts 0311 for the correct filter.
Tighten the engine oil filter cap (5) to
25 Y (18 lb ft). 9. Add oil to the oil tank through the
opening in the oil tank. See Capacities
and Specifications 0315.
10. Install the oil fill cap and insert the dipstick until fully seated to a stop,
if removed.
{Warning
To help avoid personal injury and/or
engine damage, always install the engine
oil dipstick and oil fill cap until fully
seated to a stop. If not fully seated, oil
could escape on to hot exhaust parts and
cause a fire.
11. Start the engine and check the oil level as described under "Checking the Engine
Oil." previously in this section.
Selecting the Right Engine Oil
Selecting the right engine oil depends on
both the proper oil specification and the
viscosity grade. See Recommended Fluids
and Lubricants 0310.
Specification
Use engine oils that meet the dexosR
Performance Engine Oil specification.
Engine oils that have been approved by GM
as meeting the dexosR specification are
marked with the dexosR approved logo. See
www.gmdexos.com.
GM recommends Mobil 1 engine oils that
show the dexosR approved logo.
Caution
Failure to use the recommended engine
oil or equivalent can result in engine
damage not covered by the vehicle
warranty.
Viscosity Grade
Use SAE 5W-50 viscosity grade engine oil.
When selecting an oil of the appropriate
viscosity grade, it is recommended to select
an oil of the correct specification. See
“Specification” previously in this section.
Page 248 of 351

Chevrolet Corvette Owner Manual (GMNA-Localizing-U.S./Canada/Mexico-
16287457) - 2023 - CRC - 3/10/22
Vehicle Care 247
1. Engine Oil Drain Plug
2. O-ring Seal
3. Engine Oil Filter
To change the engine oil and filter:1. Run the engine at idle for about 20 seconds to return all of the oil back
into the dry sump oil tank.
2. Turn the engine off prior to draining the oil.
3. Remove the engine oil drain plug from the bottom of the engine oil pan. Drain
plug removal will let the oil drain from
the external oil tank and residual oil
from the crankcase sump. Allow the oil
to drain. 4. Remove the engine oil filter and allow
the oil to drain.
5. Inspect the drain plug O-ring seal and replace if it is damaged. Reinstall the
drain plug into the oil pan and tighten it
to 25 N.m (18 lb ft).
6. Replace the oil filter and tighten it three-quarters to one turn after the
gasket makes contact. See Maintenance
Replacement Parts 0311 for the correct
filter.
7. Remove the oil fill cap from the external engine oil tank.
Add oil to the oil tank through the
opening in the fill tube. See Capacities
and Specifications 0315.
8. Install the oil fill cap and insert the dipstick, if removed.
{Warning
To help avoid personal injury and/or
engine damage, always install the engine
oil dipstick and oil fill cap until fully
seated to a stop. If not fully seated, oil
could escape on to hot exhaust parts and
cause a fire. 9. Start the engine and check the oil level
as described under "Checking the Engine
Oil." previously in this section.
Selecting the Right Engine Oil
Selecting the right engine oil depends on
both the proper oil specification and the
viscosity grade. See Recommended Fluids
and Lubricants 0310.
Specification
Use engine oils that meet the dexosR
specification.
Engine oils that have been approved by GM
as meeting the dexosR specification are
marked with the dexosR approved logo. See
www.gmdexos.com.
GM recommends Mobil 1 engine oils that
show the dexosR approved logo.
Page 250 of 351

Chevrolet Corvette Owner Manual (GMNA-Localizing-U.S./Canada/Mexico-
16287457) - 2023 - CRC - 3/10/22
Vehicle Care 249
How to Reset the Engine Oil Life System
Reset the system whenever the engine oil is
changed so that the system can calculate
the next engine oil change. To reset the
system:1. Scroll through the DIC Info Pages menu until the remaining Engine Oil
percentage is displayed. See Driver
Information Center (DIC) 092.
2. Press and hold the thumbwheel on the DIC while the Oil Life display is active.
When prompted, confirm reset. The oil
life will change to 100%.
If the CHANGE ENGINE OIL SOON message
comes back on when the vehicle is started,
the engine oil life system has not reset.
Repeat the procedure.
Dual Clutch Transmission Fluid
How to Check Dual Clutch Transmission
Fluid
It is not necessary to check the transmission
fluid level. A transmission fluid leak is the
only reason for fluid loss. If a leak occurs,
take the vehicle to the dealer and have it
repaired as soon as possible. The vehicle is not equipped with a
transmission fluid level dipstick. There is a
special procedure for checking and changing
the transmission fluid. Because this
procedure is difficult, this should be done at
the dealer. Contact the dealer for additional
information or the procedure can be found
in the service manual. To purchase a service
manual, see
Publication Ordering
Information 0327.
Caution
Use of the incorrect transmission fluid
may damage the vehicle, and the
damage may not be covered by the
vehicle warranty. Always use the correct
transmission fluid. See Recommended
Fluids and Lubricants 0310.
Change the fluid and external canister filter
at the proper intervals. See Maintenance
Schedule 0306. Be sure to use the correct
fluid. See Recommended Fluids and
Lubricants 0310.
Dual Clutch Transmission Fluid Life
System
When to Change the Dual Clutch
Transmission Fluid
This vehicle has a computer that indicates
when to change the transmission fluid. This
is based on a combination of factors which
include temperature and miles driven. Based
on driving conditions, the mileage at which
a fluid change is indicated can vary
considerably. For the fluid life system to
work properly, the system must be reset
every time the fluid is changed. When the
system has calculated that fluid life has
been diminished, it indicates that a fluid
change is necessary. A CHANGE
TRANSMISSION FLUID SOON message comes
on. Change the fluid as soon as possible
within the next 1 000 km (600 mi). Failure
to change transmission fluid at required
intervals could lead to suboptimal
transmission performance. Your dealer has
trained service technicians who will change
the fluid and reset the system. If the system
is ever reset accidentally, the fluid must be
changed 72 000 km (45,000 mi) after the
last fluid change.
Page 251 of 351

Chevrolet Corvette Owner Manual (GMNA-Localizing-U.S./Canada/Mexico-
16287457) - 2023 - CRC - 3/10/22
250 Vehicle Care
When to Replace the Dual Clutch
Transmission Fluid Filter
This vehicle has a computer that indicates
when to change the transmission external
canister fluid filter. This is based on the
number of miles driven as outlined in the
Service and Maintenance section. For the
fluid filter life system to work properly, the
system must be reset every time the filter is
replaced. When the system has calculated
that the external canister filter is near the
mileage interval, a REPLACE TRANSMISSION
OIL FILTER SOON message comes on. Replace
the external canister filter before the
indicator reaches 0%.
Failure to replace the transmission filter at
required intervals could lead to suboptimal
transmission performance. Your dealer has
trained service technicians who will replace
the external canister filter and reset the
system. If the system is ever reset
accidentally, the filter should be replaced
according to the service intervals indicated
in the Service and Maintenance section until
the next filter change. If the next filter
change is the first, follow the service
interval until the second filter change,
resetting the filter life system at each filter
change.
How to Reset the Dual Clutch
Transmission Fluid and Filter Life System
Reset the respective system whenever the
transmission fluid or external canister filter
is replaced so that the system can calculate
the next service interval.
To reset:1. Place the vehicle in P (Park).
2. Select Transmission Fluid Life or Transmission Oil Filter Life on the DIC
menu. See Driver Information Center
(DIC) 092.
3. Press the thumbwheel to move to the Reset submenu. Select Reset
Transmission Fluid or Reset Transmission
Oil Filter. A confirmation page will be
displayed, press the thumbwheel again
to confirm the reset.
4. When the Transmission Fluid/Filter Life System is successfully reset, 100%
remaining life will be displayed.
Engine Air Filter Life System
If equipped, this feature provides the engine
air filter’s remaining life and best timing for
a change. The timing to change an engine
air filter depends on driving and
environmental conditions.
When to Change Engine Air Filter
When the Driver Information Center (DIC)
displays a message to replace the engine air
filter at the next oil change, follow this
timing.
When the DIC displays a message to replace
the engine air filter soon, replace the engine
air filter at the earliest convenience.
The system must be reset after the engine
air filter is changed.
If the DIC displays a message to check the
engine air filter system, see your dealer.
How to Reset Engine Air Filter Life
System
Reset the system whenever the engine air
filter is replaced so that the system can
calculate the next engine air filter change.
To reset:
1. Place the vehicle in P (Park).
2. Display the Air Filter Life on the DIC. See Driver Information Center (DIC) 092.
3. Press the thumbwheel on the steering wheel to move to the Reset/Disable
display area. Select Reset and press the
thumbwheel for several seconds.
4. Press the thumbwheel to confirm reset.
Page 252 of 351

Chevrolet Corvette Owner Manual (GMNA-Localizing-U.S./Canada/Mexico-
16287457) - 2023 - CRC - 3/10/22
Vehicle Care 251
Engine Air Cleaner/Filter
SeeEngine Compartment Overview 0235 for
the location of the engine air cleaner/filter.
Caution
If water is sprayed and enters the engine
air cleaner/filter intake and housing, the
engine could be damaged. The repairs
would not be covered by the vehicle
warranty.
When to Inspect the Engine Air Cleaner/Filter
For intervals on changing and inspecting the
engine air cleaner/filter, see Maintenance
Schedule 0306.
How to Inspect/Replace the Engine Air
Cleaner/Filter
Do not start the engine or have the engine
running with the engine air cleaner/filter
housing open. Before removing the engine
air cleaner/filter, make sure that the engine
air cleaner/filter housing and nearby
components are free of dirt and debris. Do
not clean the engine air cleaner/filter or
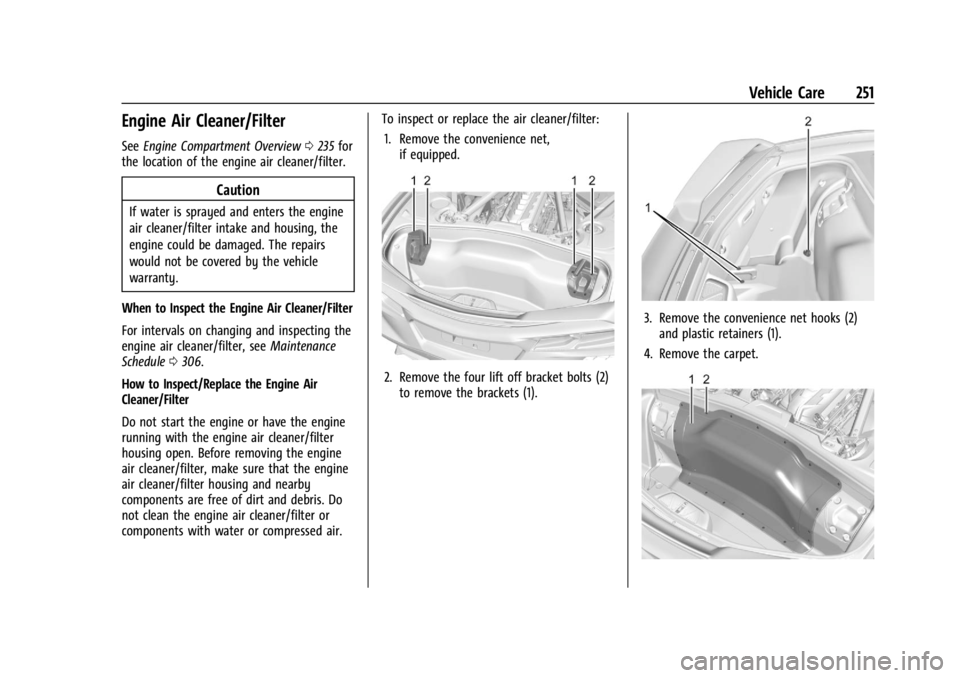
components with water or compressed air. To inspect or replace the air cleaner/filter:
1. Remove the convenience net, if equipped.
2. Remove the four lift off bracket bolts (2)to remove the brackets (1).
3. Remove the convenience net hooks (2)and plastic retainers (1).
4. Remove the carpet.
Page 254 of 351

Chevrolet Corvette Owner Manual (GMNA-Localizing-U.S./Canada/Mexico-
16287457) - 2023 - CRC - 3/10/22
Vehicle Care 253
Convertible
1. Engine Cooling Fans (Out of View)
2. Coolant Surge Tank with Pressure Cap
Coupe
1. Engine Cooling Fans (Out of View)
2. Coolant Surge Tank with Pressure Cap
{Warning
An underhood electric fan can start up
even when the engine is not running and
can cause injury. Keep hands, clothing,
and tools away from any underhood
electric fan.
{Warning
Do not touch heater or radiator hoses,
or other engine parts. They can be very
hot and can burn you. Do not run the
engine if there is a leak; all coolant could
leak out. That could cause an engine fire
and can burn you. Fix any leak before
driving the vehicle.
Engine Coolant
The cooling system in the vehicle is filled
with DEX-COOL engine coolant. See
Recommended Fluids and Lubricants0310.
The fluid requires changing at certain
intervals. See Maintenance Schedule 0306. The following explains the cooling system
and how to check and add coolant when it
is low. If there is a problem with engine
overheating, see
Engine Overheating 0255.
What to Use
{Warning
Plain water, or other liquids such as
alcohol, can boil before the proper
coolant mixture will. With plain water or
the wrong mixture, the engine could get
too hot but there would not be an
overheat warning. The engine could catch
fire and you or others could be burned.
Use a mixture of 40% DEX-COOL coolant and
60% clean, drinkable water. If using this
mixture, nothing else needs to be added.
This mixture:
.Gives freezing protection down to −28 °C
(−18 °F), outside temperature.
.Gives boiling protection up to 129 °C
(265 °F), engine temperature.
.Protects against rust and corrosion.
.Will not damage aluminum parts.
.Helps keep the proper engine
temperature.
Page 259 of 351

Chevrolet Corvette Owner Manual (GMNA-Localizing-U.S./Canada/Mexico-
16287457) - 2023 - CRC - 3/10/22
258 Vehicle Care
To help reduce squeal, the brake pads are
treated with an anti-squeal paste that may
need to be reapplied periodically as part of
normal vehicle maintenance. The anti-squeal
paste will dissipate over time. Also, the use
of wheel cleaners or power washers directly
on the brake calipers may remove the
anti-squeal paste from the brake pads.
It may be necessary to reapply the
anti-squeal paste if it is removed during
cleaning.
If brake squeal is excessive, the anti-squeal
paste should be reapplied. The anti-squeal
paste should always be reapplied whenever
the brake pads are removed or replaced. See
your dealer for service.
Brake Pedal Travel
See your dealer if the brake pedal does not
return to normal height, or if there is a
rapid increase in pedal travel. This could be
a sign that brake service may be required.
Replacing Brake System Parts
Always replace brake system parts with
new, approved replacement parts. If this is
not done, the brakes may not work
properly. The braking performance canchange in many ways if the wrong brake
parts are installed or if parts are improperly
installed.
The Brake Fade Warning Assist system is
designed for use with the factory-installed
brake pads or GM-approved replacement
pads. If the brake pads on the vehicle need
to be replaced, use GM-approved brake pads.
If this is not done, the brake fade warning
system may not function properly.
High Performance Brake Lining Car Wash
and Extended Parking Care
If equipped with high performance brake
components, binding or clunking may be
noticeable after extended parking or in cold
weather when the brakes have been wet,
such as when driving in the rain or after a
car wash. The clunking is normal for brakes
with high performance brake linings and
does not affect the operation of the brakes.
When driving, normal braking will allow for
the brakes to feel smooth and the clunking
to go away. If the vehicle is washed before
overnight parking or long term storage,
drive it and apply the brakes several times
to thoroughly dry the brakes
Brake Rotor Wear (Z06/Z07 with J57
Carbon Ceramic Rotors)
Vehicles with J57 have carbon ceramic brake
rotors. The rotors should be visually
inspected whenever the brake pads are
replaced. Carbon ceramic brake rotors also
need to be weighed before brake pads are
replaced to confirm that the rotor mass is
greater than the wear-out mass printed on
the rotor. The rotor can be reused if the
weight of the rotor is above the mass limit.
Carbon ceramic brake rotors inspection and
weighing methods can be found in the
service manual.
Z51/Z06 Cast Iron Rotor System Brake
Burnish Procedure for Corrosion Cleanup
Corrosion spotting and grooving on the
brake rotor surface may appear after the
vehicle sits for an extended period of time,
especially in high humidity. This corrosion
may result in brake pulsation and noise. To
help restore optimal braking performance
and reduce noise, complete the following
procedure: