2023 CHEVROLET BLAZER spare tire
[x] Cancel search: spare tirePage 298 of 360

Chevrolet Blazer Owner Manual (GMNA-Localizing-U.S./Canada/Mexico-
16401961) - 2023 - CRC - 5/17/22
Vehicle Care 297
5. Remove the nut retaining the spare tire.
6. Remove the spare tire and place it nextto the tire being changed.
Removing the Flat Tire and Installing the
Spare Tire
1. Do a safety check before proceeding. SeeIf a Tire Goes Flat 0295.
2. Turn the wheel wrench counterclockwise
to loosen all the wheel nuts, but do not
remove them yet.
3. Place the jack near the flat tire.
Caution
Make sure that the jack lift head is in the
correct position or you may damage your
vehicle. The repairs would not be covered
by your warranty.
4. Position the jack lift head at the jack location nearest the flat tire.
The jacking location is indicated by a half
circle notch in the metal flange. The jack
must not be used in any other position.
{Warning
Getting under a vehicle when it is lifted
on a jack is dangerous. If the vehicle slips
off the jack, you could be badly injured
or killed. Never get under a vehicle when
it is supported only by a jack.
{Warning
Raising the vehicle with the jack
improperly positioned can damage the
vehicle and even make the vehicle fall. To
help avoid personal injury and vehicle
damage, be sure to fit the jack lift head
into the proper location before raising
the vehicle.
{Warning
Lifting a vehicle and getting under it to
do maintenance or repairs is dangerous
without the appropriate safety equipment
and training. If a jack is provided with
the vehicle, it is designed only for
changing a flat tire. If it is used for
anything else, you or others could be
(Continued)
Page 299 of 360

Chevrolet Blazer Owner Manual (GMNA-Localizing-U.S./Canada/Mexico-
16401961) - 2023 - CRC - 5/17/22
298 Vehicle Care
Warning (Continued)
badly injured or killed if the vehicle slips
off the jack. If a jack is provided with the
vehicle, only use it for changing a
flat tire.
Caution
Using a jack to raise the vehicle without
positioning it correctly could damage
your vehicle. When raising your vehicle
on a jack, be sure to position it correctly
under the frame and avoid contact with
the plastic molding.
5. Turn the wheel wrench clockwise to raisethe jack until the slot in the jack lift
head fits into the metal flange located
behind the cut out on the plastic
molding.
Do not raise the vehicle yet.
6. Put the compact spare tire near you.
7. Raise the vehicle by turning the wheel wrench clockwise in the jack. Raise the
vehicle far enough off the ground so
there is enough room for the spare tire
to fit under the wheel well.
8. Remove all of the wheel nuts.
9. Remove the flat tire.
{Warning
Rust or dirt on a wheel, or on the
parts to which it is fastened, can
cause wheel nuts to become loose
over time. The wheel could come off
and cause a crash. When changing a
wheel, remove any rust or dirt from
places where the wheel attaches to
the vehicle. In an emergency, a cloth
or paper towel can be used; however,
use a scraper or wire brush later to
remove all rust or dirt.
Page 300 of 360

Chevrolet Blazer Owner Manual (GMNA-Localizing-U.S./Canada/Mexico-
16401961) - 2023 - CRC - 5/17/22
Vehicle Care 299
10. Remove any rust or dirt from the wheelbolts, mounting surfaces, and spare
wheel.
11. Place the compact spare tire on the wheel-mounting surface.
{Warning
Never use oil or grease on bolts or nuts
because the nuts might come loose. The
vehicle's wheel could fall off, causing a
crash.
12. Reinstall the wheel nuts. Tighten each nut by hand until the wheel is held
against the hub.
13. Lower the vehicle by turning the jack handle counterclockwise.
{Warning
Wheel nuts that are improperly or
incorrectly tightened can cause the
wheels to become loose or come off. The
wheel nuts should be tightened with a
torque wrench to the proper torque
specification after replacing. Follow the
torque specification supplied by the
aftermarket manufacturer when using
(Continued)
Warning (Continued)
accessory locking wheel nuts. See
Capacities and Specifications0326 for
original equipment wheel nut torque
specifications.
Caution
Improperly tightened wheel nuts can lead
to brake pulsation and rotor damage. To
avoid expensive brake repairs, evenly
tighten the wheel nuts in the proper
sequence and to the proper torque
specification. See Capacities and
Specifications 0326 for the wheel nut
torque specification.
14. Tighten the wheel nuts firmly in a crisscross sequence, as shown.
15. Lower the jack all the way and remove the jack from under the vehicle.
16. Tighten the wheel nuts firmly with the wheel wrench.
If equipped, when reinstalling the wheel
cover or center cap on the full-size tire,
tighten all six plastic caps hand snug with
the aid of the wheel wrench and tighten
them with the wheel wrench an additional
one-quarter of a turn.
Page 301 of 360

Chevrolet Blazer Owner Manual (GMNA-Localizing-U.S./Canada/Mexico-
16401961) - 2023 - CRC - 5/17/22
300 Vehicle Care
Caution
Wheel covers will not fit on the vehicle's
compact spare. If you try to put a wheel
cover on the compact spare, the cover or
the spare could be damaged.
Storing a Flat or Spare Tire and Tools
{Warning
Storing a jack, a tire, or other equipment
in the passenger compartment of the
vehicle could cause injury. In a sudden
stop or collision, loose equipment could
strike someone. Store all these in the
proper place.
To store the flat or spare tire and tools: 1. Open the liftgate. See Liftgate018.
2. Put back all tools as they were stored in the rear storage compartment and put
the compartment cover back on.
3. Place the tire, lying flat, in the rear storage compartment.
4. Place the loop end of the strap throughthe cargo tie-down. Place the hook end
of the strap through the loop and pull it
until the strap is fastened securely to
the tie-down.5. Route the strap hook through the wheel,as shown.
6. Attach the strap to the other cargo tie-down in the rear of the vehicle.
7. Tighten the strap and secure it using the buckle.
The compact spare is for temporary use
only. Replace the compact spare tire with a
full-size tire as soon as you can.
Page 302 of 360

Chevrolet Blazer Owner Manual (GMNA-Localizing-U.S./Canada/Mexico-
16401961) - 2023 - CRC - 5/17/22
Vehicle Care 301
Compact Spare Tire
{Warning
Driving with more than one compact
spare tire at a time could result in loss of
braking and handling. This could lead to a
crash and you or others could be injured.
Use only one compact spare tire at
a time.
If this vehicle has a compact spare tire, it
was fully inflated when new; however, it
can lose air over time. Check the inflation
pressure regularly. It should be 420 kPa
(60 psi).
Stop as soon as possible and check that the
spare tire is correctly inflated after being
installed on the vehicle. The compact spare
tire is designed for temporary use only. The
vehicle will perform differently with the
spare tire installed and it is recommended
that the vehicle speed be limited to 80 km/h
(50 mph). To conserve the tread of the spare
tire, have the standard tire repaired or
replaced as soon as convenient and return
the spare tire to the storage area. When using a compact spare tire, the AWD
(if equipped), ABS, and Traction Control
systems may engage until the spare tire is
recognized by the vehicle, especially on
slippery roads. Adjust driving to reduce
possible wheel slip.
Caution
When the compact spare is installed, do
not take the vehicle through an
automatic car wash with guide rails. The
compact spare can get caught on the rails
which can damage the tire, wheel, and
other parts of the vehicle.
Do not use the compact spare on other
vehicles.
Do not mix the compact spare tire or wheel
with other wheels or tires. They will not fit.
Keep the spare tire and its wheel together.
Caution
Tire chains will not fit the compact spare.
Using them can damage the vehicle and
the chains. Do not use tire chains on the
compact spare.
Jump Starting
Jump Starting - North America
For more information about the vehicle
battery, see Battery - North America 0264.
If the battery has run down, try to use
another vehicle and some jumper cables to
start your vehicle. Be sure to use the
following steps to do it safely.
{Warning
WARNING: Battery posts, terminals and
related accessories can expose you to
chemicals including lead and lead
compounds, which are known to the
State of California to cause cancer and
birth defects or other reproductive harm.
Wash hands after handling. For more
information go to
www.P65Warnings.ca.gov.
See the warning on the back cover.
Page 305 of 360

Chevrolet Blazer Owner Manual (GMNA-Localizing-U.S./Canada/Mexico-
16401961) - 2023 - CRC - 5/17/22
304 Vehicle Care
Caution (Continued)
hook to any frame, underbody,
or suspension component not specified
below. Do not move vehicles with drive
axle tires on the ground. Damage is not
covered by the vehicle warranty.
Caution
The vehicle may be equipped with an
electric parking brake and/or a
mechanical transmission range select
shifter. In the event of a loss of 12-volt
battery power, the electric parking brake
cannot be released, and the vehicle
cannot be shifted to N (Neutral). Tire
skates or dollies must be used under the
non-rolling tires to prevent damage while
loading/unloading the vehicle. Dragging
the vehicle will cause damage not
covered by the vehicle warranty.
Caution
The vehicle may be equipped with a tow
eye. Improper use of the tow eye may
cause damage to the vehicle and is not
(Continued)
Caution (Continued)
covered by the vehicle warranty.
If equipped, use the tow eye to load the
vehicle onto a flatbed tow truck from a
flat road surface, or to move the vehicle
a very short distance at a walking pace.
The tow eye is not designed for off-road
recovery. The vehicle must be in
N (Neutral) with the electric parking
brake released when using the tow eye.
Contact a professional towing service if the
disabled vehicle must be transported. GM
recommends a flatbed tow truck to
transport a disabled vehicle. Use ramps to
help reduce approach angles, if necessary.
If equipped, a tow eye may be located near
the spare tire or emergency jack. Do not use
the tow eye to pull the vehicle from the
snow, mud, sand, or ditch. Tow eye threads
may have right or left-hand threads. Use
caution when installing or removing the
tow eye.
The vehicle must be in N (Neutral) and the
electric parking brake must be released
when loading the vehicle onto a flatbed tow
truck.
.If the 12-volt battery is dead and/or
electric parking brake is not released, the
vehicle will not move. Try to jump start
the vehicle with a known good 12-volt
battery, shift the car into N (Neutral), and
release the electric parking brake. Refer to
Jump Starting - North America 0301.
.If unsuccessful, the vehicle will not move.
Tire skates or dollies must be used under
the non-rolling tires to prevent vehicle
damage.
Front Attachment Points
Page 307 of 360
Chevrolet Blazer Owner Manual (GMNA-Localizing-U.S./Canada/Mexico-
16401961) - 2023 - CRC - 5/17/22
306 Vehicle Care
3. Start the engine and let it idle for morethan three minutes before driving the
vehicle.
Caution
Too much or too little fluid can damage
the transmission. Be sure that the
transmission fluid is at the proper level
before towing with all four wheels on the
ground.
Caution
Do not tow a vehicle with the front drive
wheels on the ground if one of the front
tires is a compact spare tire. Towing with
two different tire sizes on the front of
the vehicle can cause severe damage to
the transmission.
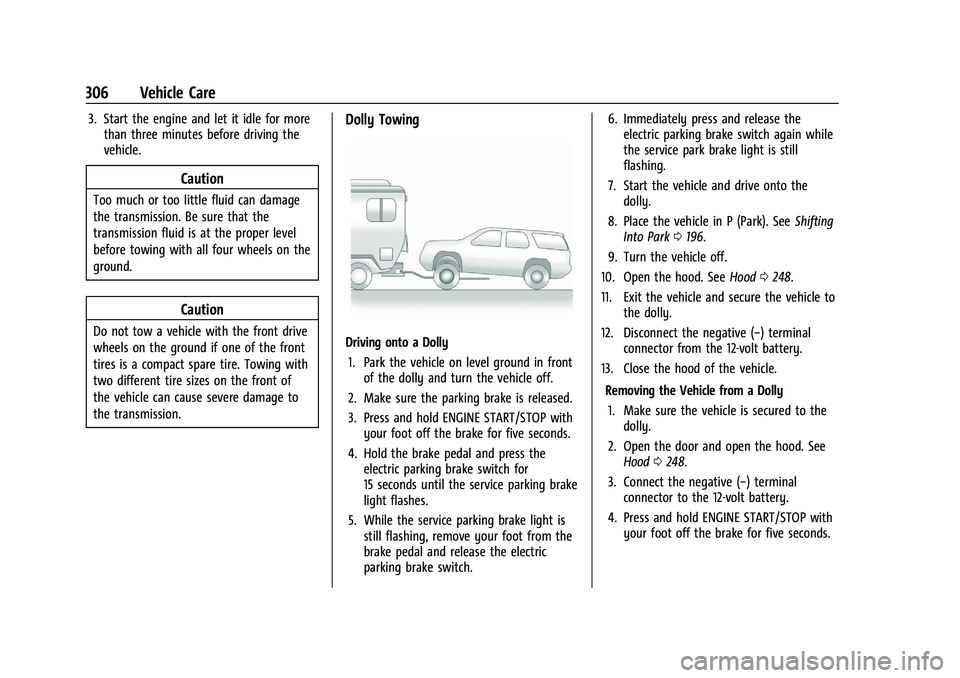
Dolly Towing
Driving onto a Dolly
1. Park the vehicle on level ground in front of the dolly and turn the vehicle off.
2. Make sure the parking brake is released.
3. Press and hold ENGINE START/STOP with your foot off the brake for five seconds.
4. Hold the brake pedal and press the electric parking brake switch for
15 seconds until the service parking brake
light flashes.
5. While the service parking brake light is still flashing, remove your foot from the
brake pedal and release the electric
parking brake switch. 6. Immediately press and release the
electric parking brake switch again while
the service park brake light is still
flashing.
7. Start the vehicle and drive onto the dolly.
8. Place the vehicle in P (Park). See Shifting
Into Park 0196.
9. Turn the vehicle off.
10. Open the hood. See Hood0248.
11. Exit the vehicle and secure the vehicle to the dolly.
12. Disconnect the negative (−) terminal connector from the 12-volt battery.
13. Close the hood of the vehicle.
Removing the Vehicle from a Dolly1. Make sure the vehicle is secured to the dolly.
2. Open the door and open the hood. See Hood 0248.
3. Connect the negative (−) terminal connector to the 12-volt battery.
4. Press and hold ENGINE START/STOP with your foot off the brake for five seconds.
Page 321 of 360

Chevrolet Blazer Owner Manual (GMNA-Localizing-U.S./Canada/Mexico-
16401961) - 2023 - CRC - 5/17/22
320 Service and Maintenance
Tire Inspection
.Tire pressure, tread depth, and wear
.Rotation, if applicable
.Alignment check, optional
.Reset tire pressure monitor
.Check tire sealant expiration date,
if equipped
.Check spare tire, if equipped
Brakes
.Check brake system
Visible and Functional Inspections
.Seat belt components
.Exhaust system
.Accelerator pedal
.Passenger compartment air filter,
if equipped
.Engine air filter
.Hoses
.Belts
.Shocks and struts
.Steering components
.Axle boots or driveshaft and u-joints
.Compartment lift struts, if equipped
.Floor mats secured, no interference with
pedals
.Horn
.Ignition lock, if equipped
.Starter switch
.Evaporative control system
Lubricate
.Chassis components
Special Application Services
.Severe Commercial Use Vehicles Only:
Lubricate chassis components every oil
change.
.Have underbody flushing service
performed. See "Underbody Maintenance"
in Exterior Care 0307.