2023 ALFA ROMEO GIULIA height
[x] Cancel search: heightPage 33 of 248
31
MEMORY POSITION RECALL
To recall a previously set position, push and
release the memory profile button assigned to
the desired positions.
NOTE:
Memory position recall can be done for approxi-
mately three minutes after the doors have been
opened, and for approximately one minute after
the ignition is placed in the OFF position.
SEATS
Seats are a part of the Occupant Restraint system
of the vehicle.
SPARCO RACING SEATS
(QUADRIFOGLIO VEHICLES) — IF EQUIPPED
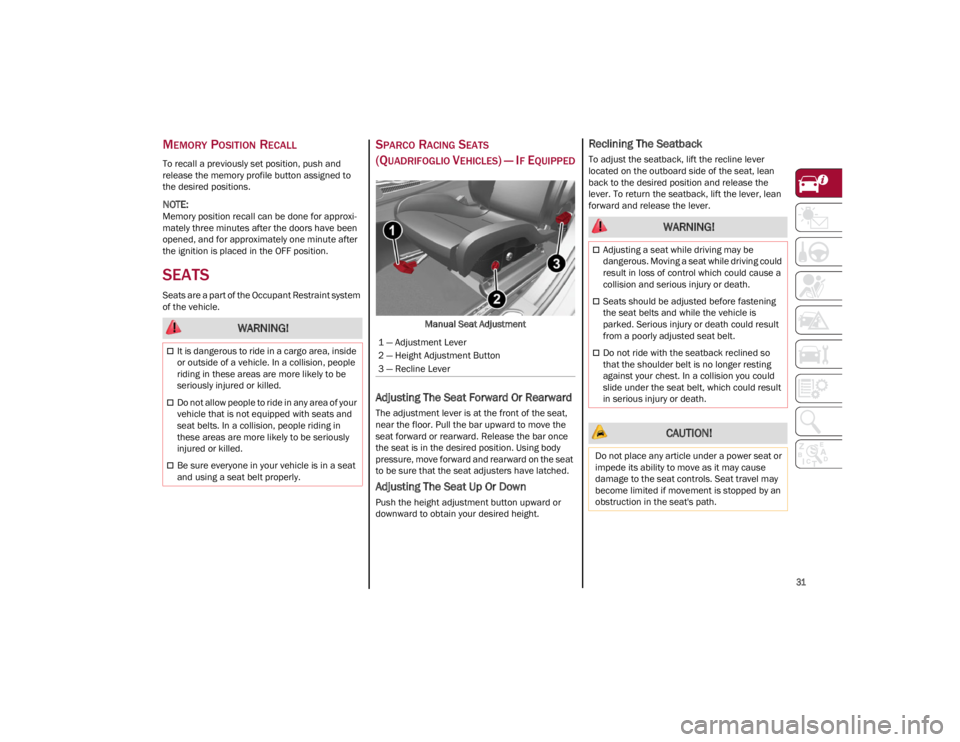
Manual Seat Adjustment
Adjusting The Seat Forward Or Rearward
The adjustment lever is at the front of the seat,
near the floor. Pull the bar upward to move the
seat forward or rearward. Release the bar once
the seat is in the desired position. Using body
pressure, move forward and rearward on the seat
to be sure that the seat adjusters have latched.
Adjusting The Seat Up Or Down
Push the height adjustment button upward or
downward to obtain your desired height.
Reclining The Seatback
To adjust the seatback, lift the recline lever
located on the outboard side of the seat, lean
back to the desired position and release the
lever. To return the seatback, lift the lever, lean
forward and release the lever.
WARNING!
It is dangerous to ride in a cargo area, inside
or outside of a vehicle. In a collision, people
riding in these areas are more likely to be
seriously injured or killed.
Do not allow people to ride in any area of your
vehicle that is not equipped with seats and
seat belts. In a collision, people riding in
these areas are more likely to be seriously
injured or killed.
Be sure everyone in your vehicle is in a seat
and using a seat belt properly.
1 — Adjustment Lever
2 — Height Adjustment Button
3 — Recline Lever
WARNING!
Adjusting a seat while driving may be
dangerous. Moving a seat while driving could
result in loss of control which could cause a
collision and serious injury or death.
Seats should be adjusted before fastening
the seat belts and while the vehicle is
parked. Serious injury or death could result
from a poorly adjusted seat belt.
Do not ride with the seatback reclined so
that the shoulder belt is no longer resting
against your chest. In a collision you could
slide under the seat belt, which could result
in serious injury or death.
CAUTION!
Do not place any article under a power seat or
impede its ability to move as it may cause
damage to the seat controls. Seat travel may
become limited if movement is stopped by an
obstruction in the seat's path.
23_GA_OM_EN_USC_t.book Page 31
Page 36 of 248
GETTING TO KNOW YOUR VEHICLE
34
POWER ADJUSTMENT (FRONT SEATS)
NOTE:
The seat layout may vary according to the vehicle
options.
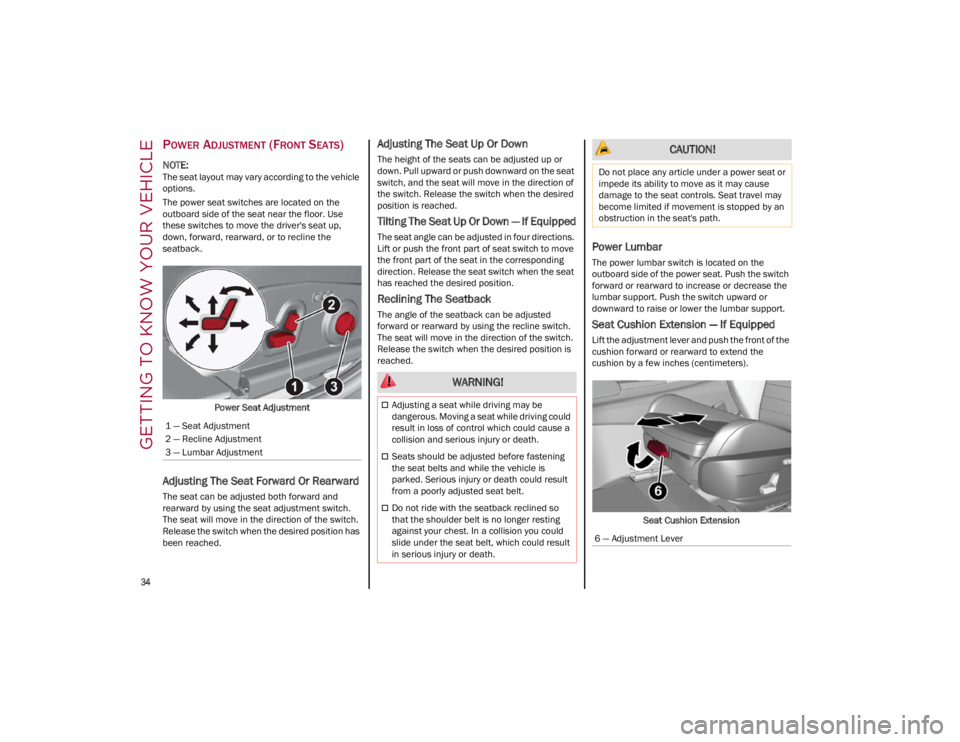
The power seat switches are located on the
outboard side of the seat near the floor. Use
these switches to move the driver's seat up,
down, forward, rearward, or to recline the
seatback.Power Seat Adjustment
Adjusting The Seat Forward Or Rearward
The seat can be adjusted both forward and
rearward by using the seat adjustment switch.
The seat will move in the direction of the switch.
Release the switch when the desired position has
been reached.
Adjusting The Seat Up Or Down
The height of the seats can be adjusted up or
down. Pull upward or push downward on the seat
switch, and the seat will move in the direction of
the switch. Release the switch when the desired
position is reached.
Tilting The Seat Up Or Down — If Equipped
The seat angle can be adjusted in four directions.
Lift or push the front part of seat switch to move
the front part of the seat in the corresponding
direction. Release the seat switch when the seat
has reached the desired position.
Reclining The Seatback
The angle of the seatback can be adjusted
forward or rearward by using the recline switch.
The seat will move in the direction of the switch.
Release the switch when the desired position is
reached.
Power Lumbar
The power lumbar switch is located on the
outboard side of the power seat. Push the switch
forward or rearward to increase or decrease the
lumbar support. Push the switch upward or
downward to raise or lower the lumbar support.
Seat Cushion Extension — If Equipped
Lift the adjustment lever and push the front of the
cushion forward or rearward to extend the
cushion by a few inches (centimeters).Seat Cushion Extension
1 — Seat Adjustment
2 — Recline Adjustment
3 — Lumbar Adjustment
WARNING!
Adjusting a seat while driving may be
dangerous. Moving a seat while driving could
result in loss of control which could cause a
collision and serious injury or death.
Seats should be adjusted before fastening
the seat belts and while the vehicle is
parked. Serious injury or death could result
from a poorly adjusted seat belt.
Do not ride with the seatback reclined so
that the shoulder belt is no longer resting
against your chest. In a collision you could
slide under the seat belt, which could result
in serious injury or death.
CAUTION!
Do not place any article under a power seat or
impede its ability to move as it may cause
damage to the seat controls. Seat travel may
become limited if movement is stopped by an
obstruction in the seat's path.
6 — Adjustment Lever
23_GA_OM_EN_USC_t.book Page 34
Page 38 of 248

GETTING TO KNOW YOUR VEHICLE
36
Rear Heated Seats — If Equipped
If equipped with rear heated seats, the
controls can be found on the rear of the
center console and will function the
same as the front heated seat controls.Rear Heated Seat Buttons
NOTE:
To preserve the battery charge, this function
cannot be activated when the engine is off.
HEAD RESTRAINTS
Head restraints are designed to reduce the risk of
injury by restricting head movement in the event
of a rear impact. Head restraints should be
adjusted so that the top of the head restraint is
located above the top of your ear.
Sparco Racing Seat Head Restraints
(Quadrifoglio Vehicles) — If Equipped
Head restraints on Sparco Racing Seats (front
seats) are non-adjustable and non-removable.
The non-adjustable head restraints consist of a
trimmed foam covering over the upper structure
of the seatbacks and are intended to help protect
you and the passenger from neck injury.
Adjust the seatbacks to their upright, on-road
positions so that the head restraint is positioned
as close as possible to the back of your head.
Front Head Restraints
The front head restraints may be height- adjustable.
To raise the head restraint, pull up on the head
restraint until it clicks into place.
To lower the head restraint, push in the
adjustment button and lower the head restraint
to the desired height while holding the button.
Then, release the adjustment button.
NOTE:
To allow maximum visibility for the driver, if the
head restraints are not in use, lower the head
restraint all the way.
WARNING!
A loose head restraint thrown forward in a
collision or hard stop could cause serious
injury or death to occupants of the vehicle.
Always securely stow removed head
restraints in a location outside the occupant
compartment.
ALL the head restraints MUST be reinstalled
in the vehicle to properly protect the
occupants. Follow the preceding reinstal -
lation instructions prior to operating the
vehicle or occupying a seat.
WARNING!
All occupants, including the driver, should
not operate a vehicle or sit in a vehicle’s seat
until the head restraints are placed in their
proper positions in order to minimize the risk
of neck injury in the event of a crash.
Head restraints should never be adjusted
while the vehicle is in motion. Driving a
vehicle with the head restraints improperly
adjusted or removed could cause serious
injury or death in the event of a collision.
23_GA_OM_EN_USC_t.book Page 36
Page 39 of 248

37
Rear Head Restraint Adjustment
The height of the outboard head restraints can be
adjusted. The head restraint of the center seat
can only be removed. The height cannot be
adjusted.
For upward adjustment, pull up on the head
restraint until it clicks into place.
For downward adjustment, push in the
adjustment button and lower the head restraint
while holding the button to the desired height.Rear Head Restraint
NOTE:
To allow maximum visibility for the driver, if the
head restraints are not in use, lower the head
restraint all the way.
Head Restraint Removal
To remove adjustable head restraints, proceed as
follows:
1. Raise the head restraints to their maximum
height.
2. Push the adjustment button and the release button at the side of the two supports.
3. Remove the head restraints by pulling them upwards. To reinstall the head restraints, proceed as
follows:
1. Hold down both the adjustment button and
release button while placing the head
restraint post into the holes.
2. Then, reposition the head restraint to the appropriate height for the passengers.MIRRORS
AUTOMATIC DIMMING MIRROR
The rearview mirror can be adjusted up, down,
left, and right. The mirror should be adjusted to
center on the view through the rear window.
This mirror automatically adjusts for headlight
glare from vehicles behind you.
WARNING!
All occupants, including the driver, should
not operate a vehicle or sit in a vehicle’s seat
until the head restraints are placed in their
proper positions in order to minimize the risk
of neck injury in the event of a crash.
Head restraints should never be adjusted
while the vehicle is in motion. Driving a
vehicle with the head restraints improperly
adjusted or removed could cause serious
injury or death in the event of a collision.
1 — Adjustment Button
2 — Release Button
WARNING!
A loose head restraint thrown forward in a
collision or hard stop could cause serious
injury or death to occupants of the vehicle.
Always securely stow removed head
restraints in a location outside the occupant
compartment.
ALL the head restraints MUST be reinstalled
in the vehicle to properly protect the
occupants. Follow the preceding reinstal -
lation instructions prior to operating the
vehicle or occupying a seat.
23_GA_OM_EN_USC_t.book Page 37
Page 160 of 248

SAFETY
158
To read data recorded by an EDR, special
equipment is required, and access to the vehicle
or the EDR is needed. In addition to the vehicle
manufacturer, other parties, such as law
enforcement, that have the special equipment,
can read the information if they have access to
the vehicle or the EDR.
CHILD RESTRAINTS
Everyone in your vehicle needs to be buckled up
at all times, including babies and children. Every
state in the United States, and every Canadian
province, requires that small children ride in
proper restraint systems. This is the law, and you
can be prosecuted for ignoring it.
Children 12 years or younger should ride properly
buckled up in a rear seat, if available. According
to crash statistics, children are safer when
properly restrained in the rear seats rather than
in the front.
There are different sizes and types of restraints
for children from newborn size to the child almost
large enough for an adult safety belt. Always
check the child seat Owner’s Manual to make
sure you have the correct seat for your child. Carefully read and follow all the instructions and
warnings in the child restraint Owner’s Manual
and on all the labels attached to the child
restraint.
Before buying any restraint system, make sure
that it has a label certifying that it meets all
applicable Safety Standards. You should also
make sure that you can install it in the vehicle
where you will use it.
NOTE:
For additional information, refer to
http://
www.nhtsa.gov/parents-and-caregivers
or call:
1–888–327–4236
Canadian residents should refer to Transport
Canada’s website for additional information:
http://www.tc.gc.ca/en/services/road/
child-car-seat-safety.html
Summary Of Recommendations For Restraining Children In Vehicles
WARNING!
In a collision, an unrestrained child can
become a projectile inside the vehicle. The
force required to hold even an infant on your
lap could become so great that you could not
hold the child, no matter how strong you are.
The child and others could be badly injured or
killed. Any child riding in your vehicle should
be in a proper restraint for the child’s size.
Child Size, Height, Weight Or AgeRecommended Type Of Child Restraint
Infants and Toddlers Children who are two years old or younger and
who have not reached the height or weight limits
of their child restraint Either an Infant Carrier or a Convertible Child
Restraint, facing rearward in a rear seat of the
vehicle
Small Children Children who are at least two years old or who
have outgrown the height or weight limit of their
rear-facing child restraint Forward-Facing Child Restraint with a five-point
Harness, facing forward in a rear seat of the
vehicle
Larger Children Children who have outgrown their forward-facing
child restraint, but are too small to properly fit
the vehicle’s seat belt Belt Positioning Booster Seat and the vehicle
seat belt, seated in a rear seat of the vehicle
Children Too Large for Child Restraints Children 12 years old or younger, who have
outgrown the height or weight limit of their
booster seat Vehicle Seat Belt, seated in a rear seat of the
vehicle
23_GA_OM_EN_USC_t.book Page 158
Page 161 of 248
159
(Continued)
Infant And Child Restraints
Safety experts recommend that children ride
rear-facing in the vehicle until they are two years
old or until they reach either the height or weight
limit of their rear-facing child restraint. Two types
of child restraints can be used rear-facing: infant
carriers and convertible child seats.
The infant carrier is only used rear-facing in the
vehicle. It is recommended for children from birth
until they reach the weight or height limit of the
infant carrier. Convertible child seats can be used
either rear-facing or forward-facing in the vehicle.
Convertible child seats often have a higher weight
limit in the rear-facing direction than infant
carriers do, so they can be used rear-facing by
children who have outgrown their infant carrier
but are still less than at least two years old.
Children should remain rear-facing until they
reach the highest weight or height allowed by
their convertible child seat.
Older Children And Child Restraints
Children who are two years old or who have
outgrown their rear-facing convertible child seat
can ride forward-facing in the vehicle.
Forward-facing child seats and convertible child
seats used in the forward-facing direction are for
children who are over two years old or who have
outgrown the rear-facing weight or height limit of
their rear-facing convertible child seat. Children
should remain in a forward-facing child seat with
a harness for as long as possible, up to the
highest weight or height allowed by the child seat.
All children whose weight or height is above the
forward-facing limit for the child seat should use
a belt-positioning booster seat until the vehicle’s
seat belts fit properly. If the child cannot sit with
knees bent over the vehicle’s seat cushion while
the child’s back is against the seatback, they
should use a belt-positioning booster seat. The
child and belt-positioning booster seat are held in
the vehicle by the seat belt.
Children Too Large For Booster Seats
Children who are large enough to wear the
shoulder belt comfortably, and whose legs are
long enough to bend over the front of the seat
when their back is against the seatback, should
use the seat belt in a rear seat. Use this simple
5-step test to decide whether the child can use
the vehicle’s seat belt alone:
1. Can the child sit all the way back against the back of the vehicle seat?
2. Do the child’s knees bend comfortably over the front of the vehicle seat while the child is
still sitting all the way back?
WARNING!
Never place a rear-facing child restraint in
front of an air bag. A deploying passenger
front air bag can cause death or serious
injury to a child 12 years or younger,
including a child in a rear-facing child
restraint.
Never install a rear-facing child restraint in
the front seat of a vehicle. Only use a
rear-facing child restraint in the rear seat. If
the vehicle does not have a rear seat, do not
transport a rear-facing child restraint in that
vehicle.
WARNING!
Improper installation can lead to failure of an
infant or child restraint. It could come loose
in a collision. The child could be badly injured
or killed. Follow the child restraint
manufacturer’s directions exactly when
installing an infant or child restraint.
After a child restraint is installed in the
vehicle, do not move the vehicle seat forward
or rearward because it can loosen the child
restraint attachments. Remove the child
restraint before adjusting the vehicle seat
position. When the vehicle seat has been
adjusted, reinstall the child restraint.
When your child restraint is not in use,
secure it in the vehicle with the seat belt or
LATCH anchorages, or remove it from the
vehicle. Do not leave it loose in the vehicle. In
a sudden stop or accident, it could strike the
occupants or seatbacks and cause serious
personal injury.
WARNING!
23_GA_OM_EN_USC_t.book Page 159
Page 181 of 248
179
(Continued)
MANUAL PARK RELEASE
See an authorized dealer to disengage the
manual park release lever.
TOWING A DISABLED
VEHICLE
This section describes procedures for towing a
disabled vehicle using a commercial towing
service.The operators of the assistance vehicle must be
informed with regard to the vehicle's minimum
height from ground in order to avoid contact
between the ends of the fascia/bumper with the
equipment of the breakdown truck.
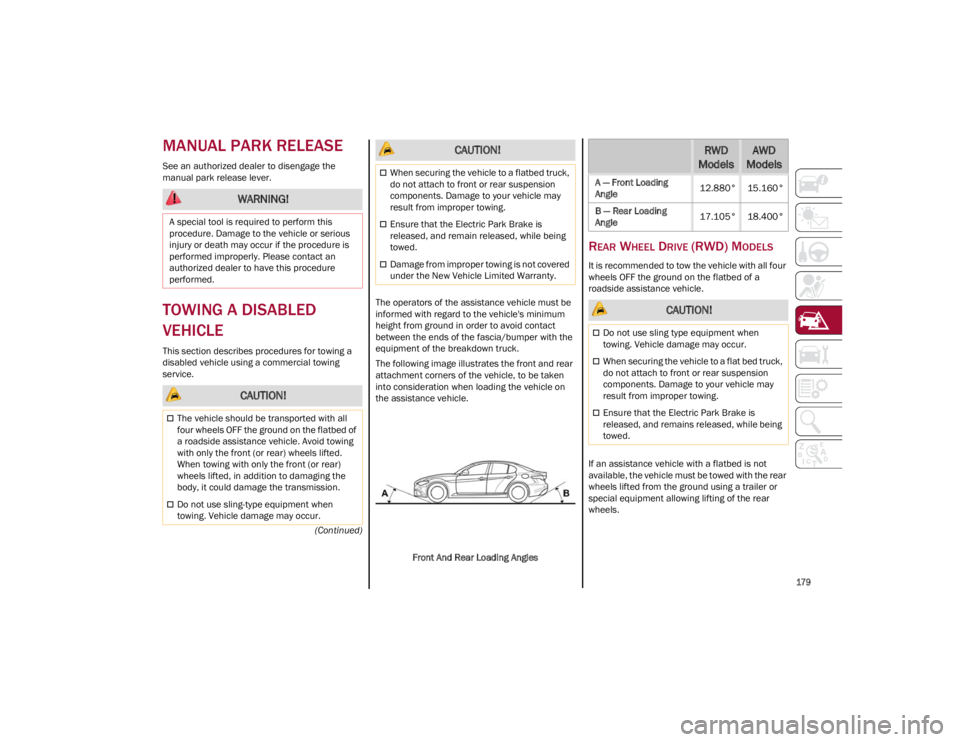
The following image illustrates the front and rear
attachment corners of the vehicle, to be taken
into consideration when loading the vehicle on
the assistance vehicle.
Front And Rear Loading Angles
REAR WHEEL DRIVE (RWD) MODELS
It is recommended to tow the vehicle with all four
wheels OFF the ground on the flatbed of a
roadside assistance vehicle.
If an assistance vehicle with a flatbed is not
available, the vehicle must be towed with the rear
wheels lifted from the ground using a trailer or
special equipment allowing lifting of the rear
wheels.
WARNING!
A special tool is required to perform this
procedure. Damage to the vehicle or serious
injury or death may occur if the procedure is
performed improperly. Please contact an
authorized dealer to have this procedure
performed.
CAUTION!
The vehicle should be transported with all
four wheels OFF the ground on the flatbed of
a roadside assistance vehicle. Avoid towing
with only the front (or rear) wheels lifted.
When towing with only the front (or rear)
wheels lifted, in addition to damaging the
body, it could damage the transmission.
Do not use sling-type equipment when
towing. Vehicle damage may occur.
When securing the vehicle to a flatbed truck,
do not attach to front or rear suspension
components. Damage to your vehicle may
result from improper towing.
Ensure that the Electric Park Brake is
released, and remain released, while being
towed.
Damage from improper towing is not covered
under the New Vehicle Limited Warranty.
CAUTION!RWD
ModelsAWD
Models
A — Front Loading
Angle 12.880° 15.160°
B — Rear Loading
Angle 17.105° 18.400°
CAUTION!
Do not use sling type equipment when
towing. Vehicle damage may occur.
When securing the vehicle to a flat bed truck,
do not attach to front or rear suspension
components. Damage to your vehicle may
result from improper towing.
Ensure that the Electric Park Brake is
released, and remains released, while being
towed.
23_GA_OM_EN_USC_t.book Page 179
Page 209 of 248
207
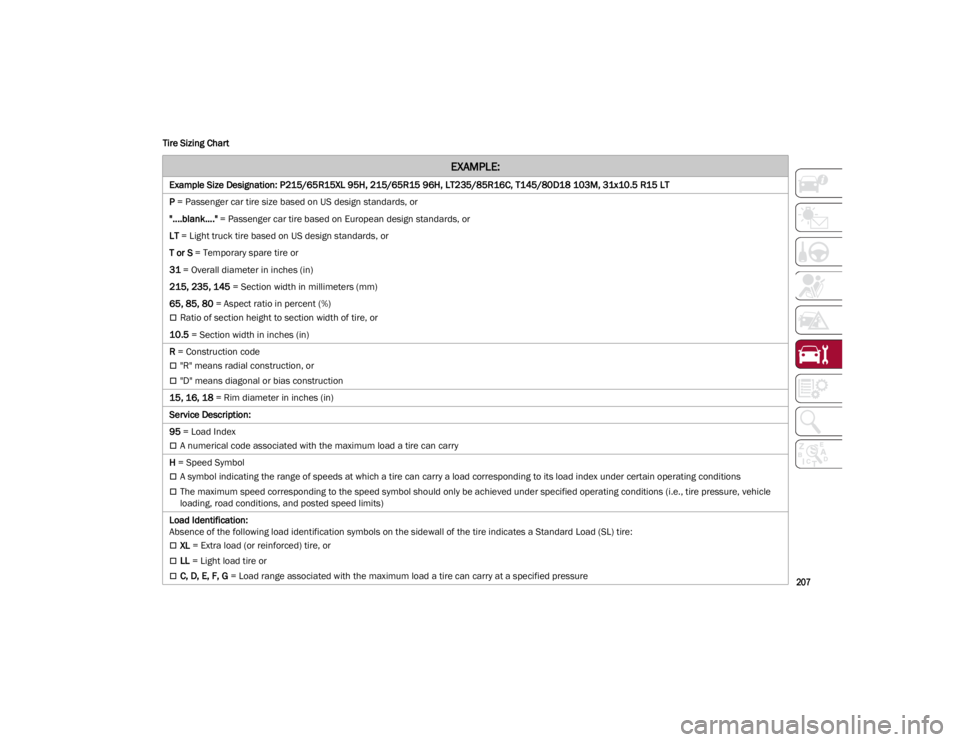
Tire Sizing Chart
EXAMPLE:
Example Size Designation: P215/65R15XL 95H, 215/65R15 96H, LT235/85R16C, T145/80D18 103M, 31x10.5 R15 LT
P
= Passenger car tire size based on US design standards, or
"....blank...." = Passenger car tire based on European design standards, or
LT = Light truck tire based on US design standards, or
T or S = Temporary spare tire or
31 = Overall diameter in inches (in)
215, 235, 145 = Section width in millimeters (mm)
65, 85, 80 = Aspect ratio in percent (%)
Ratio of section height to section width of tire, or
10.5 = Section width in inches (in)
R = Construction code
"R" means radial construction, or
"D" means diagonal or bias construction
15, 16, 18 = Rim diameter in inches (in)
Service Description:
95 = Load Index
A numerical code associated with the maximum load a tire can carry
H = Speed Symbol
A symbol indicating the range of speeds at which a tire can carry a load corresponding to its load index under certain operating conditions
The maximum speed corresponding to the speed symbol should only be achieved under specified operating conditions (i.e., tire pressure, vehicle
loading, road conditions, and posted speed limits)
Load Identification:
Absence of the following load identification symbols on the sidewall of the tire indicates a Standard Load (SL) tire:
XL = Extra load (or reinforced) tire, or
LL = Light load tire or
C, D, E, F, G = Load range associated with the maximum load a tire can carry at a specified pressure
23_GA_OM_EN_USC_t.book Page 207