2023 ALFA ROMEO GIULIA run flat
[x] Cancel search: run flatPage 170 of 248
SAFETY
168
PERIODIC SAFETY CHECKS YOU SHOULD
M
AKE OUTSIDE THE VEHICLE
Tires
Examine tires for excessive tread wear and
uneven wear patterns. Check for stones, nails,
glass, or other objects lodged in the tread or
sidewall. Inspect the tread for cuts and cracks.
Inspect sidewalls for cuts, cracks, and bulges.
Check the wheel nuts for tightness. Check the
tires (including spare) for proper cold inflation
pressure.
Lights
Have someone observe the operation of brake
lights and exterior lights while you work the
controls. Check turn signal and high beam
indicator lights on the instrument panel.
Door Latches
Check for proper closing, latching, and locking.
Fluid Leaks
Check area under the vehicle after overnight
parking for fuel, coolant, oil, or other fluid leaks.
Also, if gasoline fumes are detected or if fuel or
brake fluid leaks are suspected the cause should
be located and corrected immediately.
EXHAUST GAS
The best protection against carbon monoxide
entry into the vehicle body is a properly
maintained engine exhaust system.
Whenever a change is noticed in the sound of the
exhaust system, when exhaust fumes can be
detected inside the vehicle, or when the
underside or rear of the vehicle is damaged, have
an authorized dealer inspect the complete
exhaust system and adjacent body areas for
broken, damaged, deteriorated, or mispositioned
parts. Open seams or loose connections could permit exhaust fumes to seep into the passenger
compartment. In addition, inspect the exhaust
system each time the vehicle is raised for
lubrication or oil change. Replace as required.
CARBON MONOXIDE WARNINGS
It is recommended to only use mild soap and
water to clean your floor mats. After cleaning,
always check your floor mat has been
properly installed and is secured to your
vehicle using the floor mat fasteners by
lightly pulling mat.
WARNING!
WARNING!
Exhaust gases can injure or kill. They contain
carbon monoxide (CO), which is colorless and
odorless. Breathing it can make you
unconscious and can eventually poison you. To
avoid breathing (CO), follow these safety tips:
Do not run the engine in a closed garage or in
confined areas any longer than needed to
move your vehicle in or out of the area.
If you are required to drive with the trunk/
liftgate/rear doors open, make sure that all
windows are closed and the climate control
BLOWER switch is set at high speed. DO NOT
use the recirculation mode.
If it is necessary to sit in a parked vehicle with
the engine running, adjust your heating or
cooling controls to force outside air into the
vehicle. Set the blower at high speed.
WARNING!
Carbon monoxide (CO) in exhaust gases is
deadly. Follow the precautions below to
prevent carbon monoxide poisoning:
Do not inhale exhaust gases. They contain
carbon monoxide, a colorless and odorless
gas, which can kill. Never run the engine in a
closed area, such as a garage, and never sit
in a parked vehicle with the engine running
for an extended period. If the vehicle is
stopped in an open area with the engine
running for more than a short period, adjust
the ventilation system to force fresh, outside
air into the vehicle.
Guard against carbon monoxide with proper
maintenance. Have the exhaust system
inspected every time the vehicle is raised.
Have any abnormal conditions repaired
promptly. Until repaired, drive with all side
windows fully open.
When exiting the vehicle, always make sure
the ignition is in the OFF position, remove the
key fob from the vehicle, and lock your
vehicle.
23_GA_OM_EN_USC_t.book Page 168
Page 171 of 248
169
Have a flat tire or a burnt-out bulb?
At times, a problem such as these may interfere
with your driving experience.
The section on emergencies can help you to deal
with critical situations independently.
HAZARD WARNING
FLASHERS
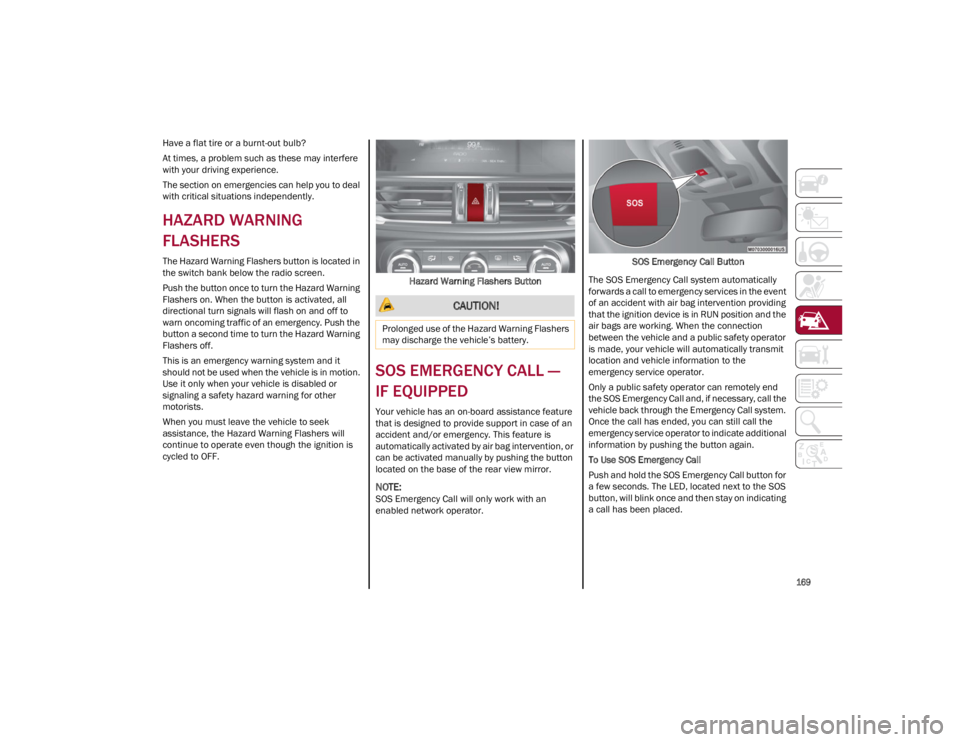
The Hazard Warning Flashers button is located in
the switch bank below the radio screen.
Push the button once to turn the Hazard Warning
Flashers on. When the button is activated, all
directional turn signals will flash on and off to
warn oncoming traffic of an emergency. Push the
button a second time to turn the Hazard Warning
Flashers off.
This is an emergency warning system and it
should not be used when the vehicle is in motion.
Use it only when your vehicle is disabled or
signaling a safety hazard warning for other
motorists.
When you must leave the vehicle to seek
assistance, the Hazard Warning Flashers will
continue to operate even though the ignition is
cycled to OFF.Hazard Warning Flashers Button
SOS EMERGENCY CALL —
IF EQUIPPED
Your vehicle has an on-board assistance feature
that is designed to provide support in case of an
accident and/or emergency. This feature is
automatically activated by air bag intervention, or
can be activated manually by pushing the button
located on the base of the rear view mirror.
NOTE:
SOS Emergency Call will only work with an
enabled network operator. SOS Emergency Call Button
The SOS Emergency Call system automatically
forwards a call to emergency services in the event
of an accident with air bag intervention providing
that the ignition device is in RUN position and the
air bags are working. When the connection
between the vehicle and a public safety operator
is made, your vehicle will automatically transmit
location and vehicle information to the
emergency service operator.
Only a public safety operator can remotely end
the SOS Emergency Call and, if necessary, call the
vehicle back through the Emergency Call system.
Once the call has ended, you can still call the
emergency service operator to indicate additional
information by pushing the button again.
To Use SOS Emergency Call
Push and hold the SOS Emergency Call button for
a few seconds. The LED, located next to the SOS
button, will blink once and then stay on indicating
a call has been placed.
CAUTION!
Prolonged use of the Hazard Warning Flashers
may discharge the vehicle’s battery.
23_GA_OM_EN_USC_t.book Page 169
Page 174 of 248
IN CASE OF EMERGENCY
172
(Continued)
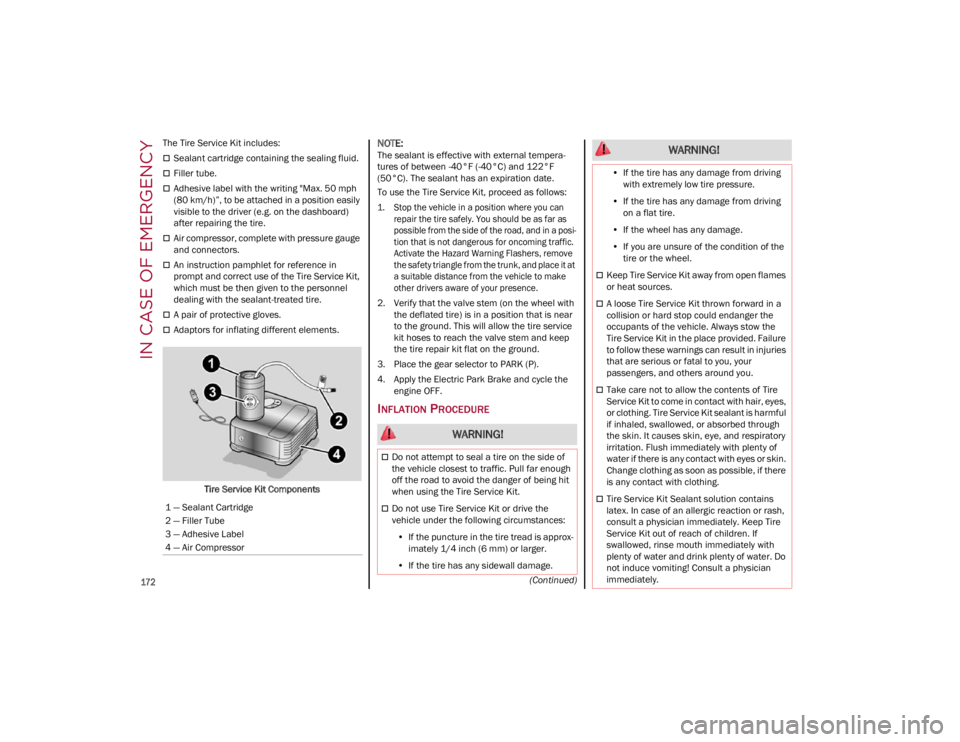
The Tire Service Kit includes:
Sealant cartridge containing the sealing fluid.
Filler tube.
Adhesive label with the writing "Max. 50 mph
(80 km/h)”, to be attached in a position easily
visible to the driver (e.g. on the dashboard)
after repairing the tire.
Air compressor, complete with pressure gauge
and connectors.
An instruction pamphlet for reference in
prompt and correct use of the Tire Service Kit,
which must be then given to the personnel
dealing with the sealant-treated tire.
A pair of protective gloves.
Adaptors for inflating different elements.
Tire Service Kit Components
NOTE:
The sealant is effective with external tempera -
tures of between -40°F (-40°C) and 122°F
(50°C). The sealant has an expiration date.
To use the Tire Service Kit, proceed as follows:
1. Stop the vehicle in a position where you can repair the tire safely. You should be as far as
possible from the side of the road, and in a posi -
tion that is not dangerous for oncoming traffic.
Activate the Hazard Warning Flashers, remove
the safety triangle from the trunk, and place it at
a suitable distance from the vehicle to make
other drivers aware of your presence.
2. Verify that the valve stem (on the wheel with the deflated tire) is in a position that is near
to the ground. This will allow the tire service
kit hoses to reach the valve stem and keep
the tire repair kit flat on the ground.
3. Place the gear selector to PARK (P).
4. Apply the Electric Park Brake and cycle the engine OFF.
INFLATION PROCEDURE
1 — Sealant Cartridge
2 — Filler Tube
3 — Adhesive Label
4 — Air Compressor
WARNING!
Do not attempt to seal a tire on the side of
the vehicle closest to traffic. Pull far enough
off the road to avoid the danger of being hit
when using the Tire Service Kit.
Do not use Tire Service Kit or drive the
vehicle under the following circumstances:
• If the puncture in the tire tread is approx-
imately 1/4 inch (6 mm) or larger.
• If the tire has any sidewall damage.
•If the tire has any damage from driving
with extremely low tire pressure.
• If the tire has any damage from driving
on a flat tire.
• If the wheel has any damage.
• If you are unsure of the condition of the
tire or the wheel.
Keep Tire Service Kit away from open flames
or heat sources.
A loose Tire Service Kit thrown forward in a
collision or hard stop could endanger the
occupants of the vehicle. Always stow the
Tire Service Kit in the place provided. Failure
to follow these warnings can result in injuries
that are serious or fatal to you, your
passengers, and others around you.
Take care not to allow the contents of Tire
Service Kit to come in contact with hair, eyes,
or clothing. Tire Service Kit sealant is harmful
if inhaled, swallowed, or absorbed through
the skin. It causes skin, eye, and respiratory
irritation. Flush immediately with plenty of
water if there is any contact with eyes or skin.
Change clothing as soon as possible, if there
is any contact with clothing.
Tire Service Kit Sealant solution contains
latex. In case of an allergic reaction or rash,
consult a physician immediately. Keep Tire
Service Kit out of reach of children. If
swallowed, rinse mouth immediately with
plenty of water and drink plenty of water. Do
not induce vomiting! Consult a physician
immediately.
WARNING!
23_GA_OM_EN_USC_t.book Page 172
Page 175 of 248
173
To use your Tire Service Kit, proceed as follows:
1. Apply the Electric Park Brake.
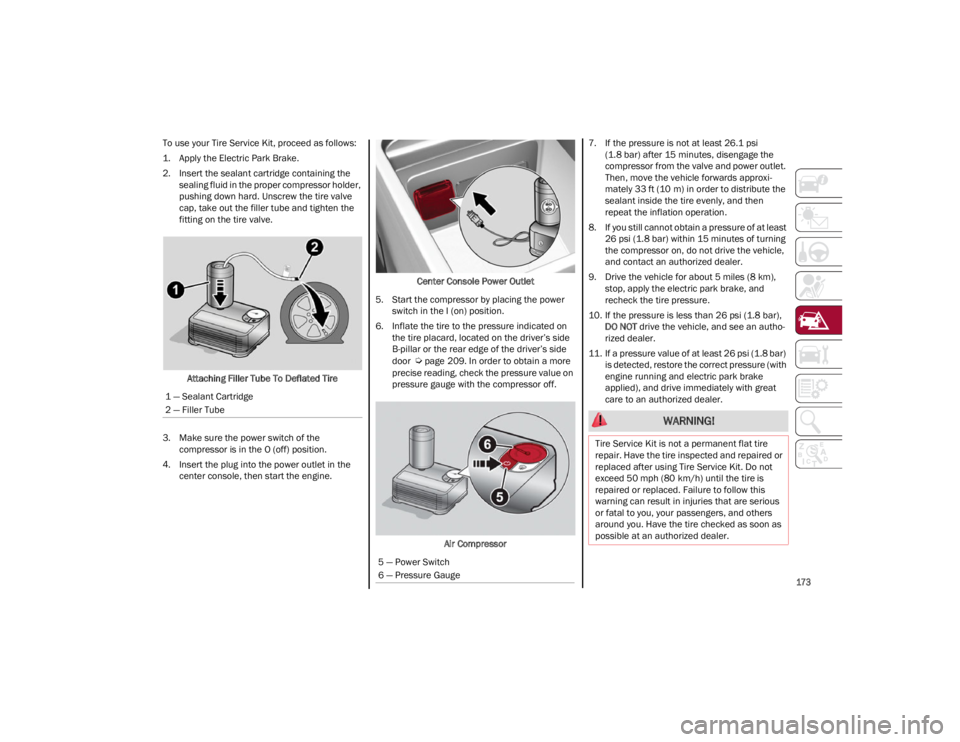
2. Insert the sealant cartridge containing the sealing fluid in the proper compressor holder,
pushing down hard. Unscrew the tire valve
cap, take out the filler tube and tighten the
fitting on the tire valve.
Attaching Filler Tube To Deflated Tire
3. Make sure the power switch of the compressor is in the O (off) position.
4. Insert the plug into the power outlet in the center console, then start the engine. Center Console Power Outlet
5. Start the compressor by placing the power switch in the I (on) position.
6. Inflate the tire to the pressure indicated on the tire placard, located on the driver’s side
B-pillar or the rear edge of the driver’s side
door
Ú
page 209. In order to obtain a more
precise reading, check the pressure value on
pressure gauge with the compressor off.
Air Compressor 7. If the pressure is not at least 26.1 psi
(1.8 bar) after 15 minutes, disengage the
compressor from the valve and power outlet.
Then, move the vehicle forwards approxi -
mately 33 ft (10 m) in order to distribute the sealant inside the tire evenly, and then
repeat the inflation operation.
8. If you still cannot obtain a pressure of at least 26 psi (1.8 bar) within 15 minutes of turning
the compressor on, do not drive the vehicle,
and contact an authorized dealer.
9. Drive the vehicle for about 5 miles (8 km), stop, apply the electric park brake, and
recheck the tire pressure.
10. If the pressure is less than 26 psi (1.8 bar), DO NOT drive the vehicle, and see an autho -
rized dealer.
11. If a pressure value of at least 26 psi (1.8 bar) is detected, restore the correct pressure (with
engine running and electric park brake
applied), and drive immediately with great
care to an authorized dealer.
1 — Sealant Cartridge
2 — Filler Tube
5 — Power Switch
6 — Pressure Gauge
WARNING!
Tire Service Kit is not a permanent flat tire
repair. Have the tire inspected and repaired or
replaced after using Tire Service Kit. Do not
exceed 50 mph (80 km/h) until the tire is
repaired or replaced. Failure to follow this
warning can result in injuries that are serious
or fatal to you, your passengers, and others
around you. Have the tire checked as soon as
possible at an authorized dealer.
23_GA_OM_EN_USC_t.book Page 173
Page 176 of 248
IN CASE OF EMERGENCY
174
12. Apply the adhesive label from the sealant bottle where it can be easily seen by the
driver as a reminder that the tire has been
treated with a Tire Service Kit, as well as not
to exceed the speed restriction for the
treated tire.
CHECKING AND RESTORING TIRE
P
RESSURE
The compressor can also be used to check and, if
necessary, restore the tire pressure.
Proceed as follows:
1. Release the quick connector and connect it
directly to the valve of the tire to be inflated.
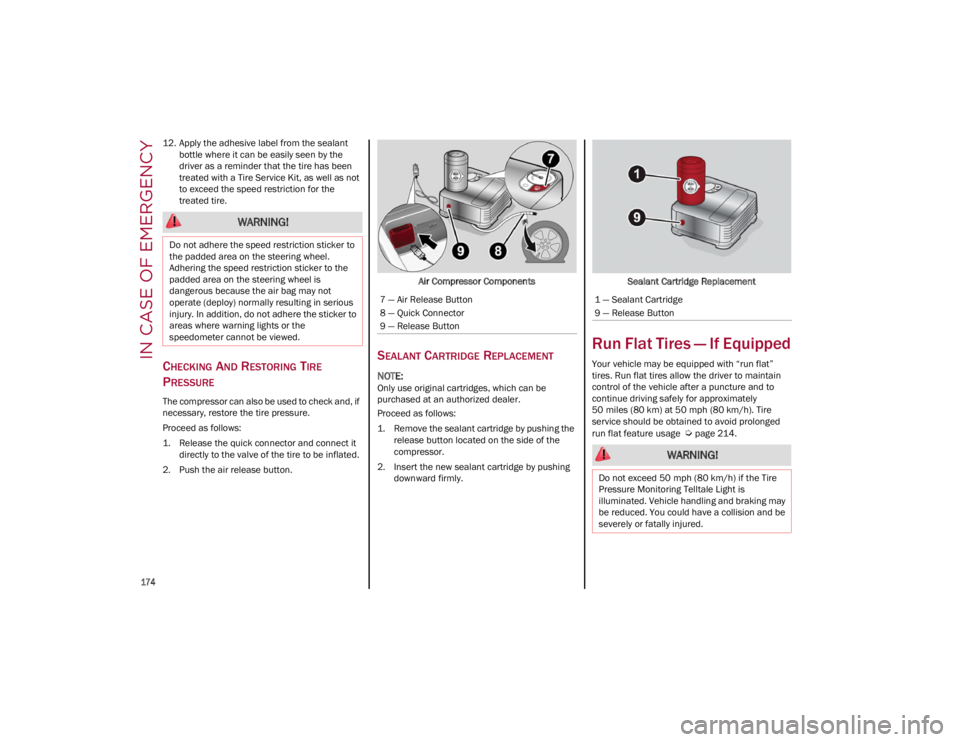
2. Push the air release button. Air Compressor Components
SEALANT CARTRIDGE REPLACEMENT
NOTE:
Only use original cartridges, which can be
purchased at an authorized dealer.
Proceed as follows:
1. Remove the sealant cartridge by pushing the
release button located on the side of the
compressor.
2. Insert the new sealant cartridge by pushing downward firmly. Sealant Cartridge Replacement
Run Flat Tires — If Equipped
Your vehicle may be equipped with “run flat”
tires. Run flat tires allow the driver to maintain
control of the vehicle after a puncture and to
continue driving safely for approximately
50 miles (80 km) at 50 mph (80 km/h). Tire
service should be obtained to avoid prolonged
run flat feature usage
Ú
page 214.
WARNING!
Do not adhere the speed restriction sticker to
the padded area on the steering wheel.
Adhering the speed restriction sticker to the
padded area on the steering wheel is
dangerous because the air bag may not
operate (deploy) normally resulting in serious
injury. In addition, do not adhere the sticker to
areas where warning lights or the
speedometer cannot be viewed.
7 — Air Release Button
8 — Quick Connector
9 — Release Button1 — Sealant Cartridge
9 — Release Button
WARNING!
Do not exceed 50 mph (80 km/h) if the Tire
Pressure Monitoring Telltale Light is
illuminated. Vehicle handling and braking may
be reduced. You could have a collision and be
severely or fatally injured.
23_GA_OM_EN_USC_t.book Page 174
Page 182 of 248
IN CASE OF EMERGENCY
180
(Continued)
ALL WHEEL DRIVE (AWD) MODELS
It is recommended to tow the vehicle with all four
wheels OFF the ground on the flatbed of a
roadside assistance vehicle.
TOW EYES
If the vehicle has been in an accident or has
broken down, a tow eye is provided in the tools
container located inside the luggage
compartment for vehicle towing. There are two
locations on the front fascia/bumper available
for Tow Eye installation, and one in the rear on
the passenger side. Towing is meant only for
short distances on a paved road surface.
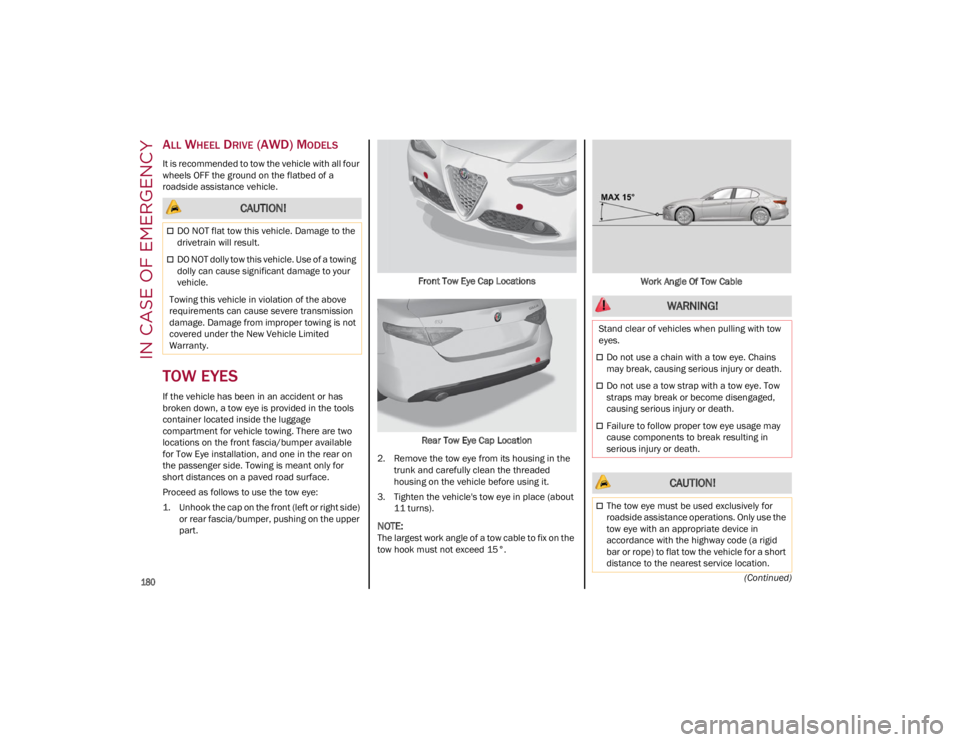
Proceed as follows to use the tow eye:
1. Unhook the cap on the front (left or right side) or rear fascia/bumper, pushing on the upper
part. Front Tow Eye Cap Locations
Rear Tow Eye Cap Location
2. Remove the tow eye from its housing in the trunk and carefully clean the threaded
housing on the vehicle before using it.
3. Tighten the vehicle's tow eye in place (about 11 turns).
NOTE:
The largest work angle of a tow cable to fix on the
tow hook must not exceed 15°. Work Angle Of Tow Cable
CAUTION!
DO NOT flat tow this vehicle. Damage to the
drivetrain will result.
DO NOT dolly tow this vehicle. Use of a towing
dolly can cause significant damage to your
vehicle.
Towing this vehicle in violation of the above
requirements can cause severe transmission
damage. Damage from improper towing is not
covered under the New Vehicle Limited
Warranty.
WARNING!
Stand clear of vehicles when pulling with tow
eyes.
Do not use a chain with a tow eye. Chains
may break, causing serious injury or death.
Do not use a tow strap with a tow eye. Tow
straps may break or become disengaged,
causing serious injury or death.
Failure to follow proper tow eye usage may
cause components to break resulting in
serious injury or death.
CAUTION!
The tow eye must be used exclusively for
roadside assistance operations. Only use the
tow eye with an appropriate device in
accordance with the highway code (a rigid
bar or rope) to flat tow the vehicle for a short
distance to the nearest service location.
23_GA_OM_EN_USC_t.book Page 180
Page 184 of 248

182
SERVICING AND MAINTENANCE
Correct servicing permits the performance of the
vehicle to be maintained over time, as well as
limited running costs and safeguarding the
efficiency of the safety systems.
This chapter explains how.
SCHEDULED SERVICING
Correct servicing is crucial for guaranteeing a
long life for the vehicle under the best conditions.
For this reason, Alfa Romeo has planned a series
of checks and services for your vehicle at fixed
intervals based on distance and time, as
described in the Scheduled Servicing Plan.
Before each service, it is always necessary to
carefully follow the instructions in the Scheduled
Servicing Plan (e.g. periodically check level of
fluids, tire pressure, etc.).
Scheduled Servicing is offered by an authorized
dealer according to a set time schedule. If, during
each operation, in addition to the ones
scheduled, the need arises for further
replacements or repairs, these may be carried
out with the owner’s explicit consent only.
NOTE:
Scheduled Servicing intervals are required by the
manufacturer. Failure to have them carried out
may invalidate the New Vehicle Limited Warranty.
You are advised to inform an authorized dealer of
any small operating irregularities without waiting
for the next service.
PERIODIC CHECKS
Every month or every 600 miles (1,000 km) or
before long trips check and, if necessary, top off:
Engine coolant level.
Brake fluid level (if insufficient, see an
authorized dealer as soon as possible).
Windshield washer fluid level.
Tire inflation pressure and condition.
Operation of lighting system (headlights,
direction indicators, hazard warning lights,
etc.).
Operation of windshield washing/wiping
system and positioning/wear of wiper blades.
Inspect the CV/Universal joints.
Oil consumption of the engine depends on
conditions and driving style. For this reason, the
engine oil level must be checked every
1,860 miles (3,000 km), and top off if necessary
Ú
page 188.
HEAVY USAGE OF THE VEHICLE
If the vehicle is used under one of the following
conditions:
Dusty roads.
Short, repeated journeys less than 4 miles
(7 km) at sub-zero outside temperatures.
Engine often idling or driving long distances at
low speeds or long periods of inactivity.
In the event of a long period of inactivity. The following checks must be carried out more
often than indicated in the Scheduled Servicing
Plan:
Check cleanliness of hood and trunk locks,
cleanliness and lubrication of linkage.
Visually inspect conditions of: engine,
transmission, pipes and hoses (exhaust/fuel
system/brakes) and rubber elements
(sleeves/bushes, etc.).
Check battery charge and battery fluid level
(electrolyte).
Visually inspect conditions of the accessory
drive belts.
Check and, if necessary, change engine oil and
replace oil filter.
Check and, if necessary, replace cabin air
filter.
Check and, if necessary, replace engine air
cleaner.
Severe Duty All Models
Vehicles that are operated in a dusty and off-road
environment, or predominately at idle or very low
engine RPM are known as Severe Duty vehicles.
It is recommended that you change engine oil at
4,000 miles (6,500 km) or 350 hours of engine
run time.
23_GA_OM_EN_USC_t.book Page 182
Page 191 of 248
189
NOTE:
Always reinstall the oil cap and tighten to proper
torque whenever it is removed to add oil to
engine. Never run the engine with cap removed
as this could cause oil to leak from engine.
Manual Oil Level Checking Procedure —
2.9L Engine
Check that the oil level is between the MIN and
MAX marks on dipstick, clean it with a lint-free
cloth and reinsert it. Extract the dipstick again
and check that the level is between the MIN and
MAX marks.
Top-Up And Oil Level Indication Update On
Display — 2.9L Engine
If an engine oil top-off is needed, in order to
ensure the correct indication of the oil level on
the display, proceed with the following process:
Leave the car on flat ground with the engine
running for approximately five minutes
(temperature higher than 198°F (90°C) and
shut the engine off.
Wait for five minutes, turn the ignition to the
ON mode without starting the engine and wait
for a few seconds.
NOTE:
If the level indication is not updated after the
previously described procedure, repeat the
engine adjustment, shut the engine off and wait
another five minutes before starting it again. If
the indication is not updated after the second
start, contact an authorized dealer.
Top-Up And Oil Level Indication Update On
Display — 2.0L Engine
If an engine oil top-off is needed, in order to
ensure the correct indication of the oil level on
the display, proceed with the following process:
Leave the car on flat ground with the engine
running for approximately five minutes
(temperature higher than 176°F (80°C) and
shut the engine off.
Start the engine again and idle it for about two
minutes.
NOTE:
If you have added the specified amount of oil and
the indicator is not reading “Full”, please contact
an authorized dealer.
ENGINE COOLANT
If the level is too low, remove the cap of reservoir
and add the fluid described on
Ú
page 233.
WASHER FLUID FOR WINDSHIELD/
H
EADLIGHTS
The windshield and headlights washer fluid
reservoir has a telescopic filler.
If the level is too low, remove reservoir cap and lift
the filler. Then, add the fluid described on
Ú
page 233.
NOTE:
Use care when filling under hood fluids such as
engine oil, windshield washer fluid, antifreeze
etc. to minimize spillage onto the top of the
engine. Any excess fluid that is spilled onto the
top of the engine should be removed using
compressed air or an absorbent cloth.
CAUTION!
Make sure not to add too much oil when
topping off the engine. Engine oil in excess
may damage the engine. Have the vehicle
checked. Never exceed the MAX level when
topping off engine oil. It is advisable to check
the oil level in intermediate steps using the oil
dipstick (2.9L Engine Only).
CAUTION!
The oil level is not refreshed immediately on
the display after topping off. Consequently,
wait for the oil level to be refreshed on the
display and see the following procedures.
WARNING!
If the engine oil is being topped up, wait for the
engine to cool down before loosening the filler
cap, particularly for vehicles with aluminum
cap (if equipped). WARNING: risk of burns!
CAUTION!
The oil level must never exceed the MAX mark.
If the MAX mark is exceeded (last notch on the
right turns red) after the fill-up, go to an
authorized dealer as soon as possible to have
the oil in excess removed.
Do not add oil with specifications different
from those of the oil already in the engine.
Used engine oil and oil filters contain
substances which are harmful to the
environment. To change the oil and filters, we
advise you to contact an authorized dealer.
23_GA_OM_EN_USC_t.book Page 189