2023 ALFA ROMEO GIULIA clock
[x] Cancel search: clockPage 72 of 248

GETTING TO KNOW YOUR INSTRUMENT PANEL
70
Units & Language
The following settings can be modified under the
“Units & Language” menu:
Units: select US, Metric, or Custom. The
custom option allows for individual selection of
the unit measures
Language: change the language of the system
Restore Unit & Language Settings: restores the
factory settings
To access and change the setting, turn and push
the Rotary Pad or press the desired setting on the
touchscreen.
Clock & Date
The following settings can be modified under the
“Clock & Date” menu:
Sync With GPS Time (if equipped): activates or
deactivates the clock synchronization through
the GPS. If the function is deactivated, the
options Set Time and Set Date are enabled
Set Time: set the time manually
Time Format: set the time format to either a
12-hour or a 24-hour clock
Set Date: set the date manually
Restore Clock & Date Settings: restores the
factory settings
To access and change the setting, turn and push
the Rotary Pad or press the desired setting on the
touchscreen. Cluster
The following settings can be modified when this
mode is selected:
Warning Buzzer Volume: set the volume of the
warning buzzer on seven levels
Trip B: activate or deactivate the Trip function
Show Phone Info: activate/deactivate
repetition of the phone function screens also
on the instrument panel display
Show Audio Info: activate/deactivate
repetition of the audio function screens (Radio
and Media) also on the instrument panel
display
Show Nav Info (if equipped): activate/
deactivate repetition of the navigator function
screens also on the instrument panel display
Digital speed on all screens: activate/deacti
-
vating of digital speed on the instrument panel
display screens other than the main screen
Consumption Bar: activate/deactivate the
consumption baron the display screens of the
instrument panel where it is available
Performance pages: choose, for each driving
mode, one of the two alternative contents
displayed in the screen
Custom areas: select which content to display
in each of the three customizable areas on the
display of the instrument panel: time, date,
outside temperature, radio information,
compass
Restore Cluster Settings: deletes the current
settings and restores the factory settings To access and change the setting, turn and push
the Rotary Pad or press the desired setting on the
touchscreen.
WARNING LIGHTS AND
MESSAGES ON THE
INSTRUMENT PANEL
The following pages consist of warning lights and
messages.
NOTE:
The warning light turns on together with a
dedicated message and/or chime when
applicable. These indications are precau
-
tionary and as such must not be considered as
exhaustive and/or alternative to the
information contained in the Owner’s Manual,
which you are advised to read carefully in all
cases. Always refer to the information in this
section in the event of a failure indication.
The failure indicators appearing on the display
are divided into two categories: very serious
and less serious faults. Serious faults are
indicated by a repeated and prolonged
warning "cycle.” Less serious faults are
indicated by a warning "cycle" with a shorter
duration. You can stop the warning cycle in
both cases by pushing the button located on
the windshield wiper stalk. The instrument
panel warning light will stay on until the cause
of the failure is eliminated.
23_GA_OM_EN_USC_t.book Page 70
Page 204 of 248

SERVICING AND MAINTENANCE
202
BULB REPLACEMENT
General Instructions
Before replacing a bulb, check the contacts for oxidation.
Replace blown bulbs with others of the same type and power.
After replacing a headlight bulb, always check its alignment.
When a light is not working, check that the corresponding fuse is intact before changing the bulb
Ú
page 197.
NOTE:
In some particular climate conditions, such as low temperature, humidity, or after washing the car, a thin condensation layer may form on the internal
surfaces of the front and rear headlights. This condensation will disappear after switching on the headlights.
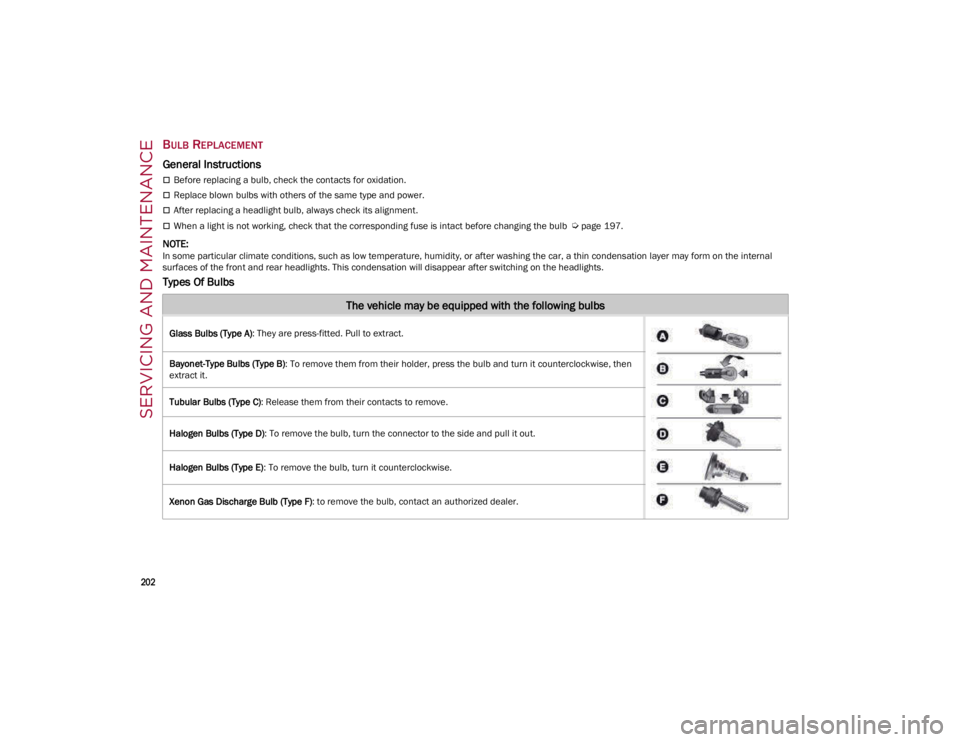
Types Of Bulbs
The vehicle may be equipped with the following bulbs
Glass Bulbs (Type A): They are press-fitted. Pull to extract.
Bayonet-Type Bulbs (Type B) : To remove them from their holder, press the bulb and turn it counterclockwise, then
extract it.
Tubular Bulbs (Type C) : Release them from their contacts to remove.
Halogen Bulbs (Type D) : To remove the bulb, turn the connector to the side and pull it out.
Halogen Bulbs (Type E) : To remove the bulb, turn it counterclockwise.
Xenon Gas Discharge Bulb (Type F) : to remove the bulb, contact an authorized dealer.
23_GA_OM_EN_USC_t.book Page 202
Page 206 of 248

SERVICING AND MAINTENANCE
204
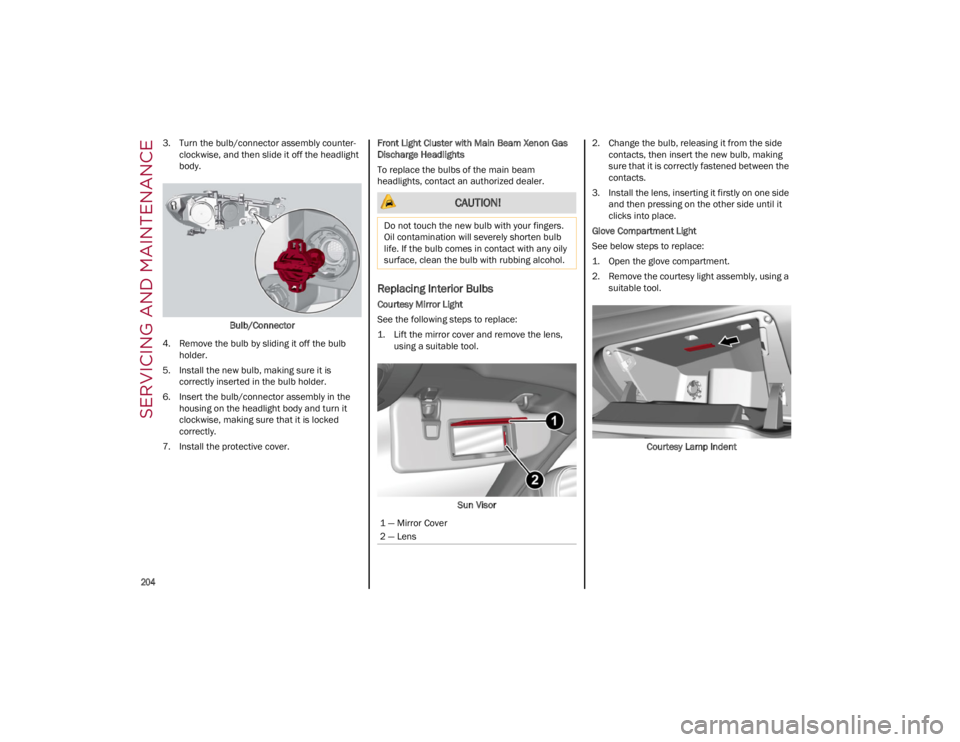
3. Turn the bulb/connector assembly counter-
clockwise, and then slide it off the headlight
body.
Bulb/Connector
4. Remove the bulb by sliding it off the bulb holder.
5. Install the new bulb, making sure it is correctly inserted in the bulb holder.
6. Insert the bulb/connector assembly in the housing on the headlight body and turn it
clockwise, making sure that it is locked
correctly.
7. Install the protective cover. Front Light Cluster with Main Beam Xenon Gas
Discharge Headlights
To replace the bulbs of the main beam
headlights, contact an authorized dealer.
Replacing Interior Bulbs
Courtesy Mirror Light
See the following steps to replace:
1. Lift the mirror cover and remove the lens,
using a suitable tool.
Sun Visor 2. Change the bulb, releasing it from the side
contacts, then insert the new bulb, making
sure that it is correctly fastened between the
contacts.
3. Install the lens, inserting it firstly on one side and then pressing on the other side until it
clicks into place.
Glove Compartment Light
See below steps to replace:
1. Open the glove compartment.
2. Remove the courtesy light assembly, using a suitable tool.
Courtesy Lamp Indent
CAUTION!
Do not touch the new bulb with your fingers.
Oil contamination will severely shorten bulb
life. If the bulb comes in contact with any oily
surface, clean the bulb with rubbing alcohol.
1 — Mirror Cover
2 — Lens
23_GA_OM_EN_USC_t.book Page 204
Page 223 of 248

221
Manual Trunk Opening Device
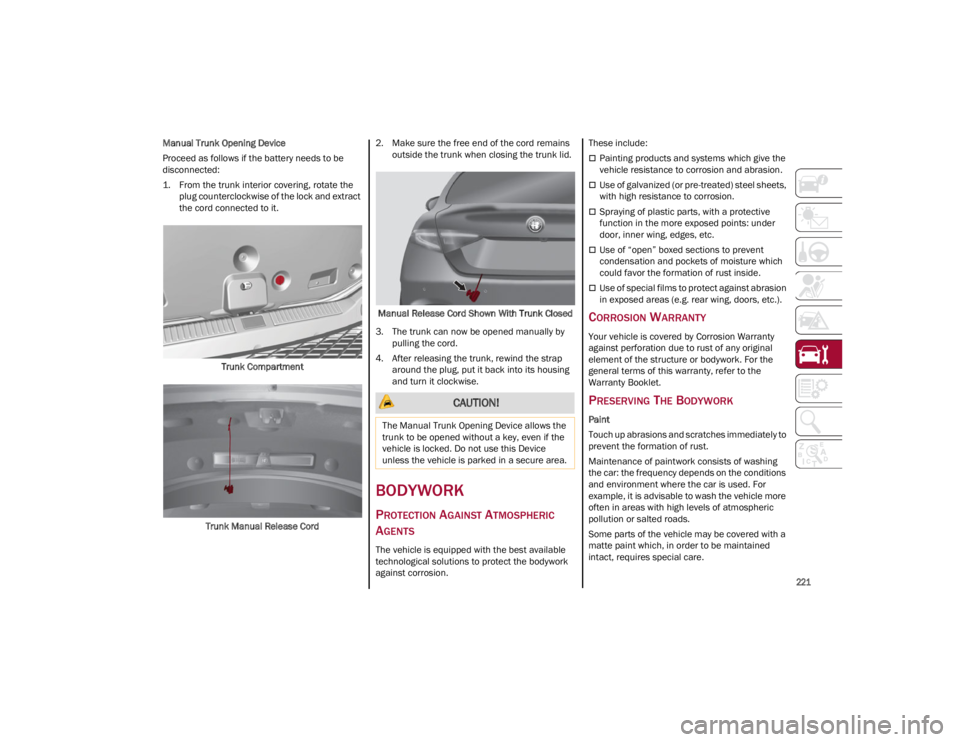
Proceed as follows if the battery needs to be
disconnected:
1. From the trunk interior covering, rotate the plug counterclockwise of the lock and extract
the cord connected to it.
Trunk Compartment
Trunk Manual Release Cord 2. Make sure the free end of the cord remains
outside the trunk when closing the trunk lid.
Manual Release Cord Shown With Trunk Closed
3. The trunk can now be opened manually by pulling the cord.
4. After releasing the trunk, rewind the strap around the plug, put it back into its housing
and turn it clockwise.
BODYWORK
PROTECTION AGAINST ATMOSPHERIC
A
GENTS
The vehicle is equipped with the best available
technological solutions to protect the bodywork
against corrosion. These include:
Painting products and systems which give the
vehicle resistance to corrosion and abrasion.
Use of galvanized (or pre-treated) steel sheets,
with high resistance to corrosion.
Spraying of plastic parts, with a protective
function in the more exposed points: under
door, inner wing, edges, etc.
Use of “open” boxed sections to prevent
condensation and pockets of moisture which
could favor the formation of rust inside.
Use of special films to protect against abrasion
in exposed areas (e.g. rear wing, doors, etc.).
CORROSION WARRANTY
Your vehicle is covered by Corrosion Warranty
against perforation due to rust of any original
element of the structure or bodywork. For the
general terms of this warranty, refer to the
Warranty Booklet.
PRESERVING THE BODYWORK
Paint
Touch up abrasions and scratches immediately to
prevent the formation of rust.
Maintenance of paintwork consists of washing
the car: the frequency depends on the conditions
and environment where the car is used. For
example, it is advisable to wash the vehicle more
often in areas with high levels of atmospheric
pollution or salted roads.
Some parts of the vehicle may be covered with a
matte paint which, in order to be maintained
intact, requires special care.
CAUTION!
The Manual Trunk Opening Device allows the
trunk to be opened without a key, even if the
vehicle is locked. Do not use this Device
unless the vehicle is parked in a secure area.
23_GA_OM_EN_USC_t.book Page 221