2023 ALFA ROMEO GIULIA battery location
[x] Cancel search: battery locationPage 173 of 248

171
(Continued)
System Requirements
Vehicle must have an operable 4G network
connection.
Vehicle must be powered with a properly
functioning electrical system.
The ignition must be in the RUN or ACC
position.
Frequently Asked Questions:
What happens if I accidentally push the SOS
Emergency Call Button? You have 10 seconds
after pushing the emergency button to cancel the
call. To cancel the call, push the button again. What type of information is sent when I make an
SOS Emergency Call from my vehicle?
Certain
vehicle information, such as the VIN, is
transmitted along with last known GPS location.
Also note that emergency service operators may
record conversations and sounds within your
vehicle once a connection is made, and by using
the service you consent to having this information
shared.
When can I use the SOS Emergency Call
button? You can ONLY Use the SOS
Emergency Call button to make a call if
you or someone else needs emergency
assistance.
TIRE SERVICE KIT
DESCRIPTION
If a tire is punctured, you can make an emergency
repair using the Tire Service Kit located in the
trunk beneath the load floor.
Tire Service Kit Location
WARNING!
Never place anything on or near the vehicle’s
4G and GPS aerials. You could prevent 4G
and GPS signal reception, which can prevent
your vehicle from placing an emergency call.
An operable 4G network connection and a
GPS signal is required for the
SOS-Emergency Call system to function
properly.
Do not add any aftermarket electrical
equipment to the vehicle’s electrical system.
This may prevent your vehicle from sending a
signal to initiate an emergency call. To avoid
interference that can cause the
SOS-Emergency Call system to fail, never
add aftermarket equipment (e.g., two-way
mobile radio, CB radio, data recorder, etc.) to
your vehicle’s electrical system or modify the
antennas on your vehicle. IF YOUR VEHICLE
AND SYSTEM LOSES BATTERY POWER FOR
ANY REASON (INCLUDING DURING OR AFTER
AN ACCIDENT) THE SOS FEATURES, APPS
AND SERVICES AMONG OTHERS WILL NOT
OPERATE.
The Occupant Restraint Controller (ORC)
turns on the air bag warning light in the
instrument cluster if a malfunction in any
part of the air bag system is detected. If the
air bag warning light is illuminated, the air
bag system may not be working properly and
the SOS-Emergency Call system may not be
able to send a signal to an emergency
service operator. If the air bag warning light
is illuminated, contact the Service Network
to have the air bag system checked
immediately.
Ignoring the LED on the SOS-Emergency Call
button could mean you will not have
emergency call services if needed. If the LED
on SOS-Emergency Call button is illuminated
red, contact the Service Network to have the
emergency call system checked
immediately.
If anyone in the vehicle could be in danger
(e.g., fire or smoke is visible, dangerous road
conditions or location), do not wait for voice
contact from an emergency service operator.
All occupants should exit the vehicle
immediately and move to a safe location.
Failure to perform scheduled maintenance
and regularly inspect your vehicle may result
in vehicle damage, accident or injury.
WARNING!
23_GA_OM_EN_USC_t.book Page 171
Page 177 of 248

175
JUMP STARTING
If your vehicle has a discharged battery, it can be
jump started from the remote battery
connections by using a set of jumper cables and
a battery in another vehicle, or by using a portable
battery booster pack. Jump starting can be
dangerous if done improperly, so please follow
the procedures in this section carefully.
NOTE:
When using a portable battery booster pack,
follow the manufacturer's operating instructions
and precautions.
REMOTE BATTERY CONNECTION POSTS
Your vehicle is equipped with remote battery
connection posts for jump starting. Depending on
the vehicle model, remote post locations may
vary.
Non Quadrifoglio Model
The remote posts of the battery for jump starting
can be found inside the engine compartment.Remote Jump Starting Post Locations
The remote positive (+) post is located at the rear
of the engine compartment, which can be
accessed by removing the cowl cover, and
opening the spring loaded protective flap. Protective Cowl Cover
Protective Flap And Remote Positive (+) Post
WARNING!
Do not attempt jump starting if the battery is
frozen. It could rupture or explode and cause
personal injury.
CAUTION!
Do not use the battery for jump starting the
vehicle. Improperly connecting the jumper
cables or booster pack to the battery can
result in electrical system and fuse failure.
Always use the remote battery connection
posts to jump start your vehicle.
Do not use a portable battery booster pack or
any other booster source with a system
voltage greater than 12 Volts or damage to
the battery, starter motor, alternator or
electrical system may occur.
Remote Positive (+) Post
Remote Negative (-) Post
23_GA_OM_EN_USC_t.book Page 175
Page 178 of 248
IN CASE OF EMERGENCY
176
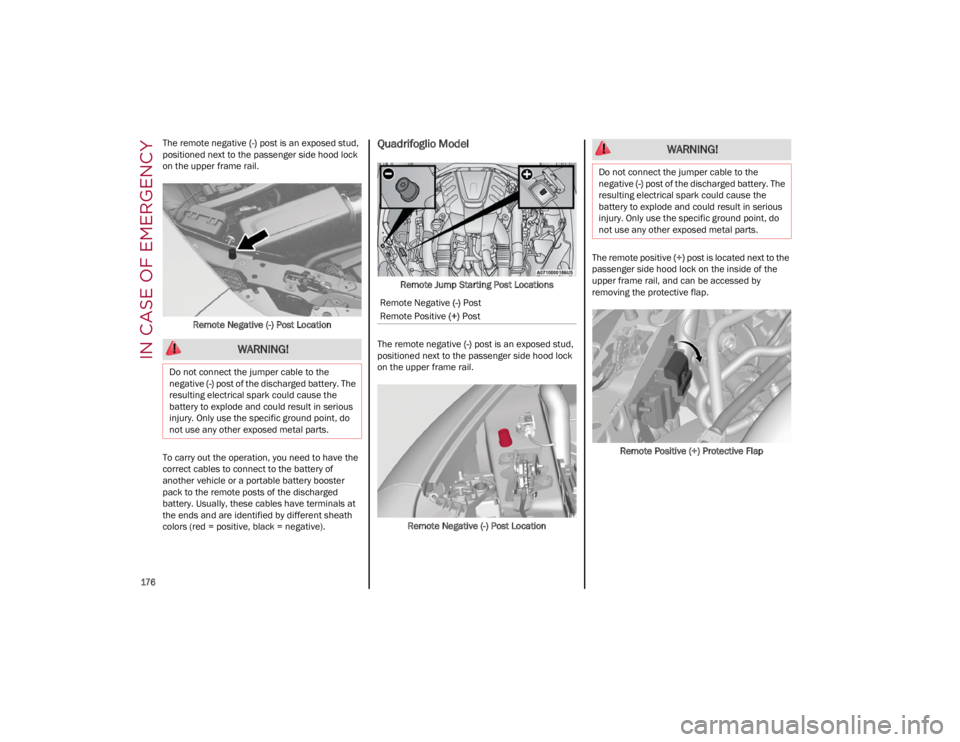
The remote negative (-) post is an exposed stud,
positioned next to the passenger side hood lock
on the upper frame rail.
Remote Negative (-) Post Location
To carry out the operation, you need to have the
correct cables to connect to the battery of
another vehicle or a portable battery booster
pack to the remote posts of the discharged
battery. Usually, these cables have terminals at
the ends and are identified by different sheath
colors (red = positive, black = negative).Quadrifoglio Model
Remote Jump Starting Post Locations
The remote negative (-) post is an exposed stud,
positioned next to the passenger side hood lock
on the upper frame rail.
Remote Negative (-) Post Location The remote positive
(+) post is located next to the
passenger side hood lock on the inside of the
upper frame rail, and can be accessed by
removing the protective flap.
Remote Positive (+) Protective Flap
WARNING!
Do not connect the jumper cable to the
negative (-) post of the discharged battery. The
resulting electrical spark could cause the
battery to explode and could result in serious
injury. Only use the specific ground point, do
not use any other exposed metal parts.
Remote Negative (-) Post
Remote Positive (+) Post
WARNING!
Do not connect the jumper cable to the
negative (-) post of the discharged battery. The
resulting electrical spark could cause the
battery to explode and could result in serious
injury. Only use the specific ground point, do
not use any other exposed metal parts.
23_GA_OM_EN_USC_t.book Page 176
Page 179 of 248
177
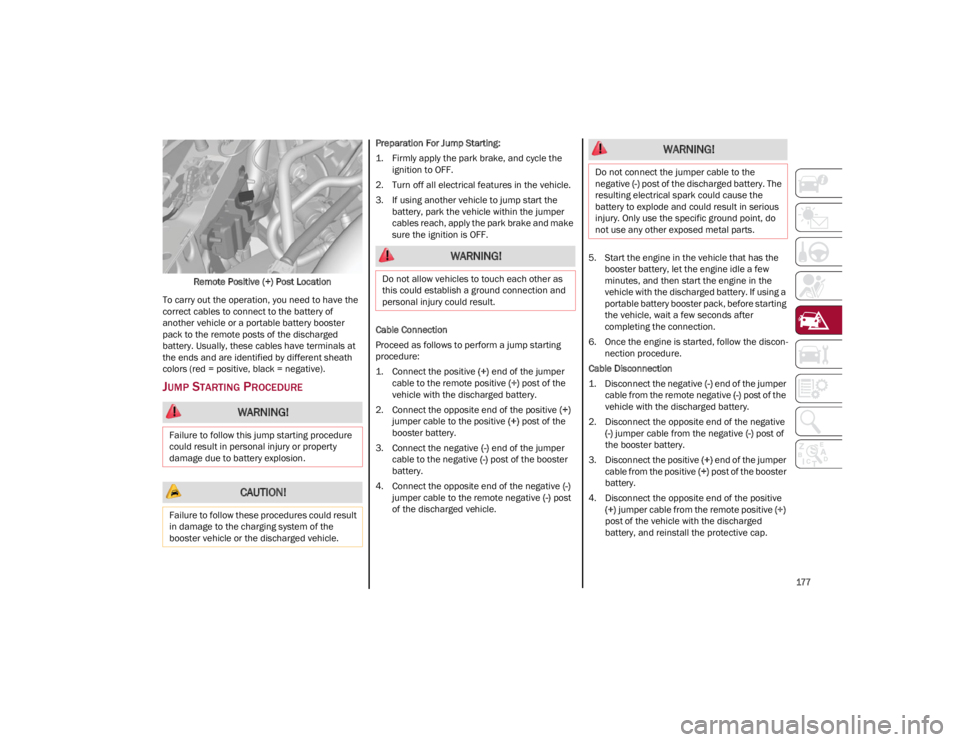
Remote Positive (+) Post Location
To carry out the operation, you need to have the
correct cables to connect to the battery of
another vehicle or a portable battery booster
pack to the remote posts of the discharged
battery. Usually, these cables have terminals at
the ends and are identified by different sheath
colors (red = positive, black = negative).
JUMP STARTING PROCEDURE
Preparation For Jump Starting:
1. Firmly apply the park brake, and cycle the ignition to OFF.
2. Turn off all electrical features in the vehicle.
3. If using another vehicle to jump start the battery, park the vehicle within the jumper
cables reach, apply the park brake and make
sure the ignition is OFF.
Cable Connection
Proceed as follows to perform a jump starting
procedure:
1. Connect the positive (+) end of the jumper
cable to the remote positive (+) post of the
vehicle with the discharged battery.
2. Connect the opposite end of the positive (+)
jumper cable to the positive (+) post of the
booster battery.
3. Connect the negative (-) end of the jumper
cable to the negative (-) post of the booster
battery.
4. Connect the opposite end of the negative (-)
jumper cable to the remote negative (-) post
of the discharged vehicle. 5. Start the engine in the vehicle that has the
booster battery, let the engine idle a few
minutes, and then start the engine in the
vehicle with the discharged battery. If using a
portable battery booster pack, before starting
the vehicle, wait a few seconds after
completing the connection.
6. Once the engine is started, follow the discon -
nection procedure.
Cable Disconnection
1. Disconnect the negative (-) end of the jumper
cable from the remote negative (-) post of the
vehicle with the discharged battery.
2. Disconnect the opposite end of the negative (-) jumper cable from the negative (-) post of
the booster battery.
3. Disconnect the positive (+) end of the jumper
cable from the positive (+) post of the booster
battery.
4. Disconnect the opposite end of the positive (+) jumper cable from the remote positive (+)
post of the vehicle with the discharged
battery, and reinstall the protective cap.
WARNING!
Failure to follow this jump starting procedure
could result in personal injury or property
damage due to battery explosion.
CAUTION!
Failure to follow these procedures could result
in damage to the charging system of the
booster vehicle or the discharged vehicle.
WARNING!
Do not allow vehicles to touch each other as
this could establish a ground connection and
personal injury could result.
WARNING!
Do not connect the jumper cable to the
negative (-) post of the discharged battery. The
resulting electrical spark could cause the
battery to explode and could result in serious
injury. Only use the specific ground point, do
not use any other exposed metal parts.
23_GA_OM_EN_USC_t.book Page 177
Page 242 of 248
240
INDEX
A
Accessories Purchased By The Owner.......... 4
Active Blind Spot Assist .............................134
Active Safety Systems ................................ 129
Active Torque Vectoring (ATV) System ......129
Adaptive Cruise Control (ACC)
(Cruise Control) ............................................ 97Off ........................................................... 101
On............................................................101
Additives, Fuel ............................................ 230
Adjust Forward.............................................. 31, 34
Rearward ........................................... 31, 34
Air Bag......................................................... 150 Air Bag Operation ...................................152Air Bag Warning Light ............................150
Driver Knee Air Bag................................ 152Enhanced Accident Response .....155, 181
Event Data Recorder (EDR) ...................181
Front Air Bag...........................................150
If Deployment Occurs ............................155
Knee Impact Bolsters ............................152
Maintaining Your Air Bag System.......... 157
Maintenance ..........................................157
Redundant Air Bag Warning Light.........150
Side Air Bags ..........................................153
Transporting Pets...................................166
Air Bag Light ......................................150, 167
Air Pressure Tires ........................................................212
Alarm Security Alarm .......................................... 24
Alfa Active Suspension (AAS)....................... 94
Alfa DNA System .......................................... 91
Anti-Lock Braking (ABS) System ................ 129 Anti-Lock Warning Light ...............................72
Automatic Door Locks ..................................28
Automatic Headlights ...................................43
Automatic Temperature Control (ATC) ........49
Automatic Transmission ..............................86
Auxiliary Driving Systems .......................... 132
B
Back-Up Camera ........................................ 123
Battery ..................................................74, 190 Charging System Light .............................74
Battery Recharging .................................... 191
Belts, Seat .................................................. 167
Blind Spot Monitoring ............................... 132
Bodywork (Cleaning And Maintenance) ... 221
B-Pillar Location......................................... 209
Brake System Warning Light .................................... 71, 72
Brakes ........................................................ 226 Brake Fluid Level................................... 190
Bulbs, Light ................................................ 168
C
Camera, Rear ............................................. 123
Carbon Monoxide Warning ....................... 168
Cargo Tie-Downs ...........................................62
Certification Label ..................................... 125
Chart, Tire Sizing........................................ 207
Check Engine Light (Malfunction
Indicator Light)..............................................80
Checking Levels ................................ 187, 188
Checking Your Vehicle For Safety............. 166
Checks, Safety ........................................... 166
Child Restraint ........................................... 158 Child Restraints
Booster Seats ........................................ 159
Child Seat Installation ........................... 165
How To Stow An unused ALR SeatBelt ..................................................... 163
Infant And Child Restraints ................... 159
LATCH Positions ..................................... 161
Lower Anchors And Tethers For Children .............................................. 161
Older Children And Child Restraints ..... 159
Seating Positions ................................... 160
Using The Top Tether Anchorage.......... 165
Clean Air Gasoline ..................................... 230
Cleaning Wheels.................................................... 217
Climate Control ......................................48, 54
Compact Spare Tire ................................... 216
Contract, Service........................................ 237
Cruise Control (Speed Control) ................... 97
Customer Assistance ................................. 236
D
Daytime Running Lights .............................. 43
Deck Lid Power Release ......................................... 61
Defroster, Windshield ................................ 167
Dimmer Switch Headlight .................................................. 46
Door Ajar.................................................75, 76
Door Ajar Light .......................................75, 76
Door Locks Automatic ................................................. 28
Door Opener, Garage................................... 39
23_GA_OM_EN_USC_t.book Page 240
Page 247 of 248
This Owner’s Manual illustrates and describes the operation of features and equipment that are either standard or optional on this
vehicle. This manual may also include a description of features and equipment that are no longer available or were not ordered on this
vehicle. Please disregard any features and equipment described in this manual that are not on this vehicle. FCA US LLC reserves the
right to make changes in design and specifications, and/or make additions to or improvements to its products without imposing any
obligation upon itself to install them on products previously manufactur\
ed.
With respect to any vehicles sold in Canada, the name FCA US LLC shall be deemed to be deleted and the name FCA Canada Inc. used
in substitution therefore. The driver’s primary responsibility is the safe operation of the vehicle. Driving while distracted can result in loss of vehicle control,
resulting in an accident and personal injury. FCA US LLC strongly recommends that the driver use extreme caution when using any
device or feature that may take their attention off the road. Use of any electrical devices, such as cellular telephones, computers, portable
radios, vehicle navigation or other devices, by the driver while the vehicle is moving is dangerous and could lead to a serious accident.
Texting while driving is also dangerous and should never be done while the vehicle is moving. If you find yourself unable to devote your
full attention to vehicle operation, pull off the road to a safe location and stop your vehicle. Some states or provinces prohibit the use of
cellular telephones or texting while driving. It is always the driver’s responsibility to comply with all local laws.
This Owner’s Manual has been prepared to help you get acquainted with your new Alfa Romeo
brand vehicle and to provide a convenient
reference source for common questions.
Not all features shown in this manual may apply to your vehicle. For add\
itional information, visit www.alfaromeousa.com (USA),
www.alfaromeo.ca (Canada) or your local Alfa Romeo brand dealer.
This Owner’s Manual is intended to familiarize you with the important features of your vehicle. Your most up-to-date Owner’s Manual,
Navigation/Uconnect manuals and Warranty Booklet can be found by visiting the website on the back cover.
U.S. Residents: If you are the first registered retail owner of your vehicle, you may obtain a complimentary printed copy of the Warranty
Booklet by calling 844-253-2872 or by contacting your dealer. Replacement kits can be purchased by visiting www.techauthority.com.
Canadian Residents: If you are the first registered retail owner of your vehicle, you may obtain a complimentary printed copy of the War -
ranty Booklet or purchase a replacement kit by calling 1-800-387-1143 or by contacting your dealer.
WARNING : Operating, servicing and maintaining a passenger vehicle or off-highway motor
vehicle can expose you to chemicals including engine exhaust, carbon monoxide, phthalates,
and lead, which are known to the State of California to cause cancer and\
birth defects or other
reproductive harm. To minimize exposure, avoid breathing exhaust, do not idle the engine
except as necessary, service your vehicle in a well-ventilated area and wear gloves or
wash your hands frequently when servicing your vehicle. For more informa\
tion go to
www.P65Warnings.ca.gov/passenger-vehicle .DRIVING AND ALCOHOL
Drunk driving is one of the most frequent causes of accidents. Your driving ability can be seriously impaired with blood alcohol levels \
far
below the legal minimum. If you are drinking, don’t drive. Ride with \
a designated non-drinking driver, call a cab, a rideshare, a friend, or
use public transportation.
WARNING
Driving after drinking can lead to an accident. Your perceptions are less sharp, your reflexes are slower and your judgment is impaired
when you have been drinking. Never drink and then drive.
ROADSIDE ASSISTANCE
24 HOURS, 7 DAYS A WEEK AT YOUR SERVICE.
CALL 1-855-299-1368 OR VISIT ALFAROMEO.RSAHELP.COM (USA)
SERVICES: Flat Tire Service, Out Of Gas/Fuel Delivery, Battery Jump Assistance, Lockout Service and Towing Service
Please see the Customer Assistance chapter in this Owner’s Manual for further information.
FCA US LLC reserves the right to modify the terms or discontinue the Roadside Assistance Program at any time. The Roadside Assistance Program is subject to restrictions and conditions of use, that are
determined solely by FCA US LLC.