2023 ACURA TLX brake light
[x] Cancel search: brake lightPage 523 of 658

521
Maintenance
This chapter discusses basic maintenance.
Before Performing MaintenanceInspection and Maintenance ............ 522
Safety When Performing Maintenance..... 523Parts and Fluids Used in Maintenance Service ........................................... 524
Maintenance Minder
TM..................... 525
Maintenance Under the Hood
Maintenance Items Under the Hood ..... 532Opening the Hood ........................... 534
Engine Compartment Cover ............. 535
Recommended Engine Oil ................ 536
Oil Check ......................................... 537
Adding Engine Oil ............................ 539
Changing the Engine Oil and Oil Filter.... 540Engine Coolant ........................ 544, 546
Transmission Fluid ............................ 548
Brake Fluid ....................................... 549
Refilling Window Washer Fluid......... 549
Replacing Light Bulbs ....................... 550
Checking and Maintaining Wiper
Blades .......................................... 552
Checking and Maintaining Tires
Checking Tires ................................. 555
Tire and Loading Information Label ...... 556Tire Labeling .................................... 556DOT Tire Quality Grading (U.S. Vehicles) .. 558
Wear Indicators ............................... 560
Tire Service Life ................................ 560
Tire and Wheel Replacement ........... 561
Tire Rotation .................................... 562
Winter Tires ..................................... 563
Battery ............................................... 564
Remote Transmitter Care Replacing the Remote Battery .......... 568
Climate Control System Maintenance.... 570CleaningInterior Care .................................... 571
Exterior Care.................................... 574
Accessories and Modifications................ 578
23 ACURA TLX-31TGV6200.book 521 ページ 2022年8月4日 木曜日 午後1時59分
Page 524 of 658

522
Maintenance
Before Performing Maintenance
Inspection and Maintenance
For your safety, perform all listed inspections and maintenance to keep your vehicle
in good condition. If you become aware of an y abnormality (noise, smell, insufficient
brake fluid, oil residue on the ground, etc.), have your vehicle inspected by a dealer.
(Note, however, that service at a dealer is not mandatory to keep your warranties in
effect.) Refer to the separate maintena nce booklet for detailed maintenance and
inspection information.
■Routine inspections
Perform inspections before long distance trips, when washing the vehicle, or when
refueling.
2 Maintenance P. 25
■Periodic inspections
• Check the brake fluid level monthly.
2 Brake Fluid P. 549
•Check the tire pressure monthly. Examin e the tread for wear and foreign objects.
2Checking and Maintaining Tires P. 555
•Check the operation of the exterior lights monthly.
2 Replacing Light Bulbs P. 550
•Check the condition of the wiper bl ades at least every six months.
2Checking and Maintaining Wiper Blades P. 552
■Types of Inspection and Maintenance
1Inspection and Maintenance
Maintenance, replacement, or repair of
emissions control devices and systems may be
done by any automotive repair establishment or
individuals using parts that are “certified” to
EPA standards.
According to state and fede ral regulations, failure to
perform maintenance on the maintenance main
items marked with # will not void your emissions
warranties. However, all ma intenance services should
be performed in accordan ce with the intervals
indicated by the mult i-information display.
2 Maintenance Service Items P. 528
If you want to perform complex maintenance tasks
that require more skills a nd tools, you can purchase a
subscription to the Service Express website at
www.techinfo.acura.com .
2 Authorized Manuals P. 645
If you want to perform ma intenance yourself, make
sure that you have the necessary tools and skills first.
After performing maintenanc e, update the records in
the separate maintenance booklet.
U.S. models
23 ACURA TLX-31TGV6200.book 522 ページ 2022年8月4日 木曜日 午後1時59分
Page 536 of 658

534
uuMaintenance Under the Hood uOpening the Hood
Maintenance
Opening the Hood
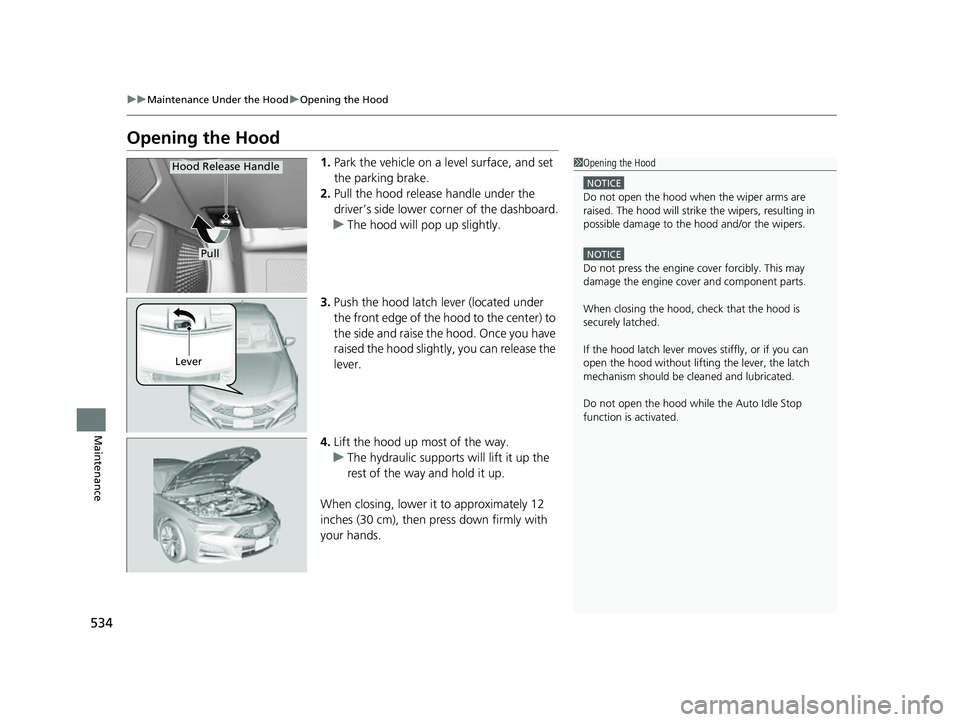
1. Park the vehicle on a level surface, and set
the parking brake.
2. Pull the hood release handle under the
driver’s side lower co rner of the dashboard.
u The hood will pop up slightly.
3. Push the hood latch lever (located under
the front edge of the hood to the center) to
the side and raise the hood. Once you have
raised the hood slightly, you can release the
lever.
4. Lift the hood up most of the way.
u The hydraulic supports will lift it up the
rest of the way and hold it up.
When closing, lower it to approximately 12
inches (30 cm), then pr ess down firmly with
your hands.1 Opening the Hood
NOTICE
Do not open the hood when the wiper arms are
raised. The hood will strike the wipers, resulting in
possible damage to the hood and/or the wipers.
NOTICE
Do not press the engine cover forcibly. This may
damage the engine cover and component parts.
When closing the hood, check that the hood is
securely latchedM
If the hood latch lever moves stiffly, or if you can
open the hood without lifti ng the lever, the latch
mechanism should be cl eaned and lubricatedM
Do not open the hood while the Auto Idle Stop
function is activated.
Pull
Hood Release Handle
Lever
23 ACURA TLX-31TGV6200.book 534 ページ 2022年8月4日 木曜日 午後1時59分
Page 553 of 658

551
uuReplacing Light Bulbs uBrake, Rear Turn Signal and ChicaneTM Taillight/Rear Side Marker Lights
Maintenance
Brake, Rear Turn Signal and ChicaneTM Taillight/Rear
Side Marker Lights
Brake, rear turn signal and taillight/rear si de marker lights are LED type. Have an
authorized Acura deal er inspect and replace the light assembly.
ChicaneTM Taillights and Back-Up Lights
Taillights and back-up lights are LED type. Ha ve an authorized Acura dealer inspect
and replace the light assembly.
Rear License Plate Light
Rear license plate light is LED type. Have an authorized Acura dealer inspect and
replace the light assembly.
High-Mount Brake Light
High-mount brake light is LED type. Have an authorized Acura dealer inspect and
replace the light assembly.
Puddle Lights*
Puddle lights are LED type. Have an authorized Acura dealer inspect and replace the
light assembly.
* Not available on all models
23 ACURA TLX-31TGV6200.book 551 ページ 2022年8月4日 木曜日 午後1時59分
Page 579 of 658

577
uuCleaning uExterior Care
Maintenance
Wipe using a glass cleaner.
Aluminum is susceptible to deterioration caused by salt and other road
contaminants. When necessary, as early as possible use a sponge and mild detergent
to wipe away these contaminants. Do no t use a stiff brush or harsh chemicals
(including some commercial wheel cleaners). These can damage the protective finish
on aluminum alloy wheels, resulting in corrosion. Depending on the type of finish,
the wheels also may lo se their luster or appear burn ished. To avoid water stains,
wipe the wheels dry with a cloth while they are still wet.
The inside lenses of exterior lights (headlig hts, brake lights, etc.) may fog temporarily
if you have driven in the rain, or after the vehicle has been run through a car wash.
Dew condensation also may build up inside the lenses when there is a significant
enough difference between the ambient and inside lens temperatures (similar to
vehicle windows fogging up in rainy conditions). These conditions are natural
processes, not structural design problems in the exterior lights.
Lens design characteristics ma y result in moisture developing on the light lens frame
surfaces. This also is not a malfunction.
However, if you see large amounts of wa ter accumulation, or large water drops
building up inside the lenses, have your vehicle inspected by a dealer.
■Cleaning the Window
■Maintaining Aluminum Wheels
■Fogged Exterior Light Lenses
23 ACURA TLX-31TGV6200.book 577 ページ 2022年8月4日 木曜日 午後1時59分
Page 585 of 658

583Continued
Handling the Unexpected
If a Tire Goes Flat
Temporarily Repairing a Flat Tire
If the tire has a large cut or is otherwise severely damaged, you will need to have the
vehicle towed. If the tire only has a small puncture, from a nail for instance, you can
use the temporary tire repair kit so that you can drive to the nearest service station
for a more permanent repair.
If a tire goes flat while driving, grasp th e steering wheel firmly and brake gradually
to reduce speed. Then, stop in a safe place.
1. Park the vehicle on a firm, level, non-slippery surface and apply the parking brake.
2. Put the transmission into
(P.
3. Turn on the hazard warning lights an d set the power mode to VEHICLE OFF.
1Temporarily Repairing a Flat Tire
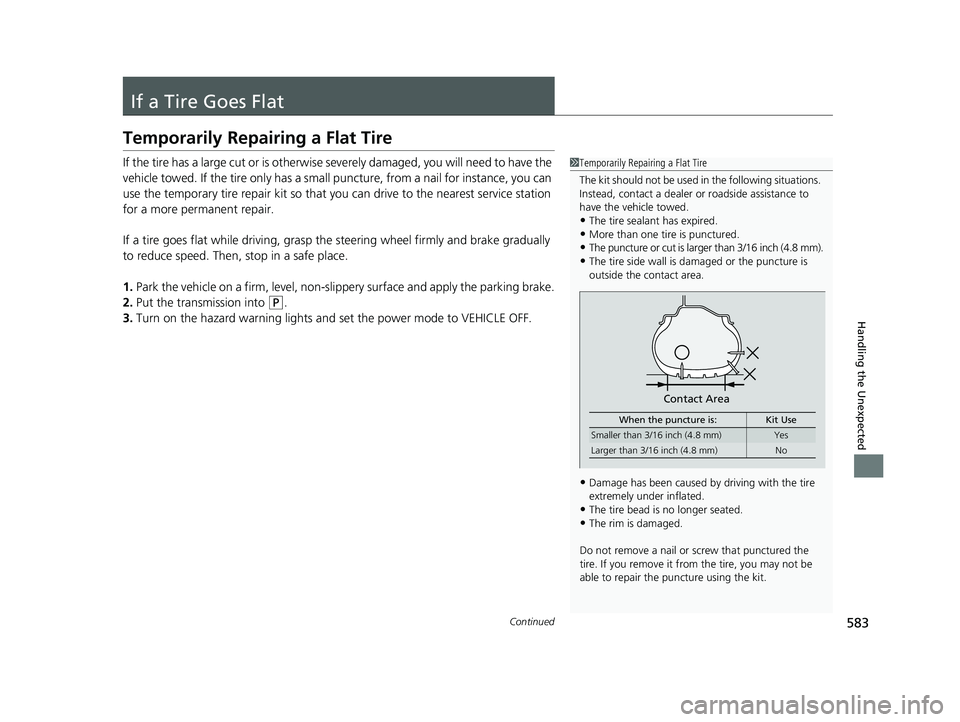
The kit should not be used in the following situations.
Instead, contact a dealer or roadside assistance to
have the vehicle towed.
•The tire sealant has expired.
•More than one tire is punctured.•The puncture or cut is larger than 3/16 inch (4.8 mm).
•The tire side wall is damaged or the puncture is
outside the contact area.
•Damage has been caused by driving with the tire
extremely under inflated.
•The tire bead is no longer seated.•The rim is damaged.
Do not remove a nail or screw that punctured the
tire. If you remove it from the tire, you may not be
able to repair the puncture using the kit.
When the puncture is: Kit Use
Smaller than 3/16 inch (4.8 mm)Yes
Larger than 3/16 inch (4.8 mm) No
Contact Area
23 ACURA TLX-31TGV6200.book 583 ページ 2022年8月4日 木曜日 午後1時59分
Page 600 of 658

598
uuIf a Tire Goes Flat uChanging a Flat Tire
Handling the Unexpected
Changing a Flat Tire
If a tire goes flat while driving, grasp the steering wheel firmly and brake gradually
to reduce speed. Then, stop in a safe place. Replace the flat tire with a compact
spare tire. Go to a dealer as soon as possible to have th e full-size tire repaired or
replaced.
1. Park the vehicle on a firm, level, non-slippery surface and apply the parking brake.
2. Put the transmission into
(P.
3. Turn on the hazard warning lights an d set the power mode to VEHICLE OFF.
Models with optional spare tire
1Changing a Flat Tire
Follow compact spare precautions:
Periodically check the tire pressure of the compact
spare. It should be set to the specified pressure.
Specified Pressure: 60 psi (420 kPa, 4.2 kgf/cm
2)
When driving with the compact spare tire, keep the
vehicle speed under 50 mph (80 km/h). Replace with
a full-size tire as soon as possible.
The compact spare tire and wheel in your vehicle are
specifically for this model. Do not use them with
another vehicle. Do not us e another type of compact
spare tire or wheel with your vehicle.
Do not mount tire chains on a compact spare tire.
If a chain-mounted front tire goes flat, remove one of
the full-size rear tires and replace it with the compact
spare tire. Remove the flat front tire and replace it
with the full-size tire that was removed from the rear.
Mount the tire chains on the front tire.
NOTICE
Do not use the jack if it doesn
Page 619 of 658

617
uuIndicator, Coming On/BlinkinguIf the Brake System Indicator (Red) Comes On or Blinks
Handling the Unexpected
If the Brake System Indicator (Red) Comes On or
Blinks
■Reasons for the indicator to come on
• The brake fluid is low.
• There is a malfunction in the brake system.
■What to do when the indicator comes on while driving
Depress the brake pedal lightly to check pedal pressure.
• If normal, check the brake fluid level the next time you stop.
• If abnormal, take immediate acti on. If necessary, downshift the
transmission to slow the vehicle using engine braking.
■Reasons for the indicator to blink
• There is a problem with the electric parking brake system.
■What to do when the indicator blinks
• Avoid using the parking brake and have your vehicle checked by a
dealer immediately.
1 If the Brake System Indicator (Red) Comes On or Blinks
Have your vehicle re paired immediately.
It is dangerous to drive with low brake fluid. If there
is no resistance from the brake pedal, stop
immediately in a safe plac e. If necessary downshift
the gears.
If the brake system indicator (red) and ABS indicator
come on simultaneously , the electronic brake
distribution system is not wo rking. This can result in
vehicle instability under sudden braking.
Have your vehicle inspecte d by a dealer immediately.
If the Brake System Indicator (Red) blinks at the same
time when the Brake System Indicator (Amber) comes
on, the parking br ake may not work.
Avoid using the parking brak e and have your vehicle
checked by a dealer immediately. 2 If the Brake System Indicator (Red) Comes
On or Blinks at the Same Time When the
Brake System Indicator (Amber) Comes On
P. 619
U.S.
Canada
23 ACURA TLX-31TGV6200.book 617 ページ 2022年8月4日 木曜日 午後1時59分