2022 YAMAHA YFM90R Valve
[x] Cancel search: ValvePage 10 of 126

Operating the drive select lever and driving in reverse ....................................... 7-3
Engine break-in ........................................... 7-4
Parking ........................................................ 7-5
Parking on a slope ...................................... 7-5
Accessories and loading ............................. 7-6
RIDING YOUR ATV ........................................ 8-1 GETTING TO KNOW YOUR ATV ................ 8-2
RIDE WITH CARE AND GOOD JUDGMENT .............................................. 8-2
BE CAREFUL WHERE YOU RIDE ............... 8-9
TURNING YOUR ATV................................ 8-12
CLIMBING UPHILL ................................... 8-13
RIDING DOWNHILL .................................. 8-16
CROSSING A SLOPE................................ 8-17
CROSSING THROUGH SHALLOW WATER .................................................... 8-18
RIDING OVER ROUGH TERRAIN ............. 8-20
SLIDING AND SKIDDING .......................... 8-20
WHAT TO DO IF... ..................................... 8-21
PERIODIC MAINTENANCE AND
ADJUSTMENT................................................ 9-1 Owner’s Manual and tool kit ....................... 9-2
Periodic maintenance chart: Emission control system .......................................... 9-3 Periodic maintenance chart: General
maintenance and lubrication .................... 9-5
Checking the spark plug............................. 9-9
Engine oil .................................................. 9-10
Why Yamalube.......................................... 9-13
Transmission oil ........................................ 9-14
Cleaning the air filter element ................... 9-15
Cleaning the spark arrester ...................... 9-18
Adjusting the carburetor ........................... 9-19
Adjusting the engine idling speed ............ 9-19
Adjusting the throttle lever free play ......... 9-20
Valve clearance......................................... 9-21
Brakes....................................................... 9-21
Checking the front and rear brake shoes ...................................................... 9-21
Adjusting the front brake lever free play... 9-23
Adjusting the rear brake lever free play .... 9-24
Drive chain slack....................................... 9-25
Lubricating the drive chain ....................... 9-27
Checking and lubricating the cables ........ 9-28
Checking and lubricating the front and rear brake levers ..................................... 9-28
Checking the wheel hub bearings ............ 9-29
Lubricating the front arm pivots ............... 9-29
Lubricating the front knuckle pivots ......... 9-30
Lubricating the steering shaft ................... 9-30
Battery ...................................................... 9-31
UBD366E0.book Page 2 Thursday, June 10, 2021 2:39 PM
Page 37 of 126

5-10
5
TIPConfirm the gasoline pump nozzle has the same
fuel identification mark.
About the recommended fuel
This model’s engine has been designed to use
regular unleaded gasoline. The research octane
number should be 95 or higher. If knocking or
pinging occurs, try a gasoline of a different brand
or higher octane.TIPGasoline containing ethanol can be used if the
ethanol content does not exceed 10% (E10). Gas-
oline containing methanol is not recommended
because it can cause damage to the fuel system
or vehicle performance problems. NOTICEECB00071Use only unleaded gasoline. The use of leaded
gasoline will cause severe damage to internal
engine parts, such as the valves and piston
rings, as well as to the exhaust system. EBU18821Fuel cockThe fuel cock supplies fuel from the tank to the
carburetor while also filtering it.
The fuel cock lever positions are explained as fol-
lows and shown in the illustrations.
Recommended fuel:
Regular unleaded gasoline (Gasohol [E10]
acceptable)
Fuel tank capacity: 6.6 L (1.7 US gal, 1.5 Imp.gal)
Fuel reserve amount: 0.9 L (0.24 US gal, 0.20 Imp.gal)
1. EN228 fuel identification mark
1
E5
E10
UBD366E0.book Page 10 Thursday, June 10, 2021 2:39 PM
Page 47 of 126

6-4
6
Tire pressure
Use a tire pressure gauge to check and adjust tire
air pressure when the tires are cold. The tire air
pressure must be equal on both sides.
WARNING! Operation of this vehicle with im- proper tire pressure may cause severe injury or
death from loss of control or rollover. Tire
pressure below the minimum specified could
also cause the tire to dislodge from the rim un-
der severe riding conditions.
[EWB02542]
Tire pressure gauge
A low-pressure tire gauge is included as standard
equipment with your vehicle. (See page 9-2.)
When using the tire pressure gauge, make two
measurements and use the second reading as grit
in the gauge or tire valve could have caused the
first reading to be incorrect.
Tire wear
If the tire is damaged or the tire tread depth de-
creases to 3 mm (0.12 in) or less, replace the tire.
Recommended tire pressure:
Front25.0 kPa (0.250 kgf/cm², 3.6 psi)
Rear 25.0 kPa (0.250 kgf/cm², 3.6 psi)
Minimum tire pressure: Front22.0 kPa (0.220 kgf/cm², 3.2 psi)
Rear 22.0 kPa (0.220 kgf/cm², 3.2 psi)
Maximum tire seating pressure: Front250 kPa (2.5 kgf/cm², 36 psi)
Rear 250 kPa (2.5 kgf/cm², 36 psi)1. Low-pressure tire gauge
2. Tire air valve
1
2
UBD366E0.book Page 4 Thursday, June 10, 2021 2:39 PM
Page 48 of 126

6-5
6Tire information
This ATV is equipped with tubeless tires and tire
air valves. After extensive tests, only the tires list-
ed below are approved for this model by Yamaha. Aftermarket tires and rims
The tires and rims that came with your ATV were
designed to match the performance capabilities
and to provide the best combination of handling,
braking, and comfort. Other tires, rims, sizes, and
combinations may not be appropriate.
WARNING
EWB02552Use of improper tires on this ATV may cause
loss of control, increasing your risk of an acci-
dent.
1. Tire tread depth
Front:
Manufacturer/model:DURO/DI2017
Size: AT18 x 7-8
Rear: Manufacturer/model:DURO/DI2016
Size: AT18 x 9-8
UBD366E0.book Page 5 Thursday, June 10, 2021 2:39 PM
Page 82 of 126

9-3
9
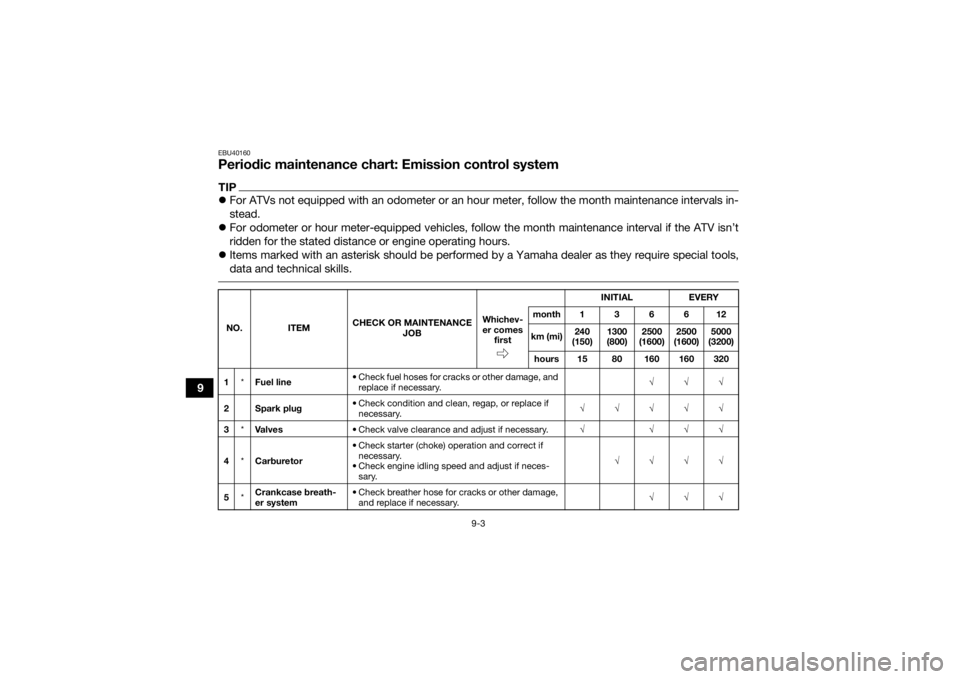
EBU40160Periodic maintenance chart: Emission control systemTIPFor ATVs not equipped with an odometer or an hour meter, follow the month maintenance intervals in-
stead.
For odometer or hour meter-equipped vehicles, follow the month maintenance interval if the ATV isn’t
ridden for the stated distance or engine operating hours.
Items marked with an asterisk should be performed by a Yamaha dealer as they require special tools,
data and technical skills. NO. ITEM CHECK OR MAINTENANCE
JOB INITIAL
EVERY
Whichev-
er comes first month136612
km (mi) 240
(150) 1300
(800) 2500
(1600) 2500
(1600) 5000
(3200)
hours 15 80 160 160 320
1 *Fuel line • Check fuel hoses for cracks or other damage, and
replace if necessary. √√√
2 Spark plug • Check condition and clean, regap, or replace if
necessary. √√√√√
3 *Va l ve s • Check valve clearance and adjust if necessary. √ √√√
4 *Carburetor • Check starter (choke) operation and correct if
necessary.
• Check engine idling speed and adjust if neces- sary. √√√√
5 *Crankcase breath-
er system • Check breather hose for cracks or other damage,
and replace if necessary. √√√
UBD366E0.book Page 3 Thursday, June 10, 2021 2:39 PM
Page 100 of 126

9-21
9Periodically check the throttle lever free play and
adjust if necessary.
TIPThe engine idling speed must be checked and ad-
justed before adjusting the throttle lever free play. 1. Slide the rubber cover away from the locknut.
2. Loosen the locknut.
3. To increase the throttle lever free play, turn
the throttle lever free play adjusting nut in di-
rection (a). To decrease the throttle lever free
play, turn the adjusting nut in direction (b).
4. Tighten the locknut.
5. Slide the rubber cover to its original position.EBU24062Valve clearanceThe valve clearance changes with use, resulting in
improper air-fuel mixture and/or engine noise. To
prevent this from occurring, the valve clearance
must be adjusted by a Yamaha dealer at the inter-
vals specified in the periodic maintenance chart.
EBU29602BrakesReplacement of brake components requires pro-
fessional knowledge. Brake service should be
performed by a Yamaha dealer.
WARNING
EWB02572Operating with improperly serviced or adjust-
ed brakes could lead to a loss in braking ability
and an accident. EBU34512Checking the front and rear brake
shoesThe front and rear brake shoes must be checked
for wear at the intervals specified in the periodic
maintenance chart. Without disassembling the
brake, this can be performed by checking the po-
sition of the brake lever free play adjusting bolts or
nut.
Front brakes
To check front brake shoe wear, check the posi-
tion of the adjusting bolts. If a bolt extends more
than 12 mm (0.47 in) from its locknut, the brake
shoes need to be replaced.
UBD366E0.book Page 21 Thursday, June 10, 2021 2:39 PM
Page 110 of 126

9-31
9
TIPFor parts equipped with a grease nipple, use a
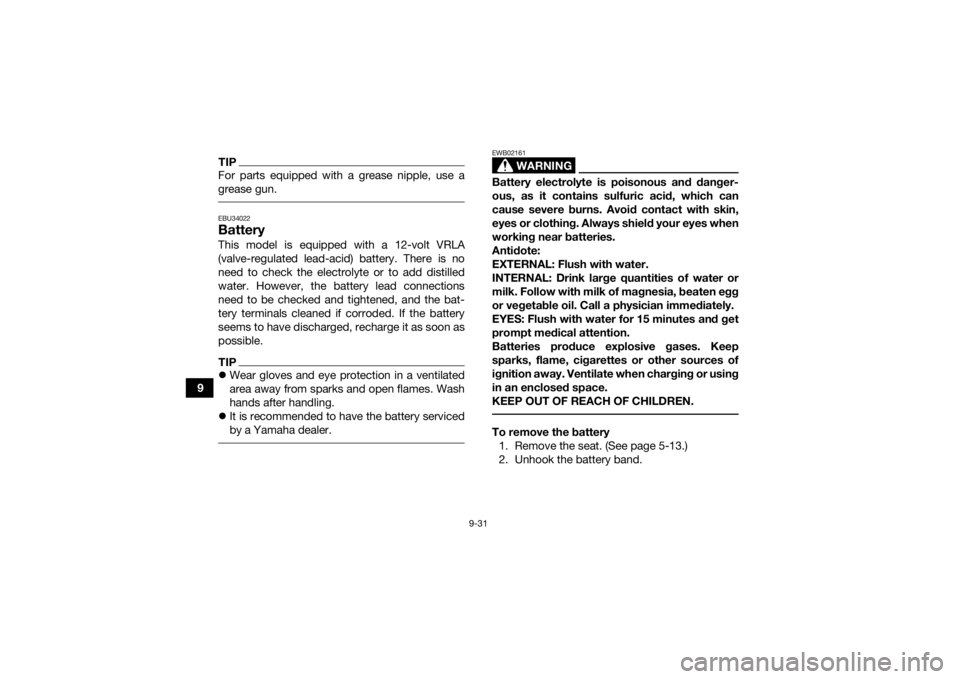
grease gun. EBU34022BatteryThis model is equipped with a 12-volt VRLA
(valve-regulated lead-acid) battery. There is no
need to check the electrolyte or to add distilled
water. However, the battery lead connections
need to be checked and tightened, and the bat-
tery terminals cleaned if corroded. If the battery
seems to have discharged, recharge it as soon as
possible.TIPWear gloves and eye protection in a ventilated
area away from sparks and open flames. Wash
hands after handling.
It is recommended to have the battery serviced
by a Yamaha dealer.
WARNING
EWB02161Battery electrolyte is poisonous and danger-
ous, as it contains sulfuric acid, which can
cause severe burns. Avoid contact with skin,
eyes or clothing. Always shield your eyes when
working near batteries.
Antidote:
EXTERNAL: Flush with water.
INTERNAL: Drink large quantities of water or
milk. Follow with milk of magnesia, beaten egg
or vegetable oil. Call a physician immediately.
EYES: Flush with water for 15 minutes and get
prompt medical attention.
Batteries produce explosive gases. Keep
sparks, flame, cigarettes or other sources of
ignition away. Ventilate when charging or using
in an enclosed space.
KEEP OUT OF REACH OF CHILDREN. To remove the battery
1. Remove the seat. (See page 5-13.)
2. Unhook the battery band.
UBD366E0.book Page 31 Thursday, June 10, 2021 2:39 PM
Page 111 of 126

9-32
9
3. Disconnect the negative battery lead first,
then the positive battery lead by removing
their bolt. NOTICE: When removing the bat-
tery, the main switch must be off, and the
negative lead must be disconnected be-
fore the positive lead.
[ECB01002]
4. Pull the battery out of its compartment.
NOTICEECB00622Never attempt to open the battery or remove
the battery cell seals, as this would permanent-
ly damage the battery. To charge the battery
Confirm the recommended charging rate as
specified on the battery itself.
Select a suitable charger and follow the manu-
facturer’s instructions.NOTICEECB00933To charge a VRLA (valve-regulated lead-acid)
battery, a special battery charger is required.
Using a conventional battery charger will dam-
age the battery. To store the battery
If the ATV will not be used for more than one
month, remove the battery, fully charge it, and
then place it in a cool, dry place.
If the battery will be stored for more than two
months, check it at least once a month and fully
charge it if necessary.
1. Positive battery lead (red)
2. Negative battery lead (black)
3. Battery
4. Battery band
3
4
2
1
UBD366E0.book Page 32 Thursday, June 10, 2021 2:39 PM