Page 49 of 126
6-6
6
EBU19841Chassis fastenersMake sure that all nuts, bolts and screws are
properly tightened.EBU33810Instruments and switchesCheck that all instruments and switches are work-
ing properly. Correct if necessary.UBD366E0.book Page 6 Thursday, June 10, 2021 2:39 PM
Page 50 of 126

7-1
7
EBU19882
OPERATION
EBU19902Read the Owner’s Manual carefully before riding
the ATV. If there is a control or function you do not
understand, ask your Yamaha dealer.
WARNING
EWB00632Read the Owner’s Manual carefully to become
familiar with all controls in order to help pre-
vent any loss of control, which could cause an
accident or injury. EBU33822Starting a cold engineNOTICEECB00151See the “Engine break-in” section on page 7-4
prior to operating the engine for the first time. 1. Set the parking brake. (The engine can bestarted only when the rear brake lever is ap-
plied.)
2. Turn the fuel cock to “ON”. 3. Turn the key to “ON” and set the engine stop
switch to “ ”.
4. Shift the drive select lever into the neutral po- sition. (The neutral indicator light should
come on.)
5. Position the starter (choke) lever according to the ambient temperature.
Position (1):
Cold engine start with ambient temperature
below 5 °C (40 °F).
Position (2):
Cold engine start with ambient temperature
between 0 °C (30 °F) and 30 °C (90 °F).
Position (3):
Cold engine start with ambient temperature
above 25 °C (80 °F).
UBD366E0.book Page 1 Thursday, June 10, 2021 2:39 PM
Page 51 of 126
 position
6. Release the throttle lever and start the engine by pushing the start switch.
TIPIf the engine fails to start, release the start
switch, then push it")
7-2
7
Ambient temp./starter (choke) position
6. Release the throttle lever and start the engine by pushing the start switch.
TIPIf the engine fails to start, release the start
switch, then push it again. Pause a few seconds
before the next attempt. Each cranking should
be as short as possible to preserve battery en-
ergy. Do not crank the engine more than 10 sec-
onds on each attempt.
If the engine fails to start using the start switch,
try using the kickstarter. (See page 5-7.)
7. If the engine is started with the starter (choke)
lever in position (1), move the lever to position
(2) to warm up the engine. If the engine is
started with the starter (choke) lever in posi-
tion (2), keep the lever in this position to warm
up the engine.
8. Continue warming up the engine until it idles smoothly, then return the starter (choke) lever
to position (3) before riding.TIPThe engine is warm when it responds quickly to
the throttle with the starter (choke) turned off. 9. Release the parking brake.NOTICEECB00164For maximum engine life, never accelerate
hard when the engine is cold!
1. Fully open
2. Half open
3. Closed
4. Starter (choke) lever
4
3
2
1
(1) (3)
(2)
UBD366E0.book Page 2 Thursday, June 10, 2021 2:39 PM
Page 52 of 126

is not required when the engine is warm. Instead,
start the eng")
7-3
7
EBU20292Starting a warm engineFollow the same procedure as for starting a cold
engine, with the exception that the starter (choke)
is not required when the engine is warm. Instead,
start the engine with the throttle slightly open.EBU33831Operating the drive select lever and
driving in reverseNOTICEECB00171Before shifting, stop the ATV, otherwise the
transmission may be damaged. Shifting: Forward1. Bring the ATV to a complete stop.
2. Apply the rear brake lever.
3. Shift from neutral to forward by moving the drive select lever along the shift guide.TIPMake sure that the drive select lever is completely
shifted into position.
4. Open the throttle lever gradually.
Shifting: Reverse
WARNING
EWB00721Improper operation in reverse could make you
hit an obstacle or even a person behind you,
resulting in serious injury. When you shift into
reverse, make sure there are no people or ob-
stacles behind you. When it is safe to proceed,
go slowly. 1. Drive select lever
2. F (Forward)
3. N (Neutral)
4. R (Reverse)
FNR
234
1
UBD366E0.book Page 3 Thursday, June 10, 2021 2:39 PM
Page 53 of 126

7-4
7
1. Bring the ATV to a complete stop.
2. Apply the rear brake lever.
3. Shift from neutral to reverse by moving the
drive select lever along the shift guide.
TIPWhen in reverse, the reverse indicator light should
come on. If the indicator light does not come on,
have a Yamaha dealer check the electrical circuit. 4. Check behind for people or obstacles, andthen release the rear brake lever. 5. Open the throttle lever gradually and continue
to watch to the rear while backing.
EBU40151Engine break-inThere is never a more important period in the life
of your engine than the first 240 km (150 mi) or 15
hours of operation. For this reason, you should fol-
low the engine break-in instructions carefully.
Since the engine is brand new, do not put an ex-
cessive load on it for the first 240 km (150 mi) or
15 hours. During this period the various parts in
the engine wear and polish themselves to the cor-
rect operating clearances. Avoid prolonged full-
throttle operation or any condition that might re-
sult in engine overheating.
0–120 km (0–75 mi) or 0–8 hours
Avoid prolonged operation above 1/2 throttle.
Vary the speed of the ATV regularly. Do not oper-
ate it at one set throttle position.
120–240 km (75–150 mi) or 8–15 hours
Avoid prolonged operation above 3/4 throttle. Rev
the engine freely, but do not use full throttle at any
time.
1. Drive select lever
2. F (Forward)
3. N (Neutral)
4. R (Reverse)
FNR
234
1
UBD366E0.book Page 4 Thursday, June 10, 2021 2:39 PM
Page 54 of 126
 or 15 hours and beyond
The ATV can now be operated normally.
NOTICEECB00221If any engine trouble should occur during the
engine break-in period, immediately have a
Yamaha dealer c")
7-5
7240 km (150 mi) or 15 hours and beyond
The ATV can now be operated normally.
NOTICEECB00221If any engine trouble should occur during the
engine break-in period, immediately have a
Yamaha dealer check the ATV. EBU30021ParkingWhen parking the ATV, apply the rear brake lever,
shift the drive select lever into the forward posi-
tion, stop the engine, apply the parking brake, and
then turn the fuel cock to “OFF”.
EBU20765Parking on a slope
WARNING
EWB00832Avoid parking on hills or other inclines. Parking
on a hill or other incline could cause the ATV to
roll out of control, increasing the chance of an
accident. If you must park on an incline, place
the ATV transversely across the incline, shift
the drive select lever to the forward position,
stop the engine, apply the parking brake, and
then block the front and rear wheels with rocks
or other objects.
Never park the ATV on hills that are too steep
to walk up easily. 1. With the transmission in the forward position, bring the ATV to a stop by applying the
brakes.
2. Stop the engine.
3. With the rear brake lever applied, apply the parking brake, and then slowly release the
rear brake lever.
4. Turn the fuel cock to “OFF”.
1. Parking brake lock plate
1
UBD366E0.book Page 5 Thursday, June 10, 2021 2:39 PM
Page 55 of 126

7-6
7
EBU20911Accessories and loadingEBU20922Genuine Yamaha Accessories
Choosing accessories for your ATV is an impor-
tant decision. Genuine Yamaha Accessories,
which are available only from a Yamaha dealer,
have been designed, tested, and approved by
Yamaha for use on your ATV. Many companies with no connection to Yamaha manufacture parts
and accessories or offer other modifications for
Yamaha vehicles. Yamaha is not in a position to test the products that these aftermarket compa- nies produce. Therefore, Yamaha can neither en-
dorse nor recommend the use of accessories not
sold by Yamaha or modifications not specifically
recommended by Yamaha, even if sold and in-
stalled by a Yamaha dealer.
Aftermarket parts, accessories, and modifica-
tions
While you may find aftermarket products similar in
design and quality to genuine Yamaha Accesso-
ries, recognize that some aftermarket accessories
or modifications are not suitable because of po-
tential safety hazards to you or others. Installing
aftermarket products or having other modifica-
tions performed to your ATV that change any of
the vehicle’s design or operation characteristics
can put you and others at greater risk of serious
injury or death. You are responsible for injuries re-
lated to changes in the vehicle.
Keep the following in mind when considering an
accessory or operating an ATV which has acces-
sories.
Accessories should be rigidly and securely
mounted. An accessory which can shift position
or come off while you are riding could affect
your ability to control the ATV.UBD366E0.book Page 6 Thursday, June 10, 2021 2:39 PM
Page 56 of 126
 a heavy or
bulky object attached to the handlebars which")
7-7
7
Do not mount an accessory where it could inter-
fere with your ability to control the ATV. Exam-
ples include (but are not limited to) a heavy or
bulky object attached to the handlebars which
could make steering difficult, an accessory that
limits your ability to move around on the seat, or
one that limits your view.
Use extra caution when riding an ATV with ac-
cessories. The ATV may handle differently than
it does without accessories.
EBU33880Loading
WARNING
EWB00821Never exceed the stated load capacity for this
ATV. Overloading this ATV or carrying or tow-
ing cargo improperly could cause changes in
ATV handling which could lead to an accident.
Cargo should be properly distributed and se-
curely attached. Reduce speed when carrying
cargo or pulling a trailer. Allow greater dis-
tance for braking. As originally equipped, this ATV is not designed to
carry cargo or tow a trailer. If you choose to add
accessories so that you can carry cargo or tow a trailer, you must use common sense and good
judgment as the stability and handling of an ATV
can be changed. When adding accessories, keep
the following points in mind:
Never exceed the weight limits shown. An over-
loaded ATV can be unstable.
If you are carrying cargo and towing a trailer, in-
clude the tongue weight in the maximum ATV
load limit.
Load cargo on the carriers as close to the center
of the ATV as possible. Put cargo at the rear of
the front carrier, at the front of the rear carrier,
and center it.
Tie down cargo securely to the carriers. Make
sure cargo in the trailer cannot move around. A
shifting load can cause an accident.
Make sure the load does not interfere with con-
trols or your ability to see where you are going.
Ride more slowly than you would without a
load. The more weight you carry, the slower you
should go. MAXIMUM LOADING LIMIT
ATV loading limit (total weight of rider, car-
go, accessories, and tongue weight):82.0 kg (181 lb)UBD366E0.book Page 7 Thursday, June 10, 2021 2:39 PM
 1
1 2
2 3
3 4
4 5
5 6
6 7
7 8
8 9
9 10
10 11
11 12
12 13
13 14
14 15
15 16
16 17
17 18
18 19
19 20
20 21
21 22
22 23
23 24
24 25
25 26
26 27
27 28
28 29
29 30
30 31
31 32
32 33
33 34
34 35
35 36
36 37
37 38
38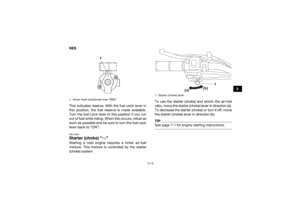 39
39 40
40 41
41 42
42 43
43 44
44 45
45 46
46 47
47 48
48 49
49 50
50 51
51 52
52 53
53 54
54 55
55 56
56 57
57 58
58 59
59 60
60 61
61 62
62 63
63 64
64 65
65 66
66 67
67 68
68 69
69 70
70 71
71 72
72 73
73 74
74 75
75 76
76 77
77 78
78 79
79 80
80 81
81 82
82 83
83 84
84 85
85 86
86 87
87 88
88 89
89 90
90 91
91 92
92 93
93 94
94 95
95 96
96 97
97 98
98 99
99 100
100 101
101 102
102 103
103 104
104 105
105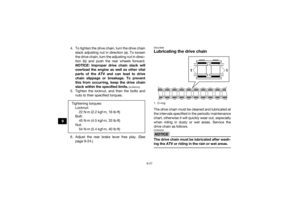 106
106 107
107 108
108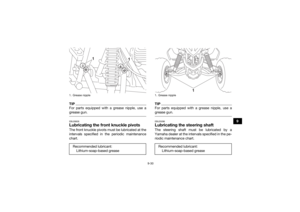 109
109 110
110 111
111 112
112 113
113 114
114 115
115 116
116 117
117 118
118 119
119 120
120 121
121 122
122 123
123 124
124 125
125