Page 119 of 176
9-20
9
TIPIf a torque wrench is not available when installing
the spark plug, a good estimate of the correct
torque is 1/4–1/2 turn past finger tight. However,
the spark plug should be tightened to the speci-
fied torque as soon as possible. 3. Install the spark plug cap.
4. Install the panels.EBU2746DEngine oil and oil filter cartridgeThe engine oil level should be checked before
each ride. In addition, the oil must be changed and
the oil filter cartridge replaced at the intervals
specified in the periodic maintenance chart.
To check the engine oil level1. Park the ATV on a level surface.
2. Check the engine oil level on a cold engine.
TIPIf the engine was started before checking the oil
level, warm up the engine, and then wait at least
10 minutes until the oil settles for an accurate
reading. 3. Remove the access cover by turning it coun- terclockwise.
4. Remove the engine oil dipstick, and then wipe it off with a clean rag.
Tightening torque:
Spark plug:13 N
Page 121 of 176
9-22
9
To change the engine oil (with or without oil fil-
ter cartridge replacement)
1. Park the ATV on a level surface.
2. Start the engine, warm it up for several min- utes, and then turn it off.
3. Remove the access cover by turning it coun- terclockwise.
4. Place an oil pan under the engine to collect the used oil.
5. Remove the dipstick, and then remove the engine oil drain bolt and its gasket to drain the
oil from the crankcase.
TIPSkip steps 6–10 if the oil filter cartridge is not be-
ing replaced. 6. Remove panel F. (See page 9-10.)
7. Remove the oil filter cartridge with an oil filterwrench.TIPAn oil filter wrench is available at a nearby Yamaha
dealer. 8. Apply a thin coat of engine oil to the O-ring ofthe new oil filter cartridge.
1. Engine oil drain bolt
2. Gasket
12
1. Oil filter cartridge
2. Oil filter wrench
UBLT60E0.book Page 22 Tuesday, July 13, 2021 9:16 AM
Page 124 of 176

9-25
9Yamaha’s experience gained over many years of
research and development into oil since the
1960’s helps make Yamalube the best choice for
your Yamaha engine.
EBU27309Final gear oilThe final gear case must be checked for oil leak-
age before each ride. If any leakage is found, have
a Yamaha dealer check and repair the ATV. In ad-
dition, the final gear oil level must be checked and
the oil changed as follows at the intervals speci-
fied in the periodic maintenance chart.
To check the final gear oil level 1. Park the ATV on a level surface. 2. Remove the final gear oil level check bolt and
its gasket, and then check the oil level in the
final gear case. The oil level should be at the
brim of the check hole.
3. If the oil is below the brim of the check hole, remove the final gear oil filler bolt and its gas-
ket, and then add sufficient oil of the recom-
mended type to raise it to the correct level.
1. Final gear oil
2. Gasket
3. Final gear oil level check bolt
4. Correct oil level
1
243
UBLT60E0.book Page 25 Tuesday, July 13, 2021 9:16 AM
Page 125 of 176
9-26
9
4. Check the gaskets for damage, and replace
them if necessary.
5. Install the oil level check bolt, the oil filler bolt and their gasket, and then tighten the bolts to
the specified torques. To change the final gear oil
1. Park the ATV on a level surface.
2. Place an oil pan under the final gear case to collect the used oil.
3. Remove the final gear oil filler bolt, the final gear oil level check bolt, the final gear oil drain
bolt and their gasket to drain the oil from the
final gear case.
4. Install the drain bolt and its new gasket, and then tighten the bolt to the specified torque.
1. Final gear oil filler bolt
2. GasketTightening torques:Final gear oil level check bolt:10 N·m (1.0 kgf·m, 7.4 lb·ft)
Final gear oil filler bolt: 23 N·m (2.3 kgf·m, 17 lb·ft)
1
2
1. Final gear oil drain bolt
2. Gasket
12
UBLT60E0.book Page 26 Tuesday, July 13, 2021 9:16 AM
Page 126 of 176
![YAMAHA GRIZZLY 700 2022 Owners Manual 9-27
95. Refill with the recommended final gear oil to
the brim of the check hole as shown.
NOTICE: Be sure no foreign material en-
ters the final gear case.
[ECB00422]
6. Check the oil level check YAMAHA GRIZZLY 700 2022 Owners Manual 9-27
95. Refill with the recommended final gear oil to
the brim of the check hole as shown.
NOTICE: Be sure no foreign material en-
ters the final gear case.
[ECB00422]
6. Check the oil level check](/manual-img/51/50437/w960_50437-125.png)
9-27
95. Refill with the recommended final gear oil to
the brim of the check hole as shown.
NOTICE: Be sure no foreign material en-
ters the final gear case.
[ECB00422]
6. Check the oil level check bolt gasket and the oil filler bolt gasket for damage, and replace
them if necessary.
7. Install the oil level check bolt, the oil filler bolt and their gasket, and then tighten the bolts to
the specified torques.
8. Check the final gear case for oil leakage. If oil is leaking, check for the cause.EBU23429Differential gear oilThe differential gear case must be checked for oil
leakage before each ride. If any leakage is found,
have a Yamaha dealer check and repair the ATV.
In addition, the differential gear oil level must be
checked and the oil changed as follows at the in-
tervals specified in the periodic maintenance
chart.
Tightening torque:
Final gear oil drain bolt:23 N·m (2.3 kgf·m, 17 lb·ft)
1. Final gear oil
2. Gasket
3. Final gear oil level check bolt
4. Correct oil levelRecommended final gear oil:See page 11-1.
1
243
Tightening torquesWFinal gear oil level check bolt:10 N
Page 127 of 176

9-28
9
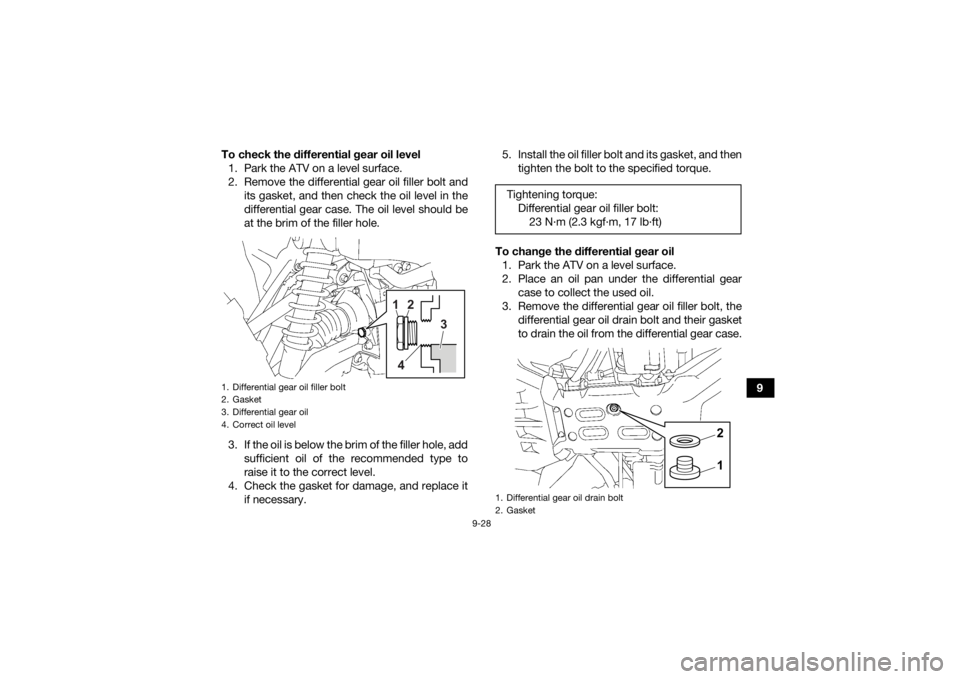
To check the differential gear oil level
1. Park the ATV on a level surface.
2. Remove the differential gear oil filler bolt and its gasket, and then check the oil level in the
differential gear case. The oil level should be
at the brim of the filler hole.
3. If the oil is below the brim of the filler hole, add sufficient oil of the recommended type to
raise it to the correct level.
4. Check the gasket for damage, and replace it if necessary. 5. Install the oil filler bolt and its gasket, and then
tighten the bolt to the specified torque.
To change the differential gear oil 1. Park the ATV on a level surface.
2. Place an oil pan under the differential gear case to collect the used oil.
3. Remove the differential gear oil filler bolt, the differential gear oil drain bolt and their gasket
to drain the oil from the differential gear case.
1. Differential gear oil filler bolt
2. Gasket
3. Differential gear oil
4. Correct oil level
1
2
3
4
Tightening torque: Differential gear oil filler bolt:23 N
Page 128 of 176

9-29
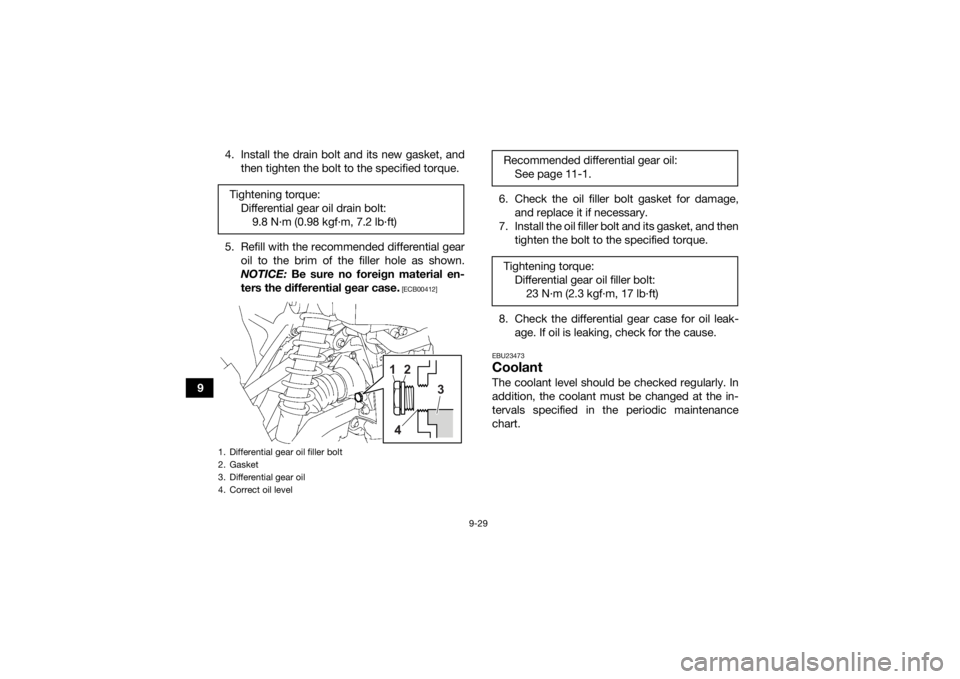
94. Install the drain bolt and its new gasket, and
then tighten the bolt to the specified torque.
5. Refill with the recommended differential gear oil to the brim of the filler hole as shown.
NOTICE: Be sure no foreign material en-
ters the differential gear case.
[ECB00412]
6. Check the oil filler bolt gasket for damage, and replace it if necessary.
7. Install the oil filler bolt and its gasket, and then tighten the bolt to the specified torque.
8. Check the differential gear case for oil leak- age. If oil is leaking, check for the cause.EBU23473CoolantThe coolant level should be checked regularly. In
addition, the coolant must be changed at the in-
tervals specified in the periodic maintenance
chart.
Tightening torque:
Differential gear oil drain bolt:9.8 N·m (0.98 kgf·m, 7.2 lb·ft)
1. Differential gear oil filler bolt
2. Gasket
3. Differential gear oil
4. Correct oil level
1
2
3
4
Recommended differential gear oil: See page 11-1.
Tightening torque: Differential gear oil filler bolt:23 N
Page 131 of 176
9-32
9
EBU34213To change the coolant
WARNING
EWB01891Wait for the engine and radiator to cool before
removing the radiator cap. You could be
burned by hot fluid and steam blown out under
pressure. Always place a thick rag over the cap
when opening. Allow any remaining pressure
to escape before completely removing the cap. 1. Park the ATV on a level surface.
2. Remove panels A, B, C, and D. (See page9-10.)
3. Remove the footboard by removing the bolts and nuts. 4. Remove the radiator cap.
1. Footboard
2. Bolt and nut
3. Bolt
3
2
2
3
1
UBLT60E0.book Page 32 Tuesday, July 13, 2021 9:16 AM