2022 VOLKSWAGEN T-ROC power
[x] Cancel search: powerPage 37 of 502
ng wheel
Operating using the wiper lever
WARNING
Accidents and injuries can occur if the driver is distracted.
Never operate the menus on the instrument cluster display while the vehicle is in motion.
Check the system settings after charging or replacing the 12-volt vehicle battery. System settings
may be changed or deleted if the power supply is interrupted.
Operating using the wiper lever
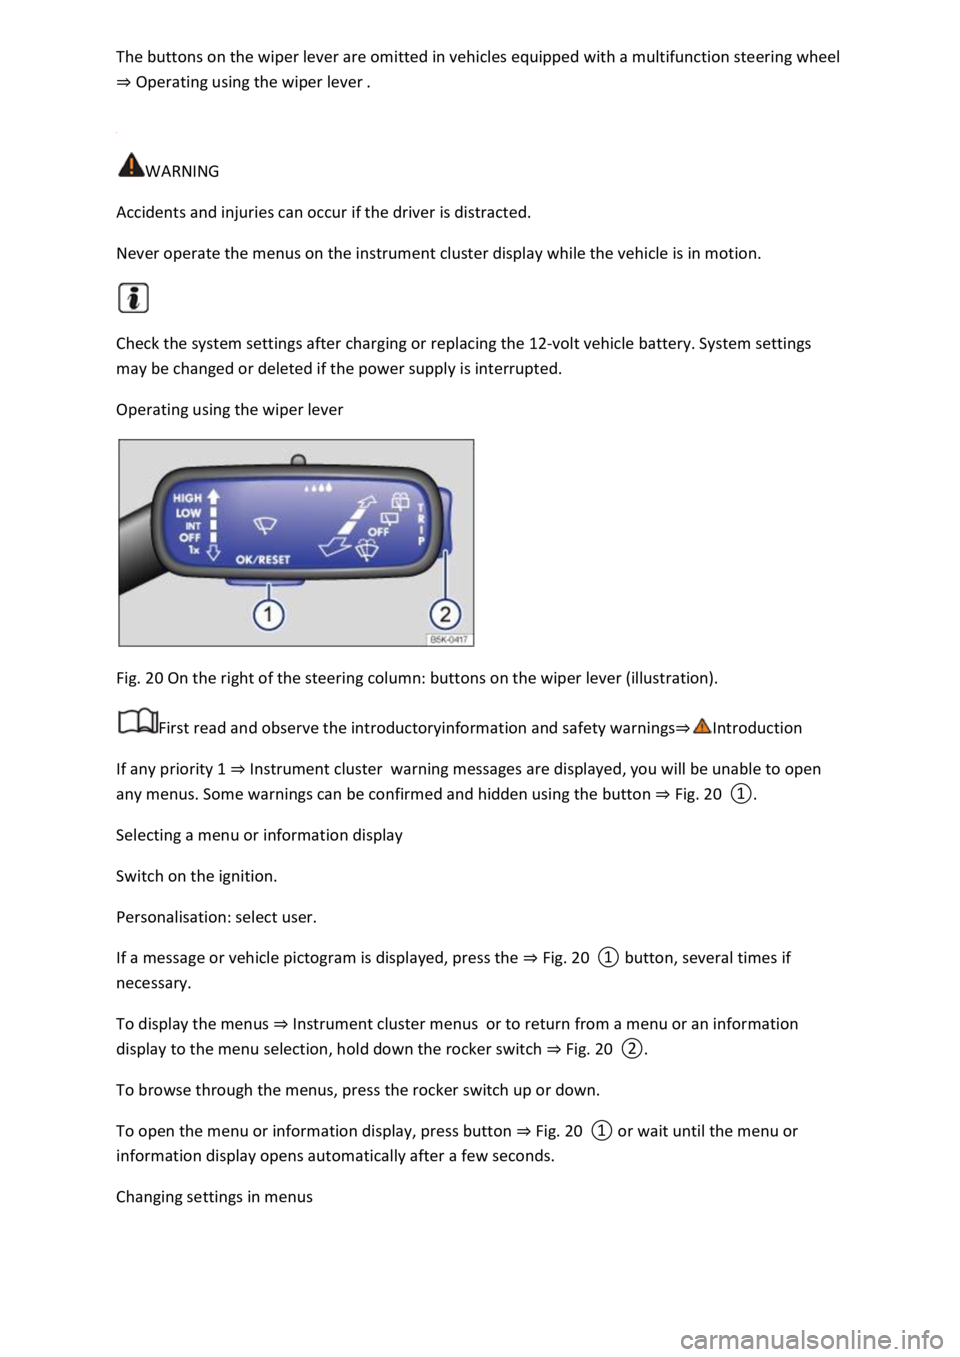
Fig. 20 On the right of the steering column: buttons on the wiper lever (illustration).
First read and observe the introductoryinformation and safety warnings
If any priority 1 Instrument clusterwarning messages are displayed, you will be unable to open
any menus. Some warnings can be confirmed and hidden using the button Fig. 20
Selecting a menu or information display
Switch on the ignition.
Personalisation: select user.
If a message or vehicle pictogram is displayed, press the Fig. 20
To display the menus Instrument cluster menusor to return from a menu or an information
display to the menu selection, hold down the rocker switch Fig. 20
To browse through the menus, press the rocker switch up or down.
To open the menu or information display, press button Fig. 20
a few seconds.
Changing settings in menus
Page 41 of 502

When you start the engine after the 12-volt vehicle battery has been totally discharged or changed,
you may find that system settings (time, date, personal convenience settings and programming) and
user accounts have been changed or deleted. Check and correct the settings as necessary once the
12-volt vehicle battery has been sufficiently charged.
Vehicle settings menu
First read and observe the introductoryinformation and safety warnings
You can switch individual functions and systems on and off and make settings in the vehicle settings
of the Infotainment system.
Opening the Vehicle settings menu
Switch on the ignition.
Switch on Infotainment system if necessary.
Press the button or function button.
Touch the Vehicle and function buttons to open the Vehicle settings menu.
Touch the corresponding function buttons to open additional menus in the Vehicle settings menu or
to make settings in the menu options.
If the checkbox in the function button is ticked , the respective function is switched on.
Touch the function button to return to the previous menu.
Performance monitor
First read and observe the introductoryinformation and safety warnings
The performance monitor is a display for sporty driving. The digital instruments display real-time
values for engine power, temperature and acceleration that are determined by sensors on the
vehicle. This provides the driver with an overview of driving dynamics.
Fig. 23 On the Infotainment system display: performance monitor.
Page 42 of 502

Fig. 23
Display areas.
Arrow buttons for changing to the lap timer.
Opening the performance monitor
Press the MENU button or function button on the Infotainment system.
Touch the Vehicle function button.
Touch the Selection function button.
Touch the Sport function button.
If you would like to switch between the performance monitor and the lap timer Lap timer
one of the arrow buttons on the left and right above the instruments Fig. 23
Selecting instruments and setting units
The display can show a maximum of three instruments at the same time. Each instrument can be
selected for each display area Fig. 23
To change between instruments, swipe vertically over the display. The currently selected instrument
will then disappear and a new instrument will appear.
The units can be adjusted for some instruments in the Infotainment system Vehicle settings
menu
The following instruments can be displayed:
Charge pressure display: the charge pressure display Fig. 23
ar). The further to the right the
needle on the scale, the higher the engine power output.
Accelerometer (G-meter): the accelerometer (G-meter) Fig. 23
-type area shows the
acceleration level and the direction of the acting force (in the opposite direction according to
physical laws). If you drive to the left, for example, the red marking will move in the right area of the
instrument (and vice versa). If you accelerate, the red marking will move down. If you brake, the red
marking will move up. The level of acceleration is indicated by the position of the red marking which
moves outwards. If the acceleration increases, the red marking will move away from the centre area.
Power display: the power display Fig. 23
Coolant temperature display: the needle may move further in a clockwise direction under high
engine loads and with high outside temperatures. This is no cause for concern unless the
indicator lamp in the instrument cluster display is lit up or flashing Coolant temperature display
Oil temperature display: the needle is in the middle area under normal driving conditions. If the
needle is in the bottom left area, this means that the engine has not yet reached its operating
temperature. Avoid excessively high speeds and acceleration when the engine has not yet reached
Page 88 of 502

specialist workshop.
Lit up green: voice services are available. System is OK.
Flashing green: active connection to a voice service.
Information call
The information call enables you to call the Volkswagen AG hotline.
The information call function is available only in some sales regions.
The telephone call centre communicates in the language registered for the vehicle in Car-Net.
Breakdown call
The breakdown call allows you to seek professional assistance should your vehicle break down.
Some vehicle data, e.g. the current location, are transmitted parallel to the voice call.
The telephone call centre communicates in the language registered for the vehicle in Car-Net.
Emergency call service
If an emergency call is placed manually, or automatically after an accident where an airbag was
triggered, data relevant for the emergency call, e.g. the current vehicle location, will be transmitted
automatically Customer information
The telephone call centre communicates in the language set up in the vehicle's Infotainment system.
English is used if this language is not available at the location of the emergency.
Back-up to 112 emergency number
In some cases, the emergency call service may be restricted or unavailable so the general emergency
call number 112 will be used to conduct an emergency call. In this case, only a voice-based
connection is established. No data will be transmitted, e.g. regarding the vehicle or its location.
The following circumstances may restrict access to the emergency call service and lead to the call
being forwarded to the 112 emergency number:
Your current emergency call location is in an area with no or insufficient mobile communications and
GPS reception. This can also include tunnels, streets with tall buildings, garages, underpasses,
mountains and valleys.
You are in an area with sufficient mobile communications and GPS reception but the
telecommunications provider's mobile network is not available.
The emergency call service is prohibited by law in some countries.
There is no valid licence for using the emergency call service.
The components in the vehicle required for the emergency call service are damaged or do not have a
sufficient power supply.
Page 135 of 502

matic headlights .
Tap the turn signal and main beam lever forwards from the basic position.
When main-beam control is switched on, the indicator lamp lights up in the instrument cluster
display.
Switching off main-beam control
Pull back the turn signal and main beam lever.
OR: switch off the automatic headlights .
OR: switch off the ignition.
OR: push the turn signal and main beam lever forwards to switch on the manual main beam.
System limits
The main beam must be manually switched off under the following conditions, as it is not switched
off by the main-beam control in time or at all:
In poorly lit streets where there are highly-reflective signs.
Other road users with insufficient lighting facilities, such as pedestrians, cyclists.
In tight bends, with half-hidden oncoming traffic, on steep crests or in dips.
With oncoming traffic on roads with a central barrier where the driver can see clearly over the
central barrier e.g. truck drivers.
In fog, snow or heavy rain.
In conditions with swirled-up dust and sand.
If the windscreen is damaged in the camera's field of vision.
If the camera's field of vision is covered by condensation, dirt, a sticker, or by snow or ice.
If the camera is faulty or the power supply is interrupted.
WARNING
Do not let the extra convenience afforded by main-beam control tempt you into taking any risks
when driving. The system is not a substitute for the full concentration of the driver.
Always check the vehicle lights yourself and adapt them to the prevailing conditions for light,
visibility and road traffic.
The main-beam control may not be able to recognise all driving situations correctly and may not
work properly in certain situations.
If the camera's field of view is dirty, covered or damaged, the function of the main-beam control
may be impaired. This also applies if changes are made to the vehicle's lighting system, for example
if additional headlights are fitted.
Page 161 of 502

Steering wheel heating
First read and observe the introductoryinformation and safety warnings
The steering wheel heating works when the engine is running.
Switching the steering wheel heating on and off via the Infotainment system
Manual air conditioning system: press the button on the Infotainment system and
touch the Vehicle and function buttons.
Climatronic: open the air conditioning settings in the Infotainment system.
Touch the function button to switch the steering wheel heating on and off.
Switching the steering wheel heating on or off together with the seat heating (only for Climatronic)
Open the air conditioning settings in the Infotainment system.
Touch the function button.
Touch the Link seat/steering wheel heating function button to link the steering wheel heating with
the seat heating.
Press the button to switch the steering wheel heating on or off together with the seat heating.
Selecting a temperature setting (only for Climatronic)
Open the air conditioning settings in the Infotainment system.
Touch the function button.
Touch the Setting function button to select a temperature setting.
Three temperature settings are available. The selected setting is saved when the ignition is switched
off. The temperature setting for the steering wheel heating is unrelated to the temperature setting
for the seat heating.
Switch-off conditions
The steering wheel heating will be switched off automatically if one of the following conditions is
met:
Seat heating for the driver seat is switched off (if Link seat/steering wheel heating is active).
Power consumption is too high.
There is a fault in the steering wheel heating system.
Troubleshooting
First read and observe the introductoryinformation and safety warnings
Page 163 of 502

Maximum heat output and the fastest possible defrosting of the windows are possible only when
the engine is running. Do not start your journey until you have good visibility.
To help ensure good visibility, make sure that you use the air conditioning system and the rear
window heating correctly.
Auxiliary heater and ventilation
Introduction
This chapter contains information on the followingsubjects:
Switching the auxiliary heater and ventilation on and off
Programming the auxiliary heater and ventilation
Remote control
The auxiliary heater and ventilation system can be used to heat the vehicle interior in the winter and
ventilate it in the summer. It is able to clear ice, condensation and a thin layer of snow from the
windscreen. The auxiliary heater is supplied with fuel from the vehicle fuel tank and can be operated
when the vehicle is stationary with the ignition switched off. The auxiliary ventilation system is
powered by the 12-volt vehicle battery.
Auxiliary heater exhaust system
The emissions generated by the auxiliary heater are discharged via an exhaust pipe underneath the
vehicle. The exhaust pipe must not be blocked by snow, mud or other objects.
WARNING
Among other things, the emissions from the auxiliary heater contain carbon monoxide, which is an
odourless and colourless poisonous gas. Carbon monoxide can cause people to lose consciousness. It
can also cause death.
Never switch on the auxiliary heater when the vehicle is in unventilated or closed rooms nor let the
auxiliary heater run in unventilated or closed rooms.
Never program the auxiliary heater so that it is switched on and runs in unventilated or closed
rooms.
WARNING
Parts of the auxiliary heater exhaust system become very hot. This can cause fires.
Park the vehicle so that no part of the exhaust system can come into contact with any inflammable
material underneath the vehicle, e.g. dry grass.
Page 173 of 502
riven by the engine and generates electrical power for convenience consumers
such as the air conditioning system, windscreen heating and ventilation. Saving electrical energy is
easy, e.g.:
Open the windows and doors before driving at high outside temperatures and drive for a short
distance with a window open. Only then switch the air conditioning system on.
Switch the convenience consumers off as soon as they have served their purpose.
WARNING
Adapt your speed and distance from the vehicles ahead to suit visibility, weather, road and traffic
conditions.
Inform yourself about other ways of protecting the environment. Think Blue. is the global
Volkswagen trademark for sustainability and environmental compatibility.
Your Volkswagen dealership can provide you with further information on maintenance and energy-
efficient replacement parts, e.g. new tyres.
Think Blue. Trainer.
The Think Blue. Trainer analyses and visualises your driving style and helps you to drive more
economically.
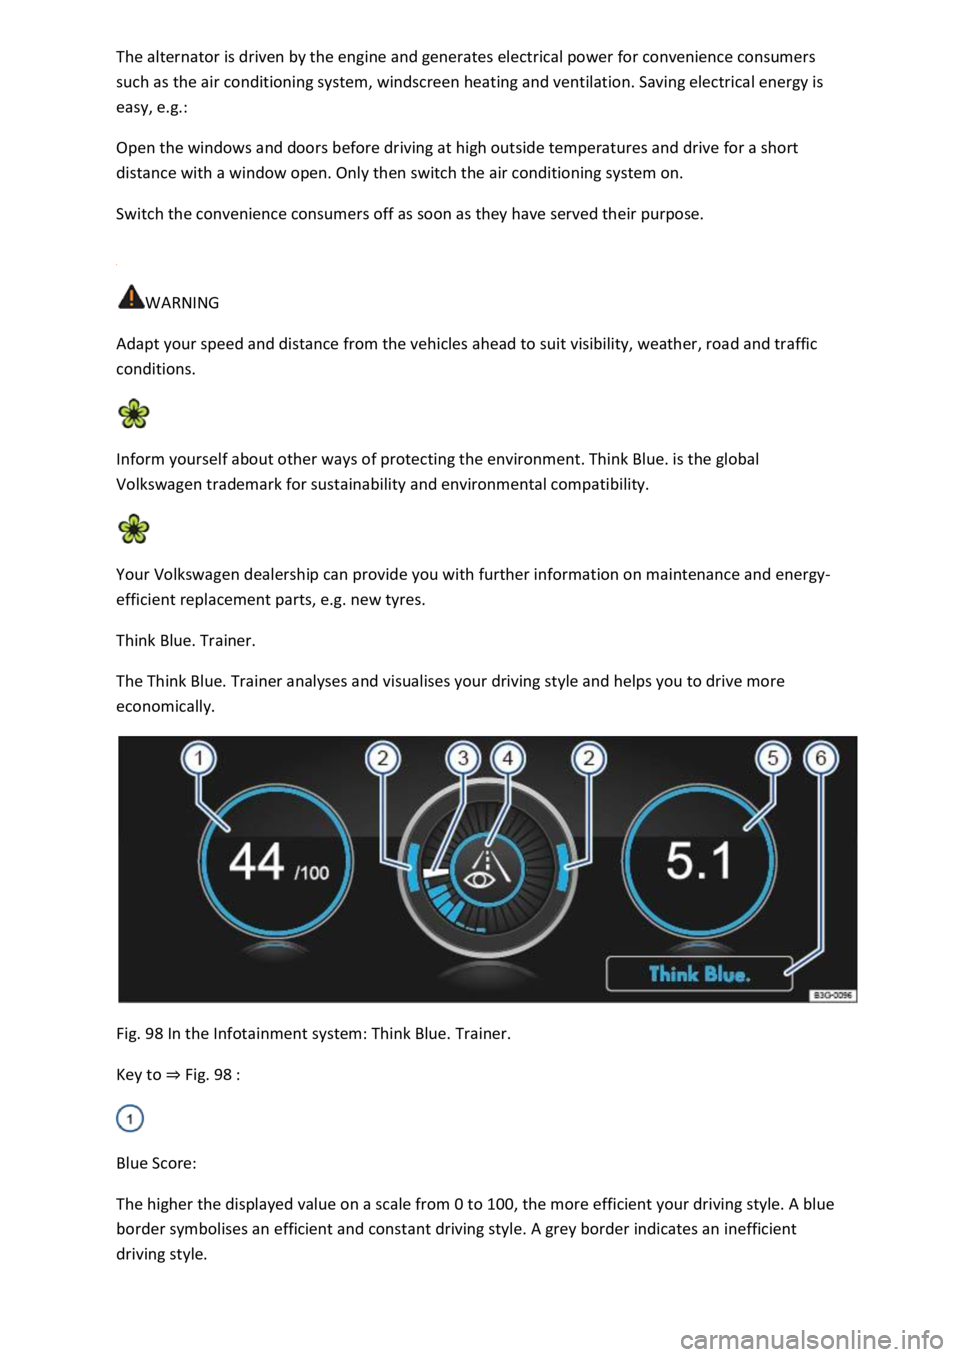
Fig. 98 In the Infotainment system: Think Blue. Trainer.
Key to Fig. 98
Blue Score:
The higher the displayed value on a scale from 0 to 100, the more efficient your driving style. A blue
border symbolises an efficient and constant driving style. A grey border indicates an inefficient
driving style.