2022 VOLKSWAGEN T-ROC boot
[x] Cancel search: bootPage 178 of 502

move unpredictably.
Any objects protruding from the luggage compartment must be marked to ensure that they are
visible to other road users. Comply with legal regulations.
If items protrude out of the luggage compartment, never use the boot lid to wedge them into place
or hold them in position.
If you have to drive with the boot lid open, you must remove any carriers and the loads attached to
them from the boot lid.
WARNING
Poisonous exhaust fumes could enter the vehicle interior when the boot lid is open. This could result
in loss of consciousness, carbon monoxide poisoning, serious injury and accidents.
You should always drive with the boot lid closed in order to prevent poisonous exhaust fumes from
entering the vehicle.
If exceptional circumstances require you to drive with an open boot lid, you must do the following to
reduce the amount of poisonous exhaust fumes that could enter into the vehicle:
Close all windows and the glass roof.
Switch off the air recirculation mode of the heating and fresh air system or air conditioning system.
Open all vents in the dash panel.
Switch the blower for the heating and fresh air system or for the air conditioning system to the
highest setting.
NOTICE
The vehicle height, and possibly the length, are different when the boot lid is open.
Driving through water
Please follow these points in order to prevent damage to your vehicle when driving through water,
for example on flooded streets:
Check how deep the water is before driving through it. The water may be no higher than the lower
edge of the body
Do not drive faster than walking speed.
Never stop the vehicle, reverse or switch off the engine while in water.
Oncoming vehicles will create waves that could increase the water level for your vehicle to such an
extent that it is not safe to drive through the water.
Always deactivate the start/stop system manually when driving through water Start/stop system
Page 222 of 502
ot on the clutch when driving offroad. When travelling over
uneven ground, you could press the clutch by mistake and lose control of the vehicle. This also
prevents power being transferred between the engine and the gearbox. In addition, driving with the
clutch partially engaged causes premature wear to the clutch lining.
Useful accessories for offroad driving
First read and observe the introductoryinformation and safety warnings
The checklist contains just a few items of equipment that can be very useful for offroad driving. If
you have an instruction manual or fitting instructions for these accessories, you should always take
them with you and observe them as necessary when driving offroad.
Checklist
Useful items when driving offroad:
Water, compass, maps and torch with spare batteries.
Winch, tow bar or rope with sufficient strength.
Mobile telephone, shovel, blankets and rubber boots.
Electrical air compressor for connection to the 12-volt sockets in the vehicle to inflate the tyres.
A wooden board approx. 4 cm thick and approx. 1 metre long or an aluminium frame of similar size:
this can be used to free a vehicle stuck in the mud and provide a platform for a vehicle jack.
Snow chains, additional spare wheels, a breakdown set, jack and box spanner.
Changing gear correctly
First read and observe the introductoryinformation and safety warnings
The correct choice of gear depends on the offroad terrain.
Before attempting to drive through difficult terrain it can be helpful to stop and consider which gear
you should select. After several trips offroad, you will learn which gear to select in conjunction with
the step-down ratio and differential locks for different types of terrain.
General rules
Page 263 of 502

Rear view camera system (Rear View)
Park Assist Park Assist
The available systems vary according to the vehicle equipment level.
Limits of the parking systems
The sensors or cameras may not always be able to detect objects such as thin rails, fences, posts,
trees, very low or high obstacles and open or opening boot lids.
In some cases, dirt and ice on the sensors or cameras could be registered as an obstacle.
Limits of the rear view camera system
The rear view camera system shows only two-dimensional images on the screen. The lack of depth
of field means that potholes and protruding objects on the ground may only be detected with
difficulty, or may not be detected at all.
The system displays the orientation lines irrespective of the area surrounding the vehicle. There is no
automatic obstacle detection. Drivers must judge for themselves whether the vehicle will fit into the
parking space.
WARNING
The intelligent technology used in the parking systems cannot overcome the laws of physics, and
functions only within the limits of the system. Never let the extra convenience afforded by the
parking systems tempt you into taking any risks when driving. The parking systems cannot replace
the full concentration of the driver.
Always adapt your speed and driving style to suit visibility, weather, road and traffic conditions.
Unintentional vehicle movements can cause serious injury.
Keep looking in the direction in which you are parking and at the relevant area surrounding the
vehicle.
Do not allow the displays in the instrument cluster and the images shown in the Infotainment
system to distract you from the traffic.
Always monitor the area around the vehicle as the parking systems will not always detect infants,
animals and objects.
The parking systems have blind spots in which obstacles and people are not registered.
External sources of sound and certain surfaces on objects and clothing may influence the signals of
the sensors. In certain circumstances, the systems will be unable to detect or properly detect people
and objects.
Certain objects, for example narrow posts or railings, may be difficult or impossible to see on the
screen because of its resolution or poor light conditions.
Page 268 of 502
First read and observe the introductoryinformation and safety warnings
Switching on the rear view camera system
Select reverse gear.
OR: press the button.
Switching off the rear view camera system
Drive forwards at a speed of at least 10 km/h (6 mph).
Display representation
First read and observe the introductoryinformation and safety warnings
The functions and displays of the rear view camera system image vary according to the equipment
level and may differ from each other.
The display of the reversing camera picture varies if the factory-fitted towing bracket is electrically
connected to the trailer Notes on towing a trailer
Functions and symbols of the rear view camera system
You can make settings by means of the function buttons when the rear view camera system is
switched on. Some setting options depend on the vehicle equipment.
xClose current display.Adjust display: brightness, contrast, colour.Switch to Park
Distance Control Park Distance ControlShow Park Distance Control display.Hide Park
Distance Control display.
Orientation lines
Red line: safety distance to the rear.
Green lateral lines: extension of the vehicle.
Prerequisites
First read and observe the introductoryinformation and safety warnings
The prerequisites for parking using the rear view camera system must be met.
Do not exceed a speed of approximately 15 km/h (9 mph).
Width of the parking space: vehicle width + 0.2 m.
The following conditions must be met in order to display a correct image:
The boot lid is closed.
The surrounding area has a flat surface.
Vehicle does not have a heavy load at the rear.
Page 298 of 502
the load in
the vehicle will have an effect on the handling and braking distance of the vehicle.
Transporting heavy objects changes the vehicle's handling and the centre of gravity.
The load should be distributed as evenly as possible in the vehicle.
Always secure heavy objects in the luggage compartment as far in front of the rear axle as possible.
Loose objects in the luggage compartment can suddenly slide and change the way the vehicle
handles.
Always adapt your speed and driving style to suit visibility, weather, road and traffic conditions.
Accelerate very carefully and gently.
Avoid sudden braking and driving manoeuvres.
Brake earlier than in normal driving.
NOTICE
Objects rubbing against the rear windows may damage or destroy the heating wires or, depending
on the vehicle equipment, also the aerial.
Luggage compartment cover
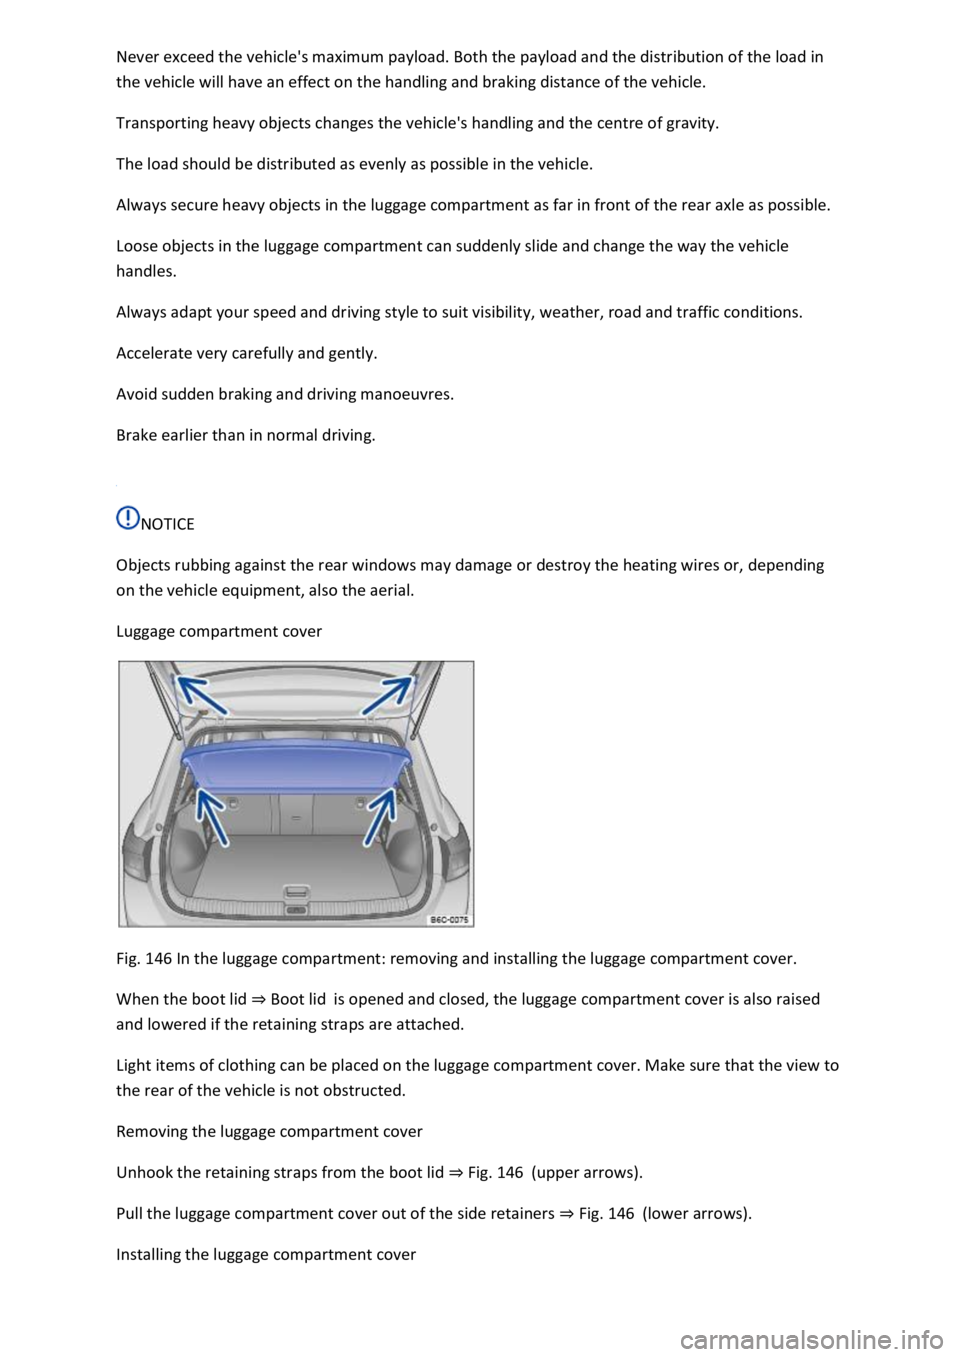
Fig. 146 In the luggage compartment: removing and installing the luggage compartment cover.
When the boot lid Boot lidis opened and closed, the luggage compartment cover is also raised
and lowered if the retaining straps are attached.
Light items of clothing can be placed on the luggage compartment cover. Make sure that the view to
the rear of the vehicle is not obstructed.
Removing the luggage compartment cover
Unhook the retaining straps from the boot lid Fig. 146(upper arrows).
Pull the luggage compartment cover out of the side retainers Fig. 146(lower arrows).
Installing the luggage compartment cover
Page 299 of 502
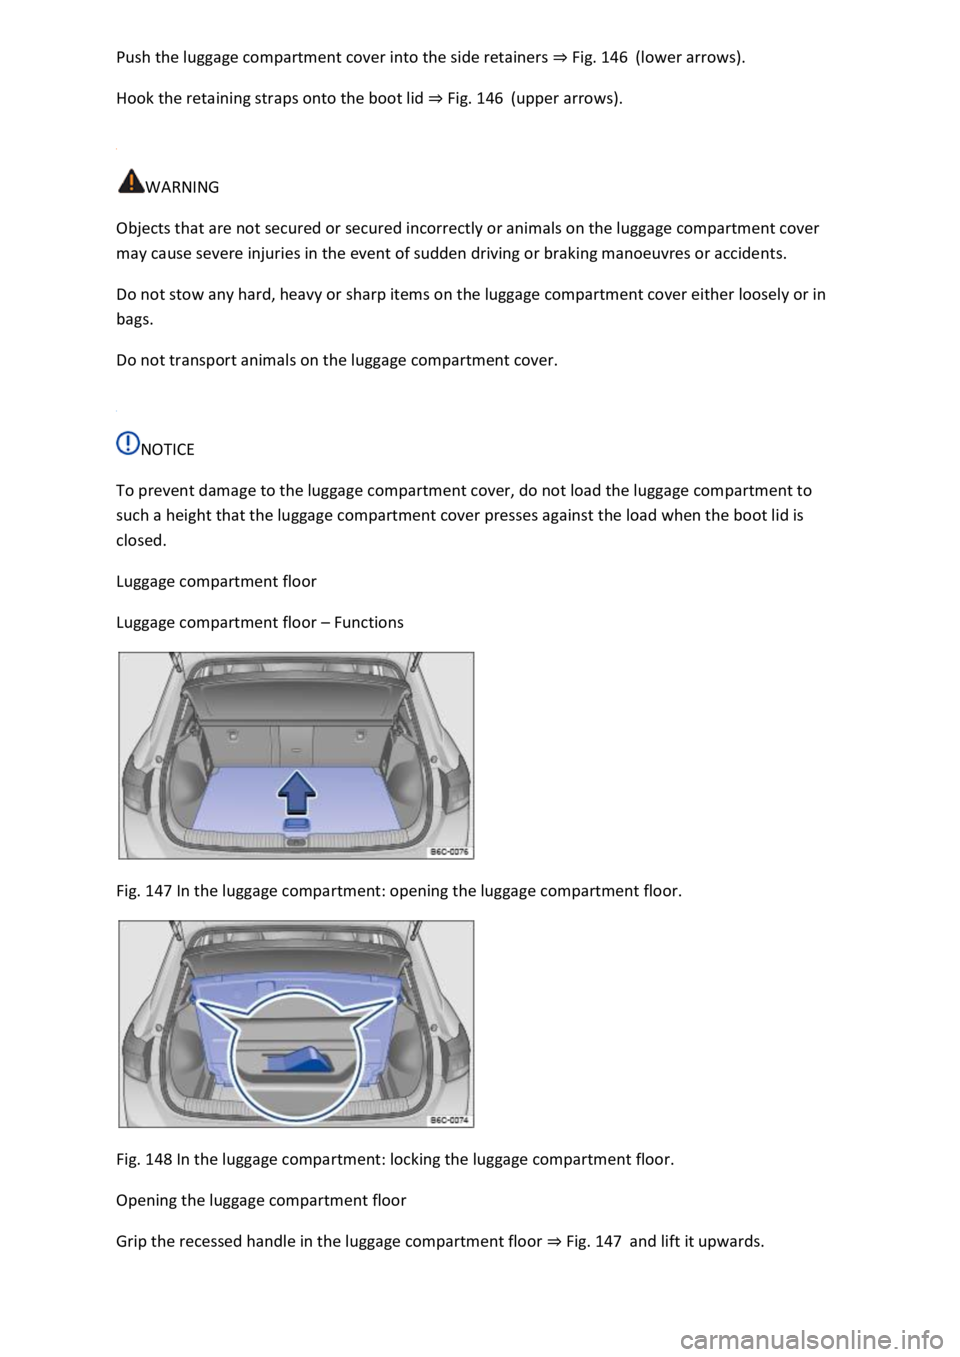
Fig. 146(lower arrows).
Hook the retaining straps onto the boot lid Fig. 146(upper arrows).
WARNING
Objects that are not secured or secured incorrectly or animals on the luggage compartment cover
may cause severe injuries in the event of sudden driving or braking manoeuvres or accidents.
Do not stow any hard, heavy or sharp items on the luggage compartment cover either loosely or in
bags.
Do not transport animals on the luggage compartment cover.
NOTICE
To prevent damage to the luggage compartment cover, do not load the luggage compartment to
such a height that the luggage compartment cover presses against the load when the boot lid is
closed.
Luggage compartment floor
Luggage compartment floor Functions
Fig. 147 In the luggage compartment: opening the luggage compartment floor.
Fig. 148 In the luggage compartment: locking the luggage compartment floor.
Opening the luggage compartment floor
Grip the recessed handle in the luggage compartment floor Fig. 147and lift it upwards.
Page 303 of 502
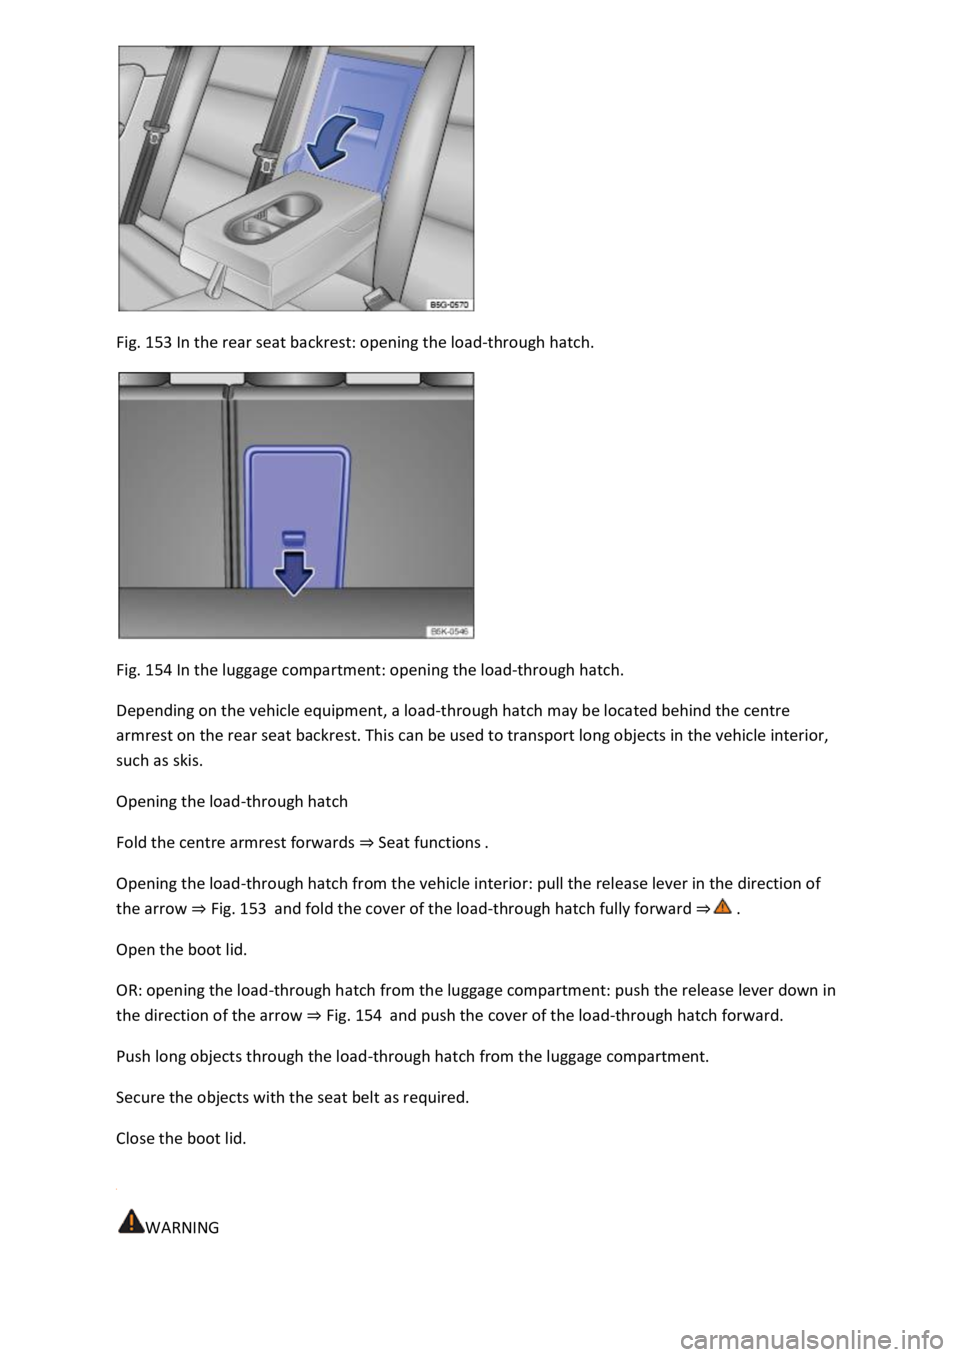
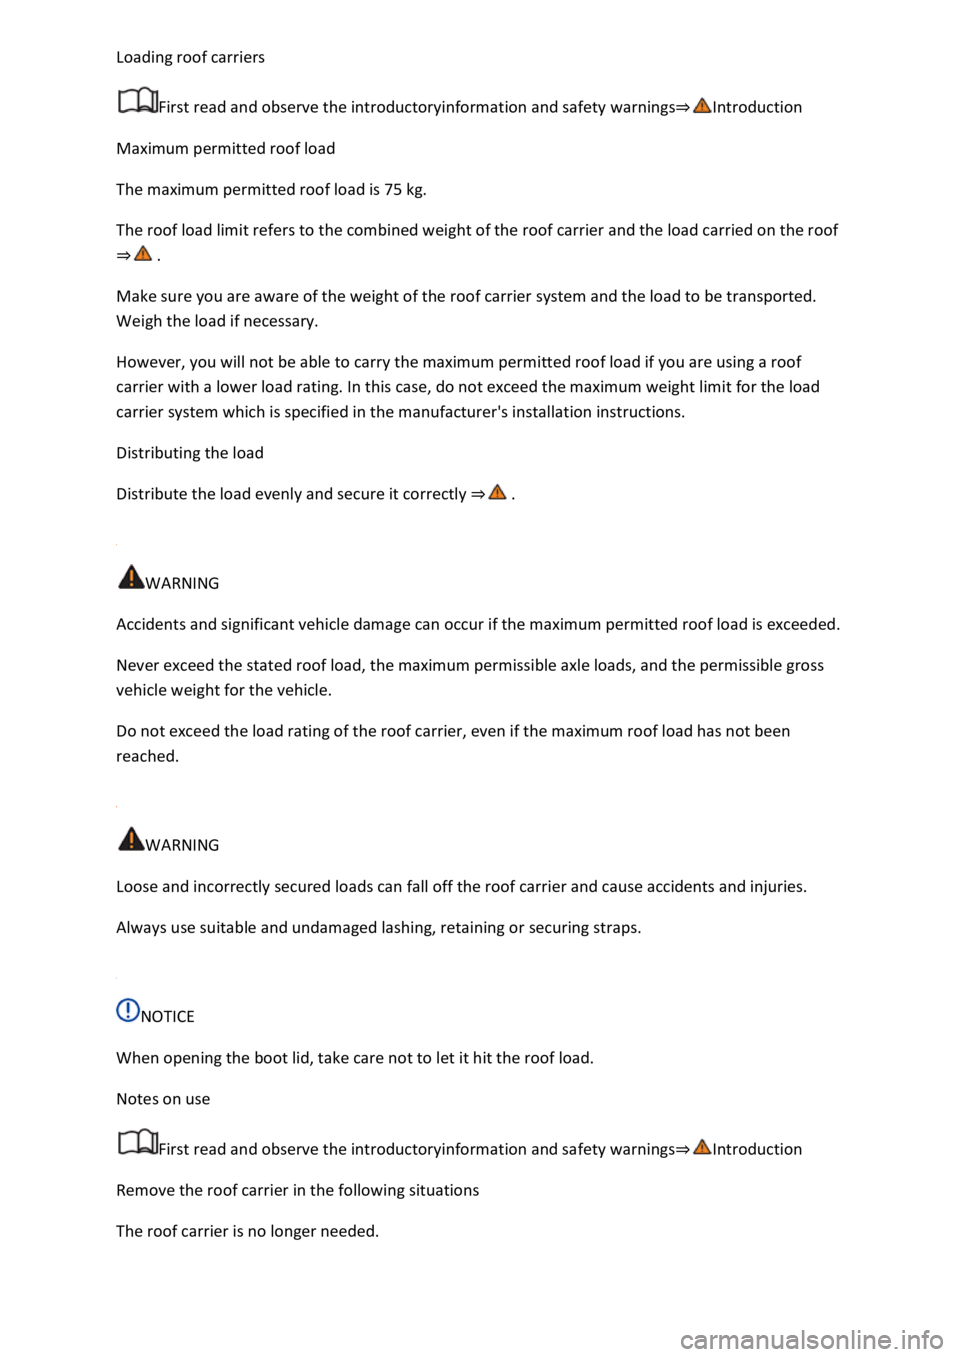
Fig. 153 In the rear seat backrest: opening the load-through hatch.
Fig. 154 In the luggage compartment: opening the load-through hatch.
Depending on the vehicle equipment, a load-through hatch may be located behind the centre
armrest on the rear seat backrest. This can be used to transport long objects in the vehicle interior,
such as skis.
Opening the load-through hatch
Fold the centre armrest forwards Seat functions
Opening the load-through hatch from the vehicle interior: pull the release lever in the direction of
the arrow Fig. 153and fold the cover of the load-through hatch fully forward
Open the boot lid.
OR: opening the load-through hatch from the luggage compartment: push the release lever down in
the direction of the arrow Fig. 154and push the cover of the load-through hatch forward.
Push long objects through the load-through hatch from the luggage compartment.
Secure the objects with the seat belt as required.
Close the boot lid.
WARNING
Page 306 of 502
First read and observe the introductoryinformation and safety warnings
Maximum permitted roof load
The maximum permitted roof load is 75 kg.
The roof load limit refers to the combined weight of the roof carrier and the load carried on the roof
Make sure you are aware of the weight of the roof carrier system and the load to be transported.
Weigh the load if necessary.
However, you will not be able to carry the maximum permitted roof load if you are using a roof
carrier with a lower load rating. In this case, do not exceed the maximum weight limit for the load
carrier system which is specified in the manufacturer's installation instructions.
Distributing the load
Distribute the load evenly and secure it correctly
WARNING
Accidents and significant vehicle damage can occur if the maximum permitted roof load is exceeded.
Never exceed the stated roof load, the maximum permissible axle loads, and the permissible gross
vehicle weight for the vehicle.
Do not exceed the load rating of the roof carrier, even if the maximum roof load has not been
reached.
WARNING
Loose and incorrectly secured loads can fall off the roof carrier and cause accidents and injuries.
Always use suitable and undamaged lashing, retaining or securing straps.
NOTICE
When opening the boot lid, take care not to let it hit the roof load.
Notes on use
First read and observe the introductoryinformation and safety warnings
Remove the roof carrier in the following situations
The roof carrier is no longer needed.