2022 TOYOTA VENZA HYBRID seat adjustment
[x] Cancel search: seat adjustmentPage 158 of 548
1573-3. Adjusting the seats
3
Before driving
■Before folding down the
seatbacks
1 Park the vehicle in a safe
place.
Apply the parking brake ( P.209)
and shift the shift lever to P.
( P.205)
2 Adjust the position of the
front seat and the angle of
the seatback. ( P.155)
Depending on the position of the
front seat, if the seatback is folded
backward, it may interfere with the
operation of the rear seat.
3 Lift up and push down the
head restraints of the rear
outboard seats, and lower
the head restraint of the rear
center seat. ( P.162)
4 Stow the armrest of the rear
seat if it is pulled out.
( P.358)
This step is not necessary when
operating the left side seat only.
■Folding down the seat-
backs
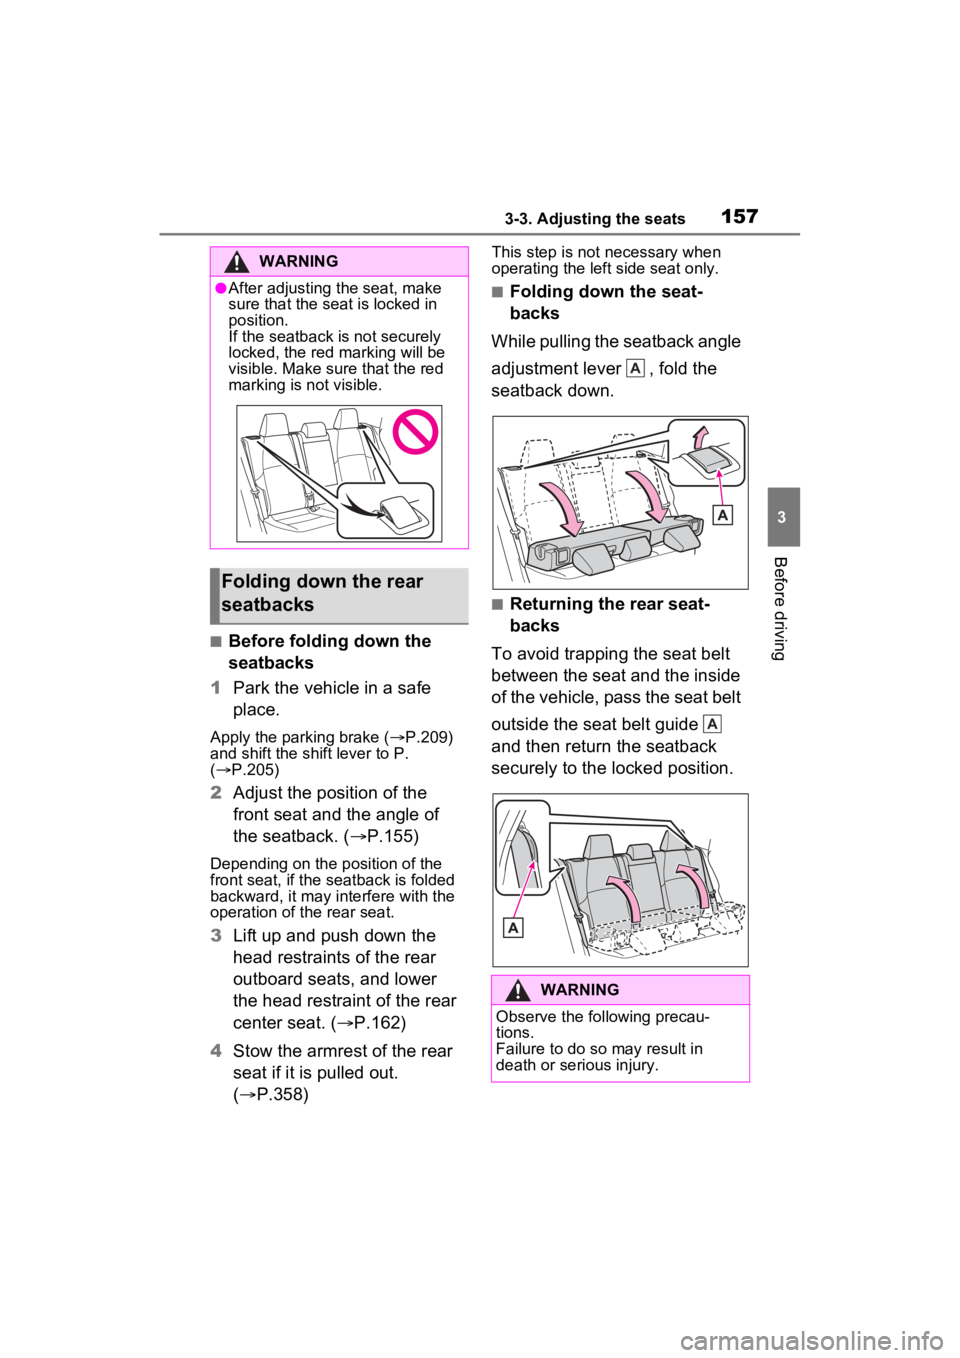
While pulling the seatback angle
adjustment lever , fold the
seatback down.
■Returning the rear seat-
backs
To avoid trapping the seat belt
between the seat and the inside
of the vehicle, pass the seat belt
outside the seat belt guide
and then return the seatback
securely to the locked position.
WARNING
●After adjusting the seat, make
sure that the seat is locked in
position.
If the seatback is not securely
locked, the red marking will be
visible. Make sure that the red
marking is not visible.
Folding down the rear
seatbacks
WARNING
Observe the following precau-
tions.
Failure to do so may result in
death or serious injury.
A
A
Page 161 of 548
1603-3. Adjusting the seats
●Operate the tilt and telescopic
steering control switch (only can-
cels steering wheel position
recall).
■Seat positions that can be
memorized (P.155)
The positions adjusted by the fol-
lowing procedure can be recorded:
●Seat position adjustment
●Seatback angle adjustment
●Seat cushion (front) angle adjust-
ment
●Vertical height adjustment
■Operating the driving position
memory after turning the power
switch to OFF
Recorded seat positions can be
activated up to 1 80 seconds after
the driver’s door is opened and
another 60 seconds after it is closed
again.
■In order to correctly use the
driving position memory func-
tion
If a seat position is already in the
furthest possible position and the
seat is operated in the same direc-
tion, the recorded position may be
slightly different w hen it is recalled.
■When recalling the driving posi-
tion
Take care when recalling the driving
position so that the head restraint
does not touch the ceiling.
■When the recorded seat posi-
tion cannot be recalled
The seat position may not be
recalled in some situations when the
seat position is recorded in a certain
range. For details, contact your
Toyota dealer.
■Registering procedure
Record your driving position to
button “1” or “2” before perform-
ing the following:
Carry only the key you want to
register, and then close the
driver’s door.
If 2 or more keys are in the vehi-
cle, the driving position cannot
be recorded properly.
1 Check that the shift lever is in
P.
2 Turn the power switch to ON.
3 Recall the driving position
that you want to record.
4 While pressing the recalled
button, press and hold the
door lock switch (either lock
or unlock) until the buzzer
sounds.
If the button could not be regis-
tered, the buzzer sounds continu-
WARNING
■Seat adjustment caution
Take care during seat adjustment
so that the seat does not strike
the rear passenger or squeeze
your body against the steering
wheel.
Registering/recall/cancel-
ing a driving position to
an electronic key (mem-
ory recall function)
Page 163 of 548
1623-3. Adjusting the seats
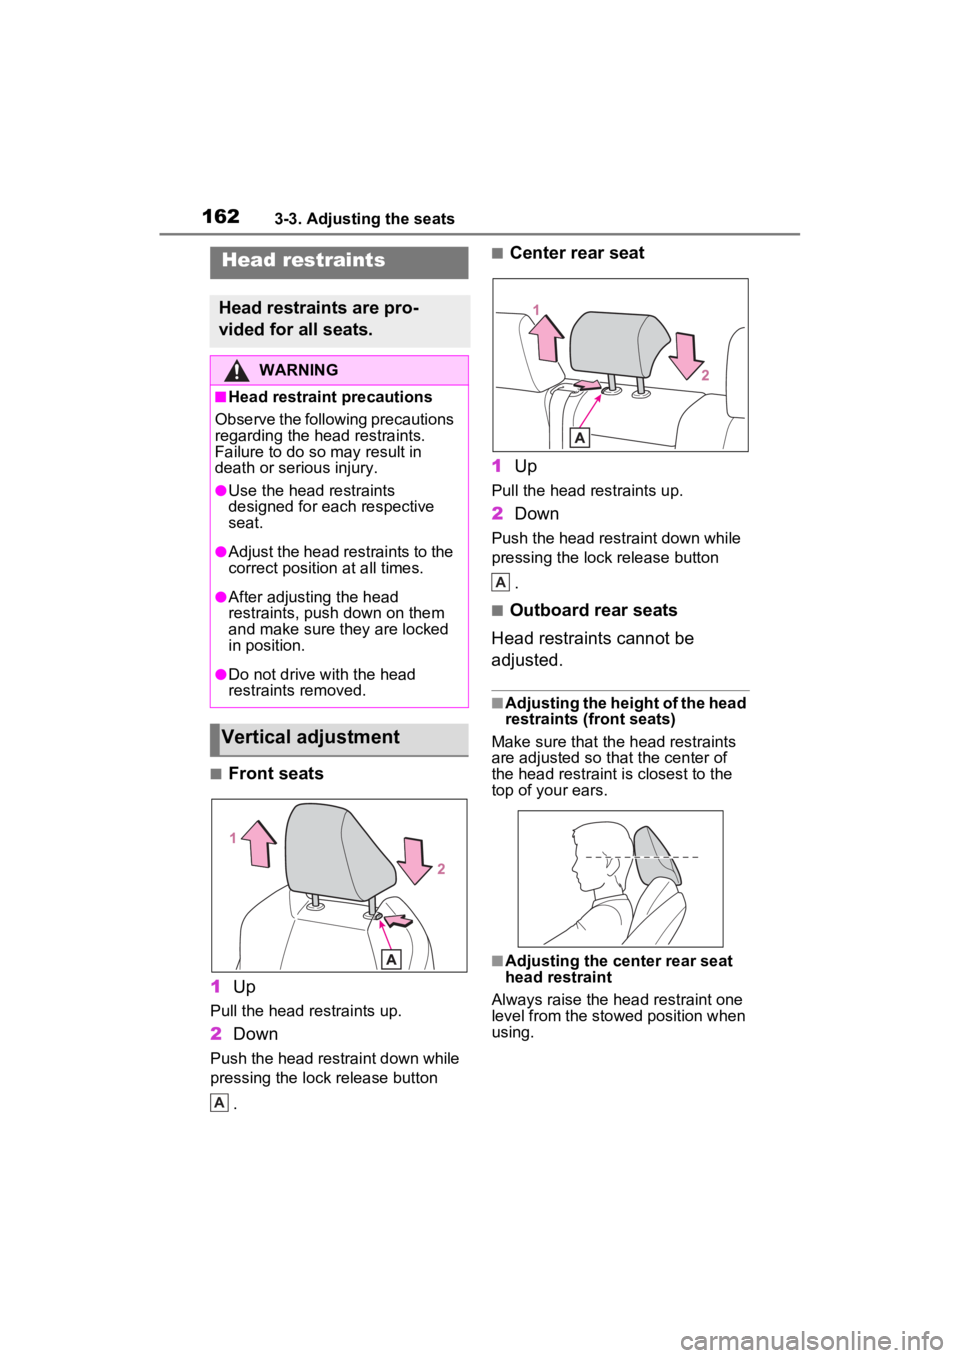
■Front seats
1 Up
Pull the head restraints up.
2Down
Push the head restraint down while
pressing the lock release button
.
■Center rear seat
1 Up
Pull the head restraints up.
2Down
Push the head restraint down while
pressing the lock release button
.
■Outboard rear seats
Head restraints cannot be
adjusted.
■Adjusting the height of the head
restraints (front seats)
Make sure that the head restraints
are adjusted so that the center of
the head restraint i s closest to the
top of your ears.
■Adjusting the center rear seat
head restraint
Always raise the head restraint one
level from the stowed position when
using.
Head restraints
Head restraints are pro-
vided for all seats.
WARNING
■Head restraint precautions
Observe the following precautions
regarding the head restraints.
Failure to do so m ay result in
death or serious injury.
●Use the head restraints
designed for each respective
seat.
●Adjust the head restraints to the
correct position at all times.
●After adjusting the head
restraints, push down on them
and make sure they are locked
in position.
●Do not drive with the head
restraints removed.
Vertical adjustment
A
A
Page 165 of 548
1643-4. Adjusting the steering wheel and mirrors
3-4.Adjusting the steering wheel and mirrors
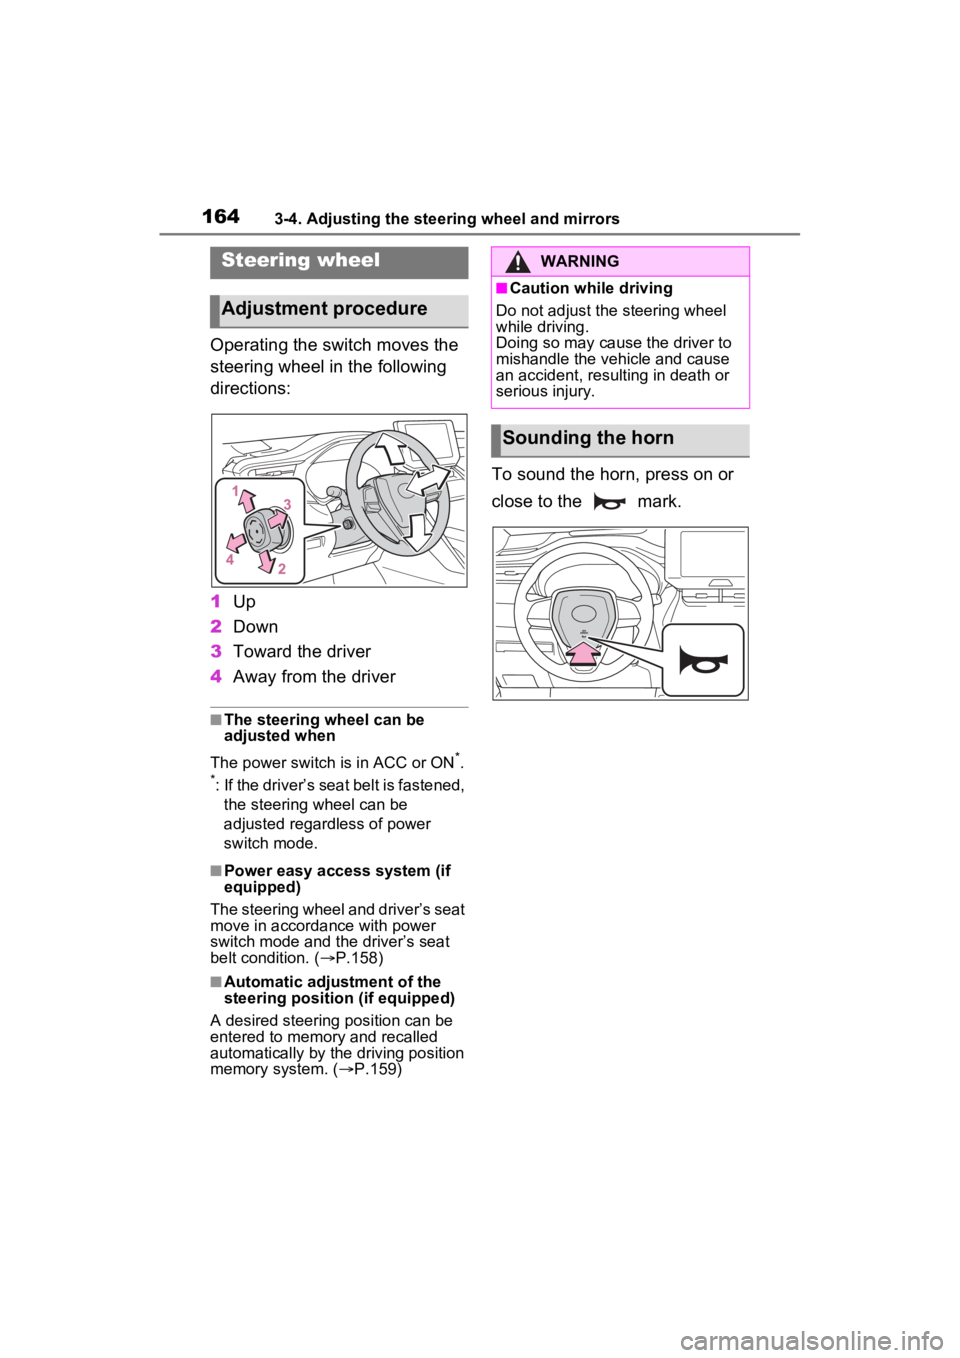
Operating the switch moves the
steering wheel in the following
directions:
1Up
2 Down
3 Toward the driver
4 Away from the driver
■The steering wheel can be
adjusted when
The power switch is in ACC or ON
*.
*: If the driver’s seat belt is fastened,
the steering wheel can be
adjusted regardless of power
switch mode.
■Power easy access system (if
equipped)
The steering wheel and driver’s seat
move in accordance with power
switch mode and the driver’s seat
belt condition. ( P.158)
■Automatic adjustment of the
steering position (if equipped)
A desired steering position can be
entered to memory and recalled
automatically by the driving position
memory system. ( P.159)
To sound the horn, press on or
close to the mark.
Steering wheel
Adjustment procedure
WARNING
■Caution while driving
Do not adjust the steering wheel
while driving.
Doing so may cause the driver to
mishandle the vehicle and cause
an accident, resulting in death or
serious injury.
Sounding the horn
Page 327 of 548
3275-1. Using the air conditioning system and defogger
5
Interior features
in the rear seats
The windshield defogger is
not operating
While operating, illuminates.
■Manually turning front seat
concentrated airflow mode
on/off
In front seat concentrated air-
flow mode, directing airflow to
the front seats only and to the all
seats can be switched via switch
operation. When the mode has
been switched manually, auto-
matic airflow control stops oper-
ating.
Select on the option control
screen of the air conditioning
control screen and switch the
airflow.
Indicator illuminated: Airflow
to the front seats only
Indicator off: Airflow to the all
seats
■Operation of automatic airflow
control
●In order to maintain a comfortable
interior, airflow may be directed to
seats without pa ssengers immedi-
ately after the hybrid system is
started and at other times depend-
ing on the outside temperature.
●After the hybrid system is started,
if passengers move around inside
or enter/exit the vehicle, the sys-
tem cannot accurately detect the
presence of passengers and auto-
matic airflow cont rol will not oper-
ate.
■Operation of manual airflow
control
Even if the funct ion is manually
switched to directing airflow to only
the front seats, w hen a rear seat is
occupied, it may automatically direct
airflow to all seats.
■To return to automatic airflow
control
1 With the indicator off, turn the
power switch to OFF.
2 After 60 minutes or more elapse,
turn the power switch to ON.
■Front seat concentrated airflow
mode
When using front seat concentrated
airflow mode to direct airflow to the
driver side only, the passenger-side
temperature cannot be adjusted
using the air conditioner control
screen in Toyota m ulti-operation
touch.
Operation is possible at this time
using the passenger-side tempera-
ture adjustment switch on the air
conditioning control panel.
This feature is used to prevent
ice from building up on the wind-
shield and wiper blades.
Press the switch to turn the sys-
tem on/off.
The indicator comes on when the
system is on.
The windshield wiper de-icer will
automatically turn off after approxi-
mately 15 minutes.
Windshield wiper de-icer
(if equipped)
Page 427 of 548
4276-3. Do-it-yourself maintenance
6
Maintenance and care
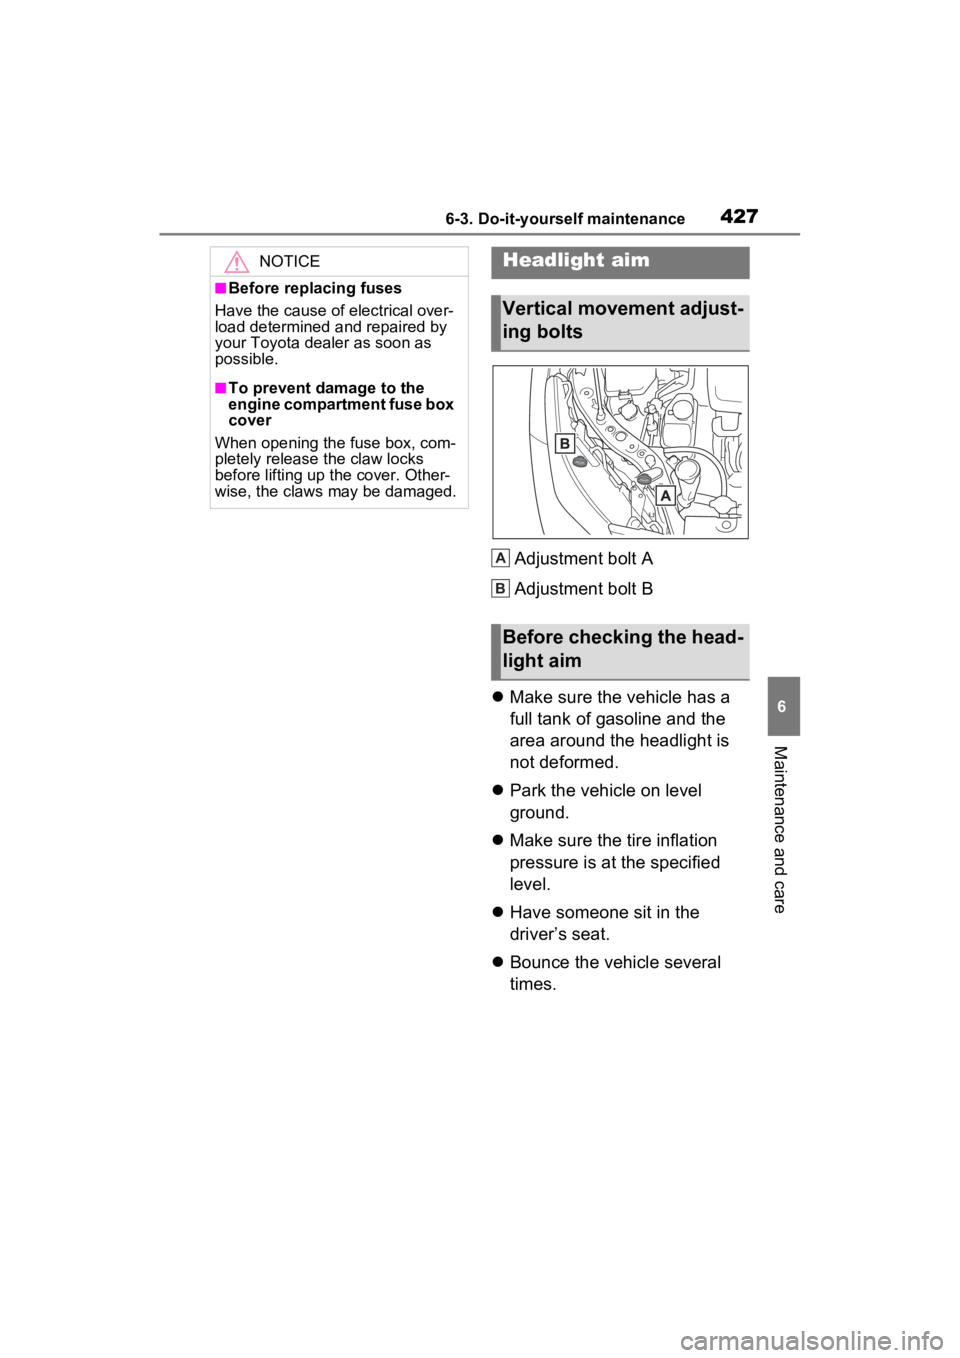
Adjustment bolt A
Adjustment bolt B
Make sure the vehicle has a
full tank of gasoline and the
area around the headlight is
not deformed.
Park the vehicle on level
ground.
Make sure the tire inflation
pressure is at the specified
level.
Have someone sit in the
driver’s seat.
Bounce the vehicle several
times.
NOTICE
■Before replacing fuses
Have the cause of electrical over-
load determined and repaired by
your Toyota dealer as soon as
possible.
■To prevent damage to the
engine compartment fuse box
cover
When opening the fuse box, com-
pletely release the claw locks
before lifting up the cover. Other-
wise, the claws may be damaged.
Headlight aim
Vertical movement adjust-
ing bolts
Before checking the head-
light aim
A
B
Page 533 of 548
Alphabetical Index533
Event data recorder (EDR)......... 8
EV indicator .............................. 71
EV Ratio .................................. 100
F
Flat tire .................................... 453Tire pressure warning system........................................... 399
Floor mats ................................. 26
Fluid Brake ............................ 392, 481
Hybrid transmission.............. 480
Rear differential .................... 480
Washer ................................. 393
Fog lights Switch................................... 221
Footwell lights ..... ................... 333
Front passenger’s seat belt reminder light ....................... 445
Front passenger occupant clas- sification system .................... 43
Front position lights Light switch .......................... 215
Front seat heaters .................. 329
Front seats .............................. 155 Adjustment ........................... 155
Cleaning ............................... 373
Correct driving posture ........... 27
Driving position memory....... 158
Head restraints ..................... 162
Memory recall function ......... 160
Power easy access system .. 158
Seat heaters ......................... 329
Seat position memory .......... 158
Seat ventilators .................... 329
Front side marker lights ........ 215 Light switch .......................... 215
Replacing light bulbs ............ 428
Front turn signal lights Replacing light bulbs ............ 428
Turn signal lever................... 208
Fuel Capacity ...............................477
Fuel gauge .......................89, 93
Gas station information ........548
Information .........
..................486
Refueling ..............................227
Type .............................477, 486
Warning light ........................444
Fuel filler door.........................228 If the fuel filler door cannot be opened ...............................462
Refueling ..............................227
Fuel gauge...........................89, 93
Fuses .......................................424
G
Garage door opene r ...............360
Gas station information .........548
Gauges ................................89, 93
Glove box ................................337
H
Headlights ...............................215 Automatic High Beam system...........................................218
Light switch...........................215
Replacing light bulbs ............428
Headlights aim ........................427
Head restraints .......................162
Head-up display ......................118 Driving position memory .......159
Driving support system display area ....................................120
HUD (Head-up display) switch ...........................................119
Hybrid System Indicator .......121
Memory recall function .........160
Navigation system-linked display ...........................................118
Outside temperature display 122
Pop-up display......................120
Settings ................................119
Page 538 of 548

538Alphabetical Index
Refueling ................................. 227Capacity ............................... 477
Fuel types..................... 477, 486
If the fuel filler door cannot be opened ............................... 462
Opening the fuel tank cap .... 228
Regenerative braking ............... 71
Replacing Electronic key battery ........... 422
Fuses ................................... 424
Light bulbs ............................ 428
Tires ..................................... 453
Wiper insert .......................... 419
Wireless remote control battery........................................... 422
Reporting safety defects for U.S. owners................................... 514
Resetting the message indicat- ing maintenance is required 378
Road accident cautions ........... 75
Road Sign Assist .................... 254
RSA (Road Sign Assist) ......... 254
S
Seat belt reminder light ......... 445
Seat belts .................................. 29 Adjusting the seat belt shoulder anchor height ....................... 31
Automatic Locking Retractor .. 31
Child restraint system installation ............................................. 54
Cleaning and maintaining the seat belt.............................. 373
Emergency Locking Retractor 31
How to wear your seat belt..... 30
How your child should wear the seat belt................................ 30
Pregnant women, proper seat belt use................................. 29
Reminder light and buzzer ... 445
Seat belt extender .................. 30
Seat belt pretensioners .......... 32 SRS warning light .................439
Seat heaters ............................329
Seating capacity .....................194
Seat position memory ............158
Seats Adjustment precautions 155, 156
Adjustment ...................155, 156
Child seats/child restraint system installation ............................50
Cleaning ...............................373
Driving position memory .......158
Folding down the rear seatbacks ...........................................157
Head restraint .......................162
Power easy access system ..158
Properly sitting in the seat ......27
Seat heaters ....... ..................329
Seat position memory...........158
Seat ventilators.....................329
Seat ventilators .. .....................329
Secondary Collision Brake ....297
Sensor Automatic headlight system .216
Automatic High Beam system...........................................218
BSM (Blind Spot M onitor) .....270
Digital Rear-view Mirror ........170
Inside rear view mirror ..........166
Intuitive parking assist ..........278
LTA (Lane Traci ng Assist) ....244
Parking Support Brake function (rear-crossing vehicles) ......270
Parking Support Brake function (static objects) ....................278
Rain-sensing windshield wipers ...........................................224
RCTA ....................................270
Toyota Safety Sense 2.0 ......230
Service plug ..............................74
Service reminder message ....378
Shift lever ................................204 If th e s hif t le ver ca n no t b e s hif te d