2022 TOYOTA TUNDRA HYBRID CLUSTER
[x] Cancel search: CLUSTERPage 100 of 618
1002-1. Instrument cluster
Owners Manual_USA_M0C031_en
■Changing settings of the
trailer type
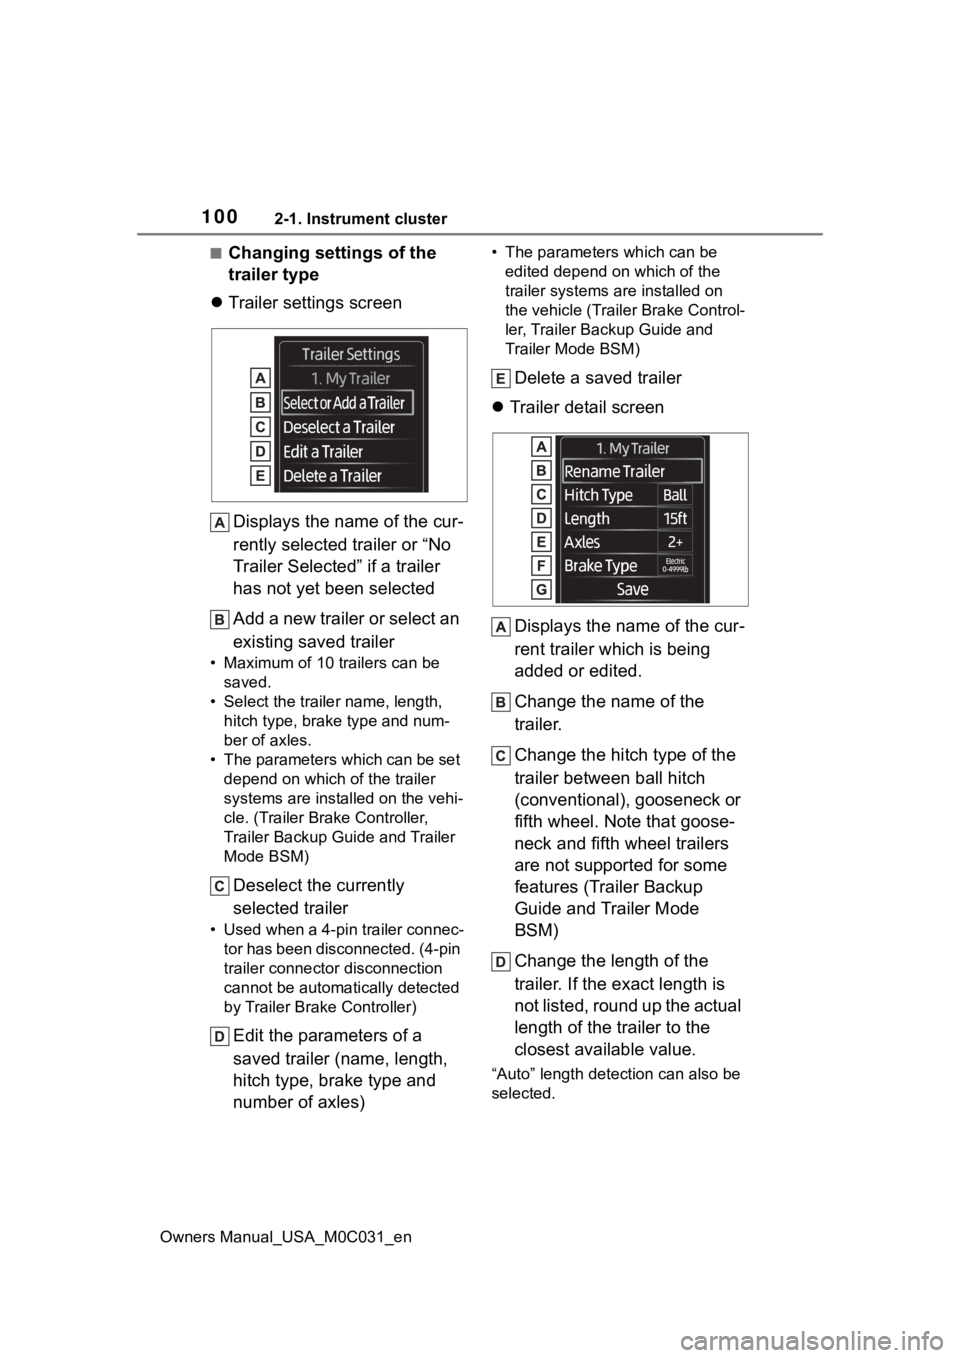
Trailer settings screen
Displays the name of the cur-
rently selected trailer or “No
Trailer Selected” if a trailer
has not yet been selected
Add a new trailer or select an
existing saved trailer
• Maximum of 10 trailers can be saved.
• Select the trailer name, length, hitch type, brake type and num-
ber of axles.
• The parameters which can be set depend on which of the trailer
systems are installed on the vehi-
cle. (Trailer Brake Controller,
Trailer Backup Guide and Trailer
Mode BSM)
Deselect the currently
selected trailer
• Used when a 4-pin trailer connec-tor has been disconnected. (4-pin
trailer connector disconnection
cannot be automatically detected
by Trailer Brake Controller)
Edit the parameters of a
saved trailer (name, length,
hitch type, brake type and
number of axles)
• The parameters which can be edited depend on which of the
trailer systems are installed on
the vehicle (Trailer Brake Control-
ler, Trailer Backup Guide and
Trailer Mode BSM)
Delete a saved trailer
Trailer detail screen
Displays the name of the cur-
rent trailer which is being
added or edited.
Change the name of the
trailer.
Change the hitch type of the
trailer between ball hitch
(conventional), gooseneck or
fifth wheel. Note that goose-
neck and fifth wheel trailers
are not supported for some
features (Trailer Backup
Guide and Trailer Mode
BSM)
Change the length of the
trailer. If the exact length is
not listed, round up the actual
length of the trailer to the
closest available value.
“Auto” length dete ction can also be
selected.
Page 101 of 618
1012-1. Instrument cluster
Owners Manual_USA_M0C031_en
2
Vehicle status information and indicators
Change the number of axles.
Change the brake type (elec-
tric or electric over hydraulic)
and weight of the trailer, or
turn trailer brakes off for that
trailer.
Save the trailer information
If there are any errors with the
trailer values, re-select the value or
delete and re-save the trailer. If the
error continues, contact your Toy-
ota dealer.
■Vehicle functions and set-
tings that can be changed
P.561
■Suspension of the settings dis-
play
●Some settings cannot be changed
while driving. When changing set-
tings, park the vehicle in a safe
place.
●If a warning message is displayed,
operation of the settings display
will be suspended.
Select to display warning mes-
sages and measures to be
taken if a malfunction is
detected. ( P.511)
WARNING
■Cautions during setting up
the display
If the hybrid system is operating
when changing the display set-
tings, ensure that the vehicle is
parked in a place with adequate
ventilation. In a closed area such
as a garage, exhaust gases
including harmful carbon monox-
ide (CO) may collect and enter
the vehicle. This may lead to
death or a seri ous health hazard.
NOTICE
■During setting up the display
To prevent 12-volt battery dis-
charge, ensure that the hybrid
system is operating while setting
up the display features.
Warning message display
Page 102 of 618
1022-1. Instrument cluster
Owners Manual_USA_M0C031_en
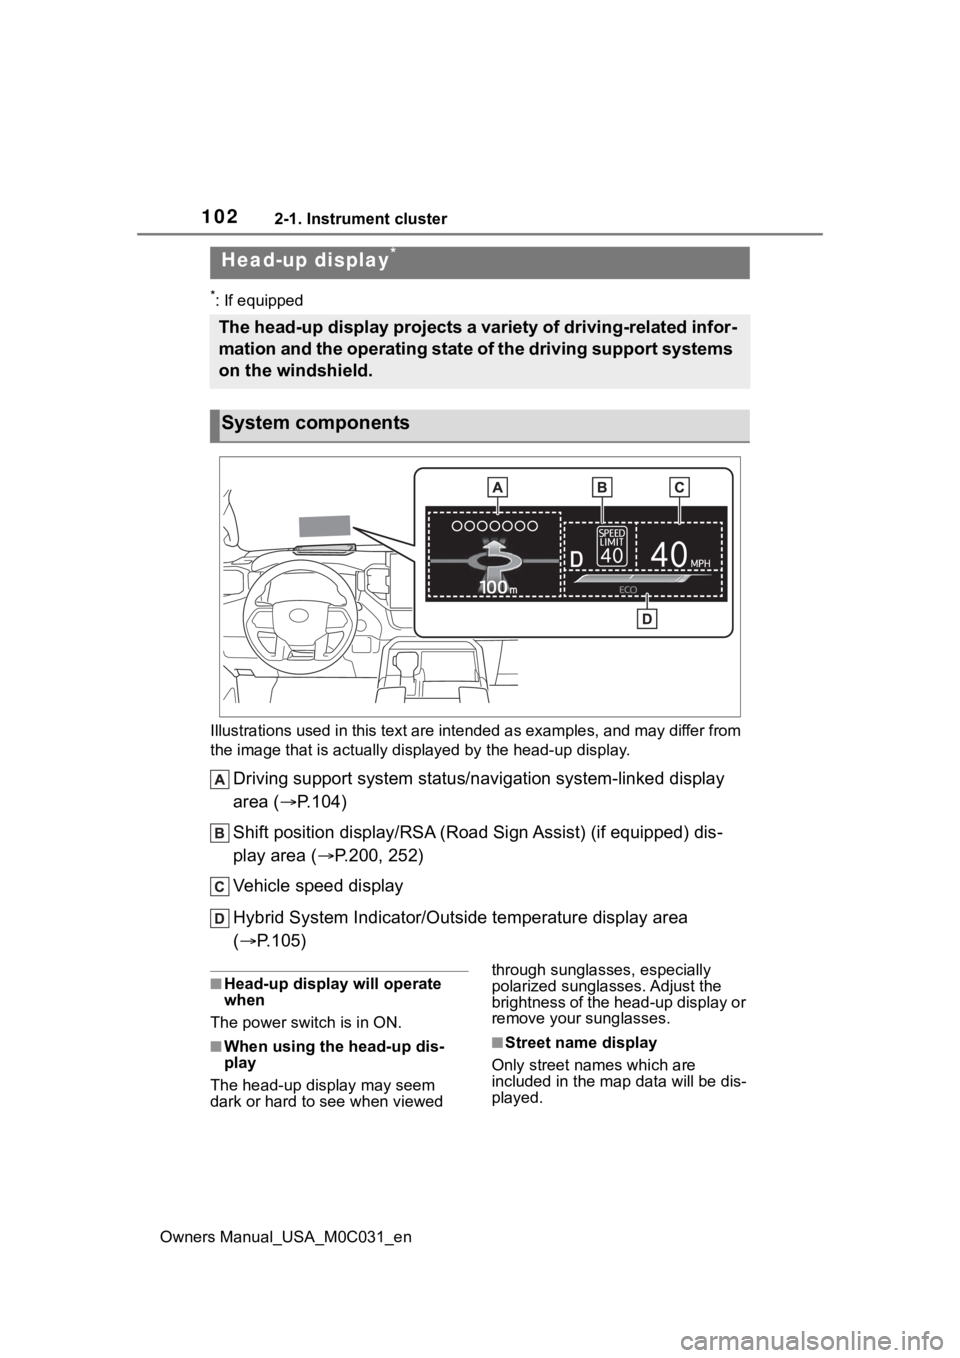
*: If equipped
Illustrations used in this text are intended as examples, and m ay differ from
the image that is actually displayed by the he ad-up display.
Driving support system status/navigation system-linked display
area ( P.104)
Shift position display/RSA (R oad Sign Assist) (if equipped) dis -
play area ( P.200, 252)
Vehicle speed display
Hybrid System Indicator/Outside temperature display area
( P.105)
■Head-up display will operate
when
The power swit ch is in ON.
■When using the head-up dis-
play
The head-up display may seem
dark or hard to see when viewed through sunglasses, especially
polarized sunglasses. Adjust the
brightness of the head-up display or
remove your sunglasses.■Street name display
Only street names which are
included in the m ap data will be dis-
played.
Head-up display*
The head-up display projects a variety of driving-related infor -
mation and the operating state of the driving support systems
on the windshield.
System components
Page 103 of 618
1032-1. Instrument cluster
Owners Manual_USA_M0C031_en
2
Vehicle status information and indicators
Select on the multi-informa-
tion display ( P.563) and then
“HUD Main”.
■Enabling/disabling the
head-up display
Press the meter control
switch to enable/disable the
head-up display.
■Changing the head-up dis-
play settings
Press and hold the meter
control switch to change the fol-
lowing settings:
Brightness and vertical posi-
tion of the head-up display
Select to adjust the brightness or
vertical position of the head-up dis-
play.
Display content
Select to change the display
between the following:
• No content
• Hybrid System Indicator
Select to enable/disable the
following items:
• Route guidance to destination
• Driving support system display
• Compass (heading-up display)
• Audio system operation status
Display angle
Select to adjus t the angle of the
head-up display.
WARNING
■When using the head-up dis-
play
●Check that the position and
brightness of the head-up dis-
play image does not interfere
with safe driving. Incorrect
adjustment of the image’s posi-
tion or brightness may obstruct
the driver’s view and lead to an
accident, resulting in death or
serious injury.
●Do not continuously look at the
head-up display while driving as
you may fail to see pedestrians,
objects on the road, etc., ahead
of the vehicle.
NOTICE
■Head-up display projector
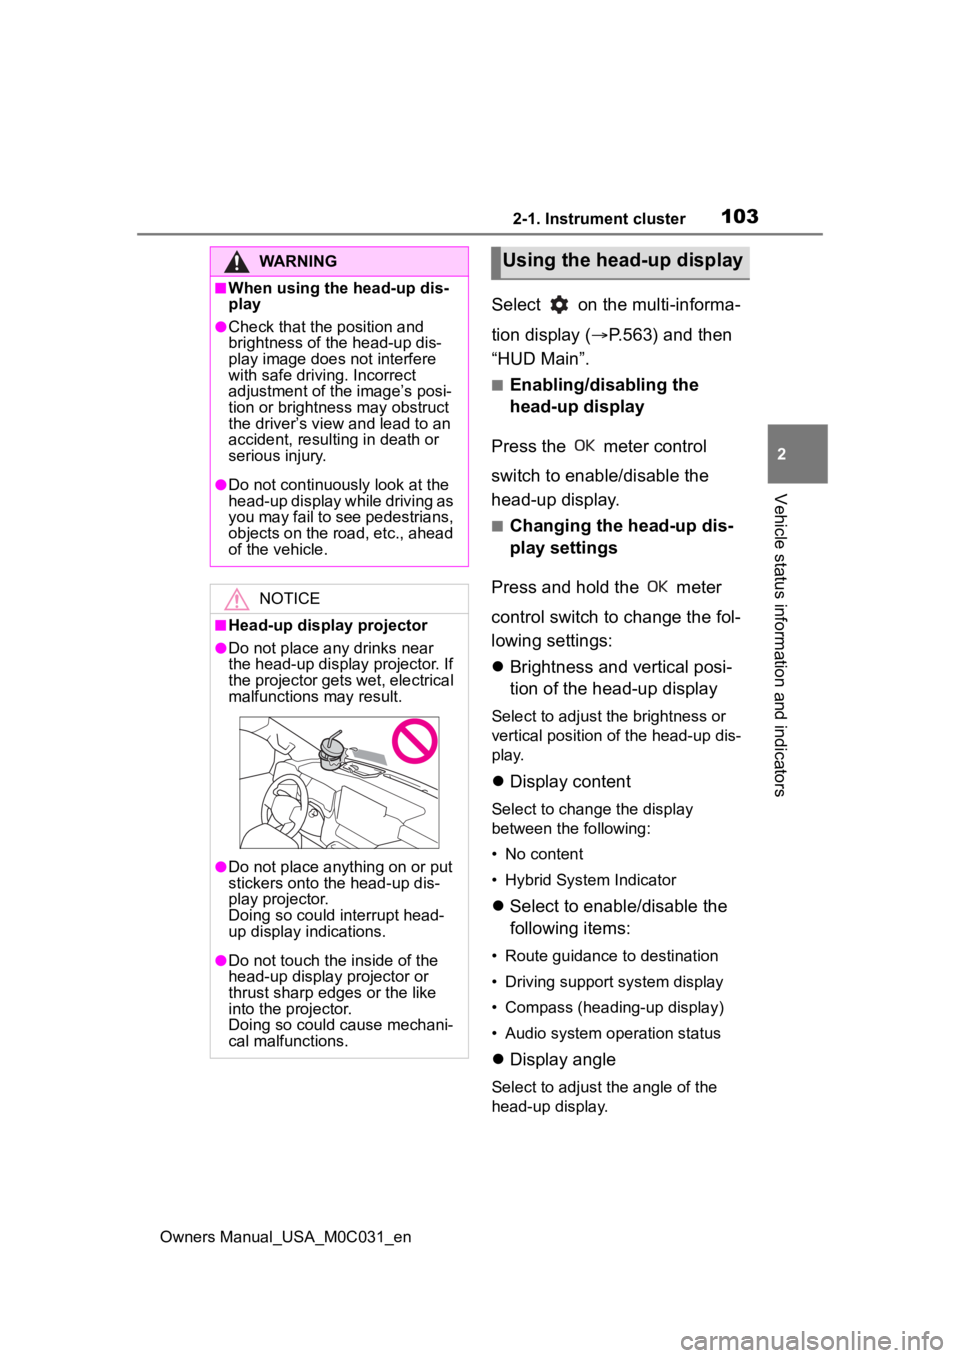
●Do not place any drinks near
the head-up display projector. If
the projector gets wet, electrical
malfunctions may result.
●Do not place anything on or put
stickers onto the head-up dis-
play projector.
Doing so could interrupt head-
up display indications.
●Do not touch the inside of the
head-up display projector or
thrust sharp edges or the like
into the projector.
Doing so could cause mechani-
cal malfunctions.
Using the head-up display
Page 104 of 618
1042-1. Instrument cluster
Owners Manual_USA_M0C031_en
■Enabling/disabling of the head-
up display
If the head-up display is disabled, it
will remain disabled when the power
switch is turned off then back to ON.
■Display brightness
The brightness of the head-up dis-
play can be adjusted on of the
multi-information display. Also, it is
automatically adjusted according to
the ambient brightness.
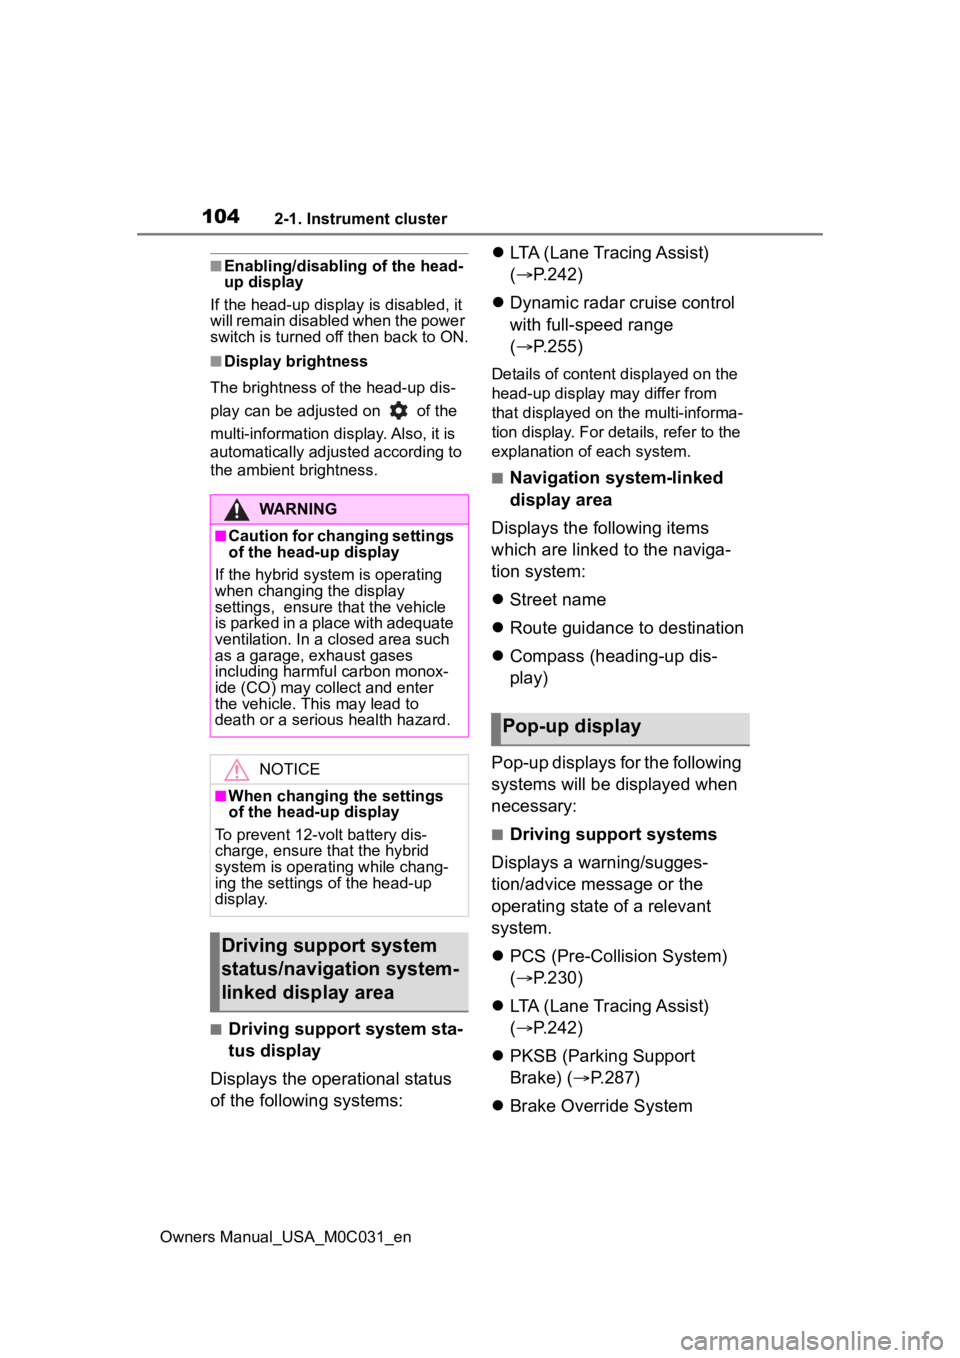
■Driving support system sta-
tus display
Displays the operational status
of the following systems:
LTA (Lane Tracing Assist)
( P.242)
Dynamic radar cruise control
with full-speed range
( P.255)
Details of content d isplayed on the
head-up display may differ from
that displayed on the multi-informa-
tion display. For details, refer to the
explanation of each system.
■Navigation system-linked
display area
Displays the following items
which are linked to the naviga-
tion system:
Street name
Route guidance to destination
Compass (heading-up dis-
play)
Pop-up displays for the following
systems will be displayed when
necessary:
■Driving support systems
Displays a warning/sugges-
tion/advice message or the
operating state of a relevant
system.
PCS (Pre-Colli sion System)
( P.230)
LTA (Lane Tracing Assist)
( P.242)
PKSB (Parking Support
Brake) ( P.287)
Brake Override System
WARNING
■Caution for changing settings
of the head-up display
If the hybrid system is operating
when changing the display
settings, ensure t hat the vehicle
is parked in a place with adequate
ventilation. In a closed area such
as a garage, exhaust gases
including harmful carbon monox-
ide (CO) may collect and enter
the vehicle. This may lead to
death or a seri ous health hazard.
NOTICE
■When changing the settings
of the head-up display
To prevent 12-volt battery dis-
charge, ensure that the hybrid
system is operating while chang-
ing the settings of the head-up
display.
Driving support system
status/navigation system-
linked display area
Pop-up display
Page 105 of 618
1052-1. Instrument cluster
Owners Manual_USA_M0C031_en
2
Vehicle status information and indicators
( P.172)
Drive-Start Control ( P.177)
Details of content displayed on the
head-up display may differ from
that displayed on the multi-informa-
tion display. For details, refer to the
explanation of each system.
■/ icons
These icons are linked to the
multi-information display
: Master warning icon
Displayed when a warning mes-
sage is displayed on the multi-infor-
mation display. ( P.511)
: Information icon
Displayed when an advice pop-up
display is displayed on the multi-
information display.
■Warning message
Some warning messages are
displayed when necessary,
according to certain conditions.
Details of content displayed on the
head-up display may differ from
that displayed on the multi-informa-
tion display.
■Audio system operation
status
Displayed when an audio
remote control switch on the
steering wheel is operated.
■Hands-free system status
Displayed when the hands-free
system is operated.
■When a pop-up display is dis-
played
When a pop-up display is displayed,
a current display may no longer be
displayed. In this case, the display
will return afte r the pop-up display
disappears.
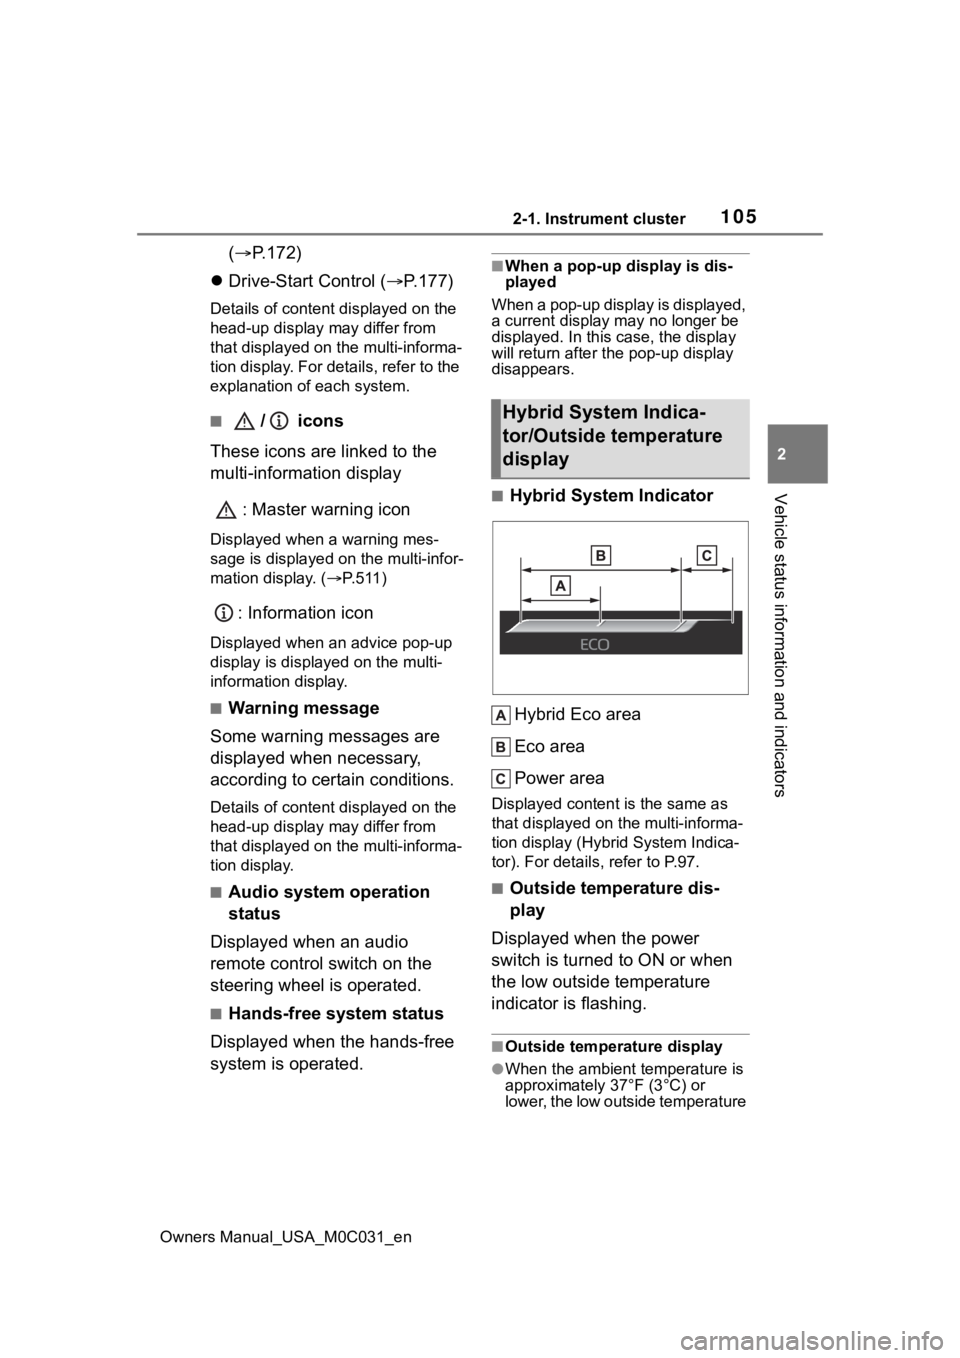
■Hybrid System Indicator
Hybrid Eco area
Eco area
Power area
Displayed content is the same as
that displayed on the multi-informa-
tion display (Hybrid System Indica-
tor). For details , refer to P.97.
■Outside temperature dis-
play
Displayed when the power
switch is turned to ON or when
the low outside temperature
indicator is flashing.
■Outside temperature display
●When the ambient temperature is
approximately 37°F (3°C) or
lower, the low outside temperature
Hybrid System Indica-
tor/Outside temperature
display
Page 106 of 618
1062-1. Instrument cluster
Owners Manual_USA_M0C031_enindicator will flash for approxi-
mately 10 seconds and the out-
side temperature display will turn
off. In this case, the display will be
displayed again when the outside
temperature becomes approxi-
mately 41°F (5°C) or higher.
●In the following si
tuations, the cor-
rect outside tempe rature may not
be displayed, or the display may
take longer than normal to
change:
• When stopped, or driving at low speeds (less than 16 mph [25
km/h])
• When the outside temperature has changed su ddenly (at the
entrance/exit of a garage, tunnel,
etc.)
●When “--” is displayed, the system
may be malfunction ing. Take your
vehicle to your Toyota dealer.
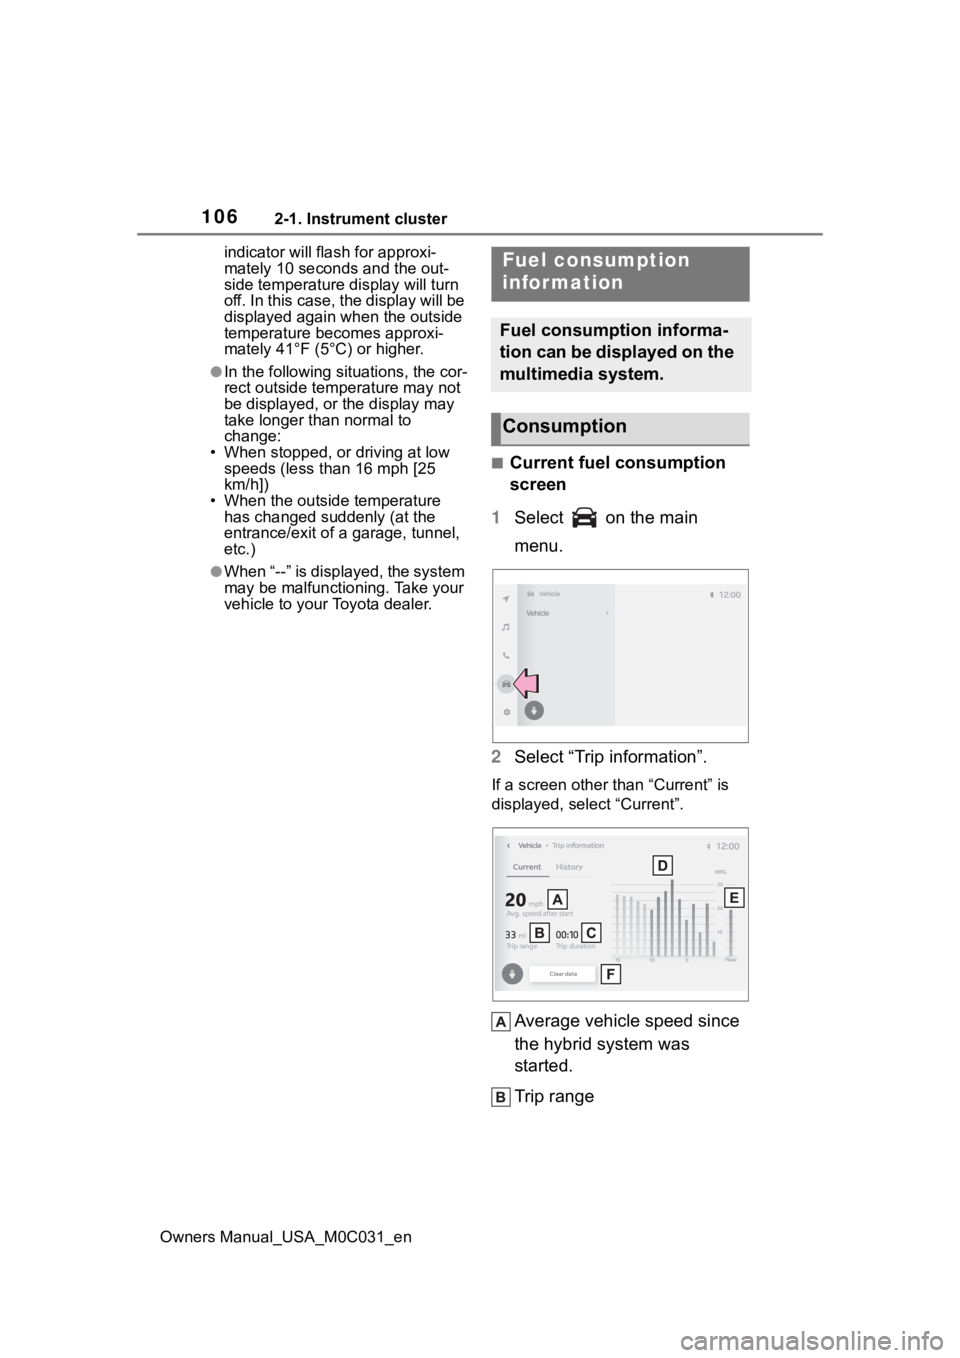
■Current fuel consumption
screen
1 Select on the main
menu.
2 Select “Trip information”.
If a screen other than “Current” is
displayed, select “Current”.
Average vehicle speed since
the hybrid system was
started.
Trip range
Fuel consumption
information
Fuel consumption informa-
tion can be displayed on the
multimedia system.
Consumption
Page 107 of 618
1072-1. Instrument cluster
Owners Manual_USA_M0C031_en
2
Vehicle status information and indicators
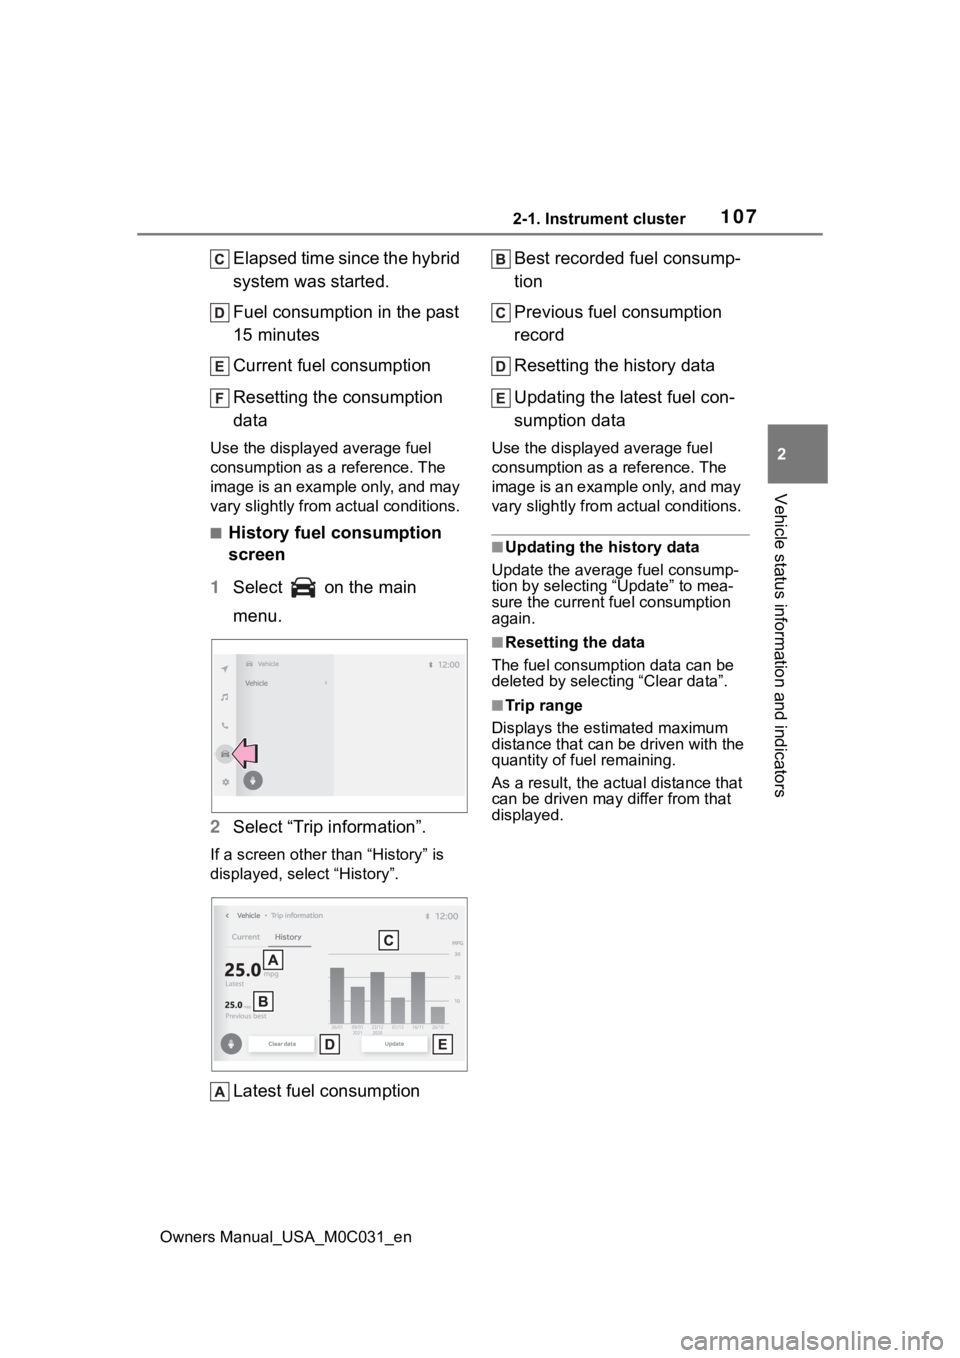
Elapsed time since the hybrid
system was started.
Fuel consumption in the past
15 minutes
Current fuel consumption
Resetting the consumption
data
Use the displayed average fuel
consumption as a reference. The
image is an example only, and may
vary slightly from actual conditions.
■History fuel consumption
screen
1 Select on the main
menu.
2 Select “Trip information”.
If a screen other than “History” is
displayed, select “History”.
Latest fuel consumption Best recorded fuel consump-
tion
Previous fuel consumption
record
Resetting the history data
Updating the latest fuel con-
sumption data
Use the displayed average fuel
consumption as a reference. The
image is an example only, and may
vary slightly from actual conditions.
■Updating the history data
Update the average fuel consump-
tion by selecting “Update” to mea-
sure the current fuel consumption
again.
■Resetting the data
The fuel consumption data can be
deleted by selecting “Clear data”.
■Trip range
Displays the estimated maximum
distance that can be driven with the
quantity of fuel remaining.
As a result, the actual distance that
can be driven may differ from that
displayed.