Page 439 of 600
4396-3. Do-it-yourself maintenance
6
Maintenance and care
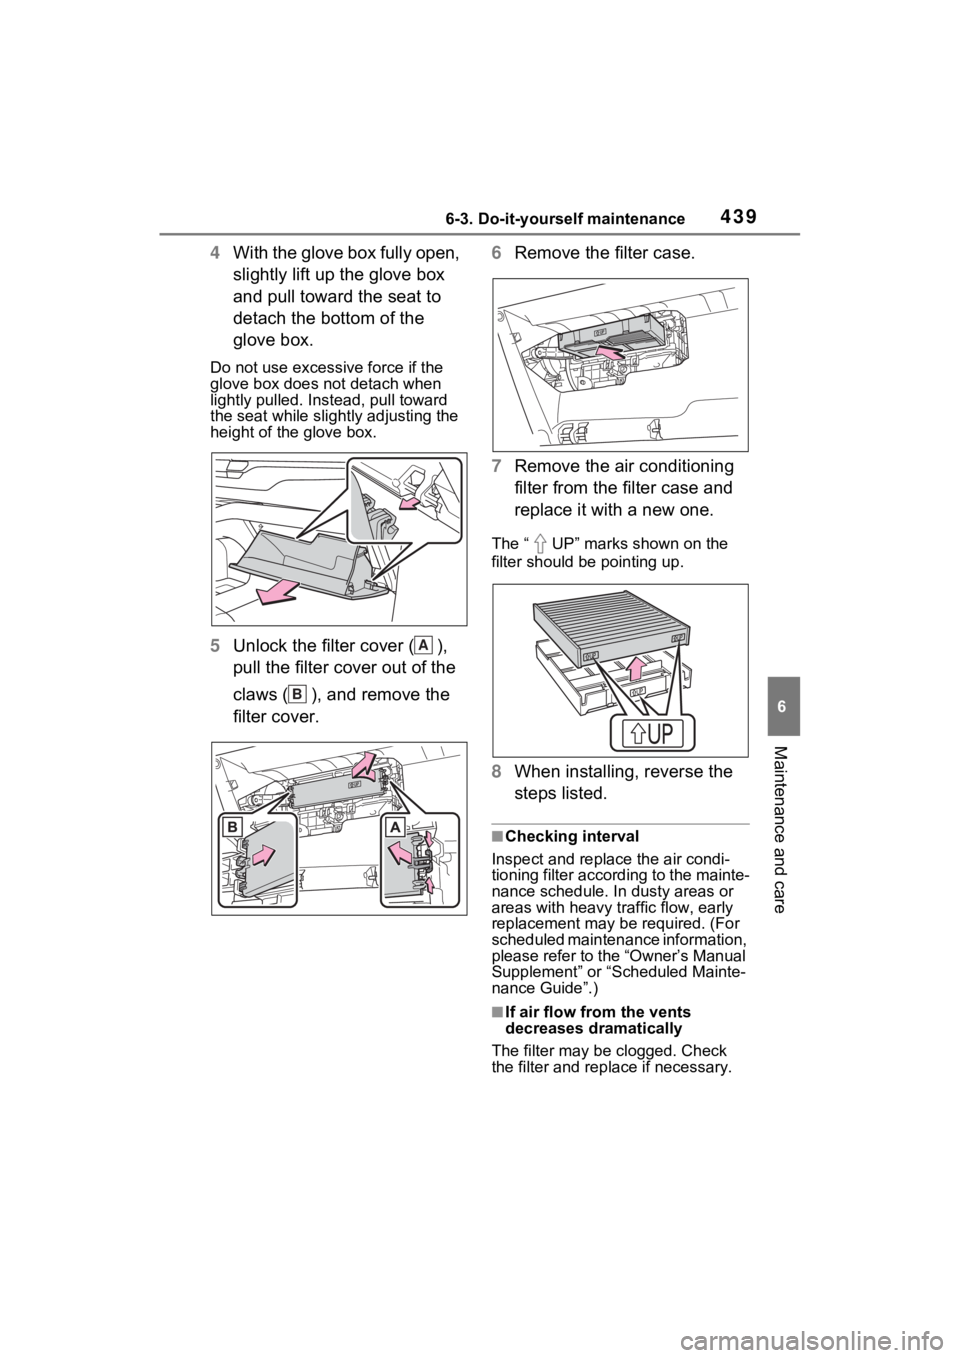
4With the glove box fully open,
slightly lift up the glove box
and pull toward the seat to
detach the bottom of the
glove box.
Do not use excessive force if the
glove box does not detach when
lightly pulled. Ins tead, pull toward
the seat while slightly adjusting the
height of the glove box.
5 Unlock the filter cover ( ),
pull the filter cover out of the
claws ( ), and remove the
filter cover. 6
Remove the filter case.
7 Remove the air conditioning
filter from the filter case and
replace it with a new one.
The “ UP” marks shown on the
filter should be pointing up.
8When installing, reverse the
steps listed.
■Checking interval
Inspect and replace the air condi-
tioning filter according to the mainte-
nance schedule. In dusty areas or
areas with heavy traffic flow, early
replacement may be required. (For
scheduled maintenance information,
please refer to the “Owner’s Manual
Supplement” or “Scheduled Mainte-
nance Guide”.)
■If air flow from the vents
decreases dramatically
The filter may be clogged. Check
the filter and rep lace if necessary.
A
B
Page 441 of 600
4416-3. Do-it-yourself maintenance
6
Maintenance and care
If dust and clogs cannot be com-
pletely removed with the air
intake vent covers installed,
remove the covers and clean
the filters.
1Turn the power switch off.
2 Using a Phillips screwdriver,
remove the clip.
3 Remove the air intake vent
cover.
Pull the cover as shown in the illus-
tration to disengage the claws,
starting from the claw in the upper
right corner and pull the cover
toward the front of the vehicle to
remove it.
4 Remove the air intake vent
filter.
Disengage the 3 center claws from the filter.
5
Remove the dust and clogs
from the filter using a vacuum
cleaner, etc.
Make sure to also remove the dust
and clogs from the inside of the air
intake vent cover.
6 Reinstall the filter to the
cover.
Engage the 3 center claws to install
the filter.
Make sure that the filter is not
crooked or deformed when install-
ing it.
If dust and clogs cannot
be completely removed
Page 445 of 600
4456-3. Do-it-yourself maintenance
6
Maintenance and care
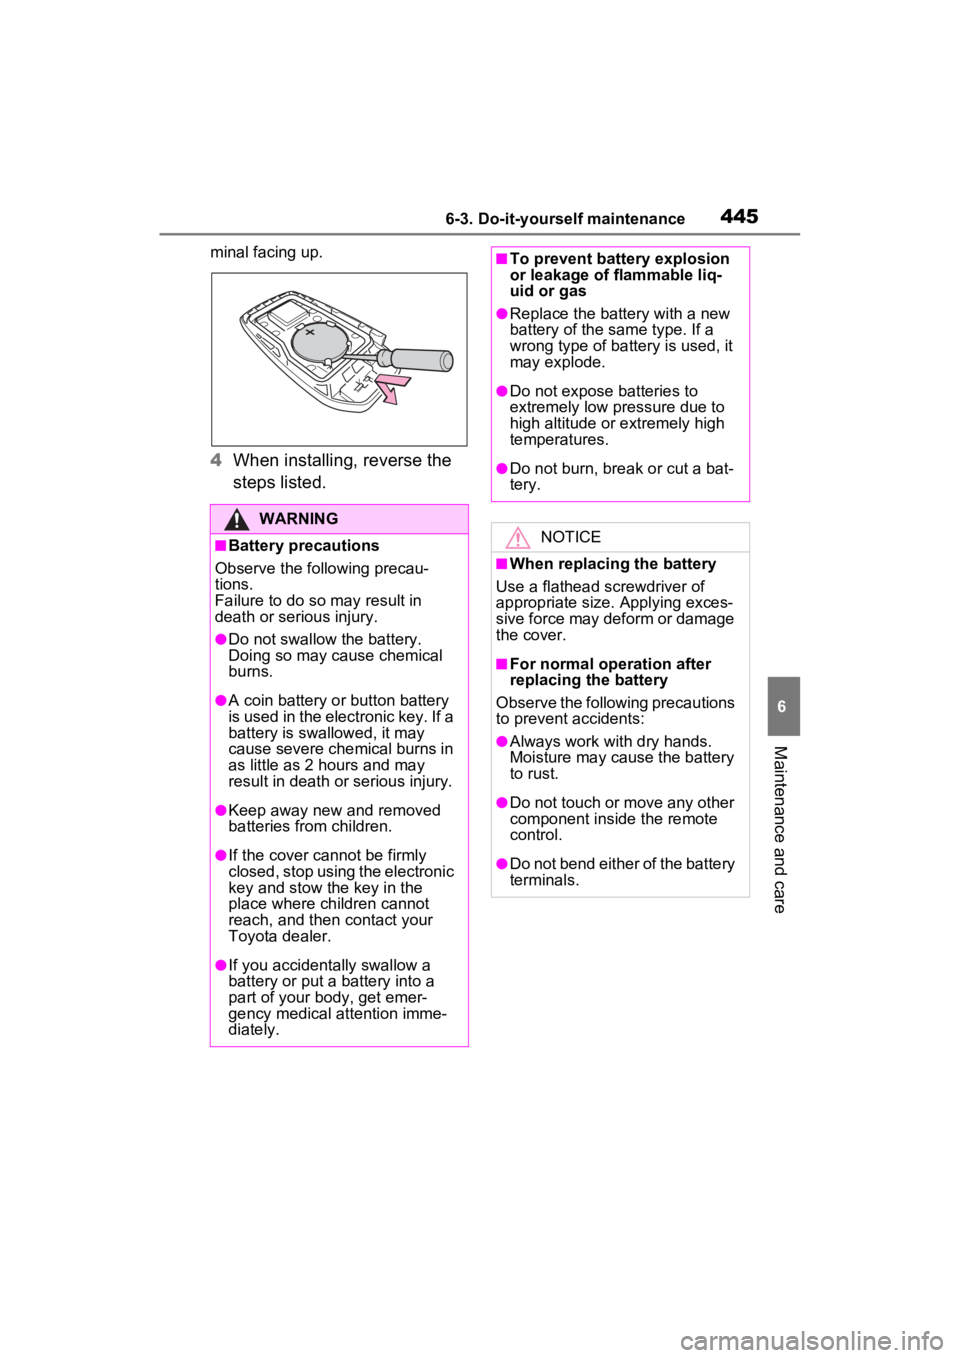
minal facing up.
4When installing, reverse the
steps listed.
WARNING
■Battery precautions
Observe the following precau-
tions.
Failure to do so m ay result in
death or serious injury.
●Do not swallow the battery.
Doing so may cause chemical
burns.
●A coin battery or button battery
is used in the electronic key. If a
battery is swallowed, it may
cause severe chemical burns in
as little as 2 hours and may
result in death or serious injury.
●Keep away new and removed
batteries from children.
●If the cover cannot be firmly
closed, stop using the electronic
key and stow the key in the
place where children cannot
reach, and then contact your
Toyota dealer.
●If you accidentally swallow a
battery or put a b attery into a
part of your body, get emer-
gency medical attention imme-
diately.
■To prevent battery explosion
or leakage of flammable liq-
uid or gas
●Replace the battery with a new
battery of the same type. If a
wrong type of battery is used, it
may explode.
●Do not expose batteries to
extremely low pr essure due to
high altitude or extremely high
temperatures.
●Do not burn, bre ak or cut a bat-
tery.
NOTICE
■When replacing the battery
Use a flathead screwdriver of
appropriate size. Applying exces-
sive force may deform or damage
the cover.
■For normal operation after
replacing the battery
Observe the following precautions
to prevent accidents:
●Always work with dry hands.
Moisture may cause the battery
to rust.
●Do not touch or move any other
component inside the remote
control.
●Do not bend either of the battery
terminals.
Page 455 of 600

455
7
7
When trouble arises
When trouble arises
7-1. Essential informationEmergency flashers .... 456
If your vehicle has to be stopped in an emergency.................................. 457
If the vehicle is submerged or water on the road is ris-
ing ............................. 458
7-2. Steps to take in an emer- gency
If your vehicle needs to be towed......................... 460
If you think something is wrong ........................ 463
If a warning light turns on or a warning buzzer sounds
.................................. 464
If a warning message is dis- played........................ 475
If you have a flat tire (vehi- cles without spare tire) 480
If you have a flat tire (vehi- cles with spare tire) ... 490
If the hybrid system will not start ........................... 499
If you lose your keys ... 500
If the fuel filler door cannot be opened ................. 501
If the electronic key does not operate properly .. 502
If the 12-volt battery is dis- charged ..................... 504If your vehicle overheats
.................................. 509
If the vehicle becomes stuck .................................. 513
Page 460 of 600
4607-2. Steps to take in an emergency
7-2.Steps to take in an emergency
If your vehicle needs
to be towed
If towing is necessary, we
recommend having your
vehicle towed by your
Toyota dealer or commer-
cial towing service, using a
wheel-lift type truck or flat-
bed truck.
Use a safety chain system
for all towing, and abide by
all state/provincial and local
laws.
2WD models: If towing your
vehicle with a wheel-lift type
truck from the front, the
vehicle’s rear wheels and
axles must be in good con-
ditions. (P.460, 461)
If they are damaged, use a
towing dolly or flatbed
truck.
AWD models: If towing your
vehicle with a wheel-lift type
truck, use a towing dolly.
( P.460, 461)
WARNING
Observe the following precau-
tions. Failure to do so may result
in death or serious injury.
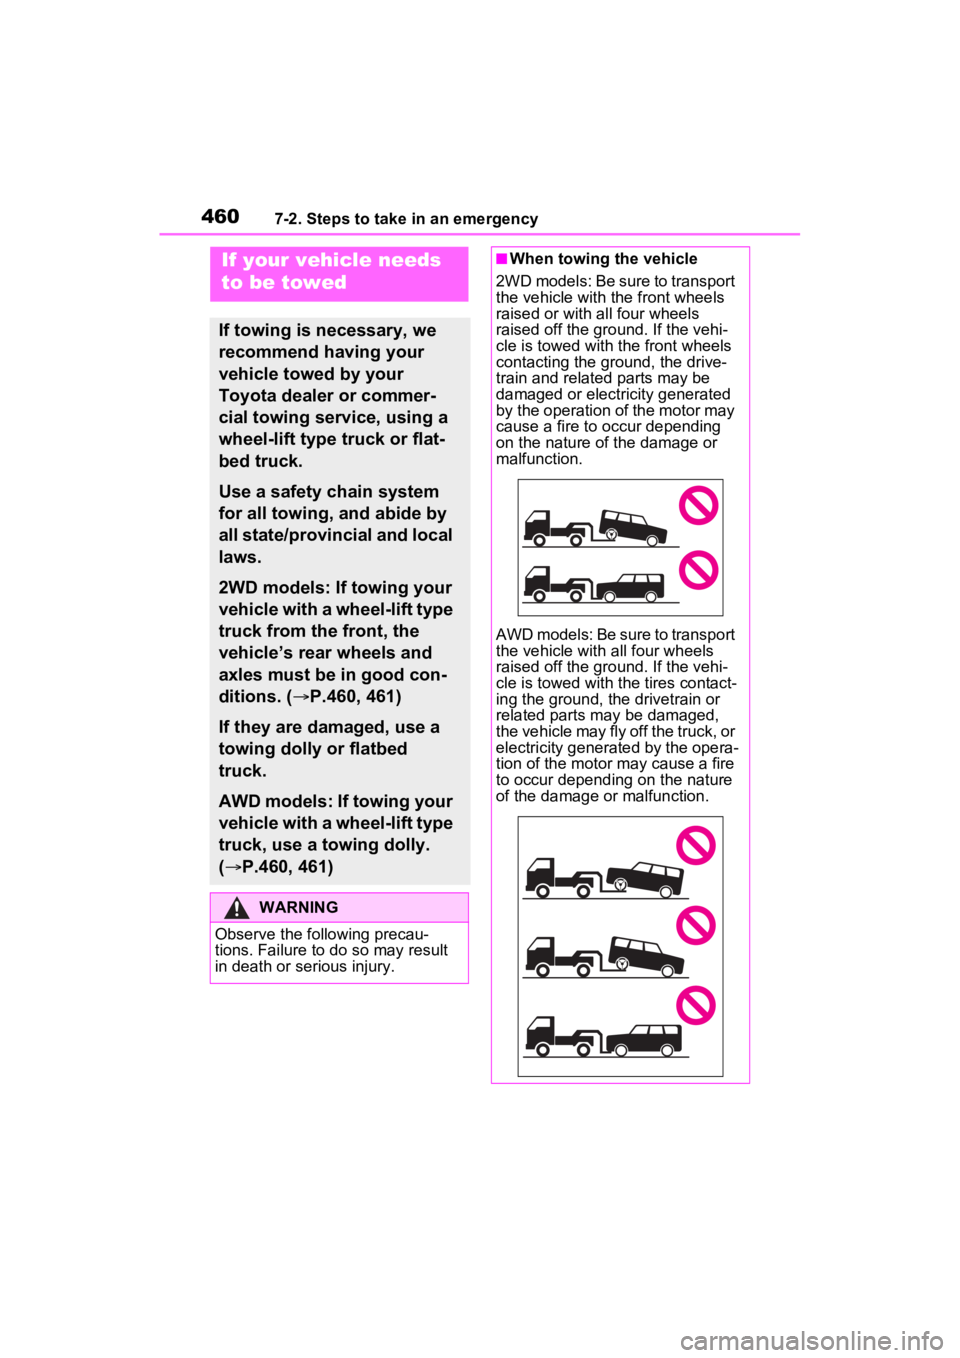
■When towing the vehicle
2WD models: Be sure to transport
the vehicle with th e front wheels
raised or with all four wheels
raised off the ground. If the vehi-
cle is towed with th e front wheels
contacting the ground, the drive-
train and related parts may be
damaged or electricity generated
by the operation of the motor may
cause a fire to occur depending
on the nature of the damage or
malfunction.
AWD models: Be sure to transport
the vehicle with all four wheels
raised off the ground. If the vehi-
cle is towed with th e tires contact-
ing the ground, the drivetrain or
related parts may be damaged,
the vehicle may fly off the truck, or
electricity generated by the opera-
tion of the motor may cause a fire
to occur depending on the nature
of the damage or malfunction.
Page 461 of 600
4617-2. Steps to take in an emergency
7
When trouble arises
The following may indicate a
problem with your transmission.
Contact your Toyota dealer or
commercial towing service
before towing.
The hybrid system warning
message is shown on the
multi-information display and
the vehicle does not move.
The vehicle makes an abnor-
mal sound.
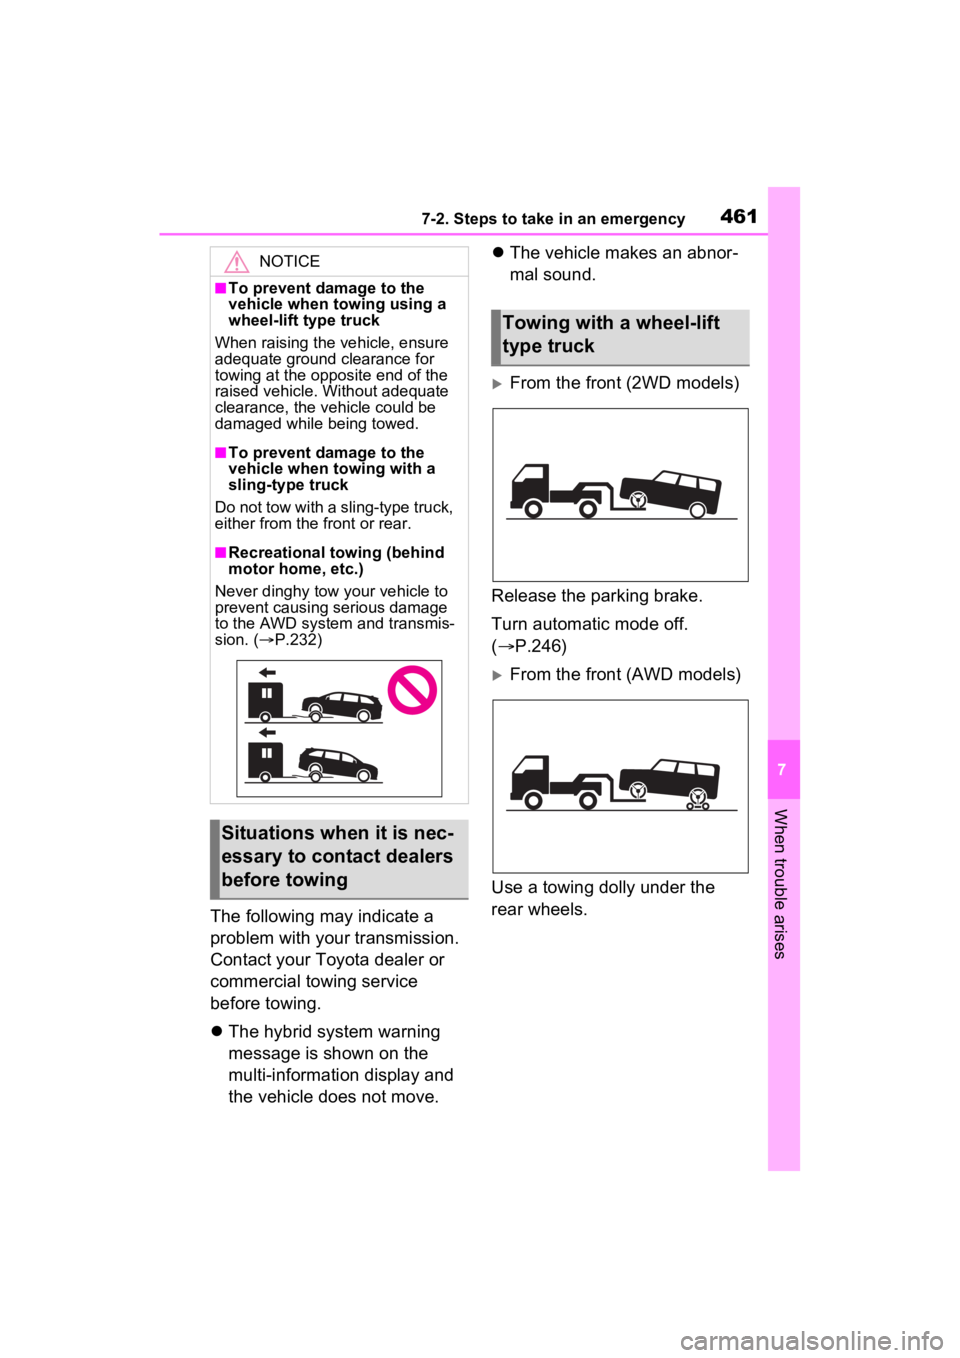
From the front (2WD models)
Release the parking brake.
Turn automatic mode off.
( P.246)
From the front (AWD models)
Use a towing dolly under the
rear wheels.
NOTICE
■To prevent damage to the
vehicle when towing using a
wheel-lift type truck
When raising the vehicle, ensure
adequate ground clearance for
towing at the opposite end of the
raised vehicle. Without adequate
clearance, the vehicle could be
damaged while being towed.
■To prevent damage to the
vehicle when towing with a
sling-type truck
Do not tow with a sling-type truck,
either from the front or rear.
■Recreational towing (behind
motor home, etc.)
Never dinghy tow your vehicle to
prevent causing serious damage
to the AWD system and transmis-
sion. ( P.232)
Situations when it is nec-
essary to contact dealers
before towing
Towing with a wheel-lift
type truck
Page 462 of 600
4627-2. Steps to take in an emergency
From the rear
Use a towing dolly under the
front wheels.
When using a flatbed truck to
transport the vehicle, use tire
strapping belts. Refer to the
owner’s manual of the flatbed truck for the tire strapping
method.
In order to suppress vehicle
movement during transporta-
tion, set the parking brake and
turn the power switch off.
NOTICE
■Towing with a sling-type
truck
Do not tow with a sling-type truck
to prevent body damage.
2WD models
AWD models
Using a flatbed truck
Page 496 of 600
4967-2. Steps to take in an emergency
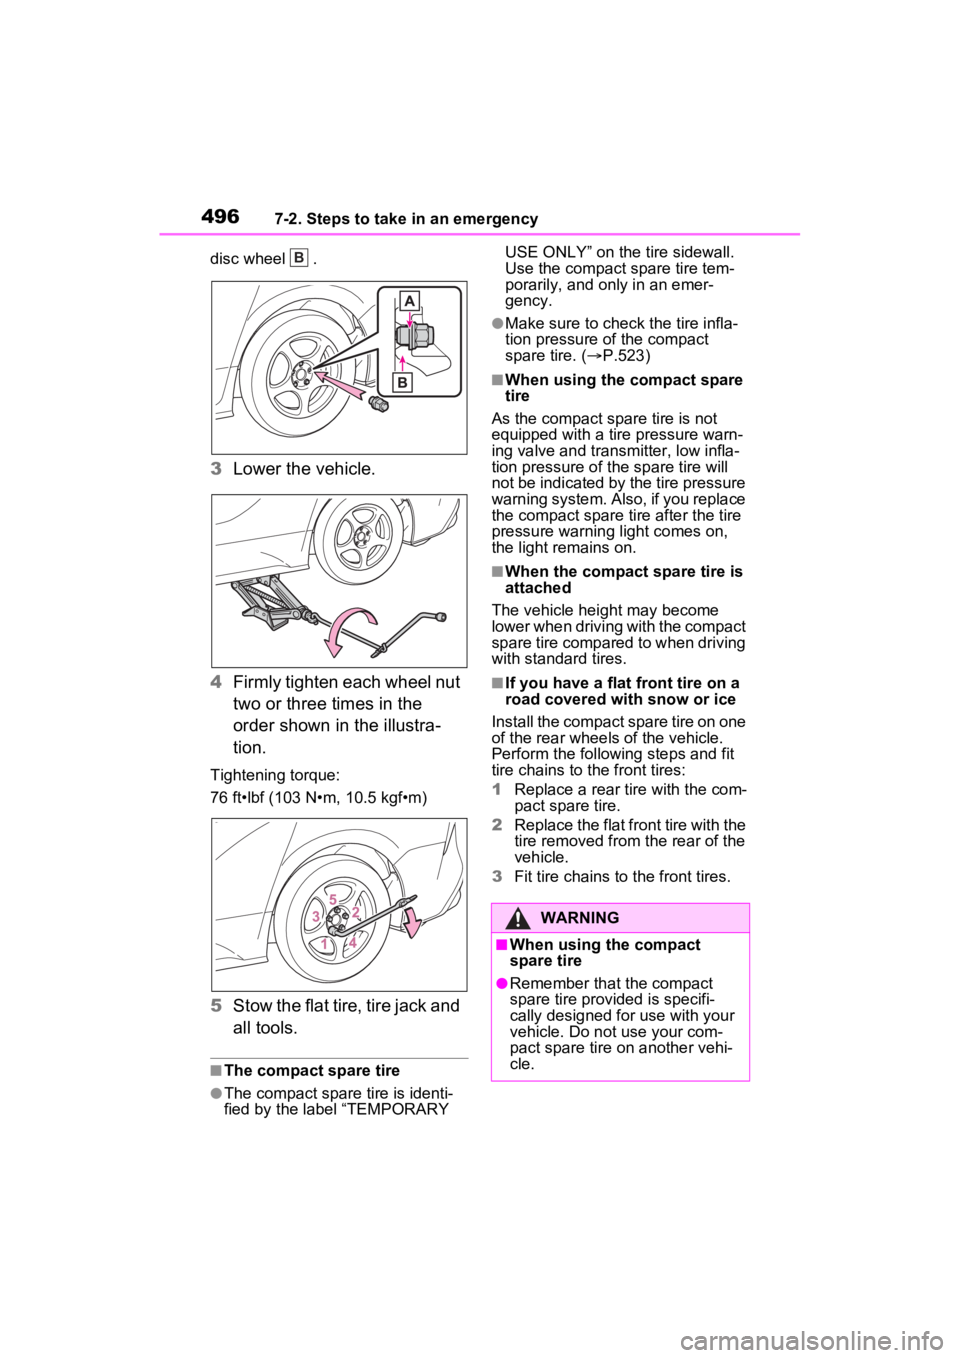
disc wheel .
3Lower the vehicle.
4 Firmly tighten each wheel nut
two or three times in the
order shown in the illustra-
tion.
Tightening torque:
76 ft•lbf (103 N•m, 10.5 kgf•m)
5Stow the flat tire, tire jack and
all tools.
■The compact spare tire
●The compact spare tire is identi-
fied by the label “TEMPORARY USE ONLY” on the tire sidewall.
Use the compact spare tire tem-
porarily, and only in an emer-
gency.
●Make sure to check the tire infla-
tion pressure of the compact
spare tire. (
P.523)
■When using the compact spare
tire
As the compact spare tire is not
equipped with a tire pressure warn-
ing valve and transm itter, low infla-
tion pressure of the spare tire will
not be indicated by the tire pressure
warning system. Also , if you replace
the compact spare ti re after the tire
pressure warning light comes on,
the light remains on.
■When the compact spare tire is
attached
The vehicle height may become
lower when driving with the compact
spare tire compared to when driving
with standard tires.
■If you have a flat front tire on a
road covered with snow or ice
Install the compact spare tire on one
of the rear wheels of the vehicle.
Perform the following steps and fit
tire chains to the front tires:
1 Replace a rear tire with the com-
pact spare tire.
2 Replace the flat front tire with the
tire removed from the rear of the
vehicle.
3 Fit tire chains to the front tires.
B
WARNING
■When using the compact
spare tire
●Remember that the compact
spare tire provided is specifi-
cally designed for use with your
vehicle. Do not use your com-
pact spare tire on another vehi-
cle.