Page 348 of 600
3485-1. Using the air conditioning system and defogger
5-1.Using the air conditioning system and defogger
“AUTO” switch (automatic mode)
“OFF” switch
Windshield defogger switch
Rear window defogger/outside rear view mirror defoggers/wind-
shield wiper de-icer switch
“A/C” switch
Outside/recirculated air mode switch
S-FLOW mode switch
Left-hand side temperature control switch
Fan speed control switch
“REAR” switch
“SYNC” switch
Airflow mode control switch
Right-hand side temperature control switch
■Adjusting the temperature
setting
Operate the each side tempera-
ture control switch upwards to increase the each side tempera-
ture and operate the switch
downwards to decrease the
each side temperature.
Front automatic ai
r conditioning system
Air outlets and fan speed are automatically adjusted accord-
ing to the temperature setting.
Air conditioning controls
A
B
C
D
E
F
G
H
I
J
K
L
M
Page 350 of 600

3505-1. Using the air conditioning system and defogger
switch.
■Defogging the rear window
and outside rear view mir-
rors (if equipped), and de-
icing windshield wipers (if
equipped)
Defoggers are used to defog the
rear window and to remove rain-
drops, dew and frost from the
outside rear view mirrors (if
equipped).
The windshield wiper de-icer is
used to prevent ice from building
up on the windshield and wiper
blades.
Press the rear window defog-
ger/outside rear view mirror
defoggers /windshield wiper de-
icer switch.
The defoggers and windshield
wiper de-icer will automatically turn
off after 15 minutes.
When the rear window defog-
ger/outside rear v iew mirror defog-
gers /windshield wiper de-icer
switch is on, the indicator illumi-
nates on the switch.
■Eco air conditioning mode
The air conditioning is controlled
with low fuel consumption priori-
tized such as reducing fan
speed, etc.
Select the eco air conditioning
mode switch on the control
screen. ( P.352)
When the eco air conditioning
mode is on, the indicator illumi-
nates on the eco air conditioning mode switch.
■Fogging up of the windows
●The windows will
easily fog up
when the humidity in the vehicle is
high. Turning “A/C” switch on will
dehumidify the air from the outlets
and defog the windshield effec-
tively.
●If you turn “A/C” switch off, the
windows may fog up more easily.
●The windows may fog up if the
recirculated air mode is used.
■When driving on dusty roads
Close all windows. If dust thrown up
by the vehicle is still drawn into the
vehicle after closing the windows, it
is recommended that the air intake
mode be set to outside air mode
and the fan speed to any setting
except off.
■Outside/recirculated air mode
●Setting to the recirculated air
mode temporarily is recom-
mended in preventing dirty air
from entering the vehicle interior
and helping to c ool the vehicle
when the outside air temperature
is high.
●Outside/recirculated air mode may
automatically switch depending on
the temperature setting or the
inside temperature.
■When the outside temperature
exceeds 75°F (24°C) and the air
conditioning system is on
●In order to reduce the air condi-
tioning power consumption, the air
conditioning system may switch to
recirculated air mode automati-
cally. This may also reduce fuel
consumption.
●Recirculated air mode is selected
as a default mode when the power
switch is turned to ON.
●It is possible to switch to outside
air mode at any time by pressing
the outside/recirculated air mode
Page 352 of 600

3525-1. Using the air conditioning system and defogger
(Customizable features: P.549)
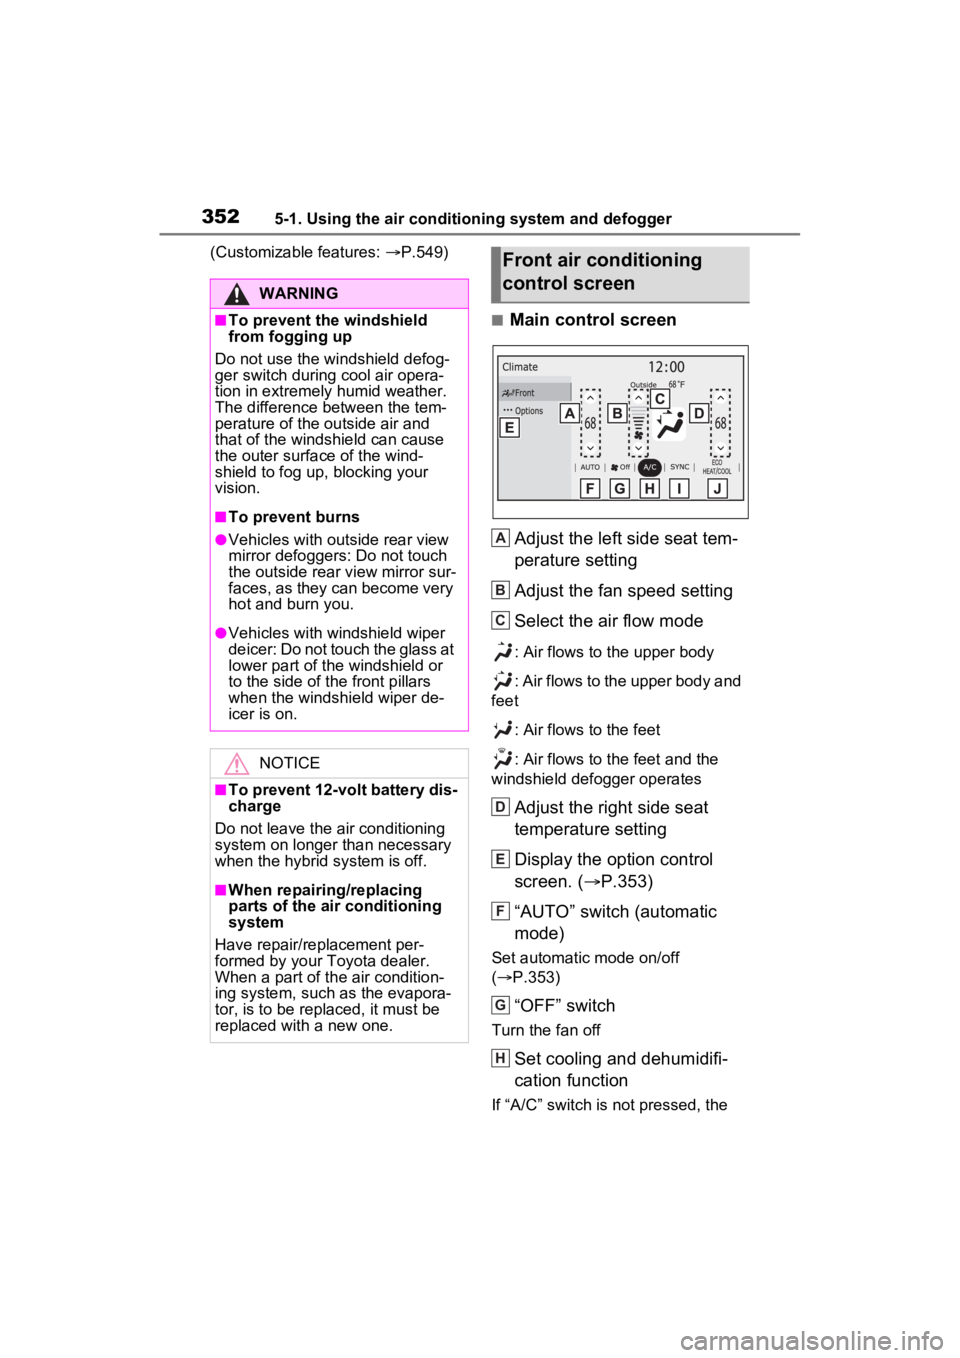
■Main control screen
Adjust the left side seat tem-
perature setting
Adjust the fan speed setting
Select the air flow mode
: Air flows to the upper body
: Air flows to the upper body and
feet
: Air flows to the feet
: Air flows to the feet and the
windshield defogger operates
Adjust the right side seat
temperature setting
Display the option control
screen. ( P.353)
“AUTO” switch (automatic
mode)
Set automatic mode on/off
( P.353)
“OFF” switch
Turn the fan off
Set cooling and dehumidifi-
cation function
If “A/C” switch is not pressed, the
WARNING
■To prevent the windshield
from fogging up
Do not use the windshield defog-
ger switch during cool air opera-
tion in extremely humid weather.
The difference between the tem-
perature of the outside air and
that of the windshield can cause
the outer surface of the wind-
shield to fog up, blocking your
vision.
■To prevent burns
●Vehicles with outside rear view
mirror defoggers: Do not touch
the outside rear view mirror sur-
faces, as they can become very
hot and burn you.
●Vehicles with windshield wiper
deicer: Do not touch the glass at
lower part of the windshield or
to the side of the front pillars
when the windshield wiper de-
icer is on.
NOTICE
■To prevent 12-volt battery dis-
charge
Do not leave the air conditioning
system on longer than necessary
when the hybrid system is off.
■When repairing/replacing
parts of the air conditioning
system
Have repair/replacement per-
formed by your Toyota dealer.
When a part of th e air condition-
ing system, such as the evapora-
tor, is to be replaced, it must be
replaced with a new one.
Front air conditioning
control screen
A
B
C
D
E
F
G
H
Page 366 of 600
3665-3. Using the storage features
5-3.Using the storage features
Conversation mirror (P.370)
Open tray ( P.370)
Glove box ( P.367)
Door pockets ( P.370)
Bottle holders ( P.369)
Auxiliary storage (7-passenger models)
Cup holders ( P.368)
Console box ( P.367)
List of storage features
Location of the storage features
A
B
C
D
E
F
G
H
Page 370 of 600
3705-3. Using the storage features
Front
RearPush the lid.
Driver’s side
Front passenger’s side
Door pockets
NOTICE
■When using the sliding door
Make sure magazines are not
bent or protruding from the sliding
door pockets. Do not insert any-
thing too big so that the shape of
the sliding door pockets is dis-
torted. Such objects may obstruct
the opening/closing of the sliding
doors, damage the sliding door
pockets or the vehicle body, and
may result in a malfunction.
Conversation mirror
Open tray
Page 374 of 600

3745-4. Using the other interior features
5-4.Using the other interior features
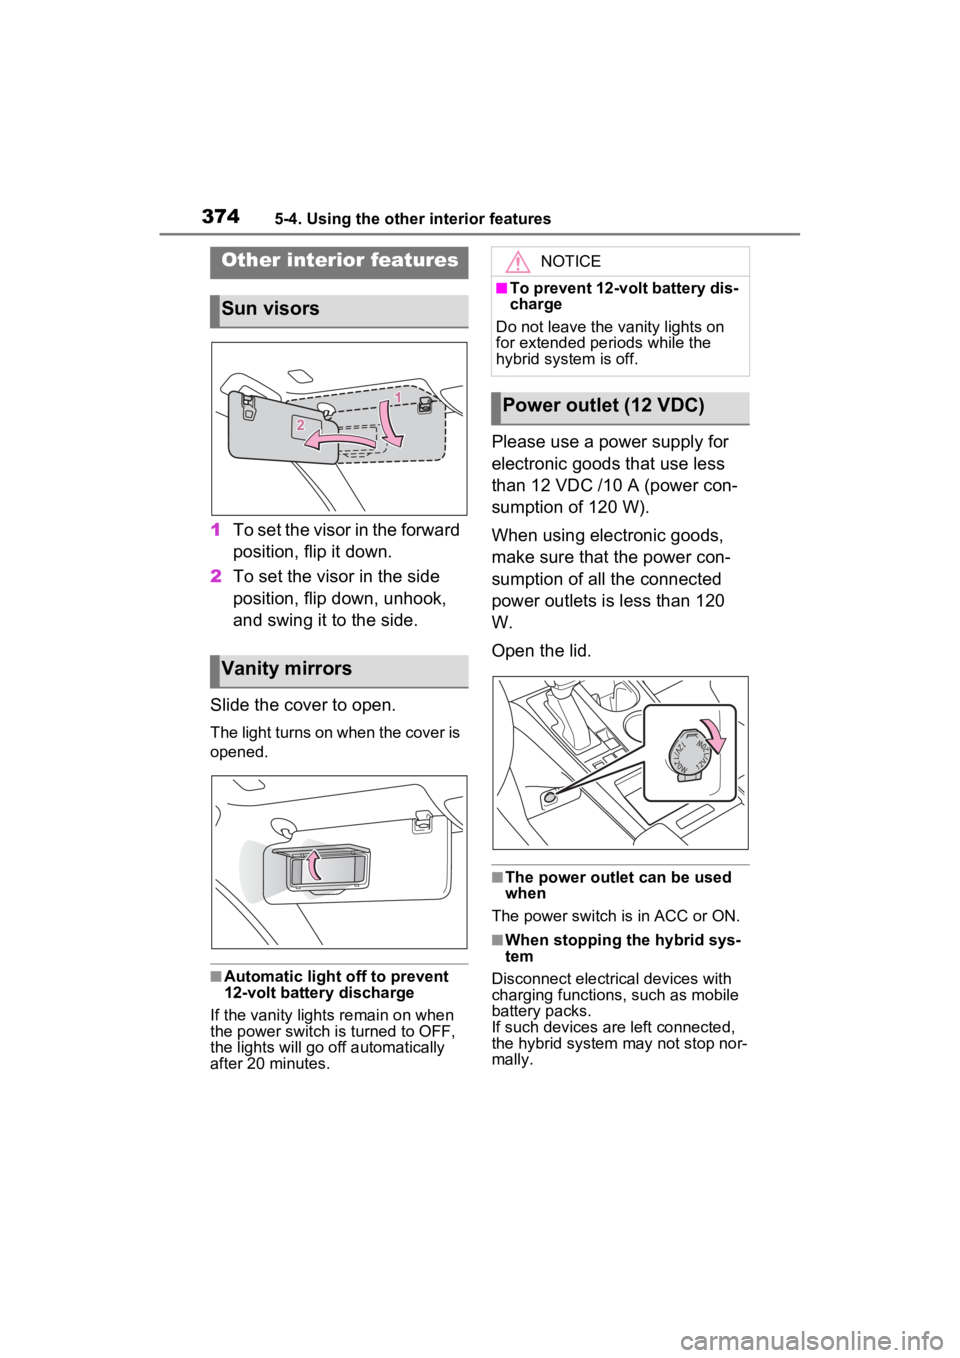
1To set the visor in the forward
position, flip it down.
2 To set the visor in the side
position, flip down, unhook,
and swing it to the side.
Slide the cover to open.
The light turns on when the cover is
opened.
■Automatic light off to prevent
12-volt battery discharge
If the vanity light s remain on when
the power switch is turned to OFF,
the lights will go off automatically
after 20 minutes.
Please use a power supply for
electronic goods that use less
than 12 VDC /10 A (power con-
sumption of 120 W).
When using electronic goods,
make sure that the power con-
sumption of all the connected
power outlets is less than 120
W.
Open the lid.
■The power outlet can be used
when
The power switch is in ACC or ON.
■When stopping the hybrid sys-
tem
Disconnect electrical devices with
charging functions, such as mobile
battery packs.
If such devices are left connected,
the hybrid system may not stop nor-
mally.
Other interior features
Sun visors
Vanity mirrors
NOTICE
■To prevent 12-volt battery dis-
charge
Do not leave the vanity lights on
for extended periods while the
hybrid system is off.
Power outlet (12 VDC)
Page 389 of 600

3895-4. Using the other interior features
5
Interior features
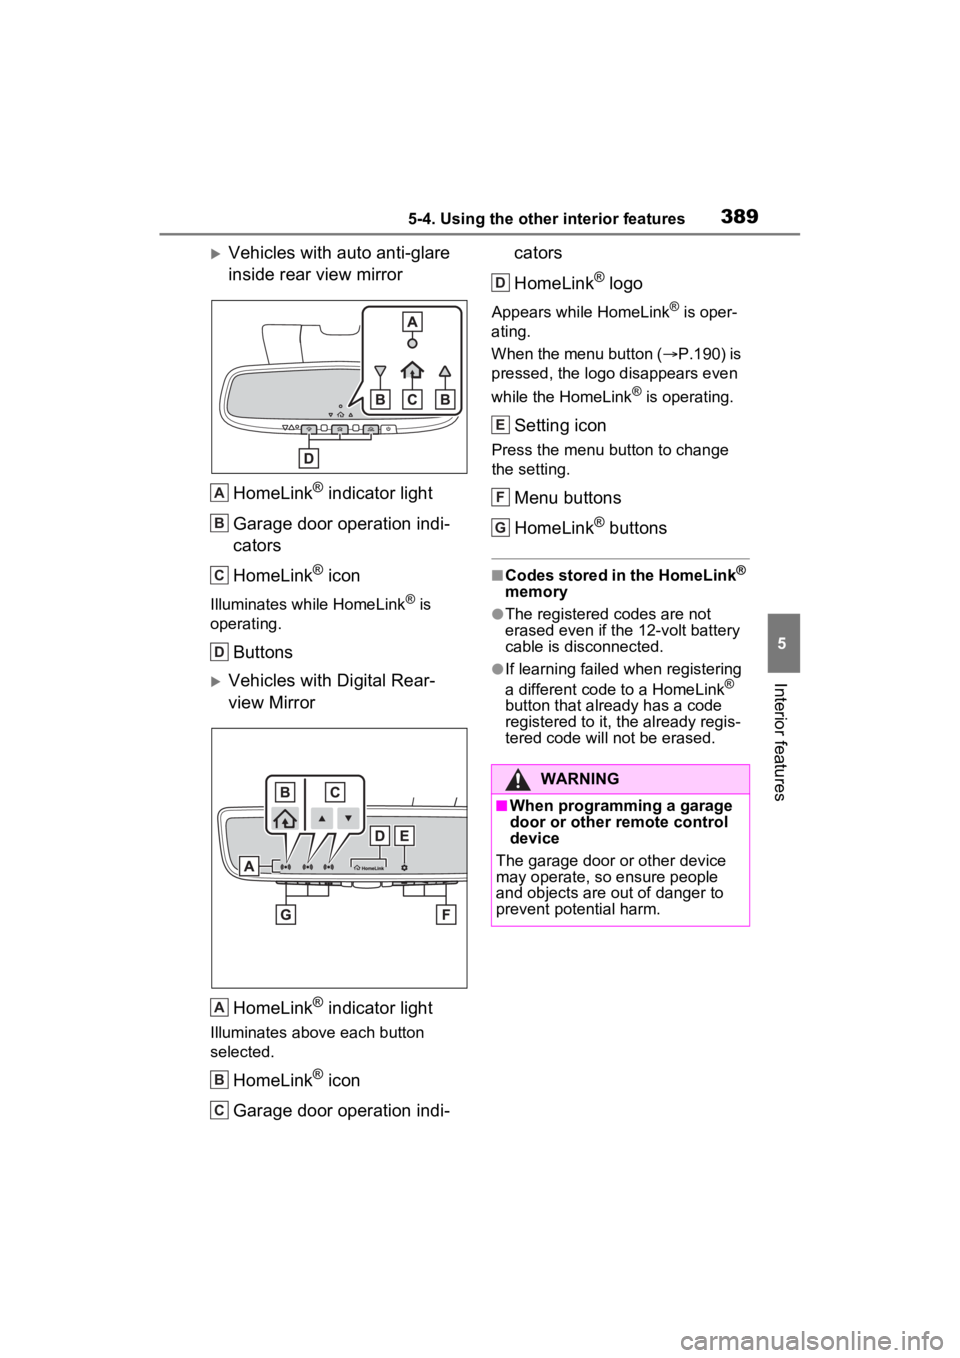
Vehicles with auto anti-glare
inside rear view mirrorHomeLink
® indicator light
Garage door operation indi-
cators
HomeLink
® icon
Illuminates while HomeLink® is
operating.
Buttons
Vehicles with Digital Rear-
view Mirror
HomeLink
® indicator light
Illuminates above each button
selected.
HomeLink® icon
Garage door operation indi- cators
HomeLink
® logo
Appears while HomeLink® is oper-
ating.
When the menu button ( P.190) is
pressed, the logo disappears even
while the HomeLink
® is operating.
Setting icon
Press the menu button to change
the setting.
Menu buttons
HomeLink
® buttons
■Codes stored in the HomeLink®
memory
●The registered codes are not
erased even if the 12-volt battery
cable is disconnected.
●If learning failed when registering
a different code to a HomeLink®
button that already has a code
registered to it, the already regis-
tered code will not be erased.
A
B
C
D
A
B
C
WARNING
■When programming a garage
door or other remote control
device
The garage door or other device
may operate, so ensure people
and objects are out of danger to
prevent potential harm.
D
E
F
G
Page 390 of 600

3905-4. Using the other interior features
■Before programming
HomeLink
®
During programming, it is pos-
sible that garage doors,
gates, or other devices may
operate. For this reason,
make sure that people and
objects are clear of the
garage door or other devices
to prevent injury or other
potential harm.
It is recommended that a new
battery be placed in the
remote control transmitter for
successful programming.
Garage door opener motors
manufactured after 1995 may
be equipped with rolling code
protection. If this is the case, you may need a stepladder or
other sturdy, safe device to
reach the “Learn” or “Smart”
button on the garage door
opener motor.
■Programming HomeLink®
Steps
2 through 4 must be per-
formed within 60 seconds, oth-
erwise the HomeLink
® indicator
light will stop flashing and pro-
gramming will not be success-
fully completed.
1 Vehicles with Digital Rear
view Mirror: Press the
HomeLink
® button or menu
button When the HomeLink
®
button is pressed: Home-
link
® Training Tutorial will be
displayed to assist you pro-
gramming the HomeLink
®.
When the menu button is pressed:
Press the menu button and
select the “SET UP”. Homelink
®
Training Tutorial will be displayed
to assist you programming the
HomeLink
®.
2 Press and release the
HomeLink
® button you want
to program and check that
the HomeLink
® indicator light
flashes (orange).
3 Point the remote control
transmitter for the device at
the rear view mirror, 1 to 3 in.
(25 to 75 mm) from the
HomeLink
® buttons.
WARNING
■Conforming to federal safety
standards
Do not use the HomeLink
® com-
patible transceiver with any
garage door opener or device that
lacks safety stop and reverse fea-
tures as required by federal safety
standards.
This includes any garage door
that cannot detect an interfering
object. A door or device without
these features increases the risk
of death or se rious injury.
■When operating or program-
ming HomeLink®
Never allow a child to operate or
play with the HomeLink® buttons.
Programming HomeLink®