Page 177 of 600
1763-3. Adjusting the seats
est position (P.183) and
stow the seat belt buckles.
2 Stow the center seat belt.
( P.38)
■Folding down the third seat-
backs
Pull the “TO RECLINE” strap
and fold down the seatback.
■Returning the third seat-
backs
Pull the “TO RECLINE” strap,
and raise the seatback and the
outside head restraints. Before stowing or returning third
seat, remove any items from the
floor area to prevent interfer-
ence with moving parts.
■Before stowing the third
seats
1 Lower the center head
restraint to the lowest posi-
tion ( P.183) and stow the
seat belt buckles.
2 Stow the center seat belt.
( P.38)
■Stowing the third seats
1 Pull the handle to move the
seat rearward. Then push the
seat down.
The outside head r estraints are
Stowing the third seats
Page 179 of 600
1783-3. Adjusting the seats
WARNING
●Do not allow anyone to sit on a
folded seatback or in the lug-
gage compartment while driv-
ing.
●Do not allow child ren to enter
the luggage compartment.
●Be careful not to get any part of
your body pinched by a seat.
■After returning the rear seat-
backs or installing seats
Observe the following precau-
tions. Failure to do so may result
in death or serious injury.
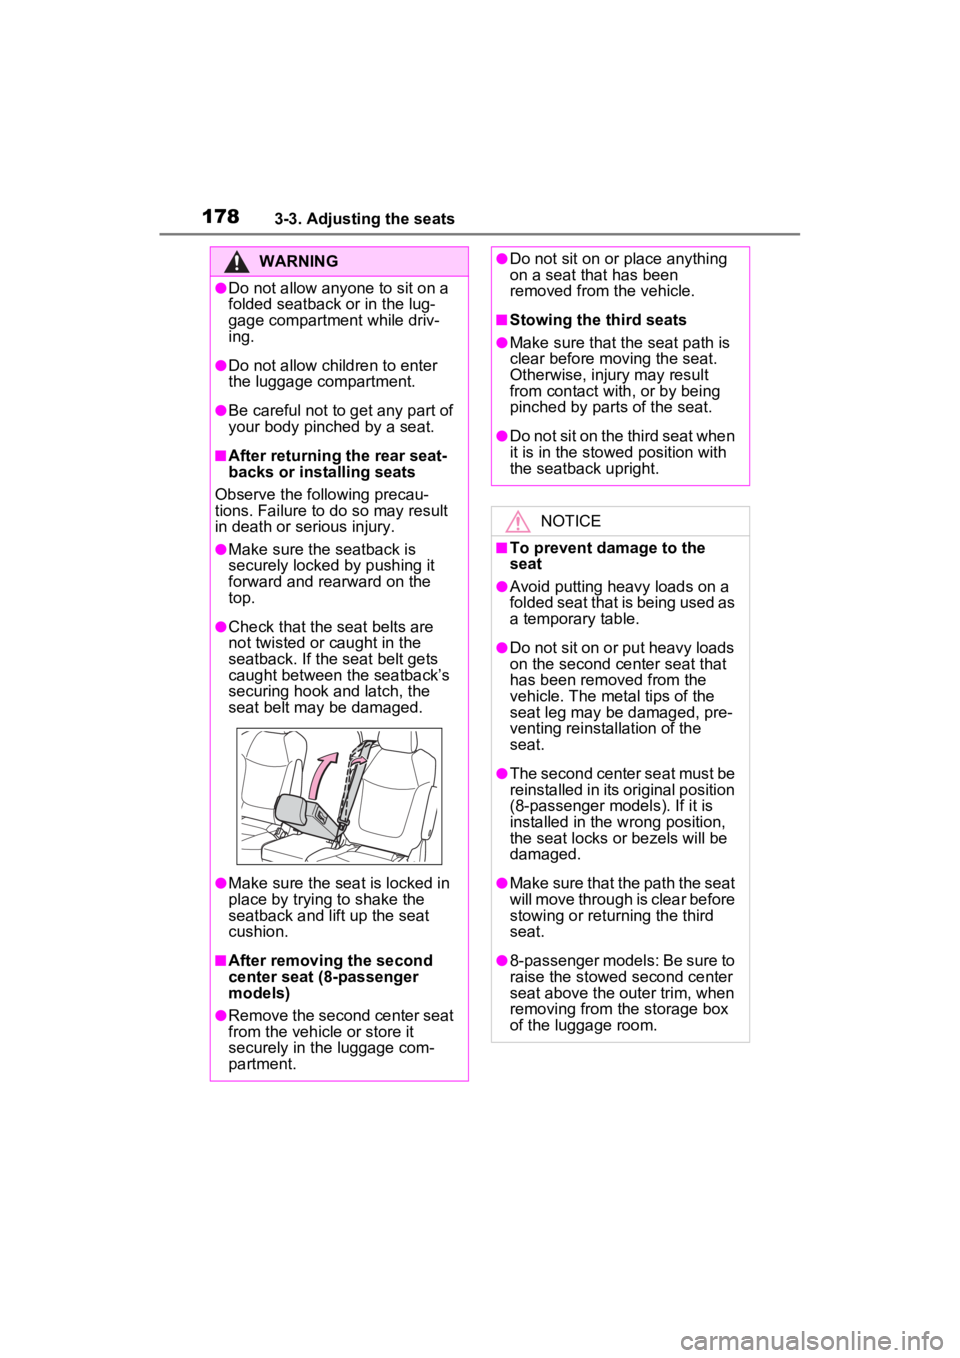
●Make sure the seatback is
securely locked by pushing it
forward and rearward on the
top.
●Check that the seat belts are
not twisted or caught in the
seatback. If the seat belt gets
caught between the seatback’s
securing hook and latch, the
seat belt may be damaged.
●Make sure the seat is locked in
place by trying to shake the
seatback and lift up the seat
cushion.
■After removi ng the second
center seat (8-passenger
models)
●Remove the second center seat
from the vehicle or store it
securely in the luggage com-
partment.
●Do not sit on or place anything
on a seat that has been
removed from the vehicle.
■Stowing the third seats
●Make sure that the seat path is
clear before moving the seat.
Otherwise, injury may result
from contact with, or by being
pinched by parts of the seat.
●Do not sit on the third seat when
it is in the stowed position with
the seatback upright.
NOTICE
■To prevent damage to the
seat
●Avoid putting heavy loads on a
folded seat that is being used as
a temporary table.
●Do not sit on or put heavy loads
on the second center seat that
has been removed from the
vehicle. The metal tips of the
seat leg may be damaged, pre-
venting reinstallation of the
seat.
●The second center seat must be
reinstalled in its original position
(8-passenger models). If it is
installed in the w rong position,
the seat locks or bezels will be
damaged.
●Make sure that the path the seat
will move through is clear before
stowing or returning the third
seat.
●8-passenger models: Be sure to
raise the stowed second center
seat above the outer trim, when
removing from the storage box
of the luggage room.
Page 180 of 600
1793-3. Adjusting the seats
3
Before driving
*: If equipped
When all of the following have
been performed, the driver’s
seat and steering wheel are
automatically adjusted to a posi-
tion that allows driver to enter
and exit the vehicle easily.
NOTICE
■Stowing the seat belt
The seat belts and the buckles
must be stowed before you fold
down the rear seatbacks.
Driving position mem-
ory*
This feature automatically
adjusts the positions of the
driver’s seat, steering
wheel, outside rear view
mirrors and head-up display
(if equipped) to make enter-
ing and exiting the vehicle
easier or to suit your prefer-
ences.
Two different driving posi-
tions can be recorded into
memory.
Each electronic key can be
registered to recall your pre-
ferred driving position.
Enabling easier driver
entry and exit (power easy
access system)
Page 185 of 600
1843-3. Adjusting the seats
top of your ears.
■Adjusting the center seat head
restraint
Always raise the head restraint one
level from the stowed position when
using.
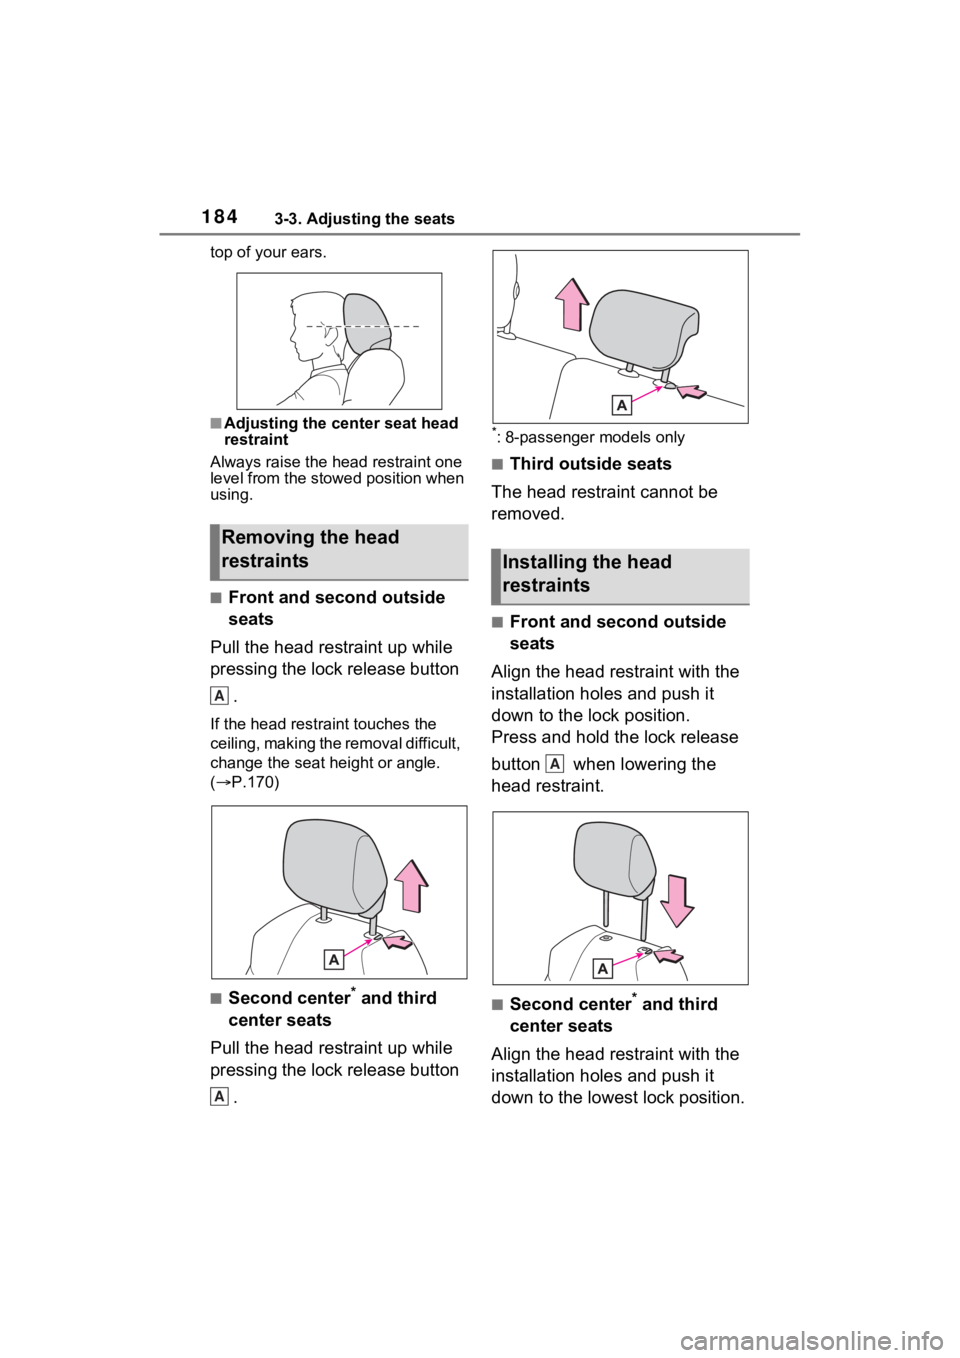
■Front and second outside
seats
Pull the head restraint up while
pressing the lock release button .
If the head restraint touches the
ceiling, making the removal difficult,
change the seat height or angle.
( P.170)
■Second center* and third
center seats
Pull the head restraint up while
pressing the lock release button .
*: 8-passenger models only
■Third outside seats
The head restraint cannot be
removed.
■Front and second outside
seats
Align the head restraint with the
installation holes and push it
down to the lock position.
Press and hold the lock release
button when lowering the
head restraint.
■Second center* and third
center seats
Align the head restraint with the
installation holes and push it
down to the lowest lock position.
Removing the head
restraints
A
A
�,�Q�V�W�D�O�O�L�Q�J���W�K�H���K�H�\
D�G��
�U�H�V�W�U�D�L�Q�W�V
A
Page 187 of 600
1863-4. Adjusting the steering wheel and mirrors
3-4.Adjusting the steering wheel and mirrors
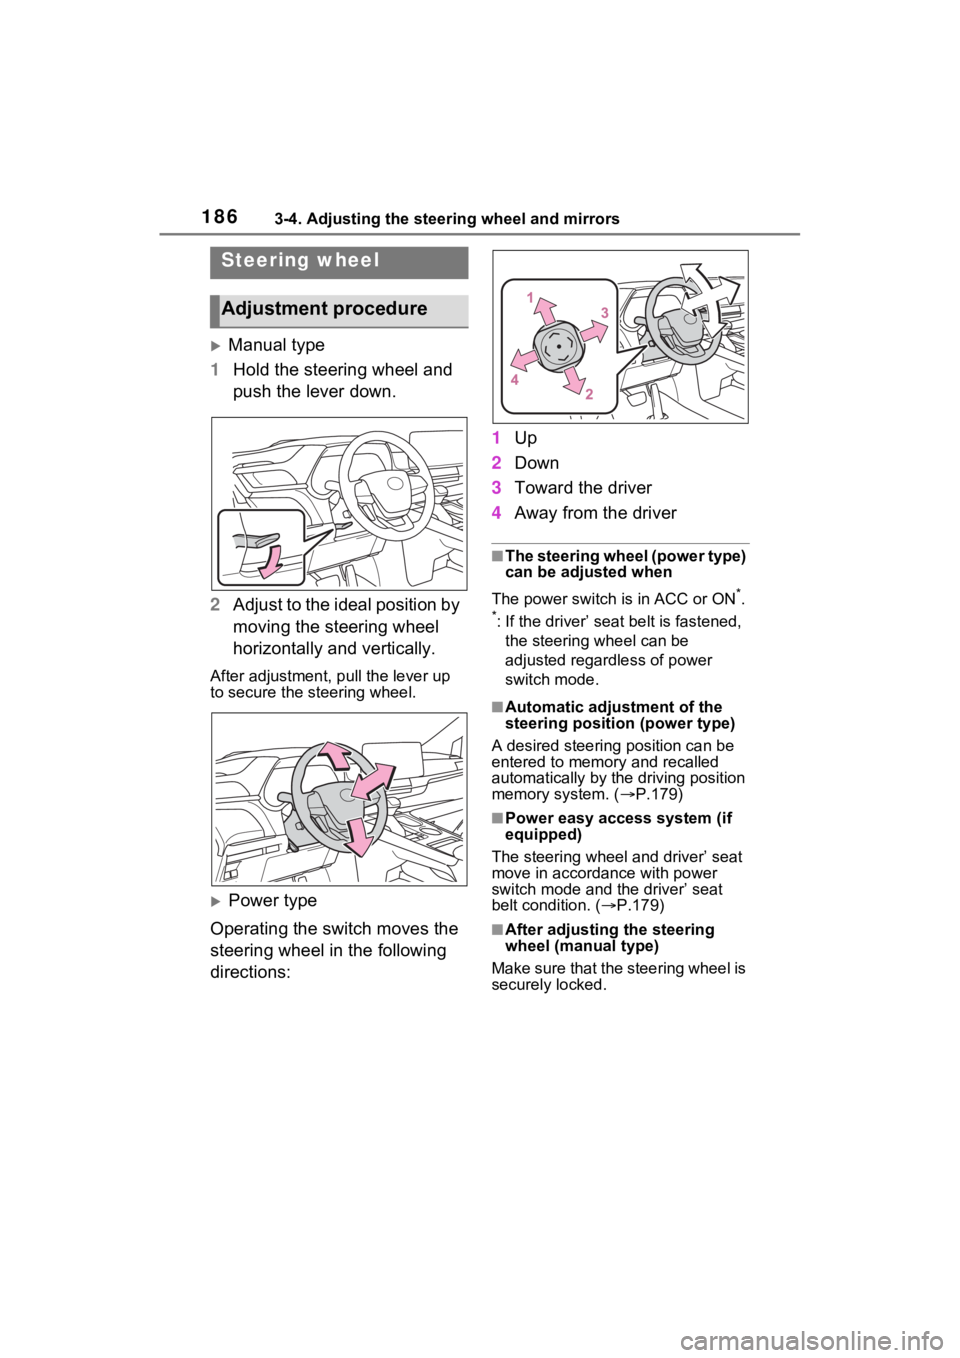
Manual type
1 Hold the steering wheel and
push the lever down.
2 Adjust to the ideal position by
moving the steering wheel
horizontally and vertically.
After adjustment, pull the lever up
to secure the steering wheel.
Power type
Operating the switch moves the
steering wheel in the following
directions: 1
Up
2 Down
3 Toward the driver
4 Away from the driver
■The steering wheel (power type)
can be adjusted when
The power switch is in ACC or ON
*.
*: If the driver’ seat belt is fastened, the steering wheel can be
adjusted regardless of power
switch mode.
■Automatic adjustment of the
steering position (power type)
A desired steering position can be
entered to memory and recalled
automatically by the driving position
memory system. ( P.179)
■Power easy access system (if
equipped)
The steering wheel and driver’ seat
move in accordance with power
switch mode and the driver’ seat
belt condition. ( P.179)
■After adjusting the steering
wheel (manual type)
Make sure that the steering wheel is
securely locked.
Steering wheel
Adjustment procedure
Page 197 of 600
1963-4. Adjusting the steering wheel and mirrors
SymptomLikely causeSolution
The image is difficult to
see.
The mirror surface is
dirty.Clean the mirror surface
gently, using a soft dry
cloth.
Sunlight or headlights
are shining directly into
the Digital Rear-view
Mirror.
Change to optical mirror
mode.
(If the light is coming
through the moon roof [if
equipped], close the
sunshade.)
• T h e v e h i c l e i s i n a d a r k area.
• The vehicle is near a TV tower, broadcast-
ing station, electric
power plant, or other
location where strong
radio waves or electri-
cal noise may be pres-
ent.
• The temperature around the camera is
extremely high/low.
• The ambient tempera- ture is extremely low.
• It is raining or humid.
• Sunlight or headlights are shining directly into
the camera lens.
• The vehicle is under fluorescent lights,
sodium lights, mer-
cury lights, etc.
• Exhaust gas is obstructing the cam-
era.
Change to optical mirror
mode.
(Change back to digital
mirror mode when the
conditions have
improved.)
Page 201 of 600
2003-4. Adjusting the steering wheel and mirrors
vate in conjunction with the anti-
glare inside rear view mirror to
reduce reflected light.
■Automatic adjustment of the
mirror angle (vehicles with driv-
ing position memory)
A desired mirror f ace angle can be
entered to memory and recalled
automatically by the driving position
memory. ( P.179)
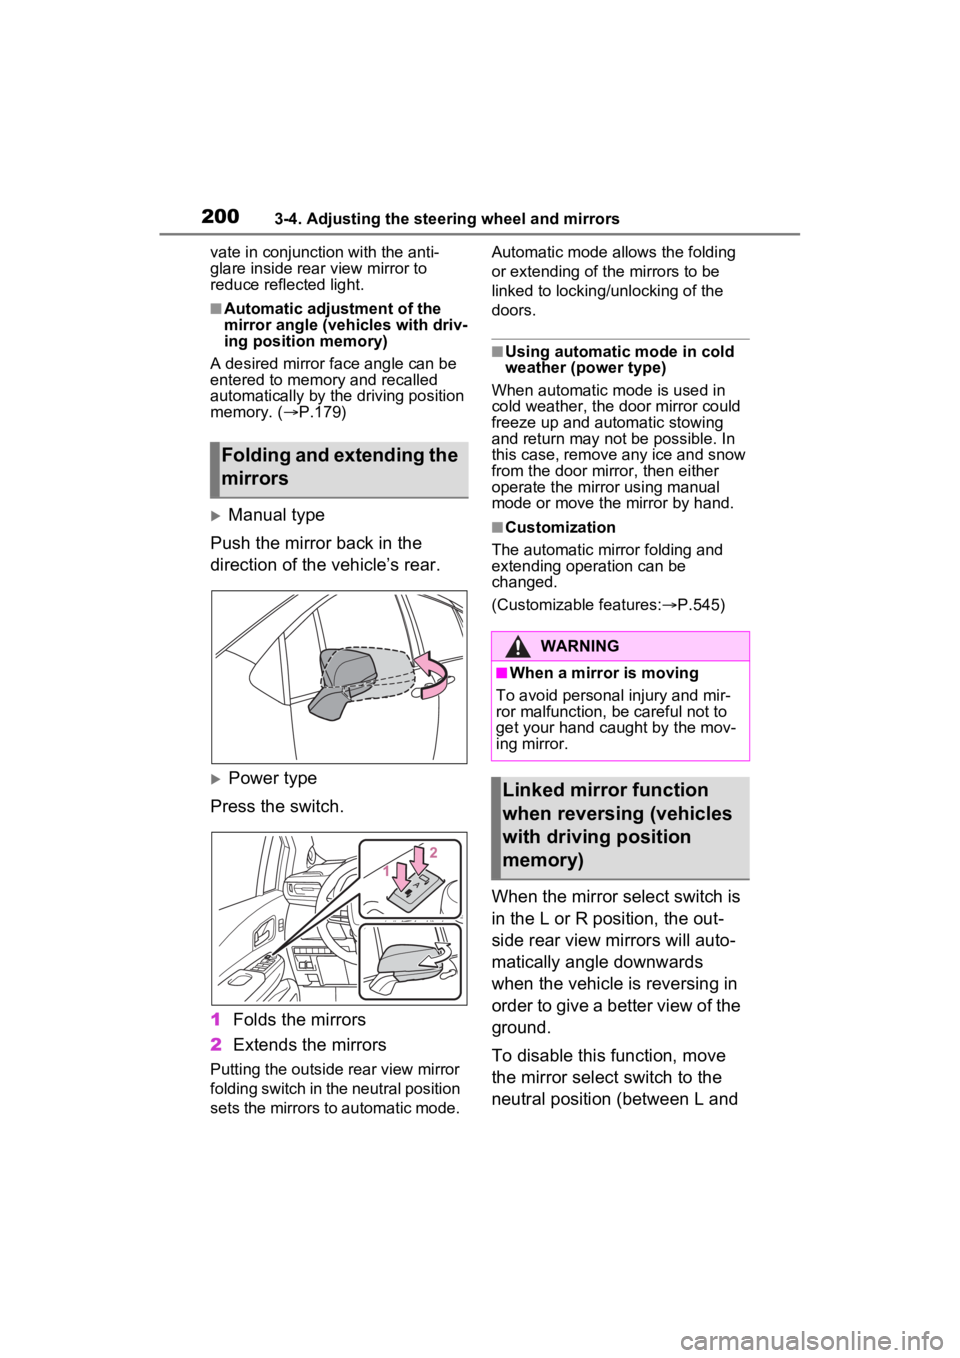
Manual type
Push the mirror back in the
direction of the vehicle’s rear.
Power type
Press the switch.
1 Folds the mirrors
2 Extends the mirrors
Putting the outside rear view mirror
folding switch in the neutral position
sets the mirrors to automatic mode. Automatic mode allows the folding
or extending of the mirrors to be
linked to locking/unlocking of the
doors.
■Using automatic mode in cold
weather (power type)
When automatic mode is used in
cold weather, the door mirror could
freeze up and automatic stowing
and return may not be possible. In
this case, remove any ice and snow
from the door mirror, then either
operate the mirror using manual
mode or move the mirror by hand.
■Customization
The automatic mirror folding and
extending operation can be
changed.
(Customizable features: P.545)
When the mirror select switch is
in the L or R position, the out-
side rear view mirrors will auto-
matically angle downwards
when the vehicle is reversing in
order to give a better view of the
ground.
To disable this function, move
the mirror select switch to the
neutral position (between L and
Folding and extending the
mirrors
WARNING
■When a mirror is moving
To avoid personal injury and mir-
ror malfunction, be careful not to
get your hand caught by the mov-
ing mirror.
Linked mirror function
when reversing (vehicles
with driving position
memory)
Page 210 of 600
209
4
4
Driving
Driving
4-1. Before drivingDriving the vehicle....... 210
Cargo and luggage ..... 217
Vehicle load limits ....... 220
Trailer towing (without tow- ing package).............. 221
Trailer towing (with towing package) ................... 222
Dinghy towing ............. 232
4-2. Driving procedures Power (ignition) switch 233
EV drive mode ............ 238
Hybrid transmission .... 240
Turn signal lever ......... 244
Parking brake .............. 245
Brake Hold .................. 248
4-3. Operating the lights and wipers
Headlight switch .......... 250
AHB (Automatic High Beam)........................ 252
Fog light switch ........... 256
Windshield wipers and washer....................... 256
Rear window wiper and washer....................... 259
4-4. Refueling Opening the fuel tank cap.................................. 2614-5. Using the dr
iving support
systems
Toyota Safety Sense 2.0 .................................. 264
PCS (Pre-Collision System) .................................. 269
LTA (Lane Tracing Assist) .................................. 277
RSA (Road Sign Assist) .................................. 287
Dynamic radar cruise con- trol with full-speed range
.................................. 290
BSM (Blind Spot Monitor) .................................. 301
Intuitive parking assist . 311
RCD (Rear Camera Detec- tion) function .............. 319
PKSB (Parking Support Brake) ........................ 323
Parking Support Brake func- tion (static objects) .... 328
Parking Support Brake func- tion (rear-crossing vehi-
cles) ........................... 331
Driving mode select switch .................................. 333
Driving assist systems. 334
4-6. Driving tips Hybrid vehicle driving tips.................................. 341
Winter driving tips........ 343