2022 TOYOTA RAV4 seats
[x] Cancel search: seatsPage 136 of 748

1363-3. Adjusting the seats
ten.
■Recall procedure
1 Check that the shift lever is in
P.
2 Turn the engine switch to
ON.
3 Press one of the buttons for
the driving position you want
to recall until the buzzer
sounds.
■To stop the position recall oper-
ation part-way through
Perform any of the following:
●Press the “SET” button.
●Press button “1” or “2”.
●Operate any of the seat adjust-
ment switches.
■Seat positions that can be
memorized ( P.132)
The adjusted positions other than
the position adjusted by lumbar sup-
port switch can be recorded.
■Operating the driving position
memory after turning the
engine switch to OFF
Recorded seat positions can be
activated up to 180 seconds after
the driver’s door is opened and
another 60 seconds after it is closed
again.
■In order to correctly use the
driving position memory func-
tion
If a seat position is already in the
furthest possible position and the
seat is operated in the same direc-
tion, the recorded position may be
slightly different w hen it is recalled.
■When recalling the driving posi-
tion
Take care when recalling the driving
position so that the head restraint
does not touch the ceiling.
■If the battery is disconnected
The memorized positions are
erased.
■When the recorded seat posi-
tion cannot be recalled
The seat position may not be
recalled in some situations when the
seat position is recorded in a certain
range. For details, contact your
Toyota dealer.
WARNING
■Seat adjustment caution
Take care during seat adjustment
so that the seat does not strike
the rear passenger or squeeze
your body against the steering
wheel.
Page 137 of 748

1373-3. Adjusting the seats
3
Before driving
■Registering procedure
Record your driving position to
button “1” or “2” before perform-
ing the following:
Carry only the key you want to
register, and then close the
driver’s door.
If 2 or more keys are in the vehi-
cle, the driving position cannot
be recorded properly.
1 Check that the shift lever is in
P.
2 Turn the engine switch to
ON.
3 Recall the driving position
that you want to record.
4 While pressing the recalled
button, press and hold the
door lock switch (either lock
or unlock) until the buzzer
sounds.
If the button could not be regis-
tered, the buzzer sounds continu-
ously for approximately 3 seconds.
■Recall procedure
Make sure that the doors are
locked before recalling the driv-
ing position. Carry the electronic
key that has been registered to
the driving position, and then
unlock and open the driver’s
door using the smart key system
or wireless remote control.
The driving position will move to the
recorded position.
If the driving position is in a position
that has already been recorded, the
seat will not move.
■Cancelation procedure
Carry only the key you want to
cancel and then close the
driver’s door.
If 2 or more keys are in the vehi-
cle, the driving position cannot
be canceled properly.
1 Check that the shift lever is in
P.
2 Turn the engine switch to
ON.
3 While pressing the “SET” but-
ton, press and hold the door
lock switch (either lock or
unlock) until the buzzer
sounds twice.
If the button could not be canceled,
the buzzer sounds c ontinuously for
approximately 3 seconds.
■Recalling the driving position
using the memory recall func-
tion
●Different driving p ositions can be
registered for each electronic key.
Therefore, the driving position that
Registering/recall/cancel-
ing a driving position to
an electronic key (mem-
ory recall function)
Page 138 of 748

1383-3. Adjusting the seats
is recalled may be different
depending on the key being car-
ried.
●If a door other than the driver’s
door is unlocked with smart key
system, the driving position can-
not be recalled. In this case, press
the driving position button which
has been set.
■Customization
Settings (e.g. the unlock door set-
tings of the memory recall function)
can be customized. (Customizable
features: P.690)
■Front seats
1 Up
Pull the head restraints up.
2Down
Push the head restraint down while
pressing the lock release button
.
Head restraints
Head restraints are pro-
vided for all seats.
WARNING
■Head restraint precautions
Observe the following precautions
regarding the head restraints.
Failure to do so may result in
death or serious injury.
●Use the head restraints
designed for each respective
seat.
●Adjust the head restraints to the
correct position at all times.
●After adjusting the head
restraints, push down on them
and make sure they are locked
in position.
●Do not drive with the head
restraints removed.
Vertical adjustment
A
Page 139 of 748

1393-3. Adjusting the seats
3
Before driving
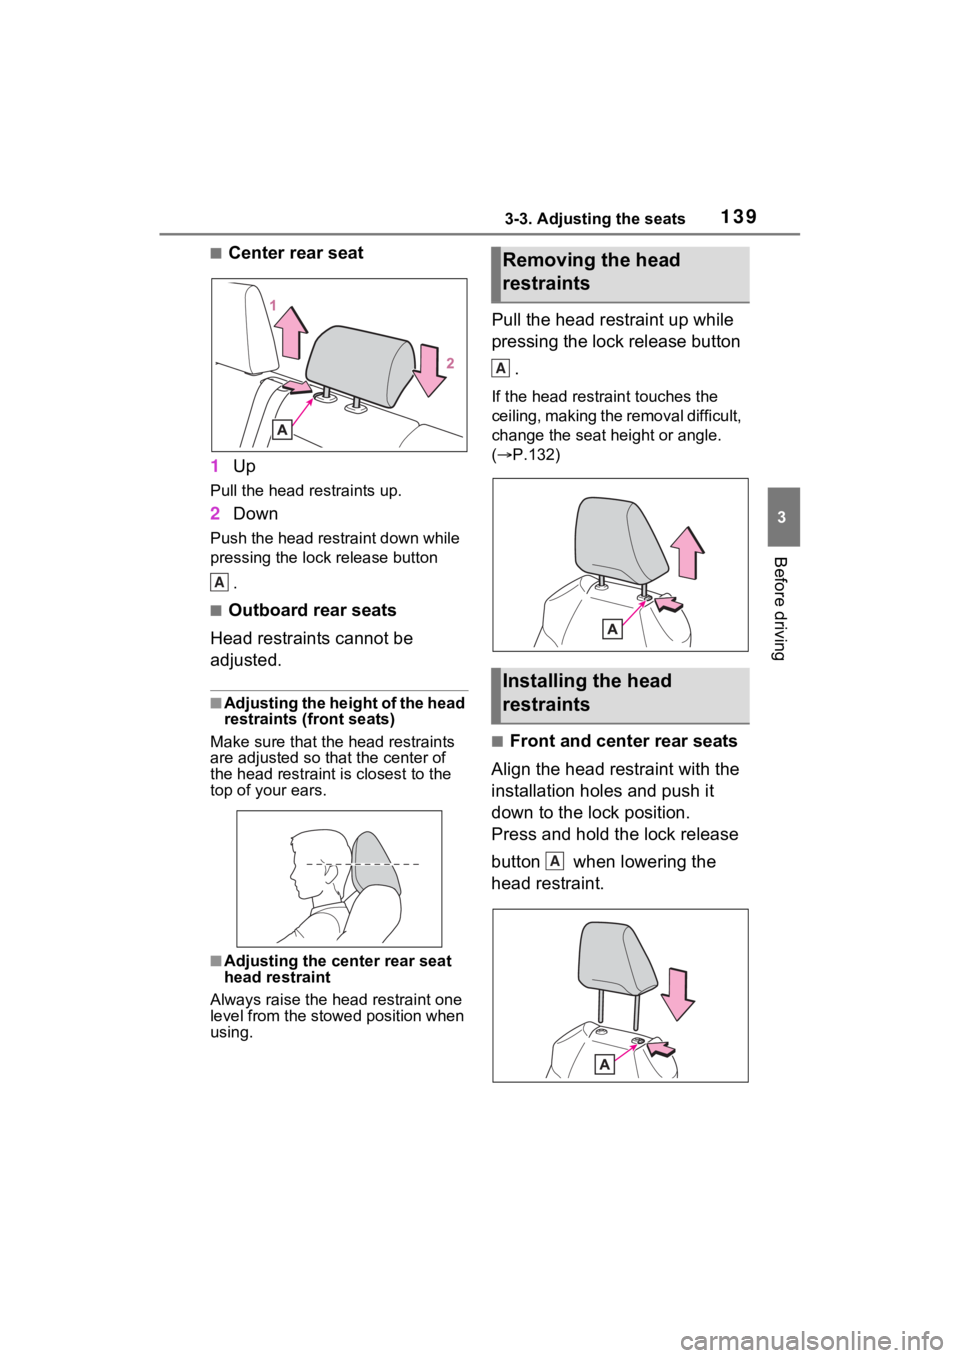
■Center rear seat
1 Up
Pull the head restraints up.
2Down
Push the head restraint down while
pressing the lock release button
.
■Outboard rear seats
Head restraints cannot be
adjusted.
■Adjusting the height of the head
restraints (front seats)
Make sure that the head restraints
are adjusted so that the center of
the head restraint is closest to the
top of your ears.
■Adjusting the center rear seat
head restraint
Always raise the head restraint one
level from the stowed position when
using.
Pull the head restraint up while
pressing the lock release button
.
If the head restrai nt touches the
ceiling, making the removal difficult,
change the seat height or angle.
( P.132)
■Front and center rear seats
Align the head restraint with the
installation holes and push it
down to the lock position.
Press and hold the lock release
button when lowering the
head restraint.
A
Removing the head
restraints
Installing the head
restraints
A
A
Page 140 of 748

1403-3. Adjusting the seats
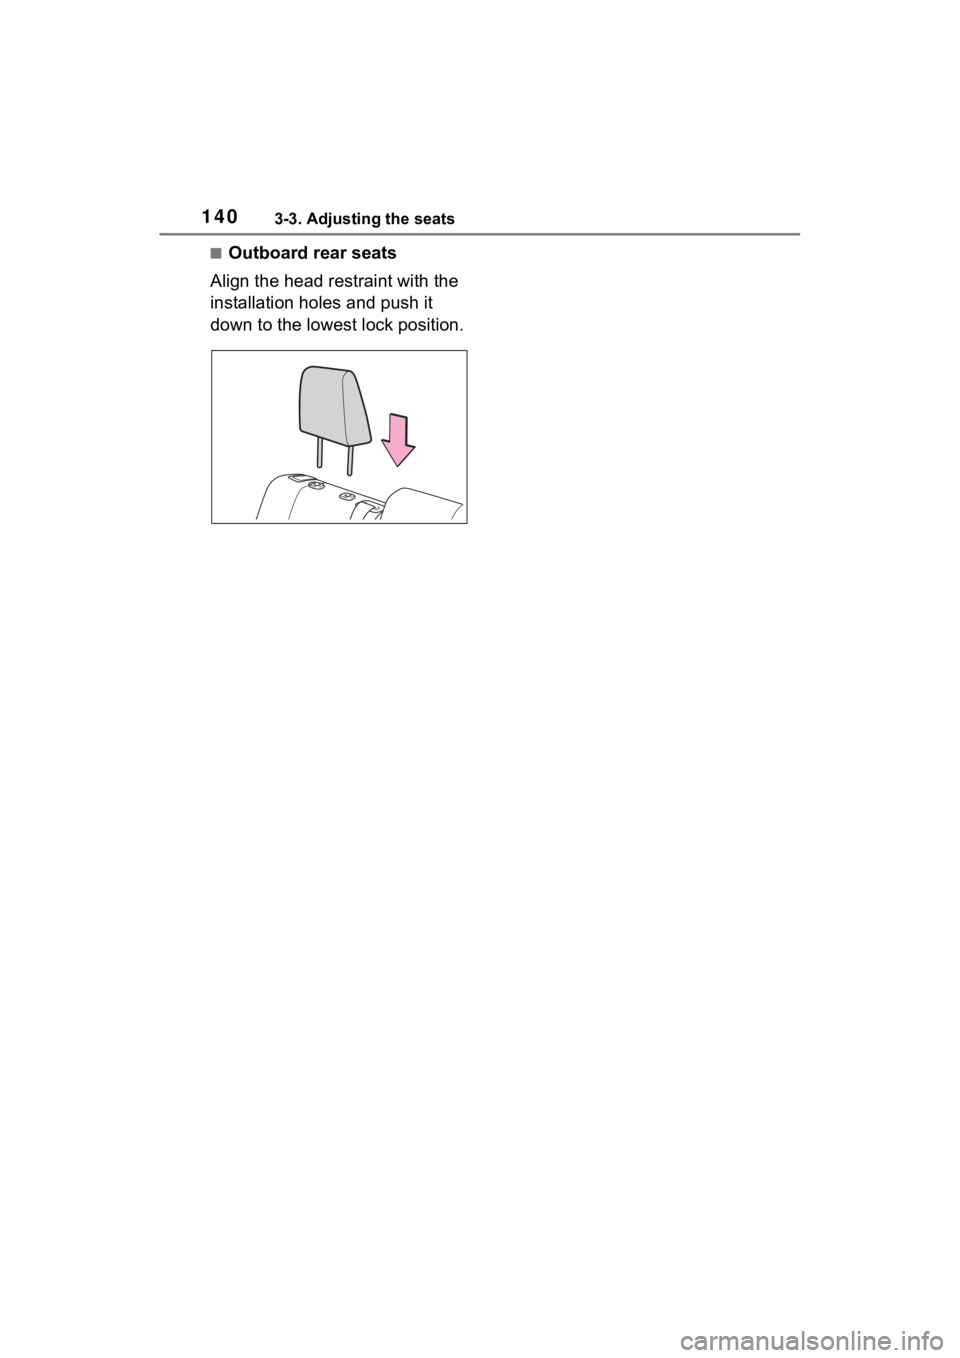
■Outboard rear seats
Align the head restraint with the
installation holes and push it
down to the lowest lock position.
Page 144 of 748

1443-4. Adjusting the steering wheel and mirrors
*: If equipped
Icon display area
Displays icons, adjusting gauge,
etc. (P.146)
Lever
Operate to change between digital
mirror mode and optical mirror
mode.
Menu button
Press to display the icon display
area and select the item you want
to adjust.
Select/adjust button
Press to change the setting of the
item you want to adjust.
Camera indicator
Indicates that the camera is operat-
ing normally.
Digital Rear-view Mir-
ror*
The Digital Rear-view Mirror
is a system that uses the
camera on the rear of the
vehicle and displays its
image on the display of the
Digital Rear-view Mirror.
The Digital Rear-view Mirror
can be changed between
optical mirror mode and dig-
ital mirror mode by operat-
ing the lever.
The Digital Rear-view Mirror
allows the driver to see the
rear view despite obstruc-
tions, such as the head
restraints or luggage,
ensuring rear visibility.
Also, the rear seats are not
displayed and privacy of the
passengers is enhanced.
WARNING
Observe the following precau-
tions.
Failure to do so m ay result in
death or serious injury.
■Before using the Digital Rear-
view Mirror
●Make sure to adjust the mirror
before driving. ( P.146)
• Change to optical mirror mode and adjust the position of the
Digital Rear-view Mirror so that
the area behind your vehicle
can be viewed properly.
• Change to digital mirror mode and adjust the display settings.
●As the range of the image dis-
played by the Digital Rear-view
Mirror is different from that of
the optical mirror, make sure to
check this difference before
driving.
System components
A
B
C
D
E
Page 173 of 748

1734-1. Before driving
4
Driving
to R*.
• When the shift lever is shifted
from P or R to forward drive
shift position such as D
*.
When the system op erates, a mes-
sage appears on the multi-informa-
tion display. Read the message
and follow the instruction.
*: Depending on the situation, the shift position may not be
changed.
■Drive-Start Control (DSC)
●When the TRAC is turned off
( P.357), sudden start restraint
control also does not operate. If
your vehicle have trouble escap-
ing from the mud or fresh snow
due to sudden start restraint con-
trol operation, deactivate TRAC
( P.357) so that the vehicle may
become able to e scape from the
mud or fresh snow.
Also, sudden start restraint control
will not operate in the following con-
ditions:
• When Multi-terrain Select is selected
Cargo and luggage
Take notice of the following
information about storage
precautions, cargo capacity
and load.
WARNING
■Things that must not be car-
ried in the luggage compart-
ment
The following things may cause a
fire if loaded in the luggage com-
partment:
●Receptacles containing gaso-
line
●Aerosol cans
■Storage precautions
Observe the following precau-
tions.
Failure to do so may prevent the
pedals from being depressed
properly, may block the driver’s
vision, or may res ult in items hit-
ting the driver or passengers, pos-
sibly causing an accident.
●Stow cargo and luggage in the
luggage compartment when-
ever possible.
●Do not stack anything in the lug-
gage compartment higher than
the seatbacks.
●Do not place cargo or luggage
in or on the follo wing locations.
• At the feet of the driver
• On the front passenger or rear seats (when stacking items)
• On the luggage cover (if equipped)
• On the instrument panel
• On the dashboard
Page 174 of 748

1744-1. Before driving
Cargo capacity depends on the
total weight of the occupants.
(Cargo capacity) = (Total load
capacity) - (Total weight of occu-
pants)
Steps for Determining Correct
Load Limit
(1) Locate the statement “The
combined weight of occupants
and cargo should never exceed
XXX kg or XXX lbs.” on your
vehicle’s placard.
(2) Determine the combined
weight of the driver and passen-
gers that will be riding in your
vehicle.
(3) Subtract the combined
weight of the driver and passen-
gers from XXX kg or XXX lbs.
(4) The resulting figure equals the available amount of cargo
and luggage load capacity.
For example, if the “XXX”
amount equals 1400 lbs. and
there will be five 150 lb passen-
gers in your vehicle, the amount
of available cargo and luggage
load capacity is 650 lbs. (1400 -
750 (5
150) = 650 lbs.)
(5) Determine the combined
weight of luggage and cargo
being loaded on the vehicle.
That weight may not safely
exceed the available cargo and
luggage load capacity calcu-
lated in Step 4.
(6) If your vehicle will be towing
a trailer, load from your trailer
will be transferred to your vehi-
cle. Consult this manual to
determine how this reduces the
available cargo and luggage
load capacity of your vehicle.
( P.176)
WARNING
●Secure all items in the occupant
compartment.
●When you fold down the rear
seats, long items should not be
placed directly behind the front
seats.
●Never allow anyone to ride in
the luggage compartment. It is
not designed for passengers.
They should ride in their seats
with their seat belts properly
fastened. Otherwise, they are
much more likely to suffer death
or serious bodily injury, in the
event of sudden braking, sud-
den swerving or an accident.
Capacity and distribution
WARNING
■Capacity and distribution
●Do not exceed the maximum
axle weight rating or the total
vehicle weight rating.
●Even if the total load of occu-
pant’ weight and the cargo load
is less than the total load capac-
ity, do not apply the load
unevenly. Improper loading may
cause deterioration of steering
or braking control which may
cause death or serious injury.