2022 TOYOTA RAV4 HYBRID tow
[x] Cancel search: towPage 198 of 752

1984-1. Before driving
Confirm that the gross trailer
weight, gross combination
weight, gross vehicle weight,
gross axle weight and tongue
weight are all within the limits.
■GCWR*
6670 lb. (3025 kg)
*: This model meets the tow-vehicle trailering requirement of SAE
International per SAE J2807.
■TWR*
1750 lb. (795 kg)
*: This model meets the tow-vehicle trailering requirement of SAE
International per SAE J2807.
■Unbraked TWR*
1000 lb. (450 kg)
*: This model meets the tow-vehicle trailering requirement of SAE
International per SAE J2807.
A recommended tongue
weight varies in accordance
with the types of trailers or
towing as described below.
To ensure the recommended
values shown below, the
trailer must be loaded by
referring to the following
instructions.
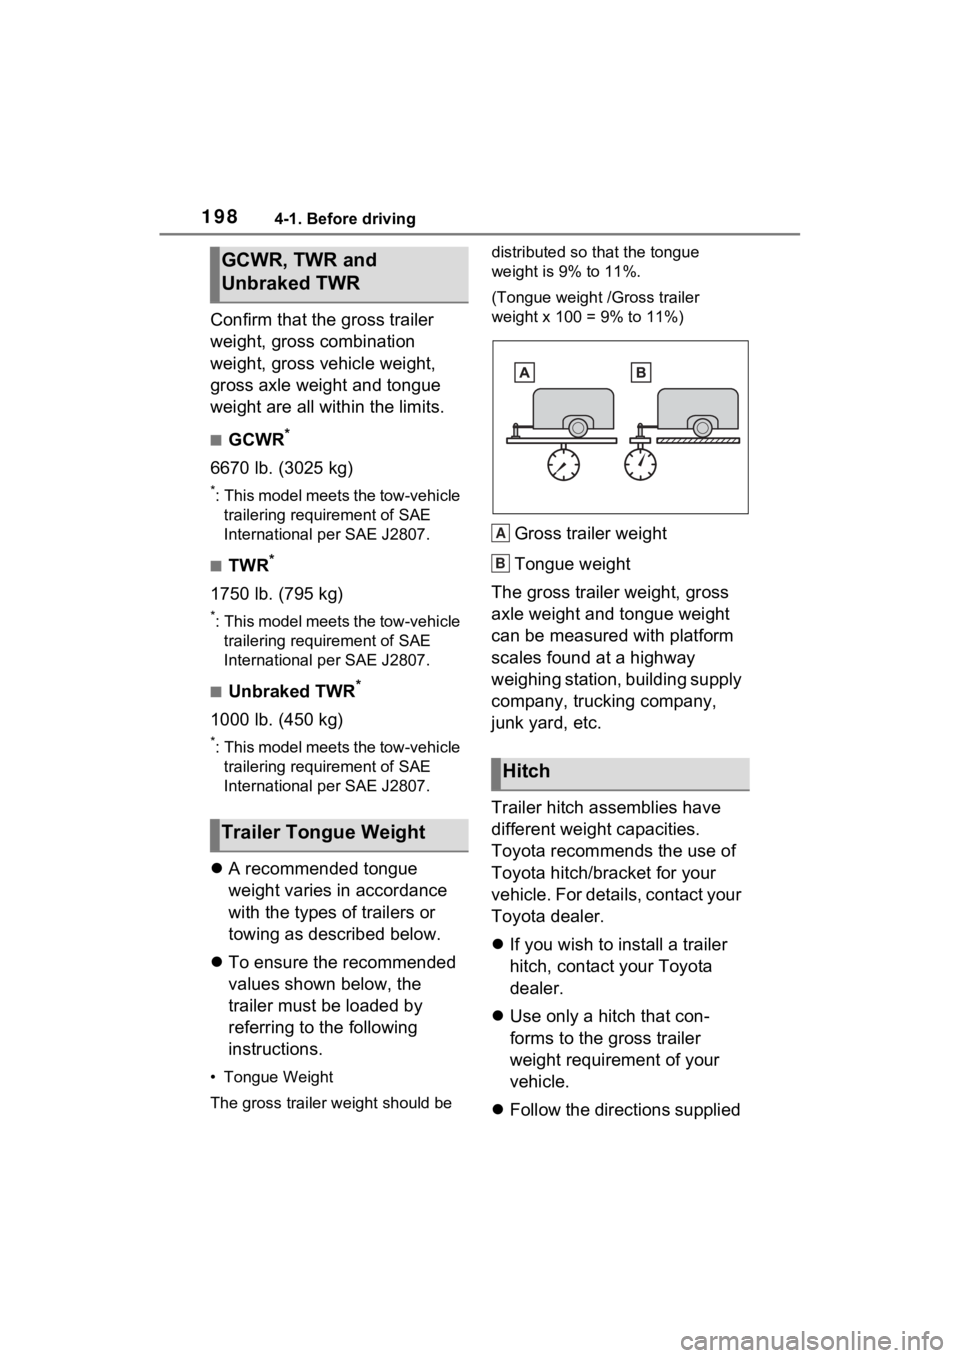
• Tongue Weight
The gross trailer weight should be distributed so that the tongue
weight is 9% to 11%.
(Tongue weight /Gross trailer
weight x 100 = 9% to 11%)
Gross trailer weight
Tongue weight
The gross trailer weight, gross
axle weight and tongue weight
can be measured with platform
scales found at a highway
weighing station, building supply
company, trucking company,
junk yard, etc.
Trailer hitch assemblies have
different weight capacities.
Toyota recommends the use of
Toyota hitch/bracket for your
vehicle. For details, contact your
Toyota dealer.
If you wish to install a trailer
hitch, contact your Toyota
dealer.
Use only a hitch that con-
forms to the gross trailer
weight requirement of your
vehicle.
Follow the directions supplied
GCWR, TWR and
Unbraked TWR
Trailer Tongue Weight
Hitch
A
B
Page 199 of 752

1994-1. Before driving
4
Driving
by the hitch manufacturer.
Lubricate the hitch ball with a
light coating of grease.
Remove the hitch ball when-
ever you are not towing a
trailer. Remove the trailer
hitch if you do not need it.
After removing the hitch, seal
any mounting holes in the
vehicle body to prevent entry
of any substances into the
vehicle.
Weight carrying ball position:
43.3 in. (1100 mm)
Hitch receiver pin hole posi-
tion: 38.1 in. (969 mm)
■Matching trailer ball height to
trailer coupler height
No matter wh ich class of tow hitch
applies, for a more safe trailer
hookup, the trailer ball setup must
be the proper height for the coupler
on the trailer.
Coupler
Trailer ball
WARNING
■Hitch
Trailer hitch assemblies have dif-
ferent weight capacities estab-
lished by the hitch manufacturer.
Even though the vehicle may be
physically capable of towing a
higher weight, the operator must
determine the maximum weight
rating of the pa rticular hitch
assembly and never exceed the
maximum weight rating specified
for the trailer-hitch. Exceeding the
maximum weight rating set by the
trailer-hitch manufacturer can
cause an accident resulting in
death or serious personal injuries.
NOTICE
■When installing a trailer hitch
Use only the position recom-
mended by your Toyota dealer.
Do not install the trailer hitch on
the bumper; this may cause body
damage.
Positions for towing hitch
receiver and hitch ball
A
B
A
B
Page 200 of 752

2004-1. Before driving
Please consult your dealer
when installing trailer lights, as
incorrect installation may cause
damage to the vehicle’s lights.
Please take care to comply with
your state’s laws when installing
trailer lights.
Your vehicle will handle differ-
ently when towing a trailer. Help
to avoid an accident, death or
serious injury, keep the follow-
ing in mind when towing:
Speed limits for towing a
trailer vary by state or prov-
ince. Do not exceed the
posted towing speed limit.
Toyota recommends that the
vehicle-trailer speed limit is 65
mph (104 km/h) on a flat,
straight, dry road. Do not
exceed this limit, the posted
towing speed limit or the
speed limit for your trailer as
set forth in your trailer owner’s
manual, whichever is lowest.
Instability of the towing vehi-
cle-trailer combination (trailer
sway) increases as speed increases. Exceeding speed
limits may cause loss of con-
trol.
Before starting out, check the
trailer lights, tires and the
vehicle-trailer connections.
Recheck after driving a short
distance.
Practice turning, stopping and
reversing with the trailer
attached in an area away
from traffic until you become
accustomed to the feel of the
vehicle-trailer combination.
Reversing with a trailer
attached is difficult and
requires practice. Grip the
bottom of the steering wheel
and move your hand to the
left to move the trailer to the
left. Move your hand to the
right to move the trailer to
right. (This is generally oppo-
site to reversing without a
trailer attached.) Avoid sharp
or prolonged turning. Have
someone guide you when
reversing to reduce the risk of
an accident.
As stopping distance is
increased when towing a
trailer, vehicle-to vehicle dis-
tance should be increased.
For each 10 mph (16 km/h) of
speed, allow at least one
vehicle and trailer length.
Avoid sudden braking as you
may skid, resulting in the
trailer jackknifing and a loss of
Connecting trailer lights
NOTICE
■Do not directly splice trailer
lights
Do not directly splice trailer lights.
Directly splicing trailer lights may
damage your vehicle’s electrical
system and cause a malfunction.
Trailer towing tips
Page 202 of 752

2024-1. Before driving
4Apply the parking brake
firmly.
5 Shift into P and turn off the
hybrid system.
When restarting after parking
on a slope:
1 With the transmission in P,
start the hybrid system. Be
sure to keep the brake pedal
depressed.
2 Shift into a forward gear. If
reversing, shift into R.
3 If the parking brake is in man-
ual mode, release the park-
ing brake. ( P.218)
4 Release the brake pedal, and
slowly pull or back away from
the wheel blocks. Stop and
apply the brakes.
5 Have someone retrieve the
blocks.
■Break-in schedule
If your vehicle is new or equipped
with any new power train compo-
nents (such as an engine, transmis-
sion, differential or wheel bearing),
Toyota recommends that you do not
tow a trailer unt il the vehicle has
been driven for over 500 miles (800
km).
After the vehicle has been driven for
over 500 miles (800 km), you can
start towing. However, for the next
500 miles (800 km), drive the vehi-
cle at a speed of less than 45 mph
(72 km/h) when towing a trailer, and
avoid full throttle acceleration.
■Maintenance
●If you tow a traile r, your vehicle
will require more f requent mainte-
nance due to the additional load. (See “Scheduled Maintenance
Guide” or “Owner
’s Manual Sup-
plement”.)
●Retighten the fixing bolts of the
towing ball and bracket after
approximately 600 miles (1000
km) of tra iler towing.
■If trailer sway occurs
One or more factors (crosswinds,
passing vehicles, rough roads, etc.)
can adversely affect handling of
your vehicle and t railer, causing
instability.
●If trailer swaying occurs:
• Firmly grip the steering wheel. Steer straight ahead.
Do not try to contr ol trailer sway-
ing by turning the steering wheel.
• Begin releasing the accelerator
pedal immediately but very gradu-
ally to reduce speed.
Do not increase speed. Do not
apply vehicle brakes.
If you make no extreme correction
with the steering or brakes, your
vehicle and trailer should stabilize (if
enabled, Trailer Sway Control can
also help to stabilize the vehicle and
trailer.).
●After the trailer swaying has
stopped:
• Stop in a safe place. Get all occu-
pants out of the vehicle.
• Check the tires of the vehicle and the trailer.
• Check the load in the trailer. Make sure the load has not
shifted.
Make sure the tongue weight is
appropriate, if possible.
• Check the load in the vehicle.
Make sure the vehicle is not over-
loaded after occupants get in.
If you cannot find any problems, the
speed at which trailer swaying
occurred is beyond the limit of your
particular vehicle-trailer combina-
tion. Drive at a lower speed to pre-
vent instability. Remember that
Page 203 of 752

2034-1. Before driving
4
Driving
swaying of the towing vehicle-trailer
increases as speed increases.Dinghy towing
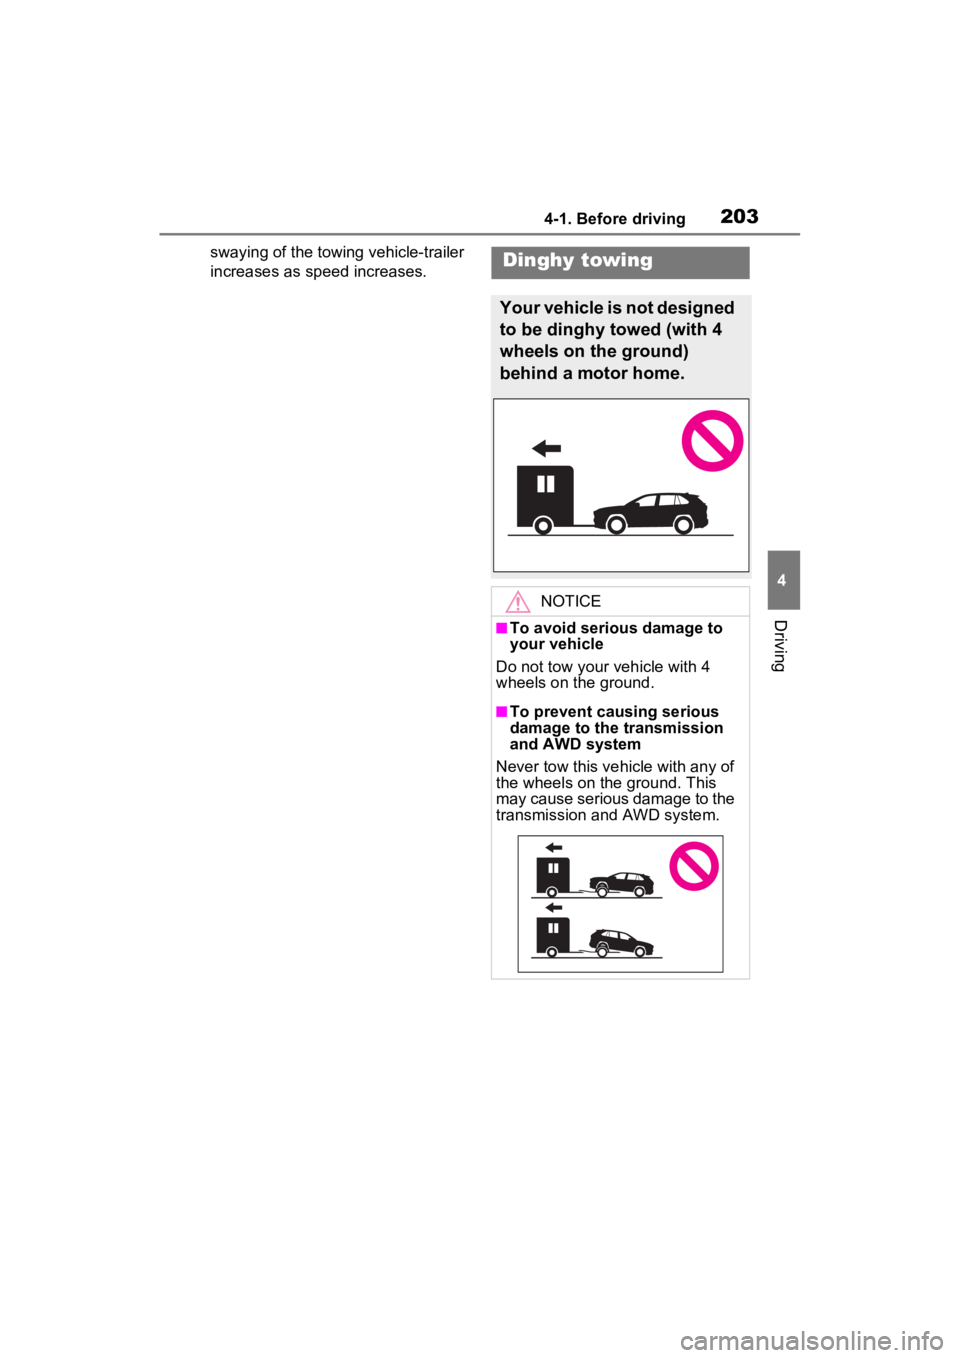
Your vehicle is not designed
to be dinghy towed (with 4
wheels on the ground)
behind a motor home.
NOTICE
■To avoid serious damage to
your vehicle
Do not tow your vehicle with 4
wheels on the ground.
■To prevent causing serious
damage to the transmission
and AWD system
Never tow this vehicle with any of
the wheels on the ground. This
may cause serious damage to the
transmission and AWD system.
Page 216 of 752

2164-2. Driving procedures
1Upshifting
2 Downshifting
The selected shift range, from S1 to
S6, will be displayed on the multi-
information display.
The initial shift range in S mode
is set automatically to S3, S4 or
S5 according to vehicle speed.
■S mode
●You can choose from 6 levels of
accelerating force and engine
braking force.
●A lower shift range will provide
greater accelerating force and
engine braking force than a higher
shift range, and t he engine revolu-
tions will also increase.
●To prevent the e ngine from over-
revving, upshifti ng may automati-
cally occur when the shift range is
4 or lower.
●When the shift range is 4 or lower,
holding the shift lever toward “+”
sets the shift range to 6.
■Downshifting restriction warn-
ing buzzer
To help ensure safety and driving
performance, downshifting opera-
tion may sometimes b e restricted. In
some circumstances, downshifting
may not be possible even when the
shift lever is operated. (A buzzer will
sound twice.)
■If the “S” indi cator does not
come on or the “D” indicator is
displayed even after shifting the
shift lever to S
This may indicate a malfunction in
the transmission system. Have the
vehicle inspected by your Toyota
dealer immediately. (In this situa-
tion, the transmission will operate in
the same manner as when the shift
lever is in D.)
Page 227 of 752

2274-3. Operating the lights and wipers
4
Driving
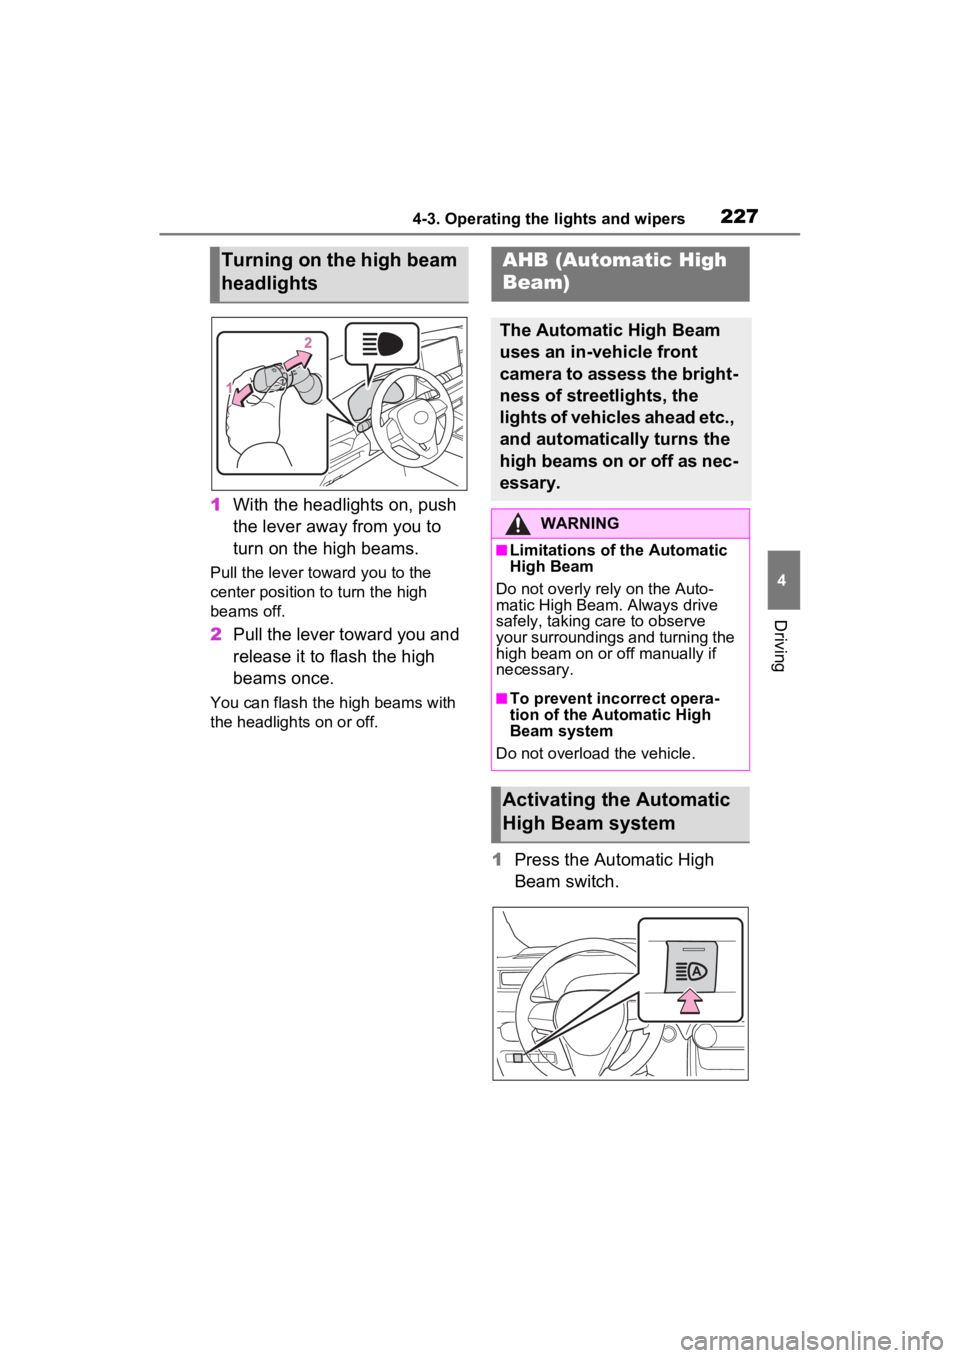
1With the headlights on, push
the lever away from you to
turn on the high beams.
Pull the lever toward you to the
center position to turn the high
beams off.
2Pull the lever toward you and
release it to flash the high
beams once.
You can flash the high beams with
the headlights on or off.
1 Press the Automatic High
Beam switch.
Turning on the high beam
headlightsAHB (Automatic High
Beam)
The Automatic High Beam
uses an in-vehicle front
camera to assess the bright-
ness of streetlights, the
lights of vehicles ahead etc.,
and automatically turns the
high beams on or off as nec-
essary.
WARNING
■Limitations of the Automatic
High Beam
Do not overly rely on the Auto-
matic High Beam. Always drive
safely, taking care to observe
your surroundings and turning the
high beam on or off manually if
necessary.
■To prevent incorrect opera-
tion of the Automatic High
Beam system
Do not overload the vehicle.
Activating the Automatic
High Beam system
Page 229 of 752

2294-3. Operating the lights and wipers
4
Driving
fog, mist, ice, dirt, etc.
• The windshield is cracked or dam- aged
• The front camera is deformed or
dirty
• When the temperature of the front
camera is extremely high
• Surrounding brightness levels are equal to those of h eadlights, tail
lights or fog lights
• When headlights or tail lights of vehicles ahead are turned off,
dirty, changing color, or not aimed
properly
• When the vehicle is hit by water,
snow, dust, etc. fr om a preceding
vehicle
• When driving thr ough an area of
intermittently changing brightness
and darkness
• When frequently and repeatedly
driving ascending/descending
roads, or roads with rough, bumpy
or uneven surfaces (such as
stone-paved roads, gravel roads,
etc.)
• When frequently and repeatedly
taking curves or driving on a wind-
ing road
• There is a highly reflective object
ahead of the vehicle, such as a
sign or mirror
• The back of a vehicle ahead is
highly reflective, such as a con-
tainer on a truck
• The vehicle’s headlights are dam-
aged or dirty, or are not aimed
properly
• The vehicle is listing or titling due
to a flat tire, a trailer being towed,
etc.
• The high beams and low beams
are repeatedly being switched
between in an abnormal manner
• The driver believes that the high
beams may be causing problems
or distress to other drivers or
pedestrians nearby
■If “Headlight System Malfunc-
tion Visit Your D ealer” is dis-
played on the multi-information
display
The system may be malfunctioning. Have the vehicle inspected by your
Toyota dealer.
■Temporarily lowering sensor
sensitivity
The sensitivity of the sensor can be
temporarily lowered.
1 Turn the power switch to OFF
while the following conditions are
met.
●The headlight switch is in or
position.
●The headlight switch lever is in
high beam position.
●Automatic High Beam switch is
on.
2 Turn the power switch to ON.
3 Within 60 seconds after step 2,
repeat pulling the headlight
switch lever to the original posi-
tion then pushing it to the high
beam position qui ckly 10 times,
then leave the lever in the origi-
nal position.
4 If the sensitivity is changed, the
Automatic High Beam indicator
is turn on and off 3 times.
Automatic High Beam (headlights)
may turn on even when the vehicle
is stopped.
■Switching to the high
beams
Push the lever away from you.
The Automatic High Beam indicator
will turn off and the headlight high
beam indicator will turn on.
Pull the lever to its original position
to activate Automatic High Beam
system again.
Turning the high beams
on/off manually